NordVPNからメッシュネット機能の廃止が発表されました。
2025 年 12 月 1 日以降、メッシュネットは完全にシャットダウンされます。
https://nordvpn.com/ja/blog/meshnet-shutdown/

2025/8に廃止が発表されましたが、ユーザの反響により、今後もサービス継続されることが2025/9に発表されました。
https://nordvpn.com/ja/blog/meshnet-stays/

ただし、メッシュネット機能はそのうちオープンソース化されるとのこと。

NASを外出先から見たい
との意図から手っ取り早く仕組みがないか考えちょうどよくセキュリティソフトとしてのVPNも触りたかったので、NordVPNを使ってます。
前提
①本記事は私的な構築対応を備忘で記録したものとなります。
②NASは以下で構築したものを参照。RaspberryPiに接続してNASとして認識されていれば特に問題なし。
③NordVPNを購入
料金は公式サイトをご覧ください。セール期間によってはAmazonのまとまった期間のオンラインコード版の方が安かったりするので、お好みで。
構築
参考リンク
公式は少々大雑把 ※RaspberryPiをGUI利用していることを暗に前提とした手順なので、CUI利用ではログイン時などで以降で述べる通り、少々異なる。

(1)RaspberryPiにNordVPNクライアントをインストール
pi@raspberrypi:~ $ sh <(curl -sSf https://downloads.nordcdn.com/apps/linux/install.sh)
/usr/bin/apt-get
ヒット:1 http://deb.debian.org/debian bullseye InRelease
ヒット:2 http://deb.debian.org/debian bullseye-updates InRelease
ヒット:3 http://security.debian.org/debian-security bullseye-security InRelease
ヒット:4 http://archive.raspberrypi.org/debian bullseye InRelease
パッケージリストを読み込んでいます... 完了
パッケージリストを読み込んでいます... 完了
依存関係ツリーを作成しています... 完了
状態情報を読み取っています... 完了
以下のパッケージが新たにインストールされます:
  apt-transport-https
アップグレード: 0 個、新規インストール: 1 個、削除: 0 個、保留: 0 個。
160 kB のアーカイブを取得する必要があります。
この操作後に追加で 166 kB のディスク容量が消費されます。
取得:1 http://deb.debian.org/debian bullseye/main arm64 apt-transport-https all 2.2.4 [160 kB]
160 kB を 0秒 で取得しました (3,113 kB/s)
以前に未選択のパッケージ apt-transport-https を選択しています。
(データベースを読み込んでいます ... 現在 102924 個のファイルとディレクトリがインストールされています。)
.../apt-transport-https_2.2.4_all.deb を展開する準備をしています ...
apt-transport-https (2.2.4) を展開しています...
apt-transport-https (2.2.4) を設定しています ...
/usr/bin/wget
deb https://repo.nordvpn.com//deb/nordvpn/debian stable main
ヒット:1 http://security.debian.org/debian-security bullseye-security InRelease
ヒット:2 http://deb.debian.org/debian bullseye InRelease
ヒット:3 http://deb.debian.org/debian bullseye-updates InRelease
取得:4 https://repo.nordvpn.com//deb/nordvpn/debian stable InRelease [5,305 B]
ヒット:5 http://archive.raspberrypi.org/debian bullseye InRelease
取得:6 https://repo.nordvpn.com//deb/nordvpn/debian stable/main arm64 Packages [3,170 B]
取得:7 https://repo.nordvpn.com//deb/nordvpn/debian stable/main armhf Packages [3,160 B]
11.6 kB を 2秒 で取得しました (6,782 B/s)
パッケージリストを読み込んでいます... 完了
パッケージリストを読み込んでいます... 完了
依存関係ツリーを作成しています... 完了
状態情報を読み取っています... 完了
以下のパッケージが新たにインストールされます:
  nordvpn
アップグレード: 0 個、新規インストール: 1 個、削除: 0 個、保留: 0 個。
35.8 MB のアーカイブを取得する必要があります。
この操作後に追加で 95.7 MB のディスク容量が消費されます。
取得:1 https://repo.nordvpn.com//deb/nordvpn/debian stable/main arm64 nordvpn arm64 3.17.4 [35.8 MB]
35.8 MB を 2秒 で取得しました (15.3 MB/s)
以前に未選択のパッケージ nordvpn を選択しています。
(データベースを読み込んでいます ... 現在 102928 個のファイルとディレクトリがインストールされています。)
.../nordvpn_3.17.4_arm64.deb を展開する準備をしています ...
nordvpn (3.17.4) を展開しています...
nordvpn (3.17.4) を設定しています ...
NordVPN for Linux successfully installed!
To get started, please re-login or execute `su - $USER` in the current shell, type 'nordvpn login' and enter your NordVPN account details. Then type 'nordvpn connect' and you’re all set! To allow other users to use the application run 'usermod -aG nordvpn otheruser'. If you need help using the app, use the command 'nordvpn --help'.
desktop-file-utils (0.26-1) のトリガを処理しています ...
hicolor-icon-theme (0.17-2) のトリガを処理しています ...
gnome-menus (3.36.0-1) のトリガを処理しています ...
man-db (2.9.4-2) のトリガを処理しています ...
mailcap (3.69) のトリガを処理しています ...
pi@raspberrypi:~ $
(2)NordVPNクライアント実装
以下参考リンクから6点実施。
①NordVPN にログイン/②ポートの開放/③VPN サーバに接続/④接続確認/⑤Meshnet を有効にする/⑥WireGuard が有効になっているか確認
1.ログイン
nordvpnグループにユーザpiを追加し、再起動
pi@raspberrypi:~ $ sudo usermod -aG nordvpn pi
pi@raspberrypi:~ $ sudo reboot
注意事項
以下の通りsudo nordvpn loginでログイン処理可能ではありますが、無難にメッセージで指示された内容で上記の通りnordvpnグループにユーザを追加している。
pi@raspberrypi:~ $ nordvpn login
Permission denied accessing /run/nordvpn/nordvpnd.sock.
Run 'sudo usermod -aG nordvpn $USER' to fix this issue and reboot your device afterwards for this to take an effect.
pi@raspberrypi:~ $
pi@raspberrypi:~ $ sudo nordvpn login
Continue in the browser: https://api.nordvpn.com/v1/users/oauth/login-redirect?attempt=xxxxxxxx-xxxx-xxxx-xxxx-xxxxxxxxxxxx
その後、起動後ログイン
pi@raspberrypi:~ $ nordvpn login
Continue in the browser: https://api.nordvpn.com/v1/users/oauth/login-redirect?attempt=xxxxxxxx-xxxx-xxxx-xxxx-xxxxxxxxxxxx
インフォメーション
メッセージ内のURLをコピーしてCUI接続元のPCのブラウザでアクセス。
※ラズパイでGUI画面を表示できるようにしているなら、Raspberry Pi のブラウザでアクセスも可。
https://api.nordvpn.com/v1/users/oauth/login-redirect?attempt=xxxxxxxx-xxxx-xxxx-xxxx-xxxxxxxxxxxx
NordVPNログインのContinueのリンクをコピーして以下の通り実行
pi@raspberrypi:~ $ nordvpn login --callback "XXXXXXXXXXXXXXXXXXXXXXXXXXXXXXXXXXXXXXXXXXXXXXXXXXXXXXXXXXXXXXXXXXXXXXXXXXXXXXXXXXXXXXXX&status=done"
Welcome to NordVPN! You can now connect to VPN by using 'nordvpn connect'.
pi@raspberrypi:~ $
2.ポート開放
pi@raspberrypi:~ $ sudo nordvpn whitelist add port 22
Port 22 (UDP|TCP) is allowlisted successfully.
pi@raspberrypi:~ $ sudo nordvpn whitelist add port 80
Port 80 (UDP|TCP) is allowlisted successfully.
pi@raspberrypi:~ $ sudo nordvpn whitelist add port 443
Port 443 (UDP|TCP) is allowlisted successfully.
pi@raspberrypi:~ $
pi@raspberrypi:~ $ nordvpn settings
Technology: NORDLYNX
Firewall: enabled
Firewall Mark: 0xe1f1
Routing: enabled
Analytics: enabled
Kill Switch: disabled
Threat Protection Lite: disabled
Notify: disabled
Auto-connect: disabled
IPv6: disabled
Meshnet: disabled
DNS: disabled
LAN Discovery: disabled
Allowlisted ports:
         22 (UDP|TCP)
         80 (UDP|TCP)
        443 (UDP|TCP)
pi@raspberrypi:~ $
3.4.VPN サーバに接続 (Japan)、接続確認
pi@raspberrypi:~ $ nordvpn connect Japan
Connecting to Japan #XXX (jpXXX.nordvpn.com)
You are connected to Japan #XXX (jpXXX.nordvpn.com)!
pi@raspberrypi:~ $
pi@raspberrypi:~ $ curl https://ipinfo.io
{
  "ip": "XXX.XXX.XXX.XXX",
  "city": "Osaka",
  "region": "?saka",
  "country": "JP",
  "loc": "XX.XXXX,XXX.XXXX",
  "org": "XXXXXXXX ~ S.A.",
  "postal": "XXX-XXXX",
  "timezone": "XXXXX/XXXXX",
  "readme": "https://ipinfo.io/missingauth"
}pi@raspberrypi:~ $
pi@raspberrypi:~ $
5.6. Meshnetを有効化、WireGuard が有効になっているか確認
補足 : WireGuardとNordVPN
⇒WireGuard が有効になっているか = nordvpn settingsの「Technology」行がNORDLYNXであることを確認
https://support.nordvpn.com/hc/ja/articles/19482810153745-%E3%81%A9%E3%81%AE%E3%83%97%E3%83%AD%E3%83%88%E3%82%B3%E3%83%AB%E3%82%92%E9%81%B8%E3%81%B6%E3%81%B9%E3%81%8D%E3%81%A7%E3%81%99%E3%81%8B

pi@raspberrypi:~ $ nordvpn set meshnet on
Meshnet is set to 'enabled' successfully.
pi@raspberrypi:~ $
pi@raspberrypi:~ $ nordvpn settings
Technology: NORDLYNX
Firewall: enabled
Firewall Mark: 0xe1f1
Routing: enabled
Analytics: enabled
Kill Switch: disabled
Threat Protection Lite: disabled
Notify: disabled
Auto-connect: disabled
IPv6: disabled
Meshnet: enabled
DNS: disabled
LAN Discovery: disabled
Allowlisted ports:
         22 (UDP|TCP)
         80 (UDP|TCP)
        443 (UDP|TCP)
pi@raspberrypi:~ $
pi@raspberrypi:~ $ ip a
1: lo: ~
2: eth0: ~
3: wlan0: ~
4: wg0: ~
6: nordlynx: <POINTOPOINT,UP,LOWER_UP> mtu XXXX qdisc noqueue state UNKNOWN group default qlen XXXX
    link/none
    inet XXX.XXX.XXX.XXX/XX scope global nordlynx
       valid_lft forever preferred_lft forever
pi@raspberrypi:~ $
pi@raspberrypi:~ $ nordvpn allowlist add subnet 192.168.XX.0/24
Subnet 192.168.XX.0/24 is allowlisted successfully.
pi@raspberrypi:~ $
pi@raspberrypi:~ $ nordvpn settings
Technology: NORDLYNX
Firewall: enabled
Firewall Mark: 0xe1f1
Routing: enabled
Analytics: enabled
Kill Switch: disabled
Threat Protection Lite: disabled
Notify: disabled
Auto-connect: disabled
IPv6: disabled
Meshnet: enabled
DNS: disabled
LAN Discovery: disabled
Allowlisted ports:
         22 (UDP|TCP)
         80 (UDP|TCP)
        443 (UDP|TCP)
Allowlisted subnets:
        192.168.XX.0/24
pi@raspberrypi:~ $
インフォメーション
プライベート ネットワーク上のデバイスを一覧表示
nordvpn mesh peer list
※表示内容の内、This device欄が今回raspberrypiに構築したNordVPN用デバイス情報。
(3)NordVPN接続経由_NAS確認
Android端末から確認する。
事前にNordVPNアプリをインストールして開く。メッシュネットワーク機能を有効化する。
デバイスの管理を開く

デバイスの管理画面において、リンクされたデバイスにraspberrypiのNordVPNにおけるホスト名とIPが表示されている。
※上記の「nordvpn mesh peer list」で表示された情報と一致すればよし

ここからはAndroid端末でNAS参照のファイルマネージャ系のアプリで接続先登録。
直前で参照したデバイスホスト名とRaspberrypiに接続するnordvpnグループに登録したユーザ(pi)とそのパスワードを入れれば、登録されて、Raspberrypiで構築したNAS(外付けHDD)を参照できる。
 >
>
これでNordVPN経由で外出先でもNASを参照できる。
補足1(auto connect)
インフォメーション
nordvpn set autoconnect onまたはoff — 自動接続の有効化または無効化
※ラズパイ機器の再起動時などの自動接続
自動接続先を日本のサーバ接続に制限する場合 : nordvpn set autoconnect on JAPAN
補足2(名前解決不可、脅威対策、キルスイッチ)
名前解決不可
nordvpn set lan-discovery enableまたはdisable — LAN discoveryの有効化または無効化。
※NordVPN Connect後にもLANから(ホスト名で)ラズパイに接続する場合。
NordVPN利用時に限りホスト名の名前解決が不可になるが、lan-discovery設定でdisable(デバイスをLAN上で非表示にする)となっていることによるもの。
脅威対策
nordvpn set threatprotectionlite onまたはoff
キルスイッチ
nordvpn set killswitch onまたはoff
補足3(強制コネクト切断、外出先からのファイル参照不可)
結論
定期的なアップデート不足によるデバイス間のver不整合に伴うメッシュネット機能のリンク拒否(エラー)?と推測される。
raspberrypi以外の他の端末では頻繁にnordvpnのアプリをアップデートしていたが、raspberrypiではnordvpn clientのアップデートを実施していなかった。
事象
①脈絡のないNordVPN Connectの強制切断 ※補足1のautoconnect機能はなぜ自動動作してない??という違和感
②(他端末からの)個人デバイス(RaspberrypiのNAS)のリンクが非活化
③ ①についてnordvpn connectで再接続、メッシュネット機能のON・OFFを試みるも②は解決せず。
インフォメーション(②の状態)
※他端末(例:スマホ端末)デバイスの管理画面において、正常な状態だとリンクされたデバイス名の左のアイコンに緑の点がついており、アクティブ状態(他の端末からRaspberrypiのNASへ接続可能)になっているが、本事象ではこれが灰色の点(非活化)になる。
対策
・sudo apt-get install nordvpn
・sudo apt-get update
・nordvpn settings
→メッシュネットがdisableに設定が変わっているため、設定変更。
・nordvpn set meshnet on
→installかupdate時に切断されているため、エラー。再接続を試みる。
・nordvpn connect Japan
→問題なし
・nordvpn set meshnet on
→問題なし
この状態で再度デバイス管理画面からリンクされたデバイスを確認すると正常な状態に戻った。
pi@raspberrypi:~ $ sudo apt-get install nordvpn
パッケージリストを読み込んでいます... 完了
依存関係ツリーを作成しています... 完了
状態情報を読み取っています... 完了
nordvpn はすでに最新バージョン (3.18.2) です。
アップグレード: 0 個、新規インストール: 0 個、削除: 0 個、保留: 0 個。
pi@raspberrypi:~ $
pi@raspberrypi:~ $ sudo apt-get update
取得:1 http://security.debian.org/debian-security bullseye-security InRelease [48.4 kB]
ヒット:2 http://deb.debian.org/debian bullseye InRelease
取得:3 http://deb.debian.org/debian bullseye-updates InRelease [44.1 kB]
ヒット:4 http://archive.raspberrypi.org/debian bullseye InRelease
ヒット:5 https://repo.nordvpn.com//deb/nordvpn/debian stable InRelease
92.4 kB を 1秒 で取得しました (62.0 kB/s)
パッケージリストを読み込んでいます... 完了
pi@raspberrypi:~ $
pi@raspberrypi:~ $ nordvpn settings
Technology: NORDLYNX
Firewall: enabled
Firewall Mark: 0xe1f1
Routing: enabled
Analytics: enabled
Kill Switch: disabled
Threat Protection Lite: disabled
Notify: disabled
Tray: enabled
Auto-connect: enabled
IPv6: disabled
Meshnet: disabled
DNS: disabled
LAN Discovery: enabled
Allowlisted ports:
         22 (UDP|TCP)
         80 (UDP|TCP)
        443 (UDP|TCP)
pi@raspberrypi:~ $
pi@raspberrypi:~ $ nordvpn set meshnet on
You are not connected to NordVPN.
pi@raspberrypi:~ $ nordvpn connect Japan
Connecting to Japan #XXX (jpXXX.nordvpn.com)
You are connected to Japan #XXX (jpXXX.nordvpn.com)!
pi@raspberrypi:~ $ nordvpn set meshnet on
Meshnet is set to 'enabled' successfully.
pi@raspberrypi:~ $
補足4(minidlnaを利用している場合)
・前提
minidlnaを利用して、DLNA機能のあるテレビでNASに保存している動画や画像などを鑑賞している場合
・事象
raspbianOSを再起動して、一定時間(少なくとも数時間から1日)はテレビに選択肢として表示されるも、一定時間経過後、なぜか表示されなくなる。
しかし、テレビからの表示に限り問題が発生しており、スマホのDLNAクライアントアプリでは問題なく表示される(私の場合はREGZAで事象確認)
・事象ログ ※以下のメッセージが大量に出ます。
pi@raspberrypi:~ $ cat /var/log/minidlna/minidlna.log |grep "minissdp"
minissdp.c:324: error: sendto(udp_notify=9, 192.168.XX.XX): Operation not permitted

~~~~~
発生条件
・DLNA機能のあるテレビでminidlna設定で公開している動画や画像などを鑑賞
・上記リンク の通り、NAS×DLNAサーバ構築を行っている場合
・minidlnaとNordVPNを同じRaspbianOSに実装している
・対策
NordVPNのセキュリティが影響しているようで、NordVPN側も事象把握はしているものの以下の通り仕様の扱いとしてそのままなのか、改善はしていないようです。
回避策としては、ホワイトリストでssh22とローカルIP群を指定するのは当然として、
重要なのは「nordvpn whitelist add subnet 239.255.255.250/32」です。
DLNA は UPnP を用いており、その機器発見にSSDPを用いているのですが、NordVPN を実装していることでブロードキャストが上手く動作しないということのようです。そのブロードキャストを通すためのものが239.255.255.250/32のホワイトリストへの追加です。

補足5
事象
原因不明のメッシュネット機能でのNAS参照不可
(メッシュネットに異常なし、nordvpn Connectも問題なし、しかし、ファイルマネージャアプリからの接続不可)
対策
接続元の端末(スマホや外出先PCなど)のOS再起動
※端末間のVer不整合と同様で再起動で反映される類の更新が適用されていなかった疑惑
補足6:外出先からのSSH接続 (2025/5追記)
公式ページの内容から最低限以下の対応を行えば、接続は可能。
Raspberrypi側
前提
本記事の通り、NordVPNクライアント実装が完了済みであること
sudo apt update && sudo apt install openssh-server
sudo systemctl status ssh
接続元(Androidの場合)
前提
NordVPNクライアントをGoogle Playからインストールして、メッシュネット機能を有効化しておくこと
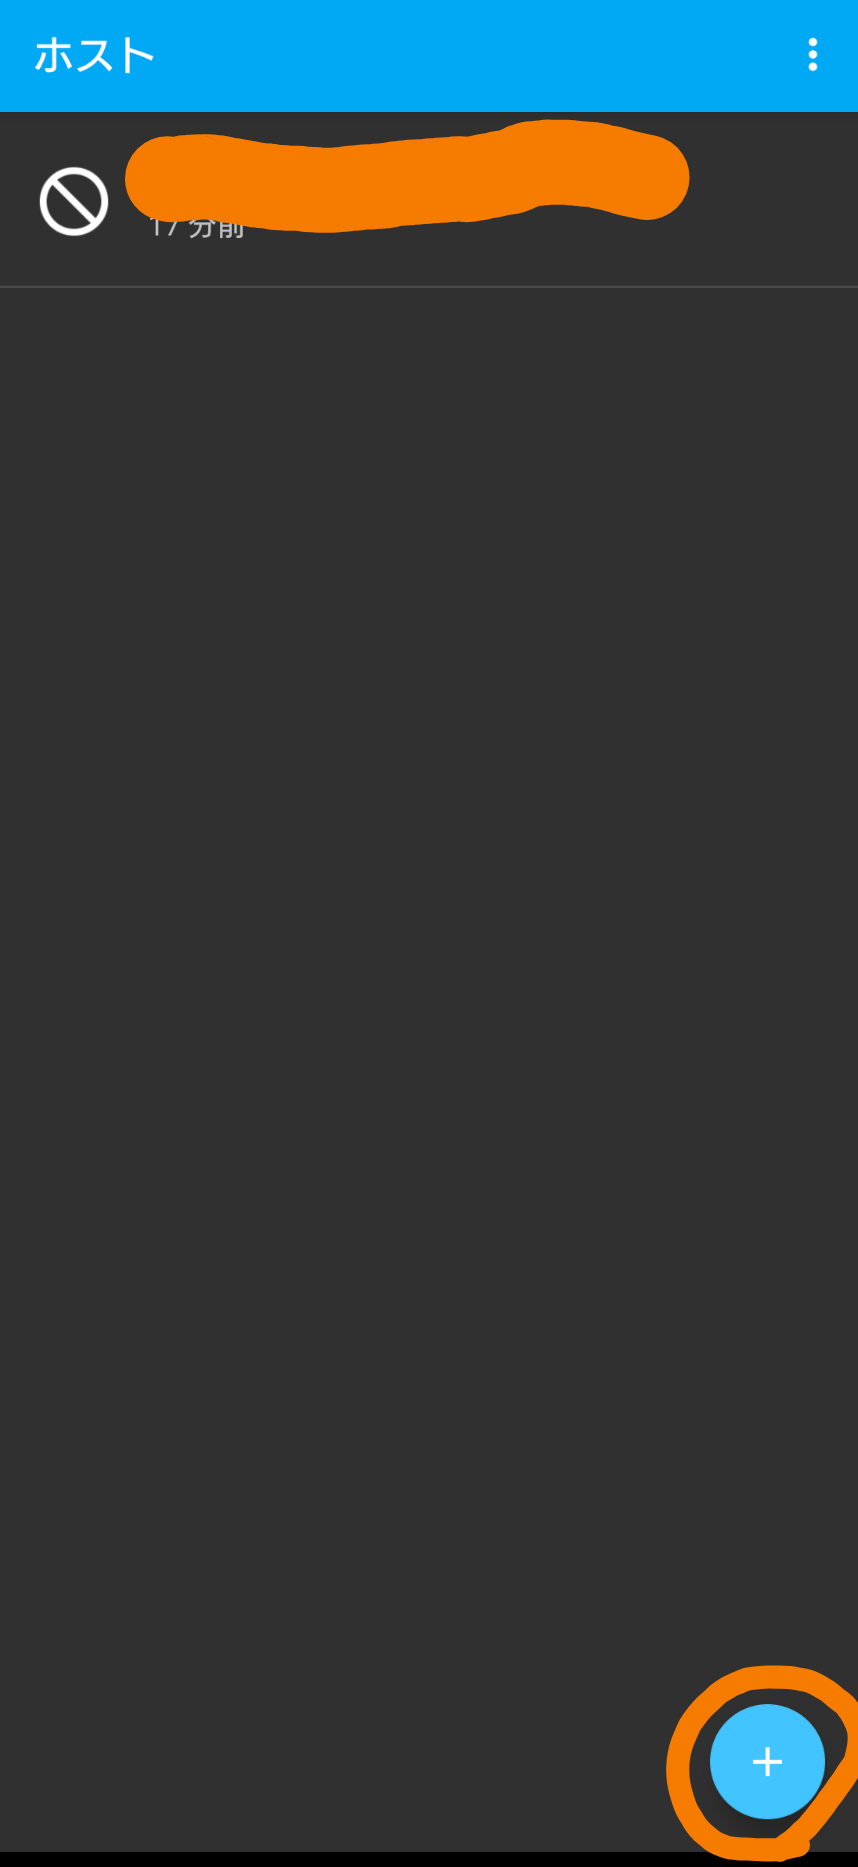
①Google Play StoreからSSH クライアントをインストール
公式ページではConnectBotを利用。+ボタンを押下。
②上記補足3の通り、ユーザはpi、ホスト名についてはここではローカルホスト(Raspberrypi)でなく、NordVPN上の管理デバイスホスト名(~.nord)のこと
参考
管理デバイスホスト名の確認位置
(3)NordVPN接続経由_NAS確認

「pi@~.nord」を入力して、画面右上の+を押下。
※ニックネーム欄は自動入力されるので無視。
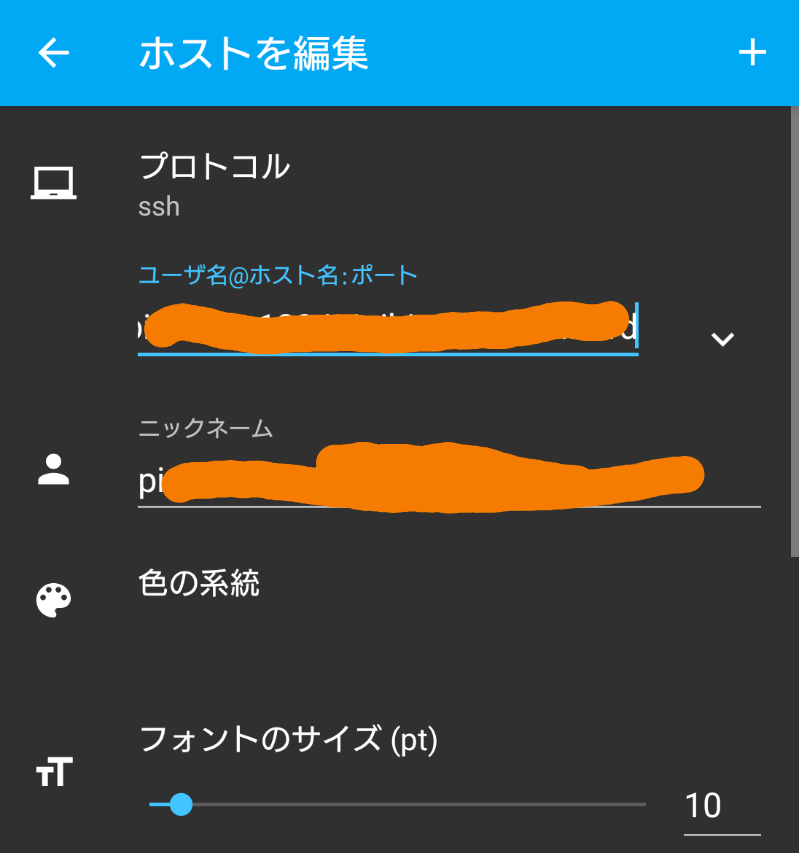
③接続画面に遷移して、パスワード入力を求められるので、スマホの仮想キーボード上で入力してEnter。
※これはOSユーザのpiのログインパスワード

そうするとAndroidでログイン画面が表示される。
