##カスタムアクションボタンでカスタムlwc画面、又はVisualforce画面をSalesforceの別タブで開くことについて、本文にて整理します。
アクションボタンで直接にカスタム画面を別タブで開くことができないため、以下の流れで別タブで画面を開くようにする。
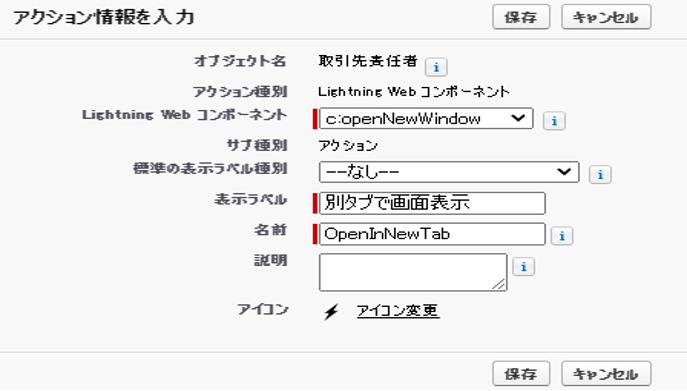
1、カスタムアクションボタンを追加して、Lightning Webコンポーネントを呼ぶように設定する。
※ここでlwc画面が呼ぶことが可能ですが、POPUPの形です。
2、POPUPのlwc画面に別タブでAuraコンポーネント/Visualforce画面を開く。
3、AuraコンポーネントにlwcコンポーネントやVisualforce画面をインクルードする。
では上記の順の詳細実装について、説明します。
1、カスタムアクションボタンを新規作成する。本文は取引先責任者を例とする。
◆Salesforce設定画面に設定⇨オブジェクトマネージャ⇨取引先責任者⇨ボタン、リンク、及びアクションの順で設定画面を開いて、以下の設定を行う。
2−1、アクションボタンでlwc画面を別タブで開く場合
※NavigationMixin.GenerateUrlを利用することで、別WindowでSalesforceの別タブで新規画面を開く。
Salesforceの別タブのみにしたい場合、NavigationMixin.Navigateを利用すればいいです。
NavigationMixinについての説明は以下のリンクを参照
https://developer.salesforce.com/docs/component-library/documentation/en/lwc/lwc.use_navigate_basic
◆lwc画面の実装
※lwcコンポーネントがカスタムアクションが参照できるように、メタデータにActionのactionTypeを追加する必要があります。
<template>
</template>
import { LightningElement, api, wire } from 'lwc';
import { NavigationMixin } from 'lightning/navigation';
import { getRecord } from 'lightning/uiRecordApi';
const FIELDS = [
    'Contact.Name'
];
export default class OpenNewWindow extends NavigationMixin( LightningElement ) {
   @api recordId;
   @wire(getRecord, {recordId: '$recordId', fields: FIELDS})
   contact;
   @api invoke() {
       console.log( "Inside Invoke Method" );
       console.log( "Record Id is " + this.recordId );
       console.log( "Record Name is " + this.contact.data.fields.Name.value );
      // Auraコンポーネントを開く
       this[NavigationMixin.GenerateUrl]({
           type: 'standard__component',
           attributes: {
               componentName: 'c__TestPageAuraWrapper'
           },
           state: {
               c__recordId: this.recordId,
               c__contactName: this.contact.data.fields.Name.value
           }
       }).then(generatedUrl => {
           console.log('generatedUrl...'+generatedUrl);
           let windowFeatures = "menubar=yes,toolbar=yes,resizable=yes,scrollbars=yes";
           windowFeatures  = "width=" + screen.width;
           windowFeatures += ",height=" + screen.height;
           console.log('windowFeatures...'+windowFeatures);
           window.open(generatedUrl,'_blank' , windowFeatures);
           // 遷移完了後にPOPUP画面を自動的にクローズする
           const closePopup = new CustomEvent('close');
           this.dispatchEvent(closePopup);
       });
   }
}
<?xml version="1.0" encoding="UTF-8"?>
<LightningComponentBundle xmlns="http://soap.sforce.com/2006/04/metadata">
    <apiVersion>52.0</apiVersion>
    <isExposed>true</isExposed>
    <targets>
        <target>lightning__RecordAction</target>
        <target>lightning__RecordPage</target>
    </targets>
    <targetConfigs>
        <targetConfig targets="lightning__RecordAction">
            <actionType>Action</actionType>
        </targetConfig>
    </targetConfigs>
</LightningComponentBundle>
2−2、アクションボタンでVisualforce画面を別タブで開く場合
Auraコンポーネントを利用せずにVisualforceページを開くことができるが、タブ名が変更することができない。
以下の実装方法でVisualforce画面を開く場合、タブ名はVisualforceページのファイル名(英字名)になります。
※Visualforceの場合、タブ名が変更したい場合、lwc画面と同様にAuraコンポーネントを利用することです。openNewWindow.jsの実装について、直接Visualforceページを開くのがやめて、lwc画面と同様にAuraコンポーネントを利用して、Auraコンポーネントに該当するVisualforceページをインクルードする。
import { LightningElement, api, wire } from 'lwc';
import { NavigationMixin } from 'lightning/navigation';
import { getRecord } from 'lightning/uiRecordApi';
const FIELDS = [
    'Contact.Name'
];
export default class OpenNewWindow extends NavigationMixin( LightningElement ) {
    @api recordId;
    @wire(getRecord, {recordId: '$recordId', fields: FIELDS})
    contact;
    @api invoke() {
        console.log( "Inside Invoke Method" );
        console.log( "Record Id is " + this.recordId );
        console.log( "Record Name is " + this.contact.data.fields.Name.value );

        // Visualforceページを直接開く
        const urlWithParameters = '/apex/TestVisualforce';
        console.log('urlWithParameters...'+urlWithParameters);
        this[NavigationMixin.GenerateUrl]({
            type: 'standard__webPage',
            attributes: {
                url: urlWithParameters
            }
        }).then(generatedUrl => {
            let windowFeatures = "menubar=no,resizable=yes,scrollbars=yes";
            windowFeatures  = "width=" + screen.width;
            windowFeatures += ",height=" + screen.height;
            console.log('windowFeatures...'+windowFeatures);
            window.open(generatedUrl,'_blank' , windowFeatures);
            const closePopup = new CustomEvent('close');
            // Dispatches the event.
            this.dispatchEvent(closePopup);
        });
    }
}
3、AuraコンポーネントにlwcコンポーネントやVisualforce画面をインクルードする
※Auraコンポーネントを利用して、workspaceAPIを利用して、タブ名、タブアイコンなどが編集することができる。
◆Auraコンポーネントの実装
<aura:component implements="force:appHostable,flexipage:availableForAllPageTypes,flexipage:availableForRecordHome,force:hasRecordId,forceCommunity:availableForAllPageTypes,force:lightningQuickAction,lightning:isUrlAddressable" access="global" >

    <!--Style-->
    <aura:html tag="style">
        .modal-body {
            height : auto !important;
        }
    </aura:html>
    <lightning:workspaceAPI aura:id="workspace"/>
    <aura:attribute type="String" name="recordId"/>
    <aura:attribute type="String" name="contactName"/>
    <aura:handler name="init" value="{!this}" action="{!c.init}"/>
    <!-- lwcの場合、実際の画面内容は以下のlwcに実装する -->
    <c:testPageLWC recordId="{!v.recordId}" onclose="{!c.close}"/>
    <!-- Visualforceの場合、実際の画面内容は以下のVisualforceに実装する -->
    <iframe src="{!'/apex/TestVisualforce?id=' + v.recordId}" height="100%" width="100%" style="background-color:white;"></iframe>
({
    init: function(cmp, evt, helper) {
        var myPageRef = cmp.get("v.pageReference");
        var recordId = myPageRef.state.c__recordId;
        var contactName = myPageRef.state.c__contactName;

        cmp.set("v.recordId", recordId);
        console.log('OK');
        var workspaceAPI = cmp.find("workspace");
        console.log(workspaceAPI);
        console.log('workspaceAPI取得OK');
        workspaceAPI.getFocusedTabInfo().then(function(response) {
            var focusedTabId = response.tabId;
            console.log(focusedTabId);
            workspaceAPI.setTabLabel({
                tabId: focusedTabId,
                label: contactName + "TabName" //set label you want to set
            });
            workspaceAPI.setTabIcon({
                tabId: focusedTabId,
                icon: "standard:file",
                iconAlt: contactName + "TabName"
            });
        }).catch(function(error) {
            console.log(error);
        });
    },
    /**
     * モーダルを閉じる
     */
    close : function(component, event, helper) {
        console.log('* Wrapper.close');
        $A.get("e.force:closeQuickAction").fire();
    }
})
◆注意
Auraコンポーネントにiframeを利用して、Visualforceページをインクルードする場合、以下の設定を設定する必要があります。設定しない場合、Visualforceの接続が拒否され表示されない。
セキュリティ⇨セッションの中に以下の設定のチェックを外す必要があります。
「ヘッダーが無効されたVisualforceページのクリックジャック保護を有効化」
##まとめ
・カスタムアクションボタンでSaleforceの別タブにlwc画面とVisualforce画面を開くことができる。
・Visualforce画面を直接に開く場合、タブ名を変更することができない。
・Visualforce画面の場合、タブ名を変更したい場合、Auraコンポーネントを利用して実現できる。ただし、一部のセキュリティ設定を変更する必要がある。