AndroidのListViewやRecyclerViewで、ViewHolderやDataBindingを調べて一回混乱しつつも腑に落ちる所まで来たので、纏めておきます。
1週間前の自分に伝えたいこと
- ListViewのAdapterに出てくるViewHolderと、RecyclerViewのAdapterに出てくるViewHolderは、似てるけど違うもの
- ListViewの方は、こうやった方が高速だよというパターン
- RecyclerViewの方は、親クラスが用意されている実装
- いきなりDataBindingをやろうとしてソースを検索すると混乱するから、順番を追っていこう
- 素のListView
- ↑+ViewHolder
- ↑+DataBinding
- 素のRecyclderView ←ここですでにViewHolderが組み込まれている
- ↑+DataBinding
素のListView
素のListViewはこんな感じ。AdapterのgetView()で毎回getViewById()が動く。これでも動くけどパフォーマンスが悪い。

    class ListAdapter(context: Context, val list:List<String>): ArrayAdapter<String>(context,0,list){
        private val layoutInflater = LayoutInflater.from(context)
        override fun getView(position: Int, convertView: View?, parent: ViewGroup): View {
            val itemView = layoutInflater.inflate(R.layout.cell_text,parent,false)
            val textView = itemView.findViewById(R.id.textView) as TextView
            textView.text = getItem(position)
            return itemView
        }
    }
ListView + ViewHolderパターン
getView()で毎回findViewById()をすると遅い。これを避けるために、GoogleがViewHolderというパターンを紹介している
Making ListView Scrolling Smooth
アイデアとしては、findViewById()で取得した参照をViewHolderクラス(自作)に保持して、それをView.tagに格納して再利用時にはそちらを使う、というもの。
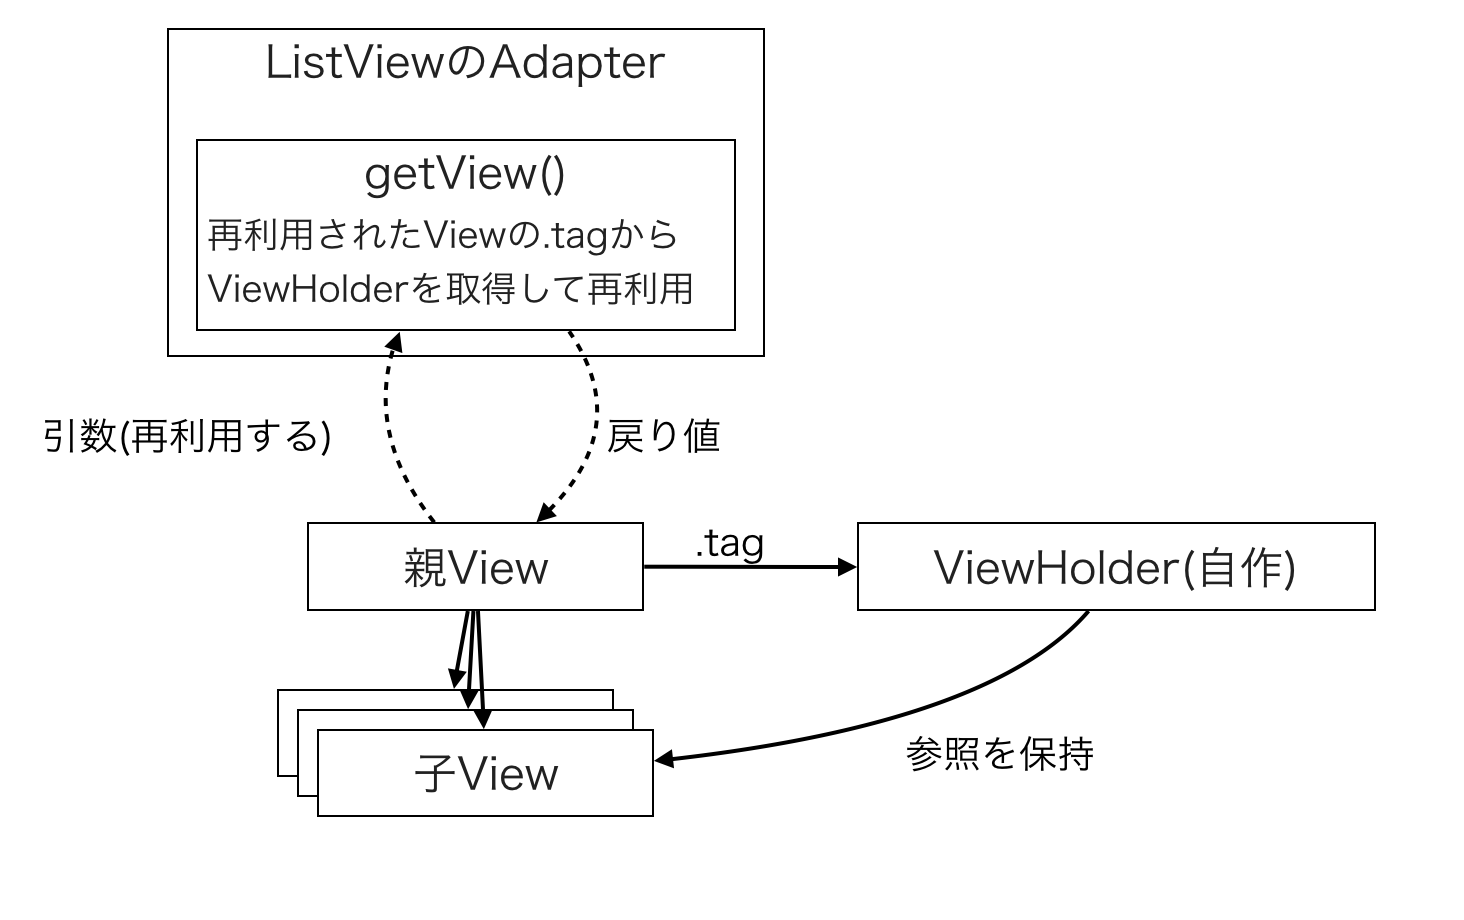
    // View.tagにセットするViewHolder
    data class ViewHolderItem(val textView:TextView)

    class ListAdapterWithViewHolder(context: Context,val list:List<String>): ArrayAdapter<String>(context,0,list){
        private val layoutInflater = LayoutInflater.from(context)
        override fun getView(position: Int, convertView: View?, parent: ViewGroup): View {
            val (viewHolder, view) = if(convertView == null) {
                // 初回時
                val itemView = layoutInflater.inflate(R.layout.cell_text,parent,false)
                val textView = itemView.findViewById(R.id.textView) as TextView
                val viewHolder = ViewHolderItem(textView)
                itemView.tag = viewHolder
                viewHolder to itemView
            } else {
                // 再利用時
                convertView.tag as ViewHolderItem to convertView
            }
            viewHolder.textView.text = getItem(position)
            return view
        }
    }
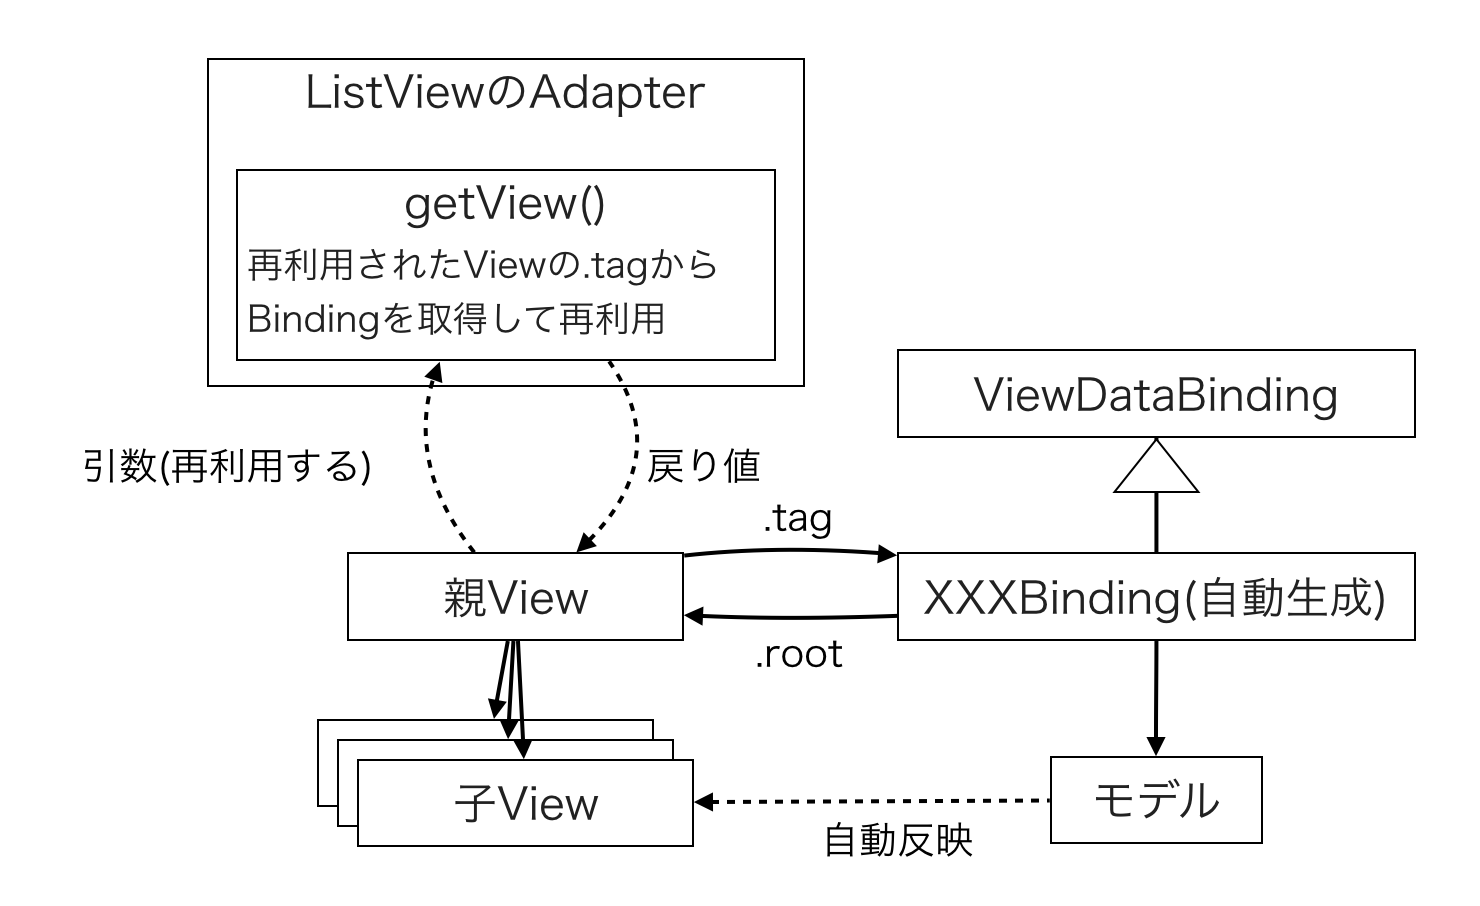
ListView + DataBinding
DataBindingをtagに入れて使い回すことで、ViewHolderパターンと同じ事ができる。そのため、「convertViewがnullならば〜、nullでないならば〜」という処理の構造は、ViewHolderパターンの時と全く同じになる。
ViewHolderパターンで自作していたクラスは、自動生成されるXXXXXBindingで代用されるため、不要となる。
また、DataBindingの元々の性質である「モデルに値をセットすると自動でViewに反映される」機能のため、子Viewへのアクセスが見えなくなる。
    class ListAdapter(context: Context, val list:List<String>): ArrayAdapter<String>(context,0,list){
        private val layoutInflater = LayoutInflater.from(context)
        override fun getView(position: Int, convertView: View?, parent: ViewGroup): View {
            val binding = if( convertView == null) {
                val binding:CellTextBinding =
                    DataBindingUtil.inflate(layoutInflater, R.layout.cell_text, parent, false)
                binding.root.tag = binding
                binding
            }else{
                convertView.tag as CellTextBinding
            }
            // モデルに値をセット→Viewに自動で反映される
            binding.text = getItem(position)
            return binding.root
        }
    }
RecyclerView
RecyelerViewは、見た目はListViewの上位互換のように思えるが、実装が全く違っている。
参考:RecyclerViewはListViewの代替ではないよねという話
自分の感じた最も大きな違いは、ListViewはViewをやり取りするのに対して、RecyclerViewはViewHolderをやり取りしている点。
RecyclerViewでのViewHolderは、RecyclerView.ViewHolderを継承したクラス。ListViewの時にはパターンだったものが、RecyclerViewでは実装に組み込まれた感じになっている。
要注意:親クラスとなるRecyclerViewの初期化には、親Viewをセットする必要がある。ここを間違っているとjava.lang.IllegalStateException: ViewHolder views must not be attached when created. Ensure that you are not passing 'true' to the attachToRoot parameter of LayoutInflater.inflate(..., boolean attachToRoot)というエラーで悩まされる(悩まされた)。
参考:ViewHolder views must not be attached when created
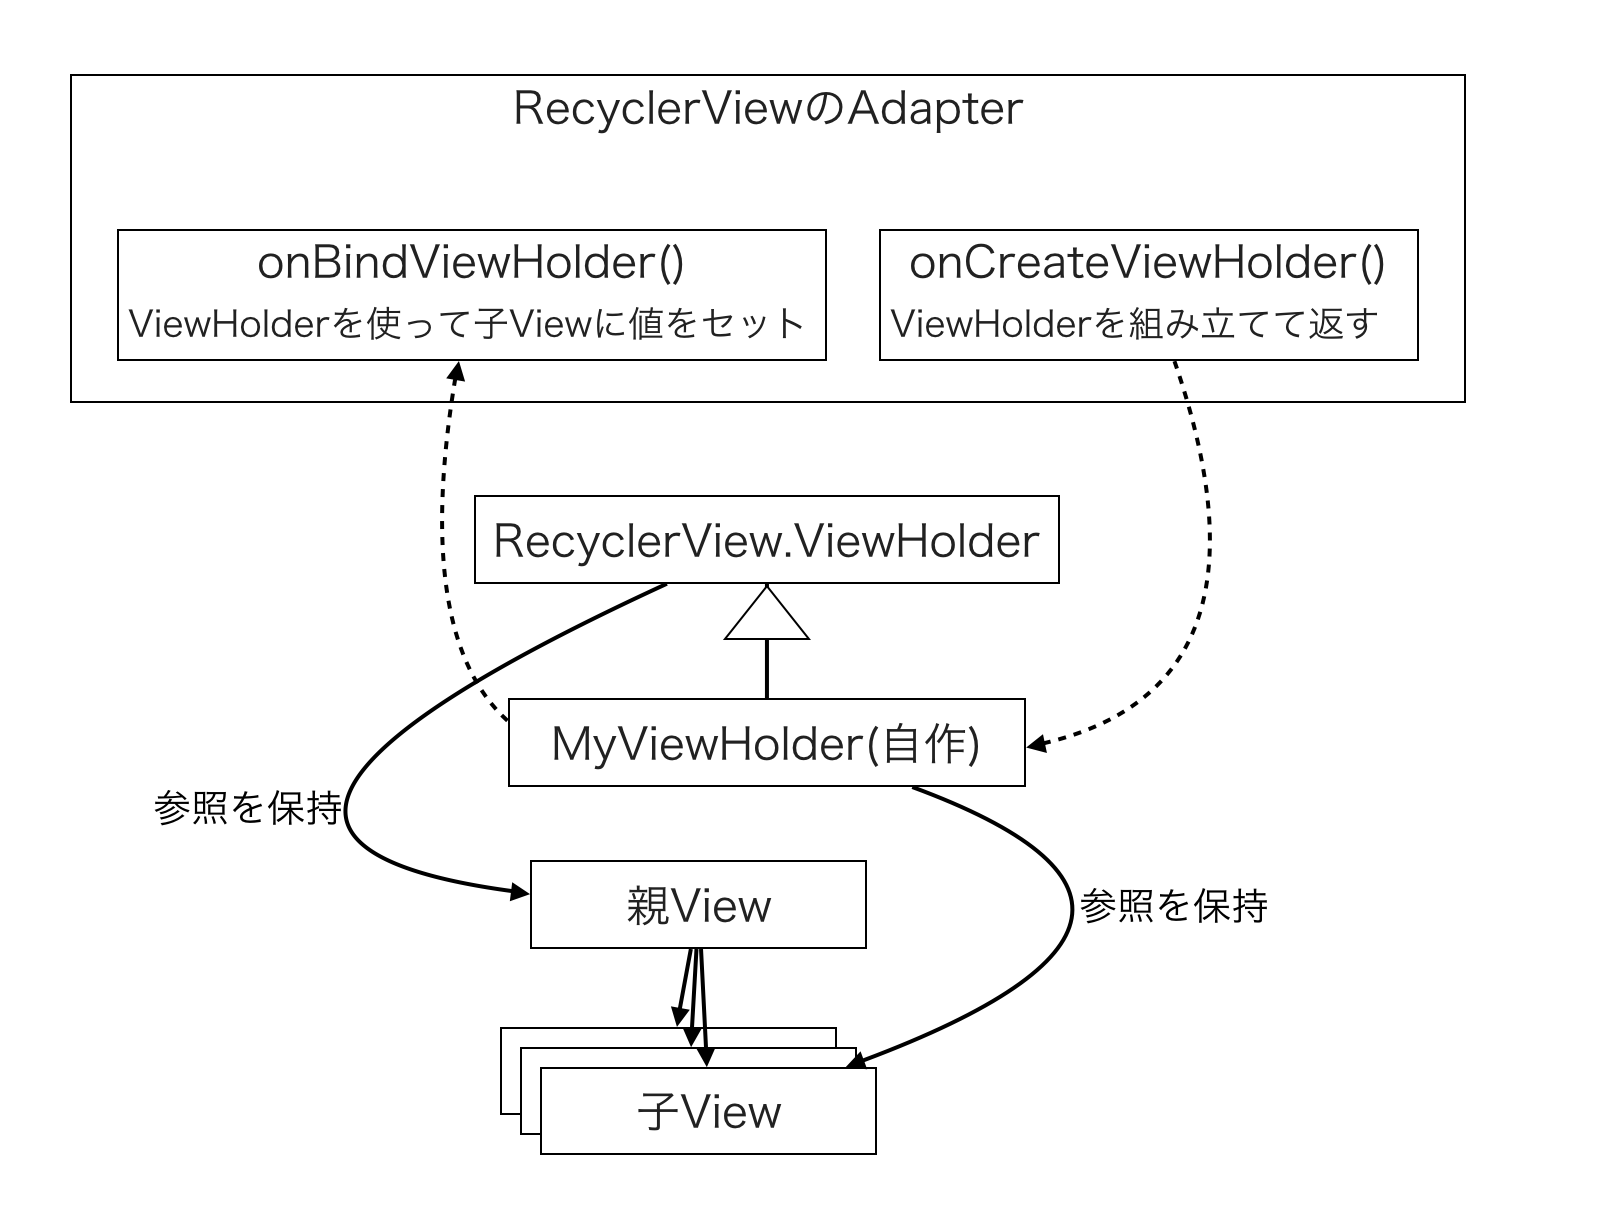
    // RecyclerView.ViewHolderを継承した自作ViewHolder
    // 親クラスの初期化には親Viewへの参照を渡し、
    // 子クラスのプロパティには子Viewへの参照を保持する
    class MyViewHolder(view: View) : RecyclerView.ViewHolder(view) {
        val textView:TextView = view.findViewById(R.id.textView)
    }

    class MyRecycleAdapter(private val context: Context, val list:List<String>) : RecyclerView.Adapter<MyViewHolder>() {
        private val layoutInflater = LayoutInflater.from(context)
        // 件数を返す
        override fun getItemCount(): Int {
            return list.size
        }
        // Viewに対応するViewHolderを生成して返す
        override fun onCreateViewHolder(parent: ViewGroup, viewType: Int): MyViewHolder {
            val view = layoutInflater.inflate(R.layout.cell_text, parent, false)
            return MyViewHolder(view)
        }
        // ViewHolderを使って、Viewの更新を行う
        override fun onBindViewHolder(holder: MyViewHolder, position: Int) {
            holder.textView.text = list[position]
        }
    }
RecyclerView + DataBinding
DataBindingを使う場合、RecyclerView.ViewHolderを継承した自作クラスで保持するものが、ViewからXXXXBindingへと変わる
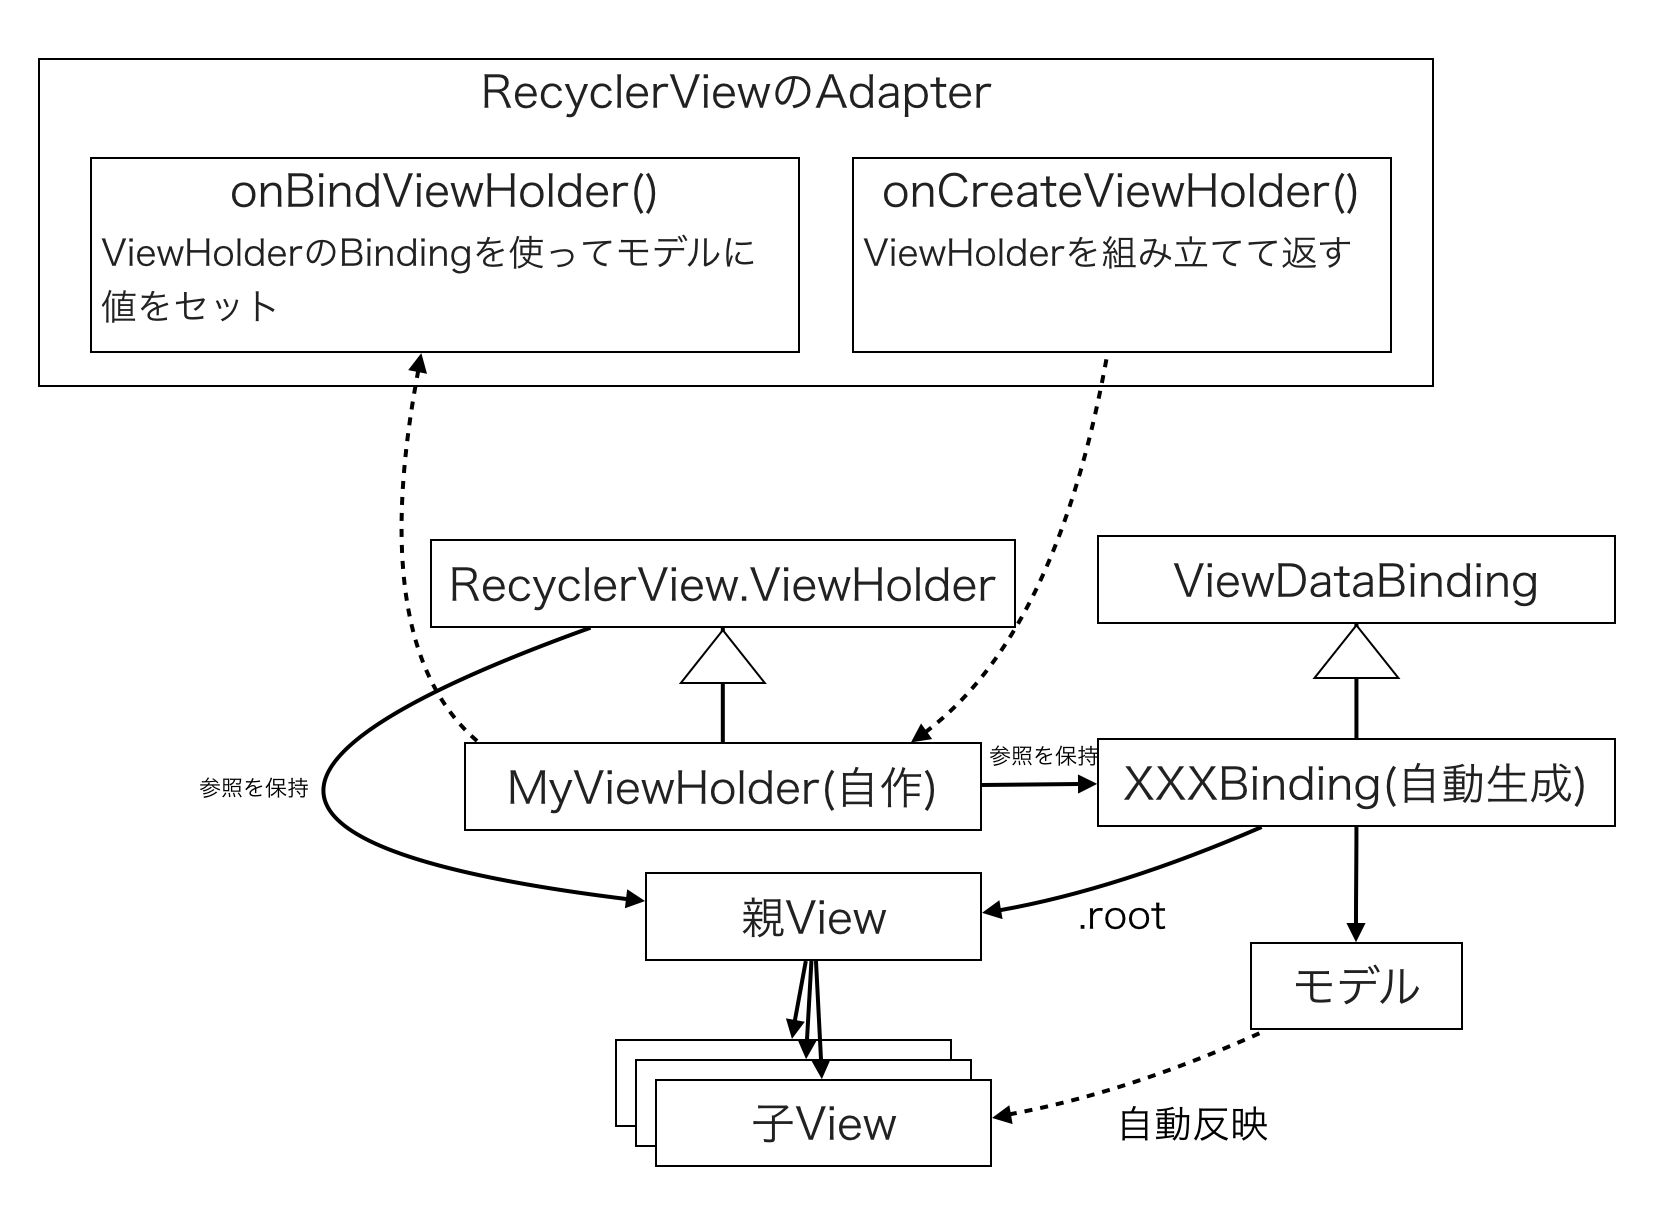
    // RecyclerView.ViewHolderを継承した自作ViewHolder
    // 親クラスの初期化にはBinding.rootで親Viewを渡し、
    // 子クラスはbindingを保持する
    class MyViewHolder(val binding: CellTextBinding) : RecyclerView.ViewHolder(binding.root)

    class MyRecycleAdapter(context: Context, val list:List<String>) : RecyclerView.Adapter<MyViewHolder>() {
        private val layoutInflater = LayoutInflater.from(context)

        override fun getItemCount(): Int {
            return list.size
        }

        override fun onCreateViewHolder(parent: ViewGroup, viewType: Int): MyViewHolder {
            val binding:CellTextBinding = DataBindingUtil.inflate(layoutInflater,R.layout.cell_text, parent, false)
            return MyViewHolder(binding)
        }

        override fun onBindViewHolder(holder: MyViewHolder, position: Int) {
            // ここではモデルに値をセットしている
            // →DataBindingにより、自動でViewに反映される
            holder.binding.text = list[position]
        }
    }