iOSでUIViewをレイアウトする場合、UITableViewやUICollectionViewを使う事が多いと思います。ですがこれらはなんというか「お堅い」奴らで、縦横のサイズがばらばらなUIViewを並べるには、けっこうめんどくさいです。
たとえばUITableViewの場合、Delegateでcellの高さを返す実装をしたりしますが、「文字数が増えた時には折り返して行数を増やしたい=縦方向を可変にしたい」な場合は高さの計算もめんどくさいです。
なので、高さや幅が違うUIViewを、適当に、それっぽく並べてくれる仕組みをお手軽実装してみました。
UIScrollView+LadderLayout.m
UIScrollViewをカテゴリ拡張して、layoutAndAddSubviewなんて関数をつくりました。これは以下の事を行います。
- UIViewの配列を受け取る
- 配列の中のUIViewを、サイズは変えずにハシゴ状に整列させる
- 右側に隙間があればそこに置き、隙間が無ければ次の段に置く
- UIScrollViewにaddSubviewして、contentSizeを広げる
//
//  UIScrollView+LadderLayout.m
//  UIScrollView+LadderLayout
//

# import "UIScrollView+LadderLayout.h"

// 便利拡張。UIViewのframe.{origin|size}へのアクセスを簡略化
@interface UIView(LadderLayout)
@property(readonly)CGFloat x;
@property(readonly)CGFloat y;
@property(readonly)CGFloat width;
@property(readonly)CGFloat height;
@end

@implementation UIView(LadderLayout)
-(CGFloat)x
{
    return self.frame.origin.x;
}
-(CGFloat)y
{
    return self.frame.origin.y;
}
-(CGFloat)width
{
    return self.frame.size.width;
}
-(CGFloat)height
{
    return self.frame.size.height;
}
@end

//梯子レイアウト本体
@implementation UIScrollView (LadderLayout)
-(void)layoutAndAddSubview:(NSArray *)views
{
    // 配列に含まれるUIViewを整列
    for(int i=0; i<views.count;i++ ){
        NSRange range={0,i};
        NSArray *layoutedViews = [views subarrayWithRange:range];
        UIView *targetView = [views objectAtIndex:i];

        // レイアウト済みの最後のViewの右側に、入れ込む隙間があるかどうかチェック
        CGPoint nextStartPoint = CGPointMake(0,0);
        if( i>0 ){
            UIView *lastLayoutView = layoutedViews.lastObject;
            nextStartPoint = CGPointMake(lastLayoutView.x+lastLayoutView.width,
                                         lastLayoutView.y);
            if( nextStartPoint.x + targetView.width > self.width ){
                // はみ出してるので、次の段の左端に移動
                nextStartPoint = CGPointMake(0,0);
                for (UIView *v  in layoutedViews) {
                    nextStartPoint.y = MAX(nextStartPoint.y, v.y + v.height);
                }
            }
        }
        // 移動先の場所が決まったので移動。
        targetView.frame = CGRectMake(nextStartPoint.x,
                                      nextStartPoint.y,
                                      targetView.width,
                                      targetView.height);
    }
    // 整列したUIViewをaddSubviewしていく
    for(UIView *v in views){
        [self addSubview:v];
    }

    // ScrollViewのcontentSizeを変更
    CGFloat contentHeight=0;
    for (UIView *v  in views) {
        contentHeight = MAX(contentHeight,v.y+v.height);
    }
    self.contentSize = CGSizeMake(self.width, contentHeight);
}

@end
ViewController側のソースでは、以下のことをやります。
- ランダムなサイズのUIViewを生成して、配列に格納
- この段階のframe.origin は{0,0}でOK
- layoutAndAddSubviewに突っ込む
-(void)viewWillAppear:(BOOL)animated
{
    NSArray *colors = @[[UIColor redColor],
                        [UIColor orangeColor],
                        [UIColor blueColor],
                        [UIColor greenColor],
                        [UIColor grayColor],
                        [UIColor whiteColor],
                        [UIColor yellowColor],
                        [UIColor purpleColor] ];
    srand((unsigned int)time(NULL)); // rand()の初期化


    // ランダムサイズのUIViewを100個作って、
    // 配列に入れておく。
    NSMutableArray *views = [[NSMutableArray alloc]init];
    for(int i=0; i<100; i++ ){
        UIView *v = [[UIView alloc]init];
        v.backgroundColor = [colors objectAtIndex:i%colors.count];
        v.bounds = CGRectMake(0,0, 1+rand()%100,1+rand()%100);
        [views addObject:v];
    }

    // 配列をScrollViewに叩き込んで整列させる。
    UIScrollView *scrollView = (UIScrollView *)self.view;
    [scrollView layoutAndAddSubview:views];

    // Storyboardを使っている場合、AutoLayoutにチェックを入れると
    // スクロールしないので注意。
    // AutoLayout使うならこんな実装要らないだろうけど。
}
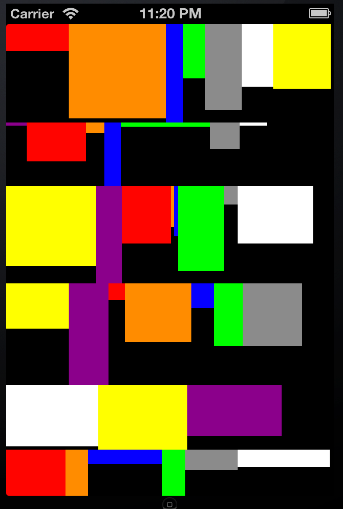
これを動かすと、↓のように、UIViewが frame.origin.y でそろった配置となります。

使い道
今回はランダムなUIViewでしたけど、横幅=画面幅なUIView(縦幅はばらばら)を放り込めば、高さ可変のUIViewを縦に並べる事が出来るかなーと思います。
本気利用するには、もっと手を入れる必要があるかと思います。画面回転とか対応してないですし。
でもUITableViewを使って苦労するよりは、楽ができる、かも?しれません。