はじめに
今回は前回の記事に関連する内容なので、まだ読まれていない方は是非お願いします。
また、前回と同じくavrdudeというツールを使用するので導入がまだの方も初めにご参照ください。
↓↓↓↓↓↓↓↓
[Arduino]Arduinoから書き込んだバイナリを吸い出す
実行環境
・ArduinoUno:バイナリを抜き出される側
・UNIROIのArduinoUno互換のやつ
・ArduinoIDE 1.8.13に付属するavrdude
(avrdude: Version 6.3-20190619)
まずはやってみる
以下のサンプルコードを書き込んだArduinoから抜き出したバイナリを、別のArduino互換のボードに書き込んでみます。
見ての通り、Arduinoに載っているLEDを点滅させるだけのプログラムです。
void setup() {
  // put your setup code here, to run once:
  pinMode(13,OUTPUT);

}

void loop() {
  // put your main code here, to run repeatedly:
  digitalWrite(13,HIGH);
  delay(500);
  digitalWrite(13,LOW);
  delay(500);
}
Arduinoにプログラムを書き込むとこんな感じの動作をします。
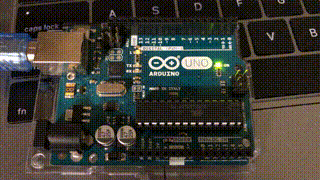
このプログラムを書き込んだArduinoから前回の記事の手順でバイナリを抜き出します。
抜き出したバイナリをこの別のボードに書き込みます。見ての通り書き込み前はLEDは点滅していません。

書き込み
以下コマンドを実行しました。(詳しいコマンドの説明は後に説明しています)
avrdude -C../etc/avrdude.conf -F -v -pm328p -cstk500v1 -P/dev/cu.usbmodem1463201 -b115200 -D -Uflash:w:program.bin:r
以下のように出力されました。
出力例
avrdude: Version 6.3-20190619
         Copyright (c) 2000-2005 Brian Dean, http://www.bdmicro.com/
         Copyright (c) 2007-2014 Joerg Wunsch

         System wide configuration file is "../etc/avrdude.conf"
         User configuration file is "/Users/p_x9/.avrduderc"
         User configuration file does not exist or is not a regular file, skipping

         Using Port                    : /dev/cu.usbmodem14601
         Using Programmer              : stk500v1
         Overriding Baud Rate          : 115200
         AVR Part                      : ATmega328P
         Chip Erase delay              : 9000 us
         PAGEL                         : PD7
         BS2                           : PC2
         RESET disposition             : dedicated
         RETRY pulse                   : SCK
         serial program mode           : yes
         parallel program mode         : yes
         Timeout                       : 200
         StabDelay                     : 100
         CmdexeDelay                   : 25
         SyncLoops                     : 32
         ByteDelay                     : 0
         PollIndex                     : 3
         PollValue                     : 0x53
         Memory Detail                 :

                                  Block Poll               Page                       Polled
           Memory Type Mode Delay Size  Indx Paged  Size   Size #Pages MinW  MaxW   ReadBack
           ----------- ---- ----- ----- ---- ------ ------ ---- ------ ----- ----- ---------
           eeprom        65    20     4    0 no       1024    4      0  3600  3600 0xff 0xff
           flash         65     6   128    0 yes     32768  128    256  4500  4500 0xff 0xff
           lfuse          0     0     0    0 no          1    0      0  4500  4500 0x00 0x00
           hfuse          0     0     0    0 no          1    0      0  4500  4500 0x00 0x00
           efuse          0     0     0    0 no          1    0      0  4500  4500 0x00 0x00
           lock           0     0     0    0 no          1    0      0  4500  4500 0x00 0x00
           calibration    0     0     0    0 no          1    0      0     0     0 0x00 0x00
           signature      0     0     0    0 no          3    0      0     0     0 0x00 0x00

         Programmer Type : STK500
         Description     : Atmel STK500 Version 1.x firmware
         Hardware Version: 3
         Firmware Version: 4.4
         Vtarget         : 0.3 V
         Varef           : 0.3 V
         Oscillator      : 28.800 kHz
         SCK period      : 3.3 us

avrdude: AVR device initialized and ready to accept instructions

Reading | ################################################## | 100% 0.01s

avrdude: Device signature = 0x000000 (retrying)

Reading | ################################################## | 100% 0.01s

avrdude: Device signature = 0x000000 (retrying)

Reading | ################################################## | 100% 0.01s

avrdude: Device signature = 0x000000
avrdude: Yikes!  Invalid device signature.
avrdude: Expected signature for ATmega328P is 1E 95 0F
avrdude: safemode: lfuse reads as 0
avrdude: safemode: hfuse reads as 0
avrdude: safemode: efuse reads as 0
avrdude: reading input file "program.bin"
avrdude: writing flash (32768 bytes):

Writing | ################################################## | 100% 5.64s

avrdude: 32768 bytes of flash written
avrdude: verifying flash memory against program.bin:
avrdude: load data flash data from input file program.bin:
avrdude: input file program.bin contains 32768 bytes
avrdude: reading on-chip flash data:

Reading | ################################################## | 100% 4.19s

avrdude: verifying ...
avrdude: 32768 bytes of flash verified

avrdude: safemode: lfuse reads as 0
avrdude: safemode: hfuse reads as 0
avrdude: safemode: efuse reads as 0
avrdude: safemode: Fuses OK (E:00, H:00, L:00)

avrdude done.  Thank you.
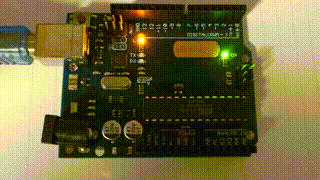
すると...
以下のようにLEDが点滅するようになりました。
コマンドの説明
avrdude -C../etc/avrdude.conf -F -v -pm328p -cstk500v1 -P/dev/cu.usbmodem1463201 -b115200 -D -Uflash:w:program.bin:r
-Cオプション
configファイルを指定します。おそらく以下のパスにあると思います。
Arduino.app/Contents/Java/hardware/tools/avr/etc/avrdude.conf
-pオプション
手順2で調べたマイコンの種類を指定します。ここから対応表を見ることができます。
Arduino UnoはATmega328Pなのでm328pでした。
-Pオプション
ポート名を指定します。わからない場合は、前回の記事で説明しているので参照してください。
-bオプション
ここではボーレートを指定します。
-Uオプション
ここで書き込むバイナリファイルを指定します。今回はprogram.binを書き込むので上記のように指定しています。
バイナリ以外のファイルを書き込む場合
-Uオプションの一番最後のrの部分で書き込むファイルの書式を指定しています。今回はバイナリなのでrをしていますが、hex形式などに対応しています。
| 書式 | 指定形式 |
|---|---|
| intel Hex | i |
| raw binary | r |
| 自動検出 | a |
さいごに
以上バイナリをArduinoに書き込む方法でした。役に立つのはかなり局所的かもしれませんが、例えばプログラムファイルはなくしたけど書き込んだボードはあるという時な度に役に立つかもと妄想しています。他にも何か役にたつ道があればコメントなどで教えてください。
普段は趣味でiOSアプリを開発したり色々変なこともしてるので是非Twitterも覗いてみてください。
[参考]
↓これを読めば完璧
https://www.cs.ou.edu/~fagg/classes/general/atmel/avrdude.pdf