概要
本稿では Docker Desktop for Windows を使わずに、「docker.com の Docker(Docker Engine)」を WSL2 環境にインストールする手順について解説します。
本稿は Windows を対象としています。Mac は本稿のスコープ外です。
Docker Desktop をインストールしないので、有償ライセンスに関わる諸懸案を回避できます。
本稿の内容を実施することで、以下のことが実現できます。
- docker.com の Docker が WSL2 環境にインストールされ、WSL2 のコマンドラインで
docker composeコマンドなどが使用できるようになります。 - 起動したコンテナに対して Windows の VSCode からアタッチして、コンテナ内のリソースやソースコードを操作することが可能になります。
- WSL2 が起動するタイミングで docker サービスが自動的に起動するようになります。
以下のことは実行できません。
- Windows の Powershell などから
dockerコマンドを実行することはできません。 -
kubectlコマンドは使えません。(別途インストールが必要になりますが未検証です。) - Docker Desktop for Windows にあった GUI による操作はできなくなります。
- Docker Desktop for Windows の Extensions は使用できなくなります。
Docker Desktop をアンインストールする
Docker Desktop for Windows や、代替の Rancher Desktop などがインストールされている場合は、アンインストールしておきます。
WSL2 のインストール状態を確認する
Windows のバージョンを確認する
[システム]>[詳細情報]を表示して Windows のバージョンが 22H2 であることを確認します。
エディションは Home/Pro/Enterprise のいずれかであることを確認します。
22H2 でない場合は Windows を更新して 22H2 とします。
WSL2 の状態を確認する
WSL2 には「インボックス版」と「ストア版」の2種類が存在します。
本稿の内容を完了するためには「ストア版」の WSL2 が必要となります。
wsl --version コマンドで、どの WSL2 がインストールされているか判別します。
また、「ストア版」のインストール確認と同時に wsl -l -v で Ubuntu が「VERSION 2」で「既定(行頭の*)」となっていることを確認します。
PS C:\Users\tadashi.oya> wsl -l -v
  NAME                    STATE           VERSION
* Ubuntu                  Running         2
(...省略...)
「ストア版」の確認
wsl --version コマンドでバージョン情報が表示される場合は、既に「ストア版」の WSL2 が導入されています。
このまま次節に進んでください。
PS C:\Users\tadashi.oya> wsl --version
WSL バージョン: 1.1.6.0
カーネル バージョン: 5.15.90.1
WSLg バージョン: 1.0.50
MSRDC バージョン: 1.2.3770
Direct3D バージョン: 1.608.2-61064218
DXCore バージョン: 10.0.25131.1002-220531-1700.rs-onecore-base2-hyp
Windows バージョン: 10.0.19045.2846
「インボックス版」の場合
wsl --version コマンドでヘルプが表示される場合は「インボックス版」の WSL2 が動作しています。
PS C:\Users\tadashi.oya> wsl --version
コマンド ライン オプションが無効です: --version
Copyright (c) Microsoft Corporation. All rights reserved.

使用法: wsl.exe [Argument] [Options...] [CommandLine]

(...省略...)

    --unregister <Distro>
        ディストリビューションの登録を解除し、ルートファイルシステムを削除します。
この場合 wsl --update コマンドでストア版をインストールします。
PS C:\Users\tadashi.oya> wsl --update
wsl --version コマンドで「ストア版」のインストールを確認したら次節に進んでください。
「ストア版」も「インボックス版」もインストールされていない場合
本稿著者の環境では「ストア版」も「インボックス版」もインストールされていない状態での wsl --version などの実行結果を確認できていません。おそらくバージョン情報でもヘルプメッセージでもない、なにかエラー表示が出力されると思います。
管理者権限の Powershell などで wsl --install コマンドを実行することで WSL2 のストア版とLinuxディストリビューションとして Ubuntu がインストールされます。
以下の公式ドキュメントが参照できます。
- https://learn.microsoft.com/ja-jp/windows/wsl/basic-commands
- https://learn.microsoft.com/ja-jp/windows/wsl/install
systemd を有効化する
「ストア版」の WSL2 が前提です。
/etc/wsl.conf を作成する
/etc/wsl.conf ファイルを作成します。
vi や nano で手作業で作成するか、下記の sudo cat >/etc/wsl.conf <<[EOF] から [EOF] までをコピーして貼り付けることで作成できます。
PS C:\Users\tadashi.oya> ubuntu

tadashi@DESKTOP-CRHC3IF:~$ sudo cat >/etc/wsl.conf <<[EOF]
[boot]
systemd=true
[EOF]

tadashi@DESKTOP-CRHC3IF:~$ cat /etc/wsl.conf # 中身を確認する
[boot]
systemd=true
/etc/wsl.conf ファイルが作成できたら wsl --shutdown コマンドで WSL2 を再起動します。
PS C:\Users\tadashi.oya> wsl --shutdown
systemd が有効になっていることを確認する
systemctl status コマンドで起動状態がリスト表示されることを確認します。
PS C:\Users\tadashi.oya> ubuntu

tadashi@DESKTOP-CRHC3IF:~$ systemctl status
● DESKTOP-CRHC3IF
    State: degraded
     Jobs: 0 queued
   Failed: 3 units
    Since: Fri 2023-04-14 21:50:31 JST; 10s ago
   CGroup: /
           ├─user.slice
           │ └─user-1000.slice
           │   ├─user@1000.service
           │   │ └─init.scope
           │   │   ├─891 /lib/systemd/systemd --user
           │   │   └─892 (sd-pam)
(...省略...)
systemd を有効化した直後は、systemd そのものは有効になっていますが State: degraded や Failed: 3 units などと表示されています。
いくつ Failed になっているかなどは、環境によって異なります。
Failed が残ったままでも Docker のインストールを実施できますが、気になる場合は手当てして State: running で Failed: 0 units とすることができます。
systemd の Failed を手当てする
なにが Failed になっているかは環境によって異なります。以下は一例です。
systemctl --failed コマンドで Failed なサービスをリスト表示します。
tadashi@DESKTOP-CRHC3IF:~$ systemctl --failed
  UNIT                       LOAD   ACTIVE SUB    DESCRIPTION
● ssh.service                loaded failed failed OpenBSD Secure Shell server
● systemd-remount-fs.service loaded failed failed Remount Root and Kernel File Systems
● multipathd.socket          loaded failed failed multipathd control socket

LOAD   = Reflects whether the unit definition was properly loaded.
ACTIVE = The high-level unit activation state, i.e. generalization of SUB.
SUB    = The low-level unit activation state, values depend on unit type.

3 loaded units listed.
例1: ssh.service
ssh サービスは使わないので、disable にします。
tadashi@DESKTOP-CRHC3IF:~$ sudo systemctl disable ssh.service
Synchronizing state of ssh.service with SysV service script with /lib/systemd/systemd-sysv-install.
Executing: /lib/systemd/systemd-sysv-install disable ssh
Removed /etc/systemd/system/sshd.service.
Removed /etc/systemd/system/multi-user.target.wants/ssh.service.
例2: multipathd.socket
multipathd は使わないので、disable にします。
エラーとして表示されていたのは multipathd.socket ですが、止めるのは multipathd.service です。
tadashi@DESKTOP-CRHC3IF:~$ sudo systemctl disable multipathd.service
Removed /etc/systemd/system/multipath-tools.service.
Removed /etc/systemd/system/sysinit.target.wants/multipathd.service.
Removed /etc/systemd/system/sockets.target.wants/multipathd.socket.
例3: systemd-remount-fs.service
systemd-remount-fs.service については、systemctl status で確認すると、
tadashi@DESKTOP-CRHC3IF:~$ systemctl status systemd-remount-fs.service
● systemd-remount-fs.service - Remount Root and Kernel File Systems
     Loaded: loaded (/lib/systemd/system/systemd-remount-fs.service; enabled-runtime; vendor preset: enabled)
     Active: failed (Result: exit-code) since Wed 2022-11-30 21:55:55 JST; 15min ago
       Docs: man:systemd-remount-fs.service(8)
             https://www.freedesktop.org/wiki/Software/systemd/APIFileSystems
    Process: 60 ExecStart=/lib/systemd/systemd-remount-fs (code=exited, status=1/FAILURE)
   Main PID: 60 (code=exited, status=1/FAILURE)

Nov 30 21:55:55 DESKTOP-CRHC3IF systemd-remount-fs[66]: mount: /: can't find LABEL=cloudimg-rootfs.
Warning: journal has been rotated since unit was started, output may be incomplete.
と表示され、
Nov 30 21:55:55 DESKTOP-CRHC3IF systemd-remount-fs[66]: mount: /: can't find LABEL=cloudimg-rootfs.
と、LABEL が見つからないとのことなので、e2label コマンドで LABEL を付与します。
tadashi@DESKTOP-CRHC3IF:~$ df
Filesystem     1K-blocks      Used Available Use% Mounted on
(...省略...)
/dev/sdc       263112772   2830428 246844188   2% /
(...省略...)

tadashi@DESKTOP-CRHC3IF:~$ sudo e2label /dev/sdc cloudimg-rootfs
systemd の Failed が解消されていることを確認する
wsl --shutdown してから systemctl status コマンドで State: running や Failed: 0 units となっていることを確認します。
PS C:\Users\tadashi.oya> wsl --shutdown

PS C:\Users\tadashi.oya> ubuntu

tadashi@DESKTOP-CRHC3IF:~$ systemctl status
● DESKTOP-CRHC3IF
    State: running
     Jobs: 0 queued
   Failed: 0 units
(...省略...)
Docker Engine をインストールする
「docker.com の Docker(Docker Engine)」を公式のドキュメントに沿ってインストールします。
Docker Engine 本体のインストール
公式ドキュメントの「Install using the apt repository」を実行します。
Install using the apt repository
章立てが見分けにくいですが、
の直前までが「Install using the apt repository」です。
一般ユーザーで Docker を実行できるようにする
公式ドキュメントの「Manage Docker as a non-root user」を実行します。
Manage Docker as a non-root user
- Create the docker group.
- Add your user to the docker group.
- Log out and log back in so that your group membership is re-evaluated.
- Verify that you can run docker commands without sudo.
と4手順が示されていますが、「Docker Engine 本体のインストール」の際に
- Create the docker group.
は完了しているはずです。
/etc/group に docker グループが追加されているかを確認します。
tadashi@DESKTOP-CRHC3IF:~$ grep docker /etc/group
docker:x:1001:tadashi
docker グループが既に追加されていることを確認したら「2. Add your user ...」から「4. Verify ...」までを実施します。
VSCode でコンテナにアタッチするには
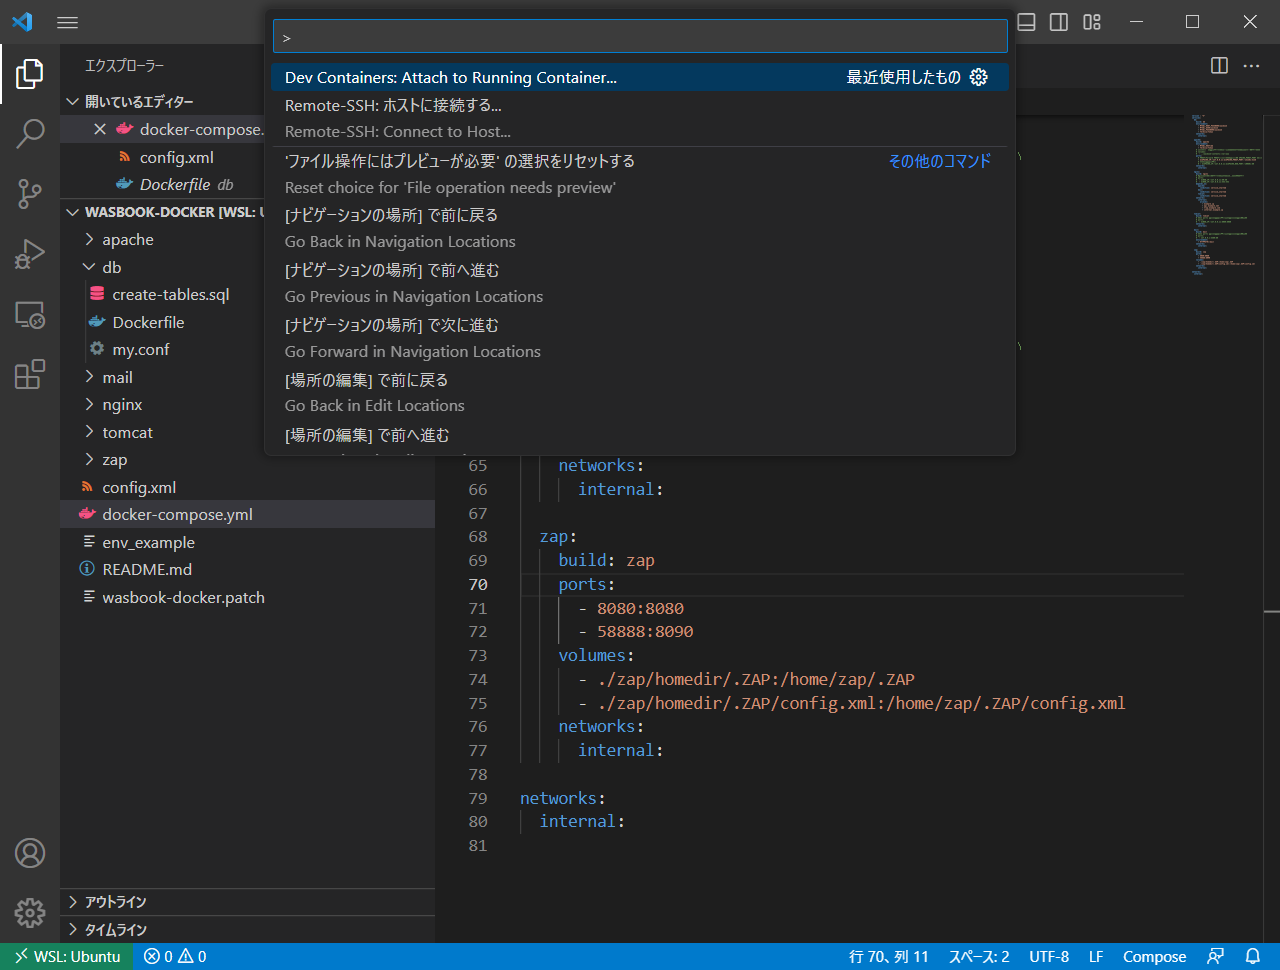
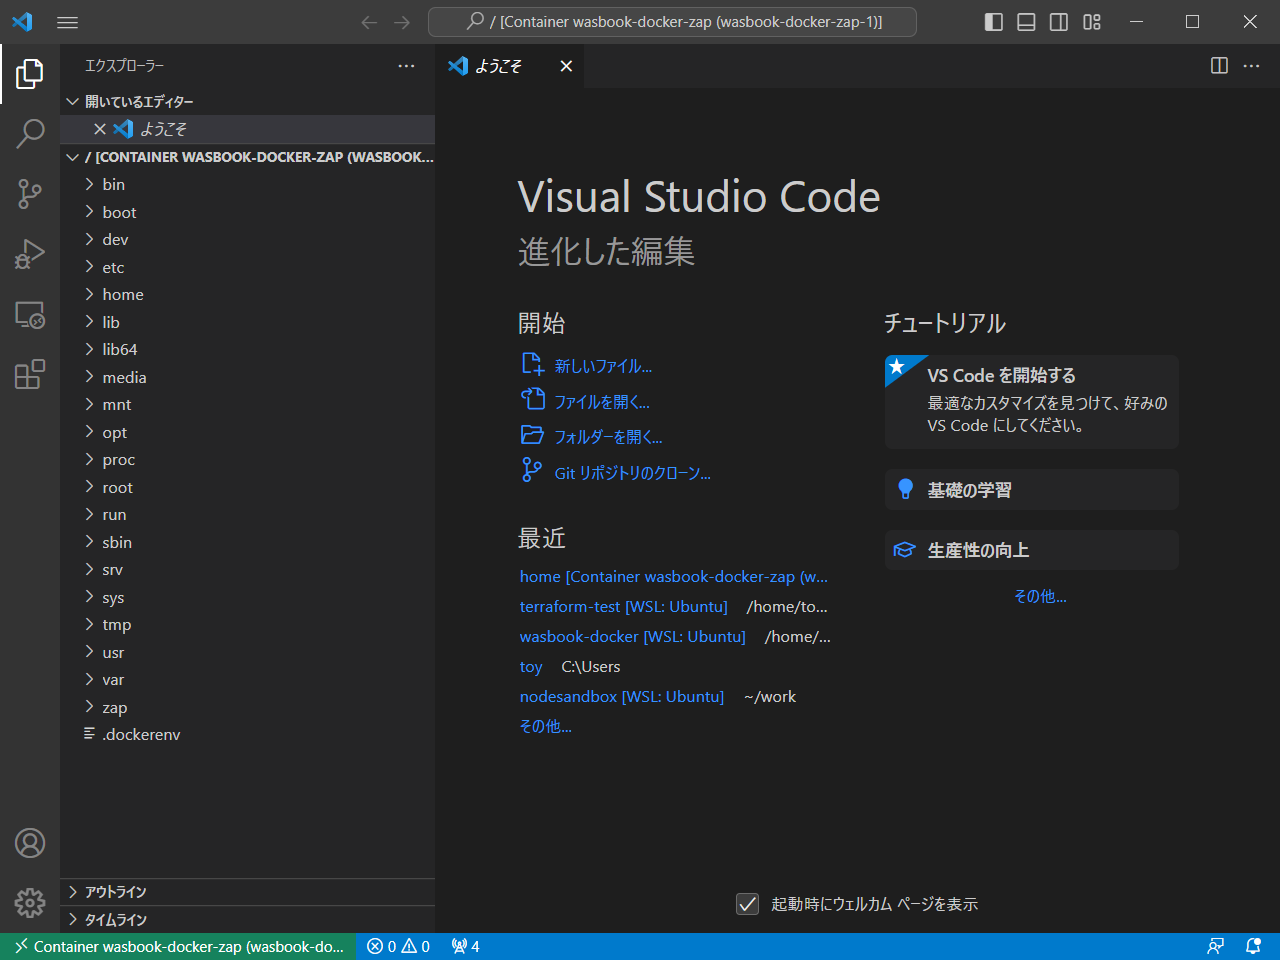
VSCode が WSL2 に接続している状態からコンテナへのアタッチ操作をする必要があります。
VSCode が WSL2 に接続している場合
VSCode の左下(歯車アイコンの下の緑色の表示領域)が「WSL:Ubuntu」状態の場合はコンテナにアタッチできます。
コンテナにアタッチできる状態(緑色の表示領域が WSL:Ubuntu となっている)

コンテナにアタッチした状態(緑色の表示領域にコンテナ名が表示されている)

VSCode が WSL2 に接続していない場合(エラーになる場合)
VSCode の左下(歯車アイコンの下の緑色の表示領域)が「どこにも接続していない」状態の場合はコンテナが起動していても見つけられません。
これは WSL2 側のコンテナ起動状態を Windows 側で検知できないためです。
コンテナにアタッチできない状態(緑色の表示領域が WSL:Ubuntu となっていない)

Ubuntu のパッケージ更新
一日の業務開始のタイミングなどで、apt-get update と apt-get upgrade を実行して Ubuntu の更新をすることを推奨します。
下記は更新するパッケージが無い状態の場合です。
tadashi@DESKTOP-CRHC3IF:~$ sudo apt-get update
[sudo] password for tadashi:
Hit:1 https://download.docker.com/linux/ubuntu focal InRelease
Hit:2 http://archive.ubuntu.com/ubuntu focal InRelease
Get:3 http://archive.ubuntu.com/ubuntu focal-updates InRelease [114 kB]
Get:4 http://security.ubuntu.com/ubuntu focal-security InRelease [114 kB]
Get:5 http://archive.ubuntu.com/ubuntu focal-backports InRelease [108 kB]
Fetched 336 kB in 3s (130 kB/s)
Reading package lists... Done

tadashi@DESKTOP-CRHC3IF:~$ sudo apt-get upgrade
Reading package lists... Done
Building dependency tree
Reading state information... Done
Calculating upgrade... Done
0 upgraded, 0 newly installed, 0 to remove and 0 not upgraded.


