表題の通りVisualStudio2015をエディタとして使いながら、TypsScriptするにはどういう構成にするのがよいのか試してみた。
サイトを作るというより、ローカルでちょっとしたWebGLをサーバーと連携させるとかそういう用途を想定して、node.jsをやってみた。
準備
事前にインストールするアプリ
- VisualStudio2015 Community Edition
- nodejstools for Visual Studio(VS plugin)
- node.js
- git
- python2系(npmでインストールするモジュールがビルドに使う場合があるぽい。無くてもいいかも)
コマンドラインに、gitとnodejs(C:\Program Files\nodejs)とnpmのパッケージ(%USERPROFILE%\AppData\Roaming\npm)へのパスを通す。
事前にインストールするnpmパッケージ
コマンドを使うので。
> npm install tsd -g
> npm install gulp -g
> npm install bower -g
最初からF5できる状態でプロジェクト開始(Blank Node.js Web Application)
追記。
初期状態でgit initとnpm initが終わった状態で"F5"できる状態ではじまる。
自前でF5まで(From Existing Node.js code)
プロジェクト開始
VisualStudioはエディタとして使うけど無くても開発できる構成で行くべく、
node.jsの作法でプロジェクトを開始する。
> mkdir tssample
> cd tssample
> npm init
# 全部そのままエンター
VisualStudio起動。新規プロジェクトで開始して
テンプレート - JavaScript -Node.js - From Existing Node.js code
を選んでnpm initしたディレクトリを選ぶ。
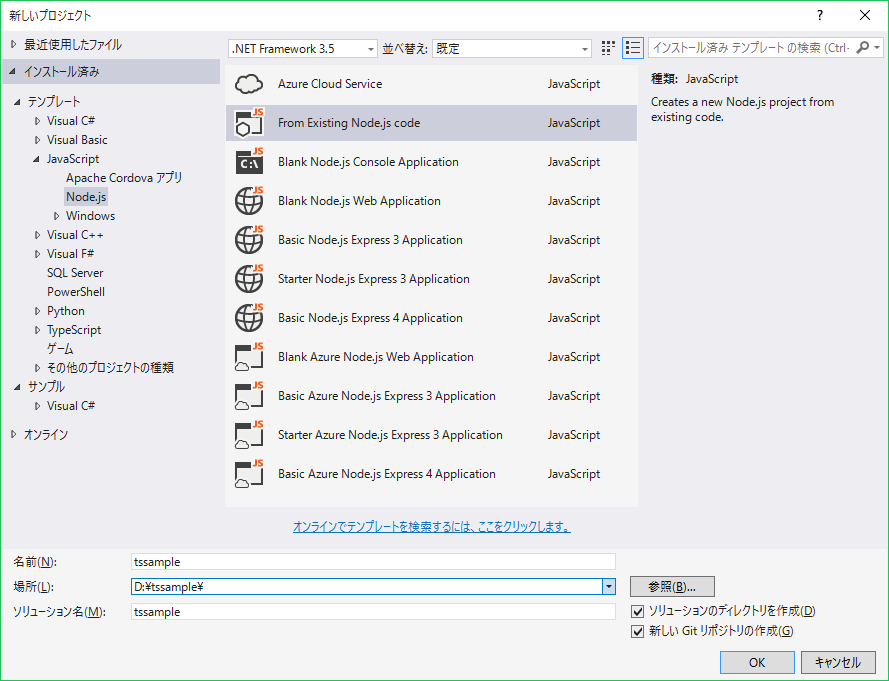
特に内容は変更せずにFinishを押した。
package.jsonだけが含まれる存在するプロジェクトができるので
ファイル-すべて保存してソリューションも保存する。
ここいらでgitに保存する。
.gitignore
.vs
> git init
> git add .
> git commit -m init
最初のTypeScriptを記述
VisualStudioでソリューションエクスプローラーのプロジェクトの右クリックメニューから追加 - 新しい項目 - TypeScript fileとして
var http = require("http");
var port = 8000;

http.createServer(function (request, response) {
    response.writeHead(200, { "Content-Type": "text/plain" });
    response.write("こんにちわびじゅある");
    response.end();
}).listen(port);
requireに赤線が引かれて名前requireが見つかりませんと出る。
typescriptの定義を入れてやる。
コマンドラインに戻ってnode.jsの関数定義を導入する。
> tsd init
> tsd query node -rosa install
タイプスクリプトの先頭に定義の参照を追加。
/// <reference path="./typings/tsd.d.ts" />
赤線が消えた。
"F5"で実行だ。
しかし、
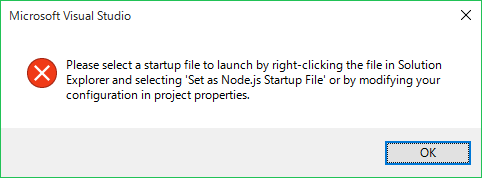
とお叱りを受ける。server.tsを右クリックしてSet as Node.js Startup Fileを選択。
"F5"で実行だ。
黒いダイアログが立ち上がる。

ブラウザのアドレス欄にhttp://localhost:8000と入力すればこんにちわびじゅあると出るので動いているのはわかる。だが、自動でブラウザが開いてほしい。
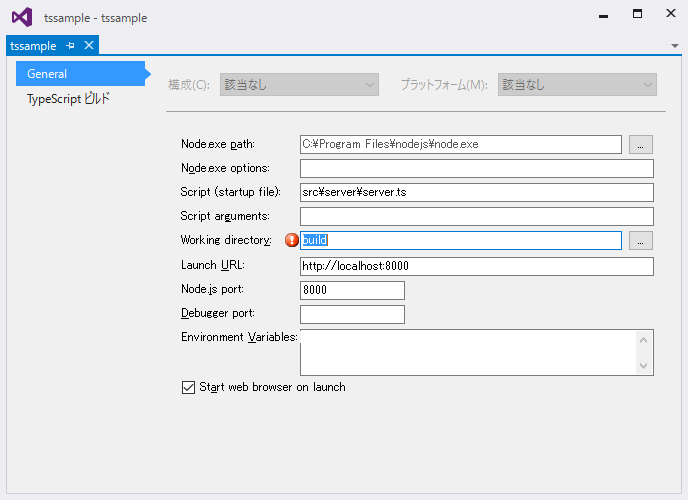
プロジェクトのプロパティを開いて以下のように設定する。
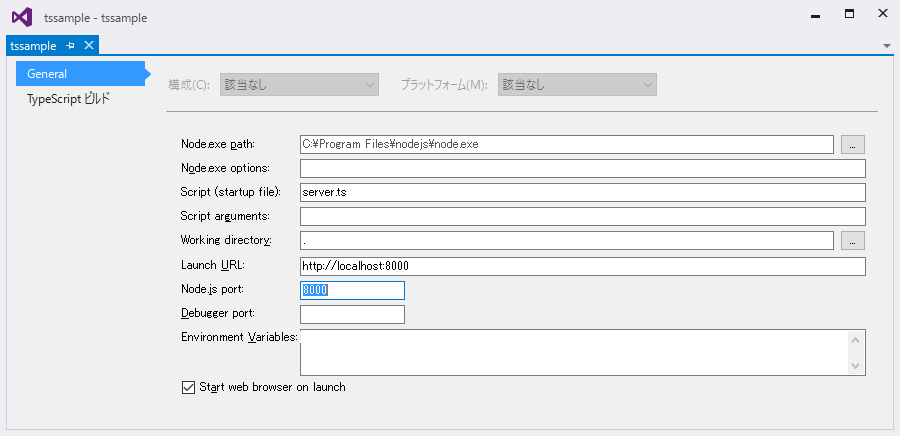
Launch URLにブラウザで開くurlを指定して、それと同じポートをNode.js portに指定する。
Node.js portは必要。無いとブラウザが開かない。node.jsの起動待ちをすると推察。
ここまでで、VisualStudioでTypeScriptして"F5"でnode.jsが起動してブラウザで見れるところまで確認できた。
.gitignoreを下記のように更新してコミットした。
# visualstudio
/.vs
/.ntvs_analysis.dat
/bin
/obj

# とりあえず
/server.js
/server.js.map

# tsd
/typings/
node.jsでディレクトリを公開する
パッケージnode-staticを導入して指定したディレクトリを公開するようにする。
> npm install node-static --save
/// <reference path="./typings/tsd.d.ts" />
var http = require("http");
var nodeStatic = require('node-static');
var port = 8000;

//
// Create a node-static server instance to serve the './public' folder
//
var file = new nodeStatic.Server('./public');

http.createServer(function (request, response) {
    request.addListener('end', function () {
        //
        // Serve files!
        //
        file.serve(request, response);
    }).resume();
}).listen(port);
<!DOCTYPE html>

<html xmlns="http://www.w3.org/1999/xhtml">
<head>
    <meta charset="utf-8" />
    <title></title>
</head>
<body>
    のーどすたてぃっく
</body>
</html>
"F5"でOK。
.gitignoreに下記を追加してコミット。
# npm
/node_modules/
gulp導入
プロジェクト整理
このままプロジェクトを続けていけばTypeScriptとコンパイル結果のJSや生成物が混在して
ディレクトリがぐちゃぐちゃになるのが予見される。
ディレクトリ構成を整理して、gulpを導入して生成物をbuildディレクトリに集約する。
とりあえずVisualStudioのクリーンを実行して一時ファイルを削除してからファイルを移動。
build # ビルド出力
  + public # node-static公開ディレクトリ
src
  + server # serverのソース。node.exeの引数になる
      + server.ts
      + tsd.json # typescript定義
      + typings # typescript定義
  + client # clientのソース。index.htmlとscriptタグで使うもの
      + index.html
packages.json # npm
node_modules # npm
ファイルをbuildディレクトリにコピーするタスクを実行するのにgulpを取り入れてみる。
> npm install gulp --save-dev
gulpスクリプトを記述
var gulp = require('gulp');

// ToDo:
// tsファイルをjsにコンパイルするタスク

gulp.task('copy', function () {
    // server
    gulp.src(['src/server/*.js'])
    .pipe(gulp.dest('build'));

    // client
    gulp.src(['src/client/index.html'])
    .pipe(gulp.dest('build/public'));
});
VisualStudioの表示 - その他のウインドウ - タスク ランナー エクスプローラーを表示する。
地味にVisualStudio2015はgulp対応。
左上の回転矢印を押して更新すると先ほどgulpfile.jsで定義したtasks-copyが現れるはず。
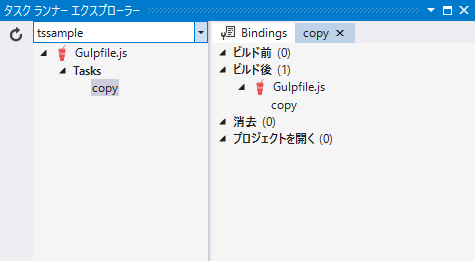
copyを右クリックしてビルド後に登録して自動でcopyタスクが動くようにする。
プロジェクトの設定を下記のようにする。
WorkingDirectoryをbuildにする。(publicがそこからの相対パス)。
.gitignoreを更新してコミット
# visualstudio
/.vs
/.ntvs_analysis.dat
/bin
/obj

# compiled
/build
/src/**/*.js
/src/**/*.js.map

# tsd
typings/

# npm
/node_modules/
Client側のタイプスクリプトとか外部ライブラリ
three.jsやってみる
three.jsのサイトの"getting started"より。
<html>
<head>
    <title>My first Three.js app</title>
    <style>
        body {
            margin: 0;
        }

        canvas {
            width: 100%;
            height: 100%;
        }
    </style>
</head>
<body>
    <script src="js/three.min.js"></script>
    <script>
			var scene = new THREE.Scene();
			var camera = new THREE.PerspectiveCamera( 75, window.innerWidth/window.innerHeight, 0.1, 1000 );

			var renderer = new THREE.WebGLRenderer();
			renderer.setSize( window.innerWidth, window.innerHeight );
			document.body.appendChild( renderer.domElement );

			var geometry = new THREE.BoxGeometry( 1, 1, 1 );
			var material = new THREE.MeshBasicMaterial( { color: 0x00ff00 } );
			var cube = new THREE.Mesh( geometry, material );
			scene.add( cube );

			camera.position.z = 5;

			var render = function () {
				requestAnimationFrame( render );

				cube.rotation.x += 0.1;
				cube.rotation.y += 0.1;

				renderer.render(scene, camera);
			};

			render();
    </script>
</body>
</html>
ついでにブラウザのリロードがめんどくさいのでキャッシュしないようにする。
var file = new nodeStatic.Server('./public', { cache: 0 });
"F5"。真っ白。
<script src="js/three.min.js"></script>
を提供する。
bowerでクライアントのライブラリを管理
またもや新しいツールが登場。
> cd src/client
src/client> bower init
src/client> bower install three.js --save
gulpでpublicにコピーするタスクを記述。
    gulp.src(['src/client/bower_components/three.js/three.min.js'])
    .pipe(gulp.dest('build/public/js'));
"F5"。緑のキューブがぐるぐる回るようになった。
three.jsのスクリプト部分をts化する
<script src="js/cube.js"></script>
// 定義
var THREE = require('THREE');

var scene = new THREE.Scene();
var camera = new THREE.PerspectiveCamera(75, window.innerWidth / window.innerHeight, 0.1, 1000);

var renderer = new THREE.WebGLRenderer();
renderer.setSize(window.innerWidth, window.innerHeight);
document.body.appendChild(renderer.domElement);

var geometry = new THREE.BoxGeometry(1, 1, 1);
var material = new THREE.MeshBasicMaterial({ color: 0x00ff00 });
var cube = new THREE.Mesh(geometry, material);
scene.add(cube);

camera.position.z = 5;

var render = function () {
				requestAnimationFrame(render);

				cube.rotation.x += 0.1;
				cube.rotation.y += 0.1;

				renderer.render(scene, camera);
};

render();
    gulp.src(['src/client/*.js'])
    .pipe(gulp.dest('build/public/js'));
"F5"。真っ白。Chromeのデベロッパーツールのコンソールを見たら
Uncaught ReferenceError: require is not defined.
と出ておる。そらそうか。
three.jsの定義ファイルをインストールしよう。
> cd src/client
src/client> tsd query three -rosa install
tsの先頭に
/// <reference path="./typings/tsd.d.ts" />
"F5"。動いた。
以上
わりとツールの手順を覚えるのが大変です。
まだ、
- serverのtsが複数になった場合にひとつに合成するgulpの記述
- tsdに無い定義ファイルをでっちあげる
という必須の話があるがとりあえずVisualStudio2015でEditするのに必要なところまでは来たのではないか。