TypeScript も使いたかったので Node.js 開発環境として WebStorm を使おうとしたのだけれど、色々はまった。
ちゃんと外部ライブラリが require できて、補完等の IDE の恩恵も受けられるようにするためにはデフォルトのままではダメで、色んな場所で色んな設定が必要だった。JetBrains本家の資料でも記述がばらけていて整理されてなさげだったのでここにまとめておく。
サーバが起動しなかったり、そんなメソッドねーよとか怒られる場合は、たいてい 2-2〜2-4 の設定が外れてることが多いのでことあるごとにチェックしませう。
1. NVM で Node.js をインストール
NVM の GitHub ページを参考にインストール。
$ curl https://raw.githubusercontent.com/creationix/nvm/v0.18.0/install.sh | bash
$ source ~/.nvm/nvm.sh
$ nvm install stable
.bashrc や .zshrc に以下の記述を追加。
NVM_HOME=${HOME}/.nvm
if [ -e "${NVM_HOME}" ]; then
  source ${NVM_HOME}/nvm.sh
  nvm use stable
fi
なお、以降の作業のため
$ echo $NODE_PATH
$ which node
で環境変数 $NODE_PATH の値と、node コマンドのパスを取得しておく。
その上で、毎回 NVM で新しい Node をインストールするたびに設定をひとつひとつ変更するのは面倒なので、シンボリックリンクを作成しておき、パスの設定はそちらを使う。
$ cd ~/.nvm
$ ln -s v0.10.33 current
- $NODE_PATH =
/Users/me/.nvm/v0.10.33/lib/node_modules→/Users/me/.nvm/current/lib/node_modules - node =
/Users/me/.nvm/v0.10.33/bin/node→/Users/me/.nvm/current/bin/node
2. WebStorm のインストールと設定
2-1. インストール
JetBrains の WebStrom のページからファイルをダウンロードしてインストール。
起動時に Java がないとインストールしろと言われるので、ダイアログのMore Info...ボタンで開くページから Java をダウンロードしてインストールしておく。
2-2. Node と NPM の設定
WebStorm > Preferences... > Languages & Frameworks > Node.js and NPM を開く。
-
Node interpreter:に何も入っていなければ、NVM でインストールした node コマンドのパス(ex./Users/me/.nvm/current/bin/node)を入力。 -
Sources of Node.js Core Modulesが「 Sources are not configured.」となっていたら、
Configure...ボタンを押下して開くダイアログからインターネット経由でソースをダウンロードする。
2-3. JavaScript ライブラリの設定
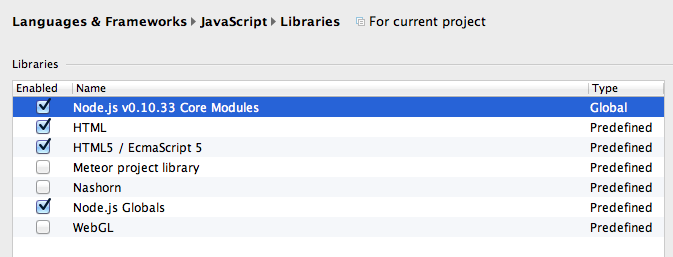
WebStorm > Preferences... > Languages & Frameworks > JavaScript > Libraries を開く。
-
Node.js vx.xx.xx Core ModulesとNode.js Globalsをチェックして Enabled にする。
-
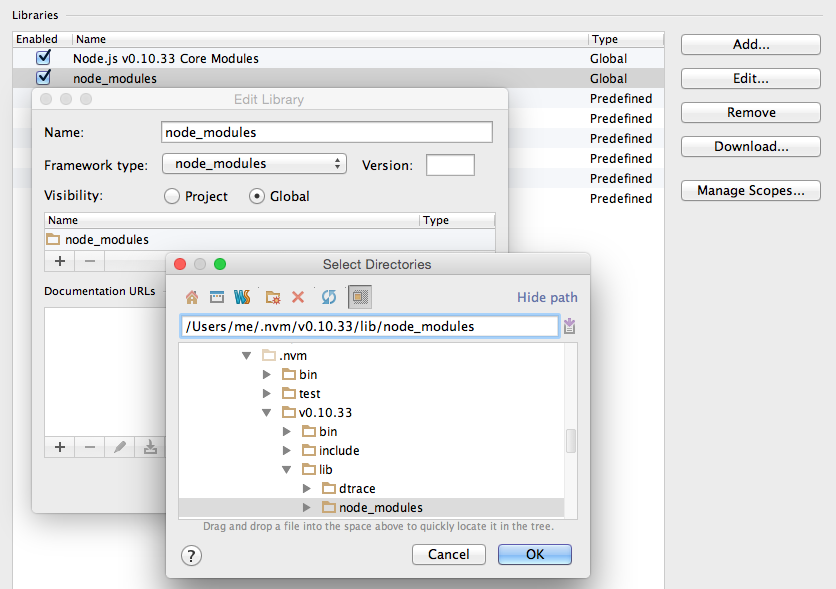
Add...から New Libraryダイアログを開き、+ > Attach Directories...から $NODE_PATH の値のディレクトリ(ex./Users/me/.nvm/current/lib/node_modules)を指定、Visibility:をGlobalにして、node_modules としてライブラリを追加する。
2-4. 環境変数の設定
Run > Edit Configurations... > Defaults > Node.js を開く。
-
Environment variables:でNODE_PATHに取得しておいた値(ex./Users/me/.nvm/current/lib/node_modules)を設定する。
3. WebStorm のカスタマイズ(個人的趣味)
3-1. エディタのキー操作を Vim 風に
-
WebStorm > Preferences... > Plugins > Browse repositories...から IdeaVim プラグインをインストール。(※ WebStorm の再起動が必要)
3-2. 好きなエディタのテーマをインポート
- IDEA Color Thems のサイトから、好きなテーマの JARファイルをダウンロード。
-
File > Import Settings...からそのファイルを読み込む。(※ WebStorm の再起動が必要) -
WebStorm > Preferences... > Editor > Colors & Fonts > Scheme nameから、適用したいテーマを選ぶ。
3-3. カーソルの点滅を止める、現在行の色を変更しない
-
WebStorm > Preferences... > Editor > General > AppearanceのCaret blinking (ms)のチェックを外す。 -
WebStorm > Preferences... > Editor > Colors & Fonts > General > Caret rowのBackgroundのチェックを外す。
4. NPMパッケージのインストール方法
コマンドラインからインストールしたほうが手っ取り早いかも。
-
WebStorm > Preferences... > Languages & Frameworks > Node.js and NPMのPackagesで「+」ボタンを押下 - パッケージを検索して選択
-
Optionsをチェック、-gを入力 -
Install Packageボタンでインストール
【参考ページ】


