はじめに
Dependabot と GitLab CI を使って、以下のことを自動化しました。
- 毎朝 4 時に、使用している RubyGems のアップデートをチェック
- アップデートがあれば、アップデート用の Merge Request を作成
Dependabot とは
Dependabot は依存パッケージの更新をチェックして、更新があれば自動で Pull Request (GitHub) や Merge Request (GitLab) を作ってくれるサービスです。
Ruby, JavaScript, Python, PHP, Elixir, Docker,... など様々な言語がサポートされています。
この記事で紹介すること
Dependabot は SaaS として提供されており、 GitHub のマーケットプレイスなどから導入できます。
一方で、コア部分に関しては公開されているため、自分自身で Dependabot をホスティングすることもできます。
そこで、今回は SaaS として利用せずに dependabot-core の Docker Image を使って GitLab CI での依存パッケージ (RubyGems) の自動更新 を実現してみました。
実際の Merge Request
Dependabot を走らせると、更新のある Gem ごとに Merge Request を作成してくれます。
Merge Request の中身はこんな感じで、 Release Notes や Changelog も表示してくれます。
環境
- Ruby 2.6.1
- GitLab.com (11.9.6-ee)
導入方法
全体像
導入には 次の 5 つのステップが必要です。
- Gemfile に
dependabot-omnibusを追加 - 更新用のスクリプトをプロジェクトに追加
- 自動更新ジョブの定義
- Access Token の取得
- 自動更新ジョブのスケジュール登録
1. Gemfile に dependabot-omnibus を追加
Gemfile に以下を追加します。
gem 'dependabot-omnibus', '~> 0.99.0'
'~> 0.99.0' の部分は、以下の URL から最新のタグを確認して、それを設定しておけばよいと思います。
https://github.com/dependabot/dependabot-core/tags
$ bundle install
2. 更新用のスクリプトをプロジェクトに追加
dependabot-script のリポジトリから更新用スクリプトをダウンロードします。
$ curl -O https://raw.githubusercontent.com/dependabot/dependabot-script/master/generic-update-script.rb
$ curl -O https://raw.githubusercontent.com/dependabot/dependabot-script/master/update-script.rb
3. 自動更新ジョブの定義
.gitlab-ci.yml に自動更新ジョブを定義します。only に schedules を指定することで、スケジュール実行時にのみジョブが実行されるようになります。
dependabot:
  image: dependabot/dependabot-core
  before_script:
    - bundle install -j $(nproc) --path vendor
  script: bundle exec ruby ./generic-update-script.rb
  only:
    - schedules
さらに、スケジュール実行時に他のジョブが実行されてしまわないように、 その他のジョブたちには except を追加しておきます。
その他のジョブたち:
  except:
    - schedules
キャッシュの設定
GitLab CI では以下のようにキャッシュを保存しておくことができますが、グローバルなキャッシュを定義していると何か悪さをしている(?)ようで、Dependabot がうまく動いてくれませんでした。
まだ詳細は把握できていませんが、キャッシュを使用する場合はグローバルに定義せずに、 各ジョブごとに定義することで回避することができました。
cache:
  paths:
    - vendor/ruby
4. Access Token の取得
GitLab Access Token の取得
Dependabot 用に AccessToken を取得します。
- GitLab の右上にある自分のアイコン >
Settings - 左のメニューバー >
Access Tokens
Name に dependabot (任意の名前でよい), Scopes の api にチェックをいれて Access Token を作成します。
作成できたら、表示されている Access Token をメモっておきます。(あとで使います)

GitHub Access Token の取得
Dependabot は依存関係の情報を GitHub から取得してきます。
その際に、API の使用制限にかかってしまわないように GitHub Access Token を取得しておきます。
- GitHub の右上にある自分のアイコン >
Settings - 左のメニューバー >
Developper settings>Personal access tokens Generate new token
Token description に dependabot (任意の名前でよい), Select scopes の repo にチェックをいれて Access Token を作成します。
作成できたら、表示されている Access Token をメモっておきます。(これもあとで使います)

5. 自動更新ジョブのスケジュール登録
ここまででほとんど準備は完了しました。あとは、自動更新ジョブが毎日実行されるようにスケジュール登録するのみです。
- GitLab のプロジェクトページ >
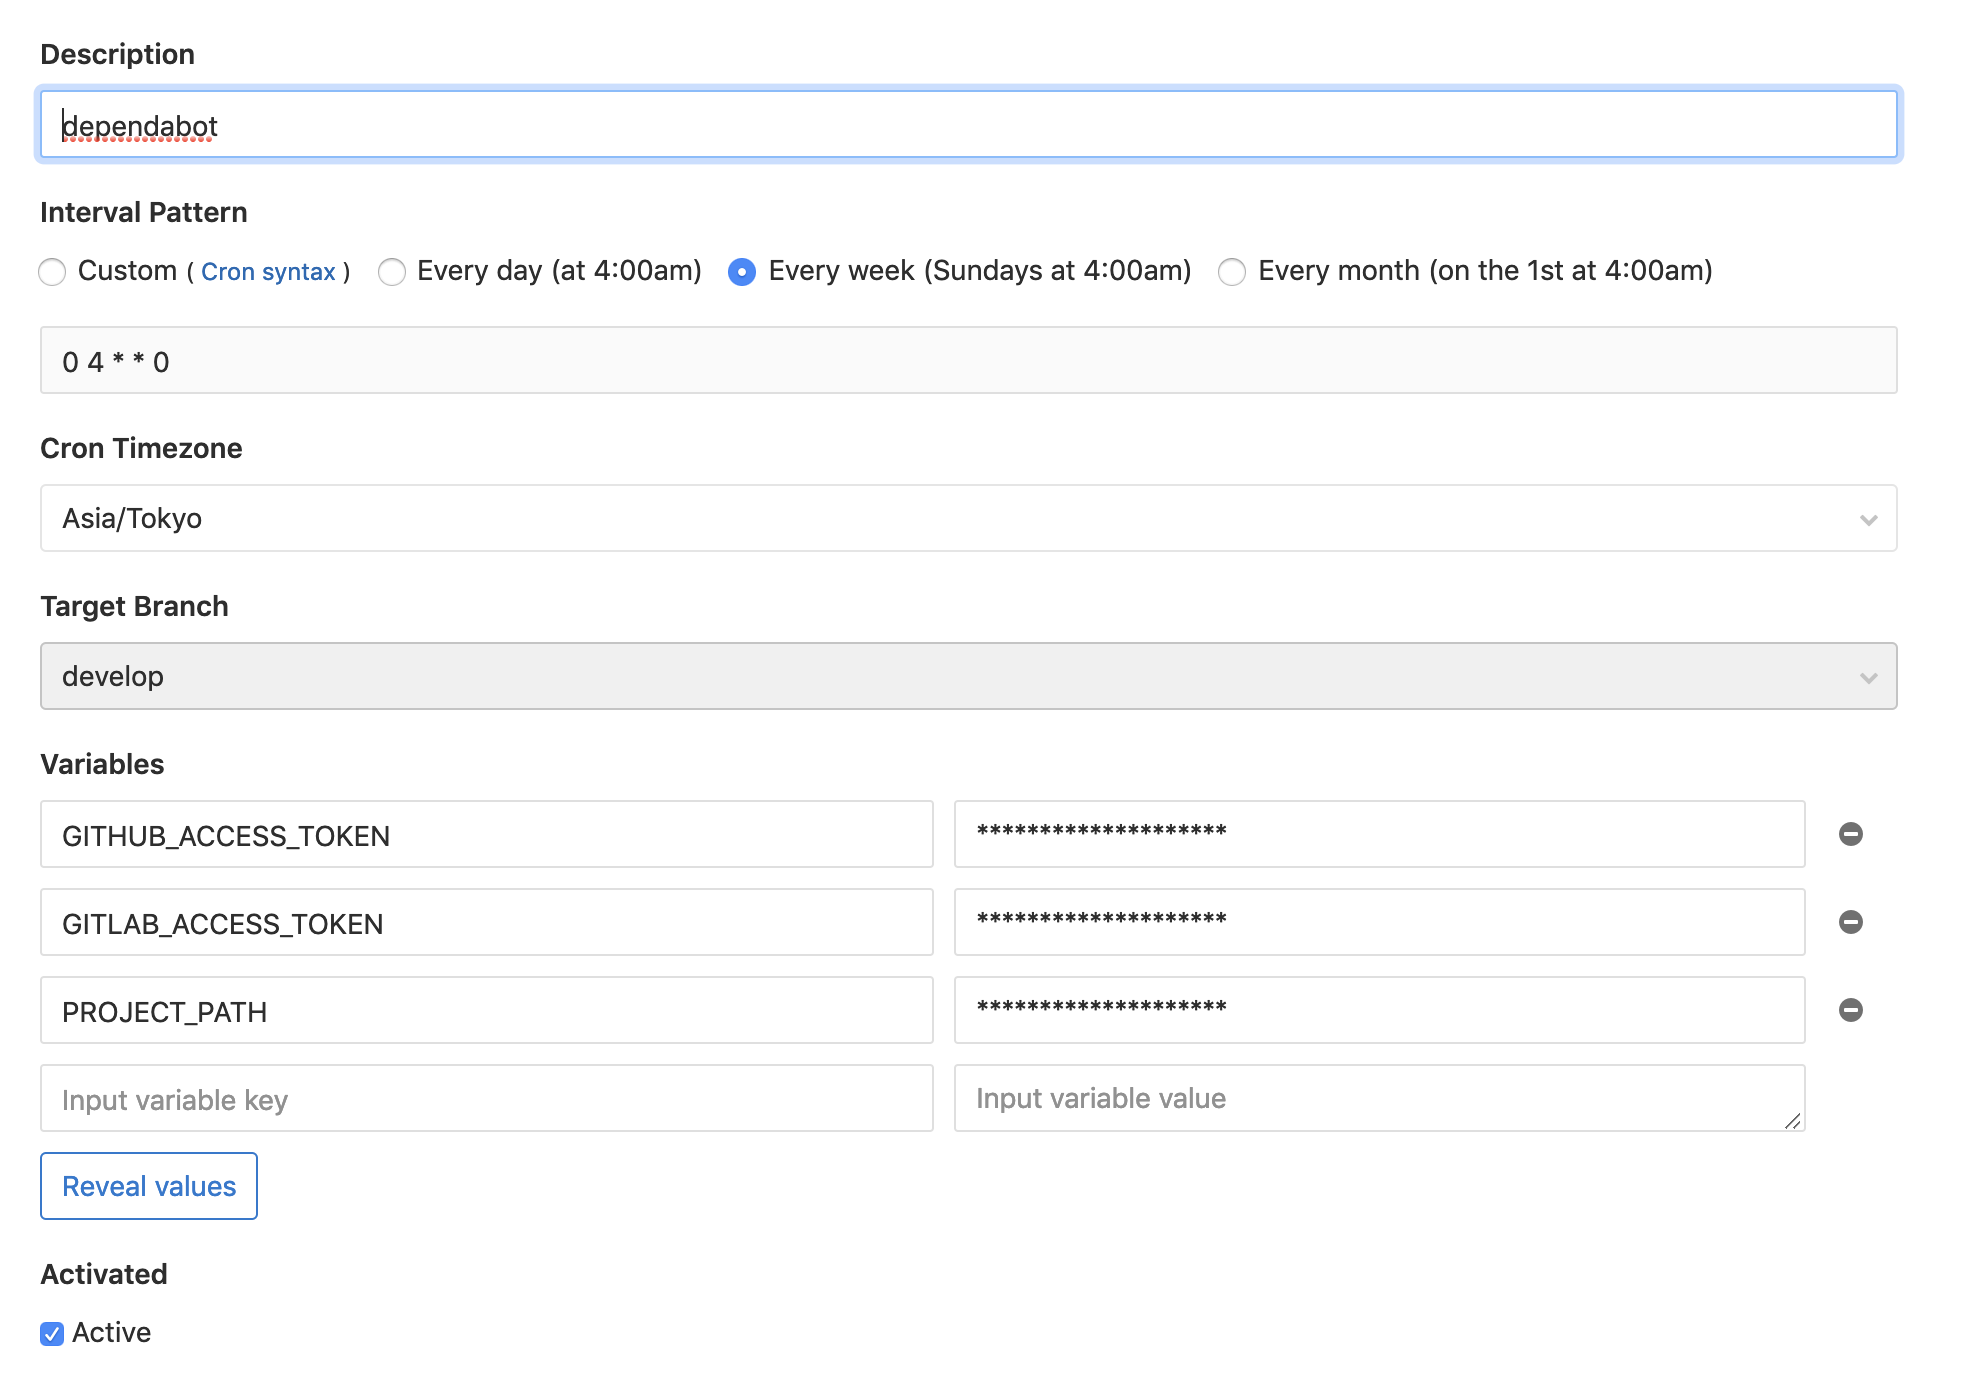
CI/CD>Schedules New schedule
設定内容
| 項目 | 設定値 |
|---|---|
| Description |
dependabot (任意でよい) |
| Interval Pattern |
Every day (at 4:00am) (任意でよい) |
| Cron Timezone | Asia/Tokyo |
| Target Branch | マージ先とするブランチを指定 |
Variables に上で取得した AccessToken 等を設定します。
| 項目 | 設定値 |
|---|---|
| GITLAB_ACCESS_TOKEN | GitLab Access Token を入力 |
| GITHUB_ACCESS_TOKEN | GitHub Access Token を入力 |
| PROJECT_PATH | プロジェクトのパス (グループ名/プロジェクト名 or ユーザ名/プロジェクト名) を入力 |

作成できたら、Schedule の ![]() 再生ボタンをクリックしてジョブを試しに実行してみます。
再生ボタンをクリックしてジョブを試しに実行してみます。
ここまで問題なく設定できていれば、Dependabot のジョブが走って Merge Request を作成してくれるはずです。(更新があれば)
そして今後は、上で設定したインターバルで実行 (毎朝4時) されることになります。
参考
- このリポジトリを参考に導入しました
- SaaS 版の Dependabot は、オープンソース/個人アカウント であればフリーで使えるようです

