はじめに
iOSアプリを開発してみようと思って先日からStart Developing iOS Apps を見ながらお勉強してました。
やっと一通り終えてチュートリアルアプリが完成したので、その流れでGitLab-CI環境も構築してみた次第です。
できるようになったこと
- ソースをリポジトリにpushするたびに自動ビルド・テストを実行する
まだ開発者アカウントを取得していないのでここまで。。。
前提とか
-
Start Developing iOS Apps で作ったチュートリアルアプリを例にあげて書きます
- すなわち最低限のUnit Testはすでにできている
- 基本的にGitLabの公式ドキュメントに書いてあるとおりにやっただけです
- 上にも書いたとおり開発者アカウントを取得していないので自動ビルドとテストまで
環境
- GitLab Enterprise Edition 10.2.4-ee (gitlab.com)
- Xcode 9.2
- macOS High Sierra (10.13.2)
.gitlab-ci.ymlの作成
GitLab上からテンプレートを使って.gitlab-ci.ymlとCI環境を構築するブランチとを作成します。
-
GitLabのプロジェクトトップページ ->
Set up CI -
Apply a GitLab CI Yaml template->Swift- テンプレートが作成されます
-
Target Branchを任意のブランチ名に書き換える- ここでは
ci-pipeline
- ここでは
-
Start a new merge request with these changesのチェックを外す
GitLab Runnerの構築
公式ドキュメントに書いてあるとおりに実行していきます。
-
バイナリのダウンロード
$ sudo curl --output /usr/local/bin/gitlab-runner https://gitlab-runner-downloads.s3.amazonaws.com/latest/binaries/gitlab-runner-darwin-amd64 -
実行権限の付与
$ sudo chmod +x /usr/local/bin/gitlab-runner -
Runnerの登録
ここも公式ドキュメントを参考に進めます。
-
以下のコマンドを実行
$ gitlab-runner register -
GitLabインスタンスのURLを入力
Please enter the gitlab-ci coordinator URL (e.g. https://gitlab.com ) https://gitlab.com -
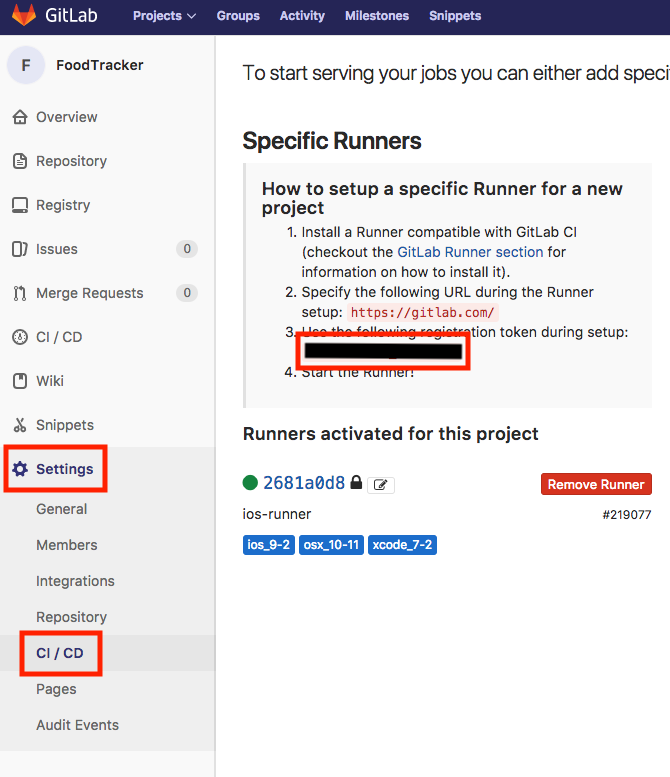
トークンを入力
Please enter the gitlab-ci token for this runner
xxx
xxxには実際のトークンを入力します。GitLabのSetting->CI/CDから確認できます。(画像の黒塗り部分)-
Runnerのホスト名を入力
Please enter the gitlab-ci description for this runner
[hostame] my-runner
ここでは
my-runnerと入力します。 -
Runnerに関連付けるタグを入力
Please enter the gitlab-ci tags for this runner (comma separated):
ios_11-2, xcode_9-2, macos_10-13-2
ここでは
ios_11-2, xcode_9-2, macos_10-13-2と入力します。任意のタグでいいのですが、(後述する).gitlab-ci.ymlの内容と一致させる必要があるので注意。 -
タグのないジョブを実行するか選択
Whether to run untagged jobs [true/false]:
[false]: true
あとで変えられるのでとりあえず
true -
Runnerを現在のプロジェクトにロックするか選択
Whether to lock Runner to current project [true/false]:
[true]: true
ここもあとで変えられるのでとりあえず
true -
Runner executorの入力
Please enter the executor: ssh, docker+machine, docker-ssh+machine, kubernetes, docker, parallels, virtualbox, docker-ssh, shell: shellshellを選択します。
-
-
Runnerをインストールして実行
$ cd ~
$ gitlab-runner install
$ gitlab-runner start
ここで一応Runnerが動いていることを確認してみましょう。
$ gitlab-runner status
gitlab-runner: Service is running!
問題なければ
gitlab-runner: Service is running!と出力されるはずです。 -
Runnerのアップデート
-
サービスの一旦停止
$ gitlab-runner stop -
バイナリのダウンロード
$ curl -o /usr/local/bin/gitlab-runner https://gitlab-runner-downloads.s3.amazonaws.com/latest/binaries/gitlab-runner-darwin-amd64 -
実行権限の付与
$ chmod +x /usr/local/bin/gitlab-runner -
サービスの再開
$ gitlab-runner start
-
Xcodeプロジェクトの設定
公式ドキュメントを参考にプロジェクトをsharedに設定します。
By sharing your scheme, GitLab CI gets context it needs to build and test your project.
To share a scheme in Xcode, choose Product > Scheme > Manage Schemes.
xcpretty のインストール
xcprettyというモジュールが必要なためインストールします。
$ gem install xcpretty
.gitlab-ci.ymlの編集
テンプレートのままでは通らないので編集します。
変更点
-
stages:から- archiveを削除 -
ProjectNameをFoodTrackerに -
SchemeNameをFoodTrackerに -
name=iPhone 6s,OS=9.2をname=iPhone 7,OS=11.2に -
tags:をGitLab Runnerの構築で設定したとおりに変更 -
archive_project:以下をごっそり削除
編集後のファイル
# This file is a template, and might need editing before it works on your project.
# Lifted from: https://about.gitlab.com/2016/03/10/setting-up-gitlab-ci-for-ios-projects/
# This file assumes an own GitLab CI runner, setup on an OS X system.
stages:
  - build

build_project:
  stage: build
  script:
    - xcodebuild clean -project FoodTracker.xcodeproj -scheme FoodTracker | xcpretty
    - xcodebuild test -project FoodTracker.xcodeproj -scheme FoodTracker -destination 'platform=iOS Simulator,name=iPhone 7,OS=11.2' | xcpretty -s
  tags:
    - ios_11-2
    - xcode_9-2
    - macos_10-13-2
.gitlab-ci.ymlのpush
.gitlab-ci.ymlをpushして自動ビルド・テストが走るか確認します。
その前に、手元で以下を実行してみます。当然うまくできなければ自動化してもこけるので。。。
$ xcodebuild clean -project FoodTracker.xcodeproj -scheme FoodTracker | xcpretty
$ xcodebuild test -project FoodTracker.xcodeproj -scheme FoodTracker -destination 'platform=iOS Simulator,name=iPhone 7,OS=11.2' | xcpretty -s
問題なければpushしちゃいましょう。
$ git add .gitlab-ci.yml
$ git commit -m "update .gitlab-ci.yml"
$ git push origin ci-pipeline
事後確認
プロジェクトのCI/CD -> Pipelinesからステータスがpassedになっていることが確認できればおわりです。
あとはソースをpushするたびに自動ビルド・テストが走ってくれるはずです。
おわりに
イマドキな開発をやってみたくてCI構築してみました。
近いうちに開発者アカウントを取得して配布用パッケージの作成とかまでやってみようかと思います。


