1、まずはLEDを光らせる!
やはり、まずはLEDチカチカ。
注意
・私は電子機器については電圧=抵抗×電流がわかる程度の全くの素人です。
2、本題
(1)接続
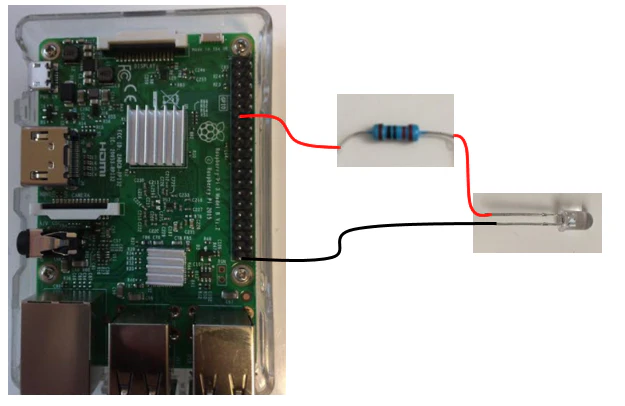
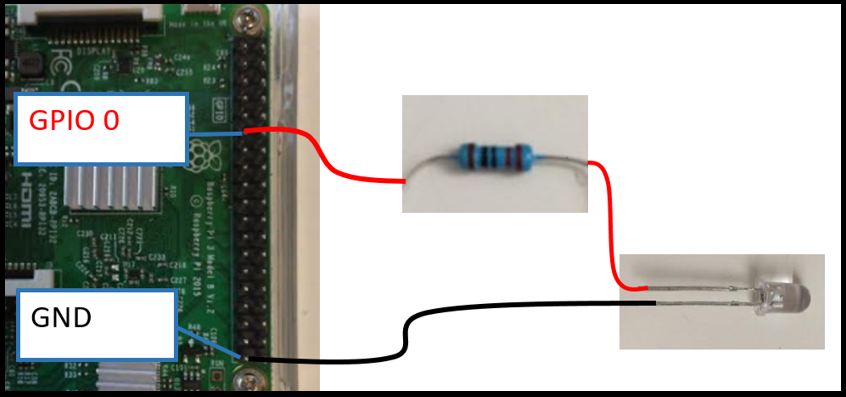
220Ωの抵抗器とLEDを接続しています。
①全体画像
②詳細
(2)Raspberry piの設定
シリアルを有効にすることで、ピンを制御できるようになります。

(3)実行プログラム
TestLed.java
import com.pi4j.io.gpio.GpioController;
import com.pi4j.io.gpio.GpioFactory;
import com.pi4j.io.gpio.GpioPinDigitalOutput;
import com.pi4j.io.gpio.PinState;
import com.pi4j.io.gpio.RaspiPin;

public class TestLed {

	/**
	 * @param args
	 */
	public static void main(String[] args) {

		try {

			System.out.println("処理開始");

			final GpioController gpio = GpioFactory.getInstance();
			final GpioPinDigitalOutput pin = gpio.provisionDigitalOutputPin(RaspiPin.GPIO_00, "MyLED", PinState.HIGH);

			pin.setShutdownOptions(true, PinState.LOW);
			Thread.sleep(1000);

			//消えた状態から始める
			pin.low();
			Thread.sleep(1000);

			//点灯
			pin.high();
			Thread.sleep(1000);

			//状態を変更(消灯)
			pin.toggle();
			Thread.sleep(1000);

			//状態を変更(点灯)
			pin.toggle();
			Thread.sleep(1000);

			//状態を変更(消灯)
			pin.toggle();
			Thread.sleep(1000);

			System.out.println("処理開始");

		} catch (InterruptedException e) {
			// TODO 自動生成された catch ブロック
			e.printStackTrace();
		}

	}

}
(4)実行結果
無事チカチカしました。

3、おわりに
無事光ました。自分の思った通りに物理的動作をすると、とてもうれしいです。
参考
Simple GPIO Control using Pi4J.
参考にしてプログラム作成しました。