gRPC-Webが正式リリースとのことなので、色々と試してみました。
grpc-web/net/grpc/gateway/examples/helloworld at master · grpc/grpc-web · GitHub
上記のように公式のサンプルもあるのですが、Javascript中心で書かれているので、typescript+goで試してみます。
また、簡単に修正しながら試せる環境となるように整備してあります。
ソース一式はGitHubにおいてます。
サンプルの説明
概要
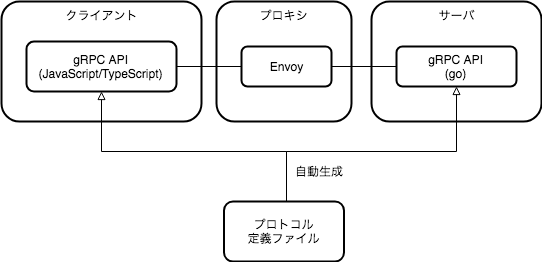
gRPC-Webを使用することで、プロトコル定義ファイルから自動生成したコードを使用してgRPCサーバとの通信ができるようになります。
REST APIでブリッジして通信する場合と比べ、統一的なフォーマットでAPIを記述できることがメリットです。

ただし、gRPC-WebのgRPCサーバのプロトコルが違うため、間にプロキシをはさむ必要があります。このあたりの経緯は、以下の文書に記載れています。
grpc/PROTOCOL-WEB.md at master · grpc/grpc · GitHub
将来的には直結できるようになるみたいですが、ブラウザの対応次第のようです。
今回のサンプルでは、プロキシに公式のチュートリアルでも使用されているEnvoyを使用しています。
Dockerイメージがあるので、変換方法を記載した設定ファイルを読み込んで起動するDockerファイルを作成します。
クライアントは何でもいいのですが、create-react-appを使用して、 React+TypeScriptで作成しています。

GitHub - wmonk/create-react-app-typescript: Create React apps using typescript with no build configuration.
サーバ側はgrpc-goのexampleのhelloworldサーバを流用してます。
grpc-go/main.go at master · grpc/grpc-go · GitHub
プロキシがDockerなので、クライアント・サーバもDockerで起動できるようにDocker Composeを使用しています。
また、create-react-appで作成したアプリはホットリロードができるので、サーバ側もfreshを使用して自動ビルドできるようにしています。
コンテナ側にホスト側のディスクをマウントしているので、VSCode等で変更したファイルをすぐにブラウザで確認することができます。
前提
以下がシステムにインストールされていることを想定しています。Macでしか試してませんが、要所を読み替えれば、他の環境でも動くと思います。
- macOS High Sierra
- Homebrew
- Docker
- Docker Compose
- Node.js 10.12.0
- create-react-app
- Go 1.11
ディレクトリ構成
hello-grpc-web
├── client
│   ├── Dockerfile
│   ├── package.json
│   ├── public
│   ├── src
│   │   ├── App.css
│   │   ├── App.test.tsx
│   │   ├── App.tsx # HelloWorldクライアント本体
│   │   ├── helloworld
│   │   │   ├── HelloworldServiceClientPb.ts # gRPC API(自動生成)
│   │   │   ├── helloworld_pb.d.ts           # gRPC API(自動生成)
│   │   │   └── helloworld_pb.js             # gRPC API(自動生成)
│   │   ├── index.css
│   │   ├── index.tsx
│   │   └── registerServiceWorker.ts
│   ├── tsconfig.json
│   ├── tsconfig.prod.json
│   ├── tsconfig.test.json
│   ├── tslint.json
│   └── yarn.lock
├── docker-compose.yml
├── gen.sh # protoc実行用シェル
├── protocol
│   └── helloworld.proto # プロトコル定義ファイル
├── proxy
│   ├── Dockerfile
│   └── envoy.yaml
└── server
    ├── Dockerfile
    ├── go.mod
    ├── go.sum
    ├── helloworld
    │   └── helloworld.pb.go # gRPC API(自動生成)
    ├── main.go
    └── tmp
プロトコル定義ファイル
まずは、今回使用するプロトコル定義ファイルです。
syntax = "proto3";

package helloworld;

service Greeter {
  rpc SayHello (HelloRequest) returns (HelloReply);
}

message HelloRequest {
  string name = 1;
}

message HelloReply {
  string message = 1;
}
初めてでも、なんとなく以下のような内容が読み取れると思います。
-
GreeterというサービスのSayHelloというAPIは、メッセージHelloRequestを渡すとメッセージHelloReplyが返る - メッセージ
HelloRequestは文字列nameを持つ - メッセージ
HelloReplyは文字列messageを持つ
このファイルをコンパイルしてgRPC APIをのソースをTypeScript用とgo用に作成します。
作成されたファイルを使用して、gRPCサーバではWorldというリクエストを送るとHello Worldが返ってくるサービスを実装します。
Protocol Buffersコンパイラのインストール
protoファイルから各言語ソースを自動生成するにはprotocというツールを使います。macではHomebrewでインストールできます。
$ brew install protobuf
$ protoc --version
libprotoc 3.6.1
protocolbuf
protocはProtocol Buffers用のツールなので、そのままではgRPCには対応していません。そのため、各言語用のプラグインをインストールする必要があります。
gRPC-Web用プラグイン
GitHubからgrpc-web取得してビルドとインストールします。
$ cd /tmp
$ git clone https://github.com/grpc/grpc-web
Cloning into 'grpc-web'...
remote: Enumerating objects: 2749, done.
remote: Total 2749 (delta 0), reused 0 (delta 0), pack-reused 2749
Receiving objects: 100% (2749/2749), 529.23 KiB | 631.00 KiB/s, done.
Resolving deltas: 100% (1411/1411), done.
$ cd grpc-web/
$ make install-plugin
cd "/tmp/grpc-web"/javascript/net/grpc/web && make install
g++ -std=c++11 -I/usr/local/include -pthread  -c -o grpc_generator.o grpc_generator.cc
g++ grpc_generator.o -L/usr/local/lib -lprotoc -lprotobuf -lpthread -ldl -o protoc-gen-grpc-web
install protoc-gen-grpc-web /usr/local/bin/protoc-gen-grpc-web
go用プラグイン
go getでインストールします。$GOPATH/binにインストールされるので、パスを通しておく必要があります。
$ go get -u google.golang.org/grpc
$ go get -u github.com/golang/protobuf/protoc-gen-go
$ export PATH=$PATH:$GOPATH/bin
$GOPATHを設定していない場合はgo envで確認したパスを指定します。
create-react-app
クライアント側のベースをcreate-react-appで作成します。
続けて、gRPC-Webを追加します。
$ create-react-app client --scripts-version=react-scripts-ts
$ cd client
$ yarn add grpc-web
プロトコル定義ファイルのコンパイル
色々とオプションが必要なのでシェルを作成しています。
ブラウザ用は、サービスとメッセージが別々に出力されます。サービスの定義にはimport_styleにtypescriptを指定したので、PureTypeScriptで出力されています。commonjs+dtsを指定すると.jsと.d.tsに分けて出力することもできます。
# !/bin/sh

CLIENT_OUTDIR=client/src/helloworld
SERVER_OUTPUT_DIR=server/helloworld

mkdir -p ${CLIENT_OUTDIR} ${SERVER_OUTPUT_DIR}

# protocol/helloworld.proto
#  --js_out => helloworld_pb.js
#  --grpc-web_out => helloworld_pb.d.ts
#  --grpc-web_out => HelloworldServiceClientPb.ts
#  --go_out => helloworld.pb.go
protoc --proto_path=protocol helloworld.proto \
    --js_out=import_style=commonjs:${CLIENT_OUTDIR} \
    --grpc-web_out=import_style=typescript,mode=grpcwebtext:${CLIENT_OUTDIR} \
    --go_out=plugins=grpc:${SERVER_OUTPUT_DIR}
クライアントのソース
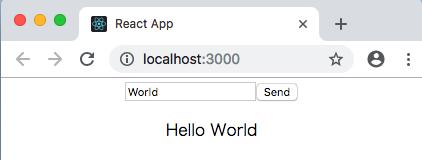
ボタンを押すとテキストボックスの文字でgRPCを呼び出す画面を作ります。
import * as React from "react";
import "./App.css";

import { HelloRequest } from "./helloworld/helloworld_pb";
import { GreeterClient } from "./helloworld/HelloworldServiceClientPb";

const initialState = {
  inputText: "World",
  message: ""
};
type State = Readonly<typeof initialState>;

class App extends React.Component<{}, State> {
  public readonly state: State = initialState;

  public render() {
    return (
      <div className="App">
        <input
          type="text"
          value={this.state.inputText}
          onChange={this.onChange}
        />
        <button onClick={this.onClick}>Send</button>
        <p>{this.state.message}</p>
      </div>
    );
  }

  private onClick = () => {
    const request = new HelloRequest();
    request.setName(this.state.inputText);

    const client = new GreeterClient("http://localhost:8080", {}, {});
    client.sayHello(request, {}, (err, ret) => {
      if (err || ret === null) {
        throw err;
      }
      this.setState({ message: ret.getMessage() });
    });
  };

  private onChange = (e: React.ChangeEvent<HTMLInputElement>) => {
    this.setState({ inputText: e.target.value });
  };
}

export default App;
gRPC-Webを使用しているのは以下の部分です。
  private onClick = () => {
    const request = new HelloRequest();
    request.setName(this.state.inputText);

    const client = new GreeterClient("http://localhost:8080", {}, {});
    client.sayHello(request, {}, (err, ret) => {
      if (err || ret === null) {
        throw err;
      }
      this.setState({ message: ret.getMessage() });
    });
  };
プロトコル定義ファイルから自動生成されたサービス(GreeterClient)とメッセージ(HelloRequest,HelloReply)を使い、gRPCの呼び出しと戻り値の取得を行います。
また、インポートしている自動生成されたソースですが、create-react-appのデフォルトで設定されているtslintの設定ではエラーになってしまうので検査対象から除外してます。
...
    "exclude": [
      ...
      "src/helloworld/*" // 追加
    ]
プロキシの設定
プロキシの受け口、接続先を設定するEnvoyの設定ファイルをyamlで作成します。
admin:
  access_log_path: /tmp/admin_access.log
  address:
    socket_address: { address: 0.0.0.0, port_value: 9901 }

static_resources:
  listeners:
  - name: listener_0
    address:
      socket_address: { address: 0.0.0.0, port_value: 8080 }
    filter_chains:
    - filters:
      - name: envoy.http_connection_manager
        config:
          codec_type: auto
          stat_prefix: ingress_http
          route_config:
            name: local_route
            virtual_hosts:
            - name: local_service
              domains: ["*"]
              routes:
              - match: { prefix: "/" }
                route:
                  cluster: greeter_service
                  max_grpc_timeout: 0s
              cors:
                allow_origin:
                - "*"
                allow_methods: GET, PUT, DELETE, POST, OPTIONS
                allow_headers: keep-alive,user-agent,cache-control,content-type,content-transfer-encoding,x-accept-content-transfer-encoding,x-accept-response-streaming,x-user-agent,x-grpc-web,grpc-timeout
                max_age: "1728000"
                expose_headers: custom-header-1,grpc-status,grpc-message
                enabled: true
          http_filters:
          - name: envoy.grpc_web
          - name: envoy.cors
          - name: envoy.router
  clusters:
  - name: greeter_service
    connect_timeout: 0.25s
    type: logical_dns
    http2_protocol_options: {}
    lb_policy: round_robin
    hosts: [{ socket_address: { address: server, port_value: 9090 }}]
色々と設定する項目がありますが、
listeners:にブラウザからの受け口の設定、clusters:にプロキシから接続するgRPCサーバの設定があります。
Envoyはコンテナとして起動するので、gRPCのアドレスはコンテナから見えるアドレスを指定する必要があります。
ここでは、Docker Composeで指定したgRPCサーバのコンテナ名を指定しています。
gRPCサーバのソース
package main

import (
	pb "hello-grpc-web/server/helloworld"
	"log"
	"net"

	"golang.org/x/net/context"
	"google.golang.org/grpc"
	"google.golang.org/grpc/reflection"
)

const (
	port = ":9090"
)

// server is used to implement helloworld.GreeterServer.
type server struct{}

// SayHello implements helloworld.GreeterServer
func (s *server) SayHello(ctx context.Context, in *pb.HelloRequest) (*pb.HelloReply, error) {
	return &pb.HelloReply{Message: "Hello " + in.Name}, nil
}

func main() {
	lis, err := net.Listen("tcp", port)
	if err != nil {
		log.Fatalf("failed to listen: %v", err)
	}
	s := grpc.NewServer()
	pb.RegisterGreeterServer(s, &server{})
	// Register reflection service on gRPC server.
	reflection.Register(s)
	if err := s.Serve(lis); err != nil {
		log.Fatalf("failed to serve: %v", err)
	}
}
gRPCのメソッドは、以下のようなインタフェースが自動生成されています。
関数の本体はこのインタフェースに沿って作成します。
// GreeterServer is the server API for Greeter service.
type GreeterServer interface {
	SayHello(context.Context, *HelloRequest) (*HelloReply, error)
}
gRPCの関数の本体は以下の部分です。
構造体として定義されているHelloRequestとHelloReplyを使用してサービスを実装します。
// server is used to implement helloworld.GreeterServer.
type server struct{}

// SayHello implements helloworld.GreeterServer
func (s *server) SayHello(ctx context.Context, in *pb.HelloRequest) (*pb.HelloReply, error) {
    return &pb.HelloReply{Message: "Hello " + in.Name}, nil
}
ちなみに、実行時のログは環境変数を設定すれば標準出力に出ます。
export GRPC_GO_LOG_VERBOSITY_LEVEL=99
export GRPC_GO_LOG_SEVERITY_LEVEL=info
ログをファイルに出力する場合はミドルウェアを使う必要があるようです。
Docker
まとめて起動できるようにDockerfileとDocker Composeの設定を行います。
FROM  node:10.12.0-slim

WORKDIR /client
COPY . .
RUN yarn install
CMD ["yarn", "start"]
EXPOSE 3000
FROM envoyproxy/envoy:latest
COPY ./envoy.yaml /etc/envoy/envoy.yaml
CMD /usr/local/bin/envoy -c /etc/envoy/envoy.yaml
EXPOSE 8080
FROM golang:1.11.1

ENV GO111MODULE=on

WORKDIR /go/src/hello-grpc-web/server
COPY . .
RUN go get github.com/pilu/fresh
CMD ["fresh"]
EXPOSE 9090
version: "3"
services:
  proxy:
    build: ./proxy
    ports:
      - "8080:8080"
    links:
      - "server"

  server:
    build: ./server
    volumes:
      - ./server/:/go/src/hello-grpc-web/server
    ports:
      - "9090:9090"
    container_name: "server"

  client:
    build: ./client
    volumes:
      - ./client/src:/client/src
      - ./client/public:/client/public
    ports:
      - "3000:3000"
ホットリロードされるようにvolumesでローカル側とコンテナでファイルを共有しています。
コンテナの起動は以下のコマンドです。
$ docker-compose up -d server proxy client
http://localhost:3000
にアクセスするとサンプルが動きます。
