6
6

Delete article

Deleted articles cannot be recovered.

Draft of this article would be also deleted.

Are you sure you want to delete this article?

More than 5 years have passed since last update.

お名前.comとさくらのVPSでネームサーバーを設定する

Posted at

この記事は、下記の記事を構成している記事のひとつです。
さくらのVPS と Debian 8 Jessie で独自ドメインのWebサイトを立ち上げる手順

・さくらのVPS(プラン512)
・Debian 8 Jessie(さくらのVPS カスタムインストール)
の環境を前提にしています。

お名前.comでネームサーバーを設定する

ドメインNaviにログインし、ネームサーバーの設定を行います。

nameserver1.png

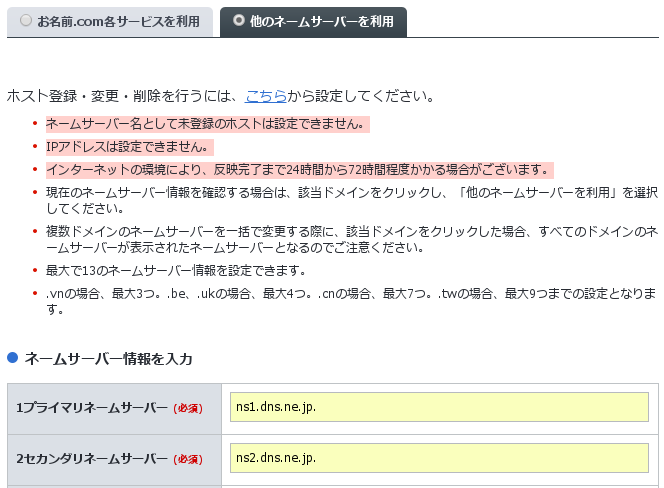
ネームサーバーは、さくらのVPSのネームサーバーを利用するので、「他のネームサーバーを利用」で、
プライマリネームサーバー:ns1.dns.ne.jp
セカンダリネームサーバー:ns2.dns.ne.jp
に設定します。

nameserver2.png

さくらのVPSでネームサーバーを設定する

ドメインメニューから「ネームサーバ新規登録」をクリックします。

nameserver3.png

新しいネームサーバの登録のドメイン名に、登録するドメインを入力し、「送信ボタン」を押下します。

nameserver4.png

ドメインメニューに戻ります。

nameserver5.png

ネームサーバとゾーンの管理の「ゾーン編集」ボタンを押下します。
nameserver6.png

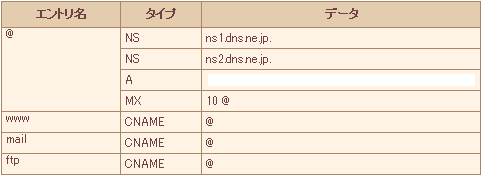
さくらのVPSのサーバのIPアドレスを入力して「送信する」ボタンを押下します。

nameserver7.png

設定完了です。「www」「mail」「ftp」のエントリ名が自動的に登録されています。
必要に応じて削除、修正して下さい。

nameserver8.png

6
6
0

Register as a new user and use Qiita more conveniently

  1. You get articles that match your needs
  2. You can efficiently read back useful information
  3. You can use dark theme
What you can do with signing up
6
6

Delete article

Deleted articles cannot be recovered.

Draft of this article would be also deleted.

Are you sure you want to delete this article?