はじめに
Xilinx Kria KV260はFPGAを搭載したエッジ向け開発ボードです。
このボードを利用して、じゃんけんロボットを作成しました。
1. 使用機材
開発にあたり、主に使用したものを記載します。
各種ケーブル類は省略します。
| 名前 | 説明 |
|---|---|
| Xilinx KV260 | $199で半年ほど前に購入 |
| Arduino UNO R3 | マニュピレータの制御に使用 |
| マニュピレータ | 秋月電子で購入 |
| ブレッドボード | Arduinoとマニュピレータの接続に使用 |
| PCディスプレイ | KV260の画面表示用 |
| マウス | KV260の操作用 |
| キーボード | KV260の操作用 |
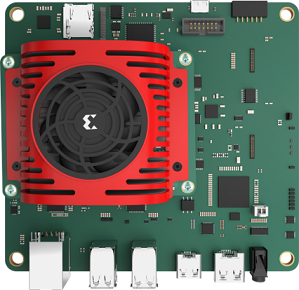
Kria KV260 (AMD Xilinx社のHPより借用)
Xilinx Kria KV260はビジョンAIスターターキットとして販売されており、
その名の通りビジョンアプリケーションの作成に特化しています。
FPGAとしてZynq Ultra Scale+ MPSoCが搭載されているのが最大の特徴です。
FPGAボードを搭載したSomボードと、USBやLANポート、HDMI/DPの映像出力などのIFを持つキャリアボードで構成されています。
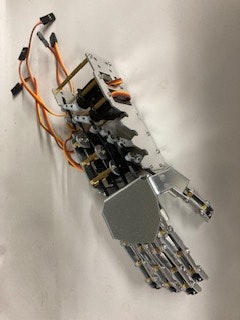
使用したマニュピレータは、秋月電子通商さんで購入しました。
https://akizukidenshi.com/catalog/g/gK-12184/
こちらの商品は自分で組み立てる必要があり、
私は3時間程度で組み立てることができました。
基本的に精密ドライバとニッパーがあれば組み立て可能ですが、
私の購入した個体は金属部品がうまく合わず、紙ヤスリで削って調整しました。
5個のサーボモータが5本の指にそれぞれ接続されており、モータの回転により指を操作します。
サーボモータは5VのPWM制御で行う仕様で、Arduinoのライブラリで制御できました。
2. システム全体像
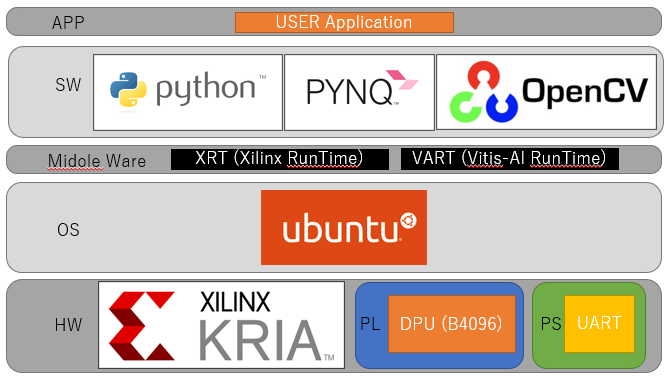
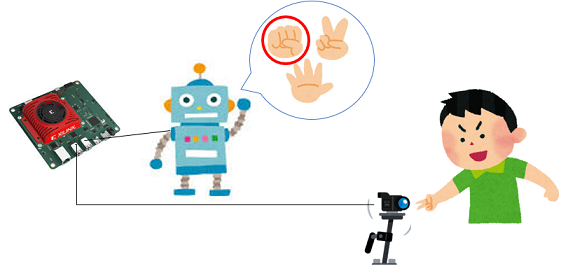
本システムでは、KV260で利用するOSとしてUbuntuを選択しました。
Xilinx MPSoCではPetalinuxを利用した開発も多いのですが、
PYNQやPython関連のライブラリの拡張性からUbuntuを選択しました。
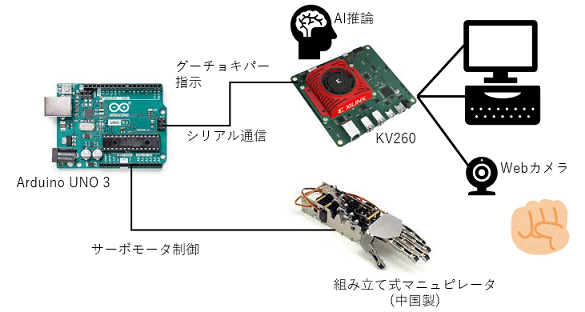
KV260はArduinoを介して、マニュピレータと接続します。
Arduinoとの通信にはUSBシリアル通信を用います。
その他KV260は、Webカメラ、マウス、キーボード、そしてディスプレイを接続します。
Webカメラの前に出した手を、KV260でAI推論を行い「グー」「チョキ」「パー」の判定を行います。
判定した人間の手に対して、それに勝つ手をマニュピレータで出力します。
PYNQとは
ここでPYNQについても、少しだけ解説します。
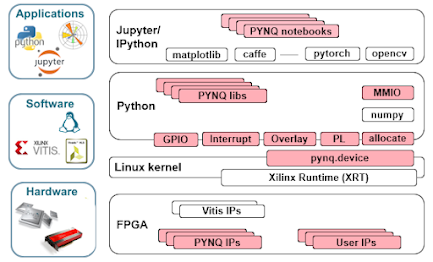
PYNQはXilinx FPGAの利用を容易にする、OSSのプロジェクトです。
Pythonとライブラリを利用して、PL(Program Logic:FPGAの回路部)とMPSoCの利点を活用します。
http://www.pynq.io/
簡単に言うと、Pythonなどのソフトウェアから、FPGAを活用しやすくするフレームワークです。
KV260の場合には、Ubuntu上でpythonのモジュールの一つとして使用することができます。
3. 開発スタート
それでは開発内容について、記載していきます。
3.1 KV260のメディア作成
まずは、KV260のブートメディアを作成します。
KV260向けのUbuntuイメージは、下記サイトから入手できます。
https://ubuntu.com/download/amd-xilinx
本開発ではKV260向けのUbuntu20.04.3を利用しました。
取得したイメージBalena Etcherで、microSDカードに書き込みます。
3.2 PYNQのインストール
microSDカードへの書き込みが終わったら、KV260に挿入し電源を入れます。
このとき、KV260にはディスプレイ、キーボードの他、インターネットに接続できるLANケーブルを繋ぎます。
起動後にターミナルを開き、下記コマンドを投入します。
git clone https://github.com/Xilinx/Kria-PYNQ.git
cd Kria-PYNQ/
sudo bash install.sh
これでUbuntu上にPYNQをインストールすることができました。
Pythonスクリプトから、PYNQ関連ライブラリをimportできるようになります。
3.3 使用したモデル
次に推論に使用したモデルについて説明します。
お手軽に試したかったので、モデルは下記のgitリポジトリをお借りしました。
https://github.com/lobster1989/Handsign-digits-classification-on-ZynqMP
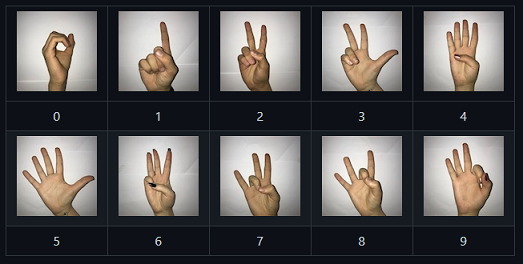
本モデルは、アメリカの指文字(手話)で0から9のハンドサインを識別するモデルです。
このモデルから0だと「グー」、2だと「チョキ」、5だと「パー」と判定することにしました。
また例えば4と判定された場合には「パー」とみなすなど、それぞれ近い手の形とみなすことにしました。
3.4 KV260の推論処理
続いて、推論部のPythonスクリプトです。
from ctypes import *from typing import List
import cv2
import numpy as np

from pynq_dpu import DpuOverlay

import os
import pathlib
import xir
import threading
import time
import sys
import argparse
import serial

overlay = DpuOverlay("dpu.bit") # AI推論で使用するDPUのビットストリームをoverlayする
selout = serial.Serial('/dev/ttyACM0', 115200) #シリアル通信用の設定

def preprocess_fn(image): #推論前処理の色空間変換
    imgGray     = cv2.cvtColor(image, cv2.COLOR_BGR2GRAY)
    img100x100 = cv2.resize(imgGray, dsize=(100,100))
    img100x100 = img100x100.reshape(100,100,1)
    img        = img100x100/255.0
    return img

def get_child_subgraph_dpu(graph: "Graph") -> List["Subgraph"]:
    assert graph is not None, "'graph' should not be None."
    root_subgraph = graph.get_root_subgraph()
    assert (root_subgraph is not None), "Failed to get root subgraph of input Graph object."
    if root_subgraph.is_leaf:
        return []
    child_subgraphs = root_subgraph.toposort_child_subgraph()
    assert child_subgraphs is not None and len(child_subgraphs) > 0
    return [
        cs
        for cs in child_subgraphs
        if cs.has_attr("device") and cs.get_attr("device").upper() == "DPU"
    ]

def junken_dec(num): #指文字を「グー」「チョキ」「パー」に分類
    '''
    G(Rock)    : 0
    P(Paper)   : 1
    C(scissors): 2
    '''
    hand = 0
    if (num == 0):
        hand = 0
    elif (num == 1):
        hand = 0
    elif (num == 2):
        hand = 2
    elif (num == 3):
        hand = 2
    elif (num == 4):
        hand = 1
    elif (num == 5):
        hand = 1
    elif (num == 6):
        hand = 2
    elif (num == 7):
        hand = 2
    elif (num == 8):
        hand = 2
    elif (num == 9):
        hand = 0

    if(hand == 0):
        return "G"
    elif(hand == 1):
        return "P"
    else:
        return "C"


def runDPU(id,dpu): #推論処理

    '''get tensor'''
    inputTensors = dpu.get_input_tensors()
    outputTensors = dpu.get_output_tensors()
    input_ndim = tuple(inputTensors[0].dims)
    output_ndim = tuple(outputTensors[0].dims)

    WIDTH  = 640
    HEIGHT = 480
    FPS = 10

    cap = cv2.VideoCapture(0) # カメラ映像取得処理
    cap.set(cv2.CAP_PROP_FOURCC, cv2.VideoWriter_fourcc('Y','U','Y','V'))
    cap.set(cv2.CAP_PROP_FRAME_WIDTH, WIDTH)
    cap.set(cv2.CAP_PROP_FRAME_HEIGHT, HEIGHT)
    cap.set(cv2.CAP_PROP_FPS, FPS)

    batchSize = input_ndim[0]

    print("batchSizi:", batchSize)

    count = 0
    now = 100
    while True: #推論ループ
        count += 1

        ret,frame = cap.read()

        frame480 = frame[0:480, 80:560] # 640x480の画像から480x480を切り出し

        img = preprocess_fn(frame480) # 推論部に合わせて100x100にリサイズと色空間変換

        # バッチ処理
        outputData = []
        inputData = []
        inputData = [np.empty(input_ndim, dtype=np.float32, order="C")]
        outputData = [np.empty(output_ndim, dtype=np.float32, order="C")]

        # 前処理
        imageRun = inputData[0]
        imageRun[0, ...] = img.reshape(input_ndim[1:])

        # 推論処理
        job_id = dpu.execute_async(inputData,outputData)
        dpu.wait(job_id)

        # 推論結果から指文字を識別
        out_put = np.argmax(outputData[0][0])

        # 指文字から「グー」「チョキ」「パー」識別
        hand = junken_dec(out_put)
        print("hand:", hand, "estimate:", out_put)

        # 画面出力
        cv2.putText(frame480, text=hand, org=(10, 40), fontFace=cv2.FONT_HERSHEY_SIMPLEX, fontScale=1.5, color=(0, 255, 0), thickness=2, lineType=cv2.LINE_4)
        cv2.imshow('hand', frame480)

        # 推論結果に変更があるときに、シリアル出力(Arduinoに出してほしい手を通知)
        if (out_put != now):
            now = out_put
            txtout = hand.encode('unicode-escape')
            selout.write(txtout)

        if cv2.waitKey(1) & 0xFF == ord('q'):
            break

    cap.release()
    cv2.destroyAllWindows()

def app(model):

    overlay.load_model(model)
    dpu = overlay.runner

    ''' preprocess images '''
    threadAll = []
    t1 = threading.Thread(target=runDPU, args=(id, dpu))
    threadAll.append(t1)

    time1 = time.time()
    for x in threadAll:
        x.start()
    for x in threadAll:
        x.join()
    time2 = time.time()
    timetotal = time2 - time1

    return


# only used if script is run as 'main' from command line
def main():

  # construct the argument parser and parse the arguments
  ap = argparse.ArgumentParser()
  ap.add_argument('-m', '--model',     type=str, default='model_dir/customcnn.xmodel', help='Path of xmodel. Default is model_dir/customcnn.xmodel')

  args = ap.parse_args()

  print ('Command line options:')
  print (' --model     : ', args.model)

  app(args.model)

if __name__ == '__main__':
  main()
参考にしたコードに加えた修正は以下です。
・カメラ映像を入力に変更。
・停止操作まで、ループ処理を行う。
・指文字の推論結果からグー・チョキ・パーを判定する。
・推論結果に変更があった場合に、シリアル通信でArduinoに通知する。
Arduinoの制御処理
続いて受信側のArduinoのコードです。
#include <Servo.h>

Servo servo5;
Servo servo6;
Servo servo9;
Servo servo10;
Servo servo11;

void setup() {
  Serial.begin(115200);
  servo5.attach(5); //親指
  servo6.attach(6); //人差し指
  servo9.attach(9); //中指
  servo10.attach(10); //薬指
  servo11.attach(11); //小指
}

void goo(){ //グーの形にする
  servo5.write(120);
  servo6.write(130);
  servo9.write(130);
  servo10.write(65);
  servo11.write(70);
}

void cho(){ //チョキの形にする
  servo5.write(120);
  servo6.write(90);
  servo9.write(90);
  servo10.write(65);
  servo11.write(70);
}

void par(){ //パーの形にする
  servo5.write(90);
  servo6.write(90);
  servo9.write(90);
  servo10.write(100);
  servo11.write(90);
}

void loop() {
  while (Serial.available() == 0) {}     //wait for data available
  int rd = Serial.read();  //read until timeout
  if (rd == 0x47) {        // グーを検出
    par();                 // パーを出す
  }
  else if (rd == 0x43) {   // チョキを検出
    goo();                 // グーを出す
  }
  else if (rd == 0x50) {   // パーを検出
    cho();                 // チョキを出す
  }
  delay(1);
}
シリアル通信の結果を受けて、どの手を出すかを決定しています。
グー・チョキ・パーのポーズを、5個のサーボモータを実現しています。
Servo.write()関数は、サーボモータに向いてほしい角度で指定します。
「親指・人差し指・中指」と「薬指・小指」は、マニュピレータ上で
サーボモータの取り付けている向きが逆になります。
そのため角度を小さくすると「親指・人差し指・中指」は伸ばす方向に、
「薬指・小指」は曲げる方向に動きます。
なお、パーのときに、全て90度とならないのは、
サーボモータの個性(マニュピレータの組み立ての甘さ)を吸収するためです。
4. 動作確認
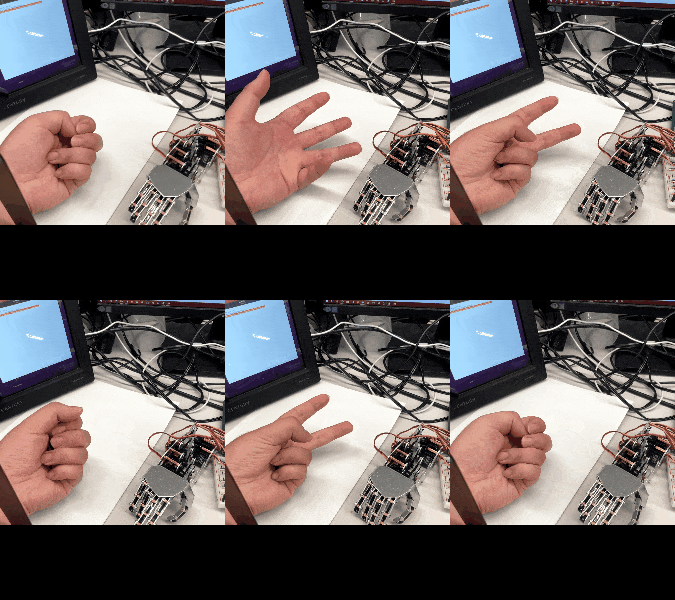
人間が出したグー・チョキ・パーの形から判断して、マニュピレータを動かすことができました。
最後ロボットが反応しないのは、ご愛嬌です。
これは認識精度に甘いところがあります。
最後に
FPGAデバイスは私のようなソフトウェア屋からすると取っ付きにくいイメージがありましたが、
この開発では比較的ストレスなく、割とRaspberry Piに近い感覚で進めることができました。
これは、PetalinuxではなくUbuntuを使用して開発できたことが、大きいと思います。
ちなみに開発当初は、Arduinoを使用せずにKV260で直接PWMでマニュピレータを制御する想定でした。
しかし、KV260でGPIOを利用するbitファイルと、AI推論を行うDPUを利用するbitファイルは
同時に使用できませんでした。(Overlayした場合には後勝ちになります。)
bitファイルのカスタマイズ、すなわちFPGAのカスタマイズをしないと、
DPUとGPIOなどのデバイスは同時利用できない様です、ぐぬぬ。
今後の課題ですね。
最後まで読んでくださって、ありがとうございます!
