環境
さくらのVPS
お名前ドットコム
ubuntu18.04
ubuntuのユーザー名:ubuntu(自分のユーザー名に合わせてください)
SSH接続ソフト:Teraterm(コピペ使える、えらい)
python3.6.9
nginx/1.14.0
とりあえず最初の呪文。とりあえずインストールするgit
sudo apt update
sudo apt upgrade
sudo apt install git
python環境を整える
pythonのインストール
sudo apt install python3-pip python3-dev build-essential libssl-dev libffi-dev python3-setuptools

# 確認
python3.6 -V
pythonの仮想環境を作成
sudo apt install python3-venv

# 環境ディレクトリ作成
mkdir ~/myproject
cd ~/myproject

# 仮想環境作成と起動
python3.6 -m venv myprojectenv
source myprojectenv/bin/activate
# 解除方法する方法は、【deactivate】
Flaskとuwsgiのインストール
pip install wheel
pip install uwsgi flask
サンプル用アプリを作成する
sudo nano ~/myproject/myproject.py
from flask import Flask
app = Flask(__name__)

@app.route("/")
def hello():
    return "<h1 style='color:#ff0000'>Hello Flask!</h1>"

if __name__ == "__main__":
    app.run(host='0.0.0.0')
さくらVPSのネットワーク情報からカスタムポート5000を開ける。
python myproject.py
http://"your_ipadress":5000にアクセス
sudo nano ~/myproject/wsgi.py
from myproject import app

if __name__ == "__main__":
    app.run()
uwsgiのテスト
uwsgi --socket 0.0.0.0:5000 --protocol=http -w wsgi:app
http://"your_ipadress":5000へアクセスして確認
uWSGIの構成ファイルの作成
deactivate
sudo nano ~/myproject/myproject.ini
[uwsgi]
module = wsgi:app

master = true
processes = 5

socket = myproject.sock
chmod-socket = 660
vacuum = true

die-on-term = true
systemdを作成
sudo nano /etc/systemd/system/myproject.service
[Unit]
Description=uWSGI instance to serve myproject
After=network.target

[Service]
User=ubuntu
Group=www-data
WorkingDirectory=/home/ubuntu/myproject
Environment="PATH=/home/ubuntu/myproject/myprojectenv/bin"
ExecStart=/home/ubuntu/myproject/myprojectenv/bin/uwsgi --ini myproject.ini
systemdの起動・自動起動・ステータスの確認
sudo systemctl start myproject
sudo systemctl enable myproject
sudo systemctl status myproject
activate (running)と出てればOK
※【停止】sudo systemctl stop myproject
※【自動起動停止】sudo systemctl disable myproject
Nginxの起動と設定
sudo apt install -y nginx
確認
ls /etc/nginx/sites-available/
>>default とでてればインストールファイルできてるのでOK

sudo nano /etc/nginx/sites-available/myproject
server {
    listen 80;
    server_name <your_ipadress> www.<your_ipadress>;

    location / {
        include uwsgi_params;
        uwsgi_pass unix:/home/ubuntu/myproject/myproject.sock;
    }
}
作成したNginxサーバーブロック構成を有効にするには、ファイルをsites-enabledディレクトリにリンクします。
sudo ln -s /etc/nginx/sites-available/myproject /etc/nginx/sites-enabled
テスト:sudo nginx -t
最後にtest is successfulとでてればおk
nginxの再起動
sudo systemctl restart nginx
サイトの確認
http://"your_ipadress"
LOG系の確認
sudo less /var/log/nginx/error.log:Nginxエラーログを確認します。
sudo less /var/log/nginx/access.log:Nginxアクセスログを確認します。
sudo journalctl -u nginx:Nginxプロセスのログを確認します。
sudo journalctl -u myproject:FlaskアプリのuWSGIログを確認します。
ドメインの設定
お名前ドットコムの利用
【ドメインの取得・ネームサーバーの設定】
お名前ドットコムにログイン
ドメイン取得
ドメインの詳細からネームサーバーの登録
その他から、
ネームサーバー1:ns1.dns.ne.jp
ネームサーバー2:ns2.dns.ne.jp
を設定する。
完了。
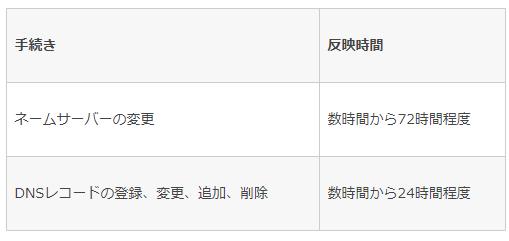
1日後?とかに反映する??たぶん
情報あった
【ドメインの設定】
ドメインNaviにアクセス
「ドメイン設定」→「DNS関連機能の設定」
対象ドメインを選択して次へ
「DNSレコード設定を利用する」
必要項目を入力して「追加」をクリックすると下部に追加。
【IPの設定】
以下の手順に沿ってIPを登録する
https://www.onamae.com/guide/p/70
サーバー側の設定
sudo nano /etc/nginx/sites-available/myproject
your_ipadressをyour_domainに。
要は、設定した独自ドメインに書き換える。
server {
    listen 80;
    server_name <your_DOMAIN> www.<your_DOMAIN>;

    location / {
        include uwsgi_params;
        uwsgi_pass unix:/home/ubuntu/myproject/myproject.sock;
    }
}
HTTPS化する(LetsEncript)
sudo apt-get install software-properties-common
sudo add-apt-repository ppa:certbot/certbot
sudo apt install python-certbot-nginx

sudo certbot --nginx -d your_domain -d www.your_domain
>>outputは以下の分
Please choose whether or not to redirect HTTP traffic to HTTPS, removing HTTP access.
-------------------------------------------------------------------------------
1: No redirect - Make no further changes to the webserver configuration.
2: Redirect - Make all requests redirect to secure HTTPS access. Choose this for
new sites, or if you're confident your site works on HTTPS. You can undo this
change by editing your web server's configuration.
-------------------------------------------------------------------------------
Select the appropriate number [1-2] then [enter] (press 'c' to cancel):
ENTERを選択。
構成が更新され、Nginxがリロードして新しい設定を取得します。
certbotプロセスが成功し、証明書が保存されている場所を通知するメッセージが表示されます。
IMPORTANT NOTES:
 - Congratulations! Your certificate and chain have been saved at:
   /etc/letsencrypt/live/your_domain/fullchain.pem
   Your key file has been saved at:
   /etc/letsencrypt/live/your_domain/privkey.pem
   Your cert will expire on 2018-07-23. To obtain a new or tweaked
   version of this certificate in the future, simply run certbot again
   with the "certonly" option. To non-interactively renew *all* of
   your certificates, run "certbot renew"
 - Your account credentials have been saved in your Certbot
   configuration directory at /etc/letsencrypt. You should make a
   secure backup of this folder now. This configuration directory will
   also contain certificates and private keys obtained by Certbot so
   making regular backups of this folder is ideal.
 - If you like Certbot, please consider supporting our work by:

   Donating to ISRG / Let's Encrypt:   https://letsencrypt.org/donate
   Donating to EFF:                    https://eff.org/donate-le
NGINXのHTTPを停止
sudo ufw delete allow 'Nginx HTTP'
確認
https://"your-domain"
結論
意外と簡単。
LINEBOT等はHttps化が必須なので、これで作れますね。
管理用のコマンドとかもまとめておくといいかもです。