はじめに
モダンなアプリでよく使われている印象のBottomNavigation。
AndroidStudioのテンプレートを使う簡単な方法もありますが、今回は勉強のために一から作ってみます。
コードはGithubに載せています。GitHub - orimomo/bottom-navigation-test
環境
- macOS: 10.14.1
- Android Studio: 3.4
- Kotlin: 1.3.21
- Support Library: AndroidX
手順
依存関係の設定
以下を追加します。
dependencies {
    // MaterialComponentsのBottomNavigationを使うため
    implementation "com.google.android.material:material:1.1.0-alpha06"

    // Navigationを使うため
    def nav_version = '2.0.0'
    implementation "androidx.navigation:navigation-fragment-ktx:$nav_version"
    implementation "androidx.navigation:navigation-ui-ktx:$nav_version"
}
BottomNavigationの実装
まずはBottomNavigationを動くようにします。
activity_mainにBottomNavigationの要素を追加します。
<FrameLayout
        xmlns:android="http://schemas.android.com/apk/res/android"
        xmlns:tools="http://schemas.android.com/tools"
        xmlns:app="http://schemas.android.com/apk/res-auto"
        android:layout_width="match_parent"
        android:layout_height="match_parent"
        tools:context=".MainActivity">

    <com.google.android.material.bottomnavigation.BottomNavigationView
            android:id="@+id/bottom_navigation"
            android:layout_width="match_parent"
            android:layout_height="wrap_content"
            android:layout_gravity="bottom"
            android:background="?android:attr/windowBackground"
            app:menu="@menu/bottom_navigation_menu"/>
</FrameLayout>
android:backgroundの他にもapp:itemIconTintやapp:itemTextColorを指定することで見た目を変えることができます。
次はapp:menuに設定しているファイルを作っていきます。
menuパッケージを追加し、その中にbottom_navigation_menuファイルを追加します。
<?xml version="1.0" encoding="utf-8"?>
<menu xmlns:android="http://schemas.android.com/apk/res/android">
    <item
            android:id="@+id/navi_smile"
            android:icon="@drawable/ic_insert_emoticon_black_24dp"
            android:title="スマイル"/>
    <item
            android:id="@+id/navi_pets"
            android:icon="@drawable/ic_pets_black_24dp"
            android:title="ペット"/>
    <item
            android:id="@+id/navi_sun"
            android:icon="@drawable/ic_wb_sunny_black_24dp"
            android:title="太陽"/>
    <item
            android:id="@+id/navi_flight"
            android:icon="@drawable/ic_airplanemode_active_black_24dp"
            android:title="飛行機"/>
</menu>
android:iconに指定するリソースは、drawableパッケージに事前にVectorAssetとして作成したものを使っています。
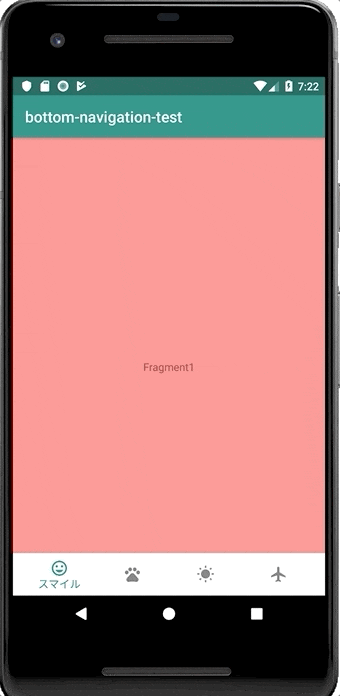
ここでビルドするとBottomNavigationが表示され、タブの切り替えができるようになっていると思います。

Navigationの実装
BottomNavigationのボタンを押すとそれぞれに違うFragmentを表示するようにしたいと思います。
表示させるFragmentのlayoutファイルとclassファイルをそれぞれ4つ作っておきます。
<androidx.constraintlayout.widget.ConstraintLayout
        xmlns:android="http://schemas.android.com/apk/res/android"
        xmlns:app="http://schemas.android.com/apk/res-auto"
        android:layout_width="match_parent"
        android:layout_height="match_parent"
        android:background="@color/pink">

    <TextView
            android:id="@+id/textView1"
            android:text="Fragment1"
            android:layout_width="wrap_content"
            android:layout_height="wrap_content"
            app:layout_constraintStart_toStartOf="parent"
            app:layout_constraintTop_toTopOf="parent"
            app:layout_constraintEnd_toEndOf="parent"
            app:layout_constraintBottom_toBottomOf="parent"/>
</androidx.constraintlayout.widget.ConstraintLayout>
class Fragment1 : Fragment() {
    override fun onCreateView(inflater: LayoutInflater, container: ViewGroup?, savedInstanceState: Bundle?): View? {
        super.onCreateView(inflater, container, savedInstanceState)
        return  inflater.inflate(R.layout.fragment_1, container, false)
    }
}
activity_mainに以下を追加します。
<fragment
    android:id="@+id/nav_host_fragment"
    android:layout_height="match_parent"
    android:layout_width="match_parent"
    android:name="androidx.navigation.fragment.NavHostFragment"
    app:navGraph="@navigation/navigation_graph"/>
app:navGraphに設定しているファイルを作ります。
navigationパッケージを追加し、その中にnavigation_graphファイルを追加します。
<navigation xmlns:android="http://schemas.android.com/apk/res/android"
            xmlns:app="http://schemas.android.com/apk/res-auto"
            android:id="@+id/navigation_graph"
            app:startDestination="@id/navi_smile">

    <fragment android:id="@+id/navi_smile"
              android:name="com.example.bottom_navigation_test.Fragment1"
              android:label="Fragment1"/>

    <fragment android:id="@+id/navi_pets"
              android:name="com.example.bottom_navigation_test.Fragment2"
              android:label="Fragment2"/>

    <fragment android:id="@+id/navi_sun"
              android:name="com.example.bottom_navigation_test.Fragment3"
              android:label="Fragment3"/>

    <fragment android:id="@+id/navi_flight"
              android:name="com.example.bottom_navigation_test.Fragment4"
              android:label="Fragment4"/>
</navigation>
各Fragmentに設定するidは、先程bottom_navigation_menuファイルで指定したidと同じものを対応させて使う必要がある点に注意が必要です。
最後にMainActivityでBottomNavigationとNavigationを紐づけて完成です。
class MainActivity : AppCompatActivity() {
    override fun onCreate(savedInstanceState: Bundle?) {
        super.onCreate(savedInstanceState)
        setContentView(R.layout.activity_main)

        val navController = findNavController(R.id.nav_host_fragment)
        setupWithNavController(bottom_navigation, navController)
    }
}
さいごに
リップル付きのBottomNavigationが思ったよりも簡単に実装できました◎
ただ今回の実装だとタブを切り替えるとFragmentも再生成されてしまうので、次回はFragmentの状態を保持できる実装を試してみたいと思います。
参考
Bottom navigation - Material Design
Getting Started - Material Components for Android
Navigation + BottomNavigationViewでFragmentの状態を残す – Kenji Abe – Medium
BottomNavigationView と Navigationを一緒に使う - Qiita