Azure Deployment Environments (ADE) とは、開発チームがセルフサービスで素早くアプリ開発環境を準備できるサービスです。プラットフォームエンジニアがIaCテンプレートをカタログ化しておくことで、開発者は開発者ポータルを通じてインフラ環境をボタンポチで構築できるため、開発者の認知負荷軽減!というような効果が期待できます。
ADEで使用できるIaCとしてはArmTemplateとBicepがネイティブでサポートされてます。TerraformやPulumiはカスタムコンテナイメージを使用するようです。
Terraformユーザーも多いと思うので、今回はこちらを試してみました💪
ADEの作成
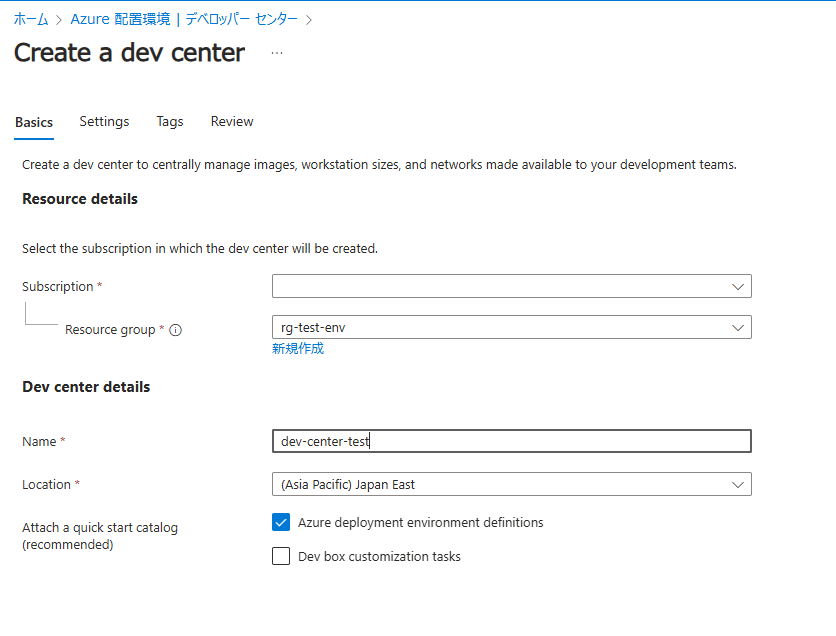
まずはADEをデプロイしていきます。以下のクイックスタート通りに進めます。
-
ポータルで [Azure Deployment Environments] を検索
-
デベロッパー センターから [作成] を選択
-
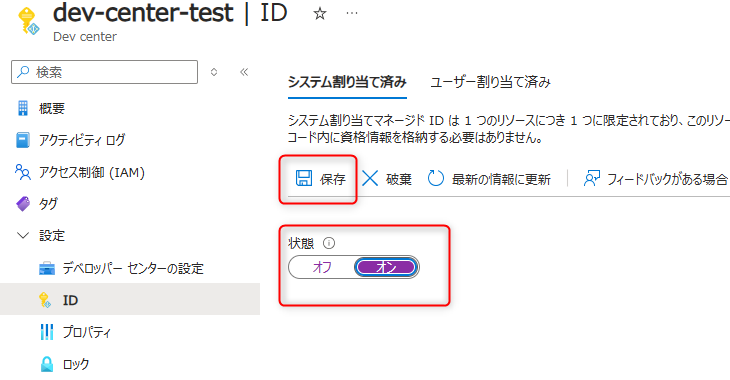
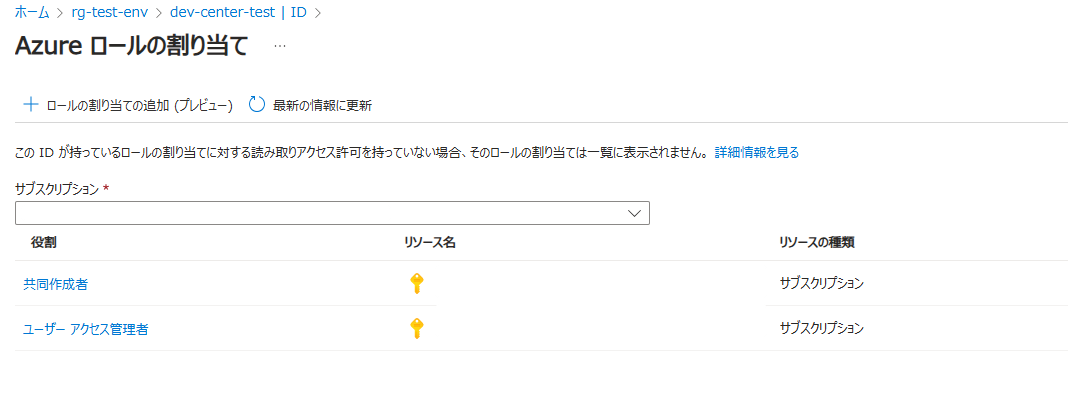
[Azureロールの割当] から [ロール割当の追加] → [サブスクリプションスコープ] で [共同作成者] と[ユーザーアクセス管理者] を割り当て
-
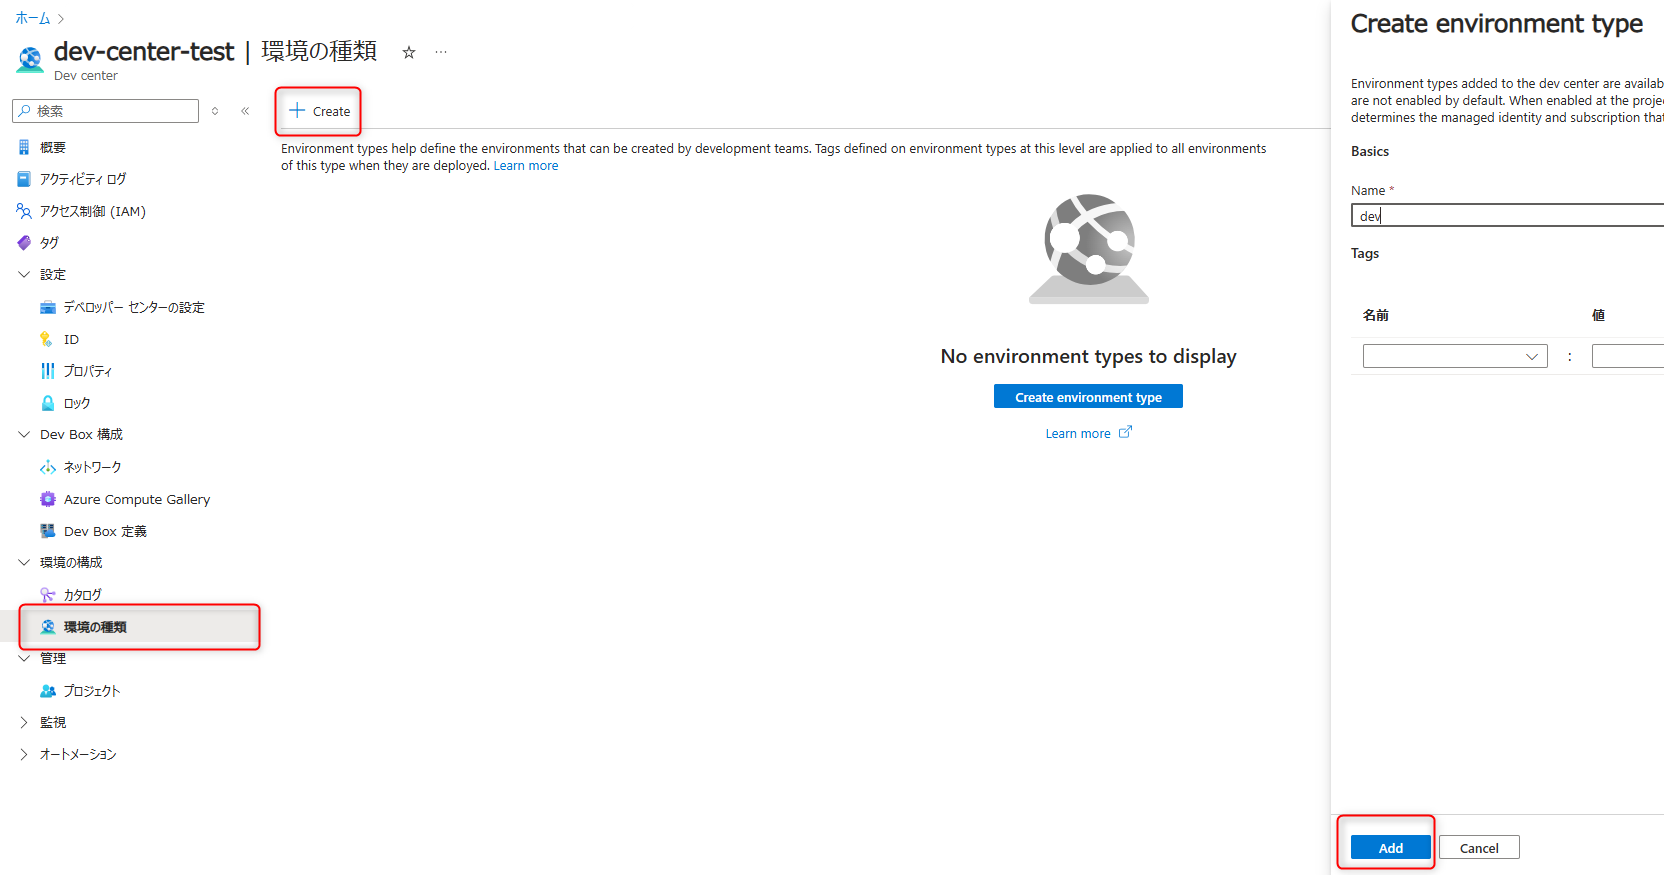
[環境の種類] から [Create environment type] →
devと入力して作成
この後の手順にはなりますが、Environment type 毎にデプロイ対象のサブスクリプションを選択できるので、ステージや本番、開発などといった分け方が想定できます。
-
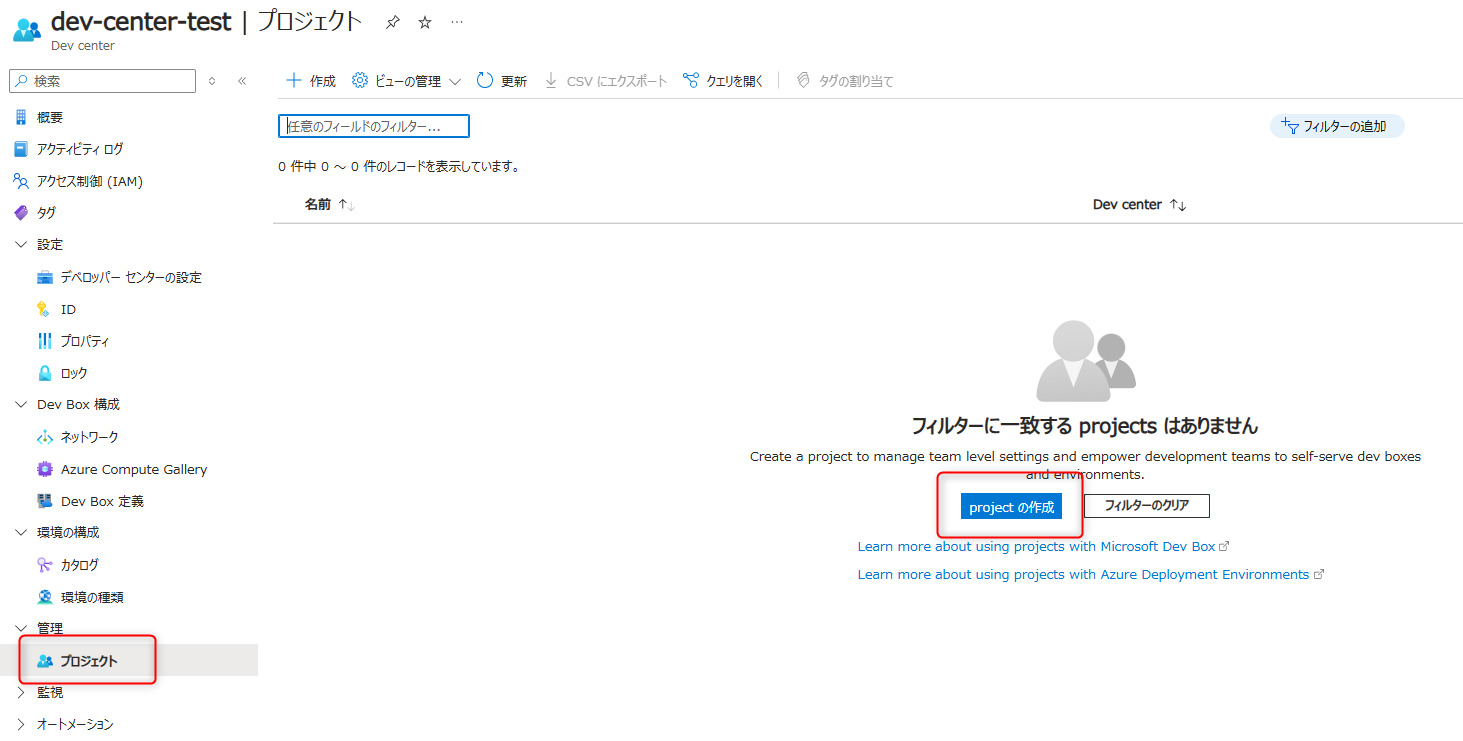
続いて、[管理] → [プロジェクト] からプロジェクトを作成
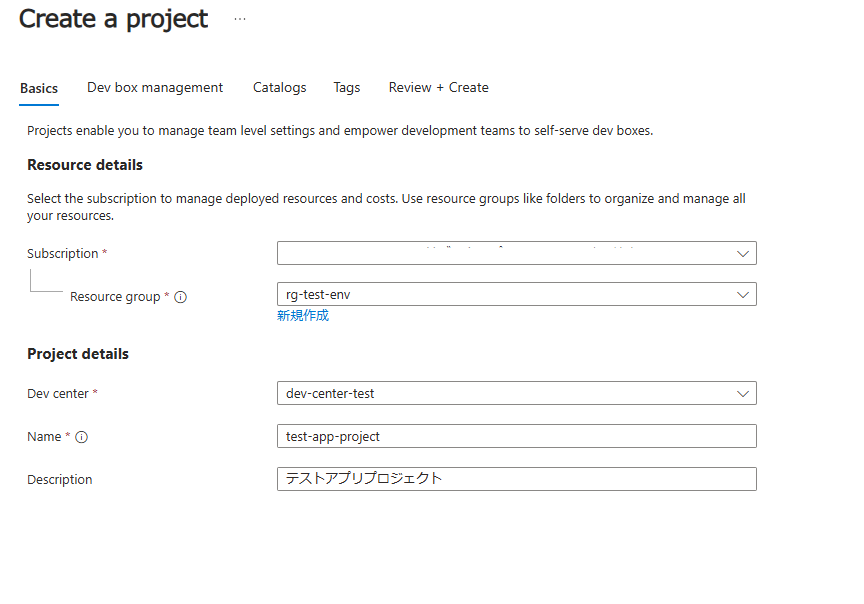
今回は「テストアプリプロジェクト」などとしておきます。その他はデフォルトで作成
-
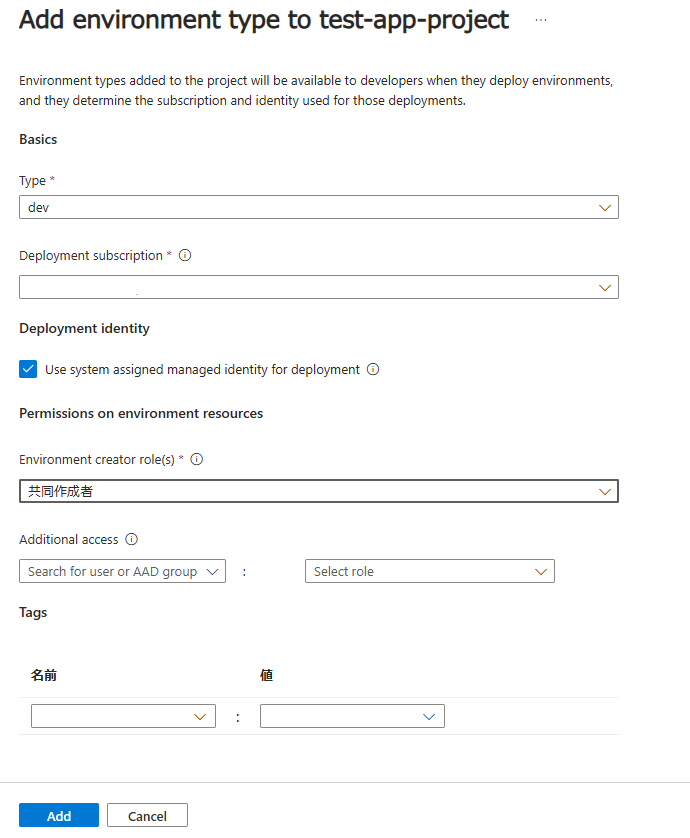
作成したプロジェクトに移動して、[環境の種類] から「Add environment type」を選択
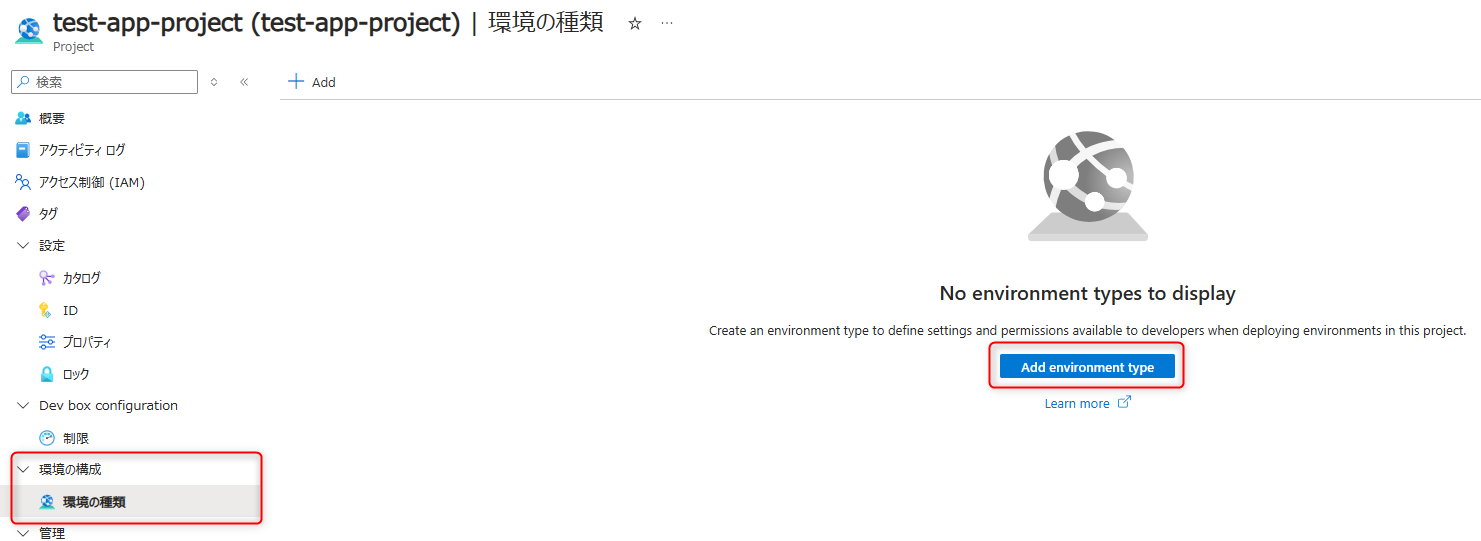
ここでは先程作成した、environment typeを選択し、デプロイ対象のサブスクリプションを選択します。また、Permissions on environment resourcesでは「共同作成者」(開発者ポータルからボタンポチした際の権限)を指定し、「追加のアクセス」(同時に権限を渡したい人)は無しにしておきます。
カスタムコンテナイメージの作成
前述の通り、Terraformの場合はカスタムコンテナイメージを作成する必要があります。以下のドキュメントを参考にやってみます。
今回はTerraformでAzure App ServiceとAzure MySQL データベースを作成します。
ドキュメントに記載があるADE構成に必要なファイルは以下の通りです。
-
environment.yaml(環境定義ファイル) azuredeploy.tfDockerfile-
deploy.sh(デプロイ時に実行されるスクリプト) -
delete.sh(環境削除時に実行されるスクリプト)
ディレクトリ構成としては以下のようになります。
.
├── Dockerfile
├── azuredeploy.tf
├── environment.yaml
└── scripts
    ├── delete.sh
    └── deploy.sh
以下内容
FROM mcr.microsoft.com/deployment-environments/runners/core:latest

RUN wget -O terraform.zip https://releases.hashicorp.com/terraform/1.7.5/terraform_1.7.5_linux_amd64.zip
RUN unzip terraform.zip && rm terraform.zip
RUN mv terraform /usr/bin/terraform

COPY scripts/* /scripts/
RUN find /scripts/ -type f -iname "*.sh" -exec dos2unix '{}' '+'
RUN find /scripts/ -type f -iname "*.sh" -exec chmod +x {} \;
provider "azurerm" {
  features {}
}

variable "db_password" {
  type = string
}

variable "resource_group_name" {
  type = string
}

data "azurerm_resource_group" "rg" {
  name = var.resource_group_name
}

resource "azurerm_app_service_plan" "asp" {
  name                = "asp-terraform"
  location            = data.azurerm_resource_group.rg.location
  resource_group_name = data.azurerm_resource_group.rg.name
  kind                = "Linux"
  reserved            = true

  sku {
    tier = "Standard"
    size = "S1"
  }
}

resource "azurerm_app_service" "as" {
  name                = "as-terraform"
  location            = data.azurerm_resource_group.rg.location
  resource_group_name = data.azurerm_resource_group.rg.name
  app_service_plan_id = azurerm_app_service_plan.asp.id

  site_config {
    linux_fx_version = "DOCKER|nginx"
  }
}

resource "azurerm_mysql_flexible_server" "mysql" {
  name                = "mysql-terraform"
  location            = data.azurerm_resource_group.rg.location
  resource_group_name = data.azurerm_resource_group.rg.name
  sku_name            = "GP_Standard_D2ds_v4"
  version             = "5.7"
  administrator_login = "mysqladmin"
  administrator_password = var.db_password

  storage {
    size_gb = 20
  }

  high_availability {
    mode = "ZoneRedundant"
  }

  tags = {
    environment = "dev"
  }
}
name: WebApp
version: 1.0.0
summary: Azure Web App Environment
description: Deploys a web app in Azure without a datastore
runner: "<REGISTRY_NAME>.azurecr.io/<REPOSITORY_NAME>:<TAG>"
templatePath: azuredeploy.tf

# 実行時に使用するパラメータ
parameters:
  - id: db_password
    name: db_password
    description: 'The password for the database'
    type: string
    required: true
#!/bin/bash

set -e

echo "Signing into Azure using MSI"
while true; do
    az login --identity --allow-no-subscriptions --only-show-errors --output none && {
        echo "Successfully signed into Azure"
        break
    } || sleep 5
done

EnvironmentState="$ADE_STORAGE/environment.tfstate"
EnvironmentPlan="/environment.tfplan"
EnvironmentVars="/environment.tfvars.json"

echo "$ADE_OPERATION_PARAMETERS" > $EnvironmentVars

export TF_VAR_resource_group_name=$ADE_RESOURCE_GROUP_NAME
export ARM_USE_MSI=true
export ARM_CLIENT_ID=$ADE_CLIENT_ID
export ARM_TENANT_ID=$ADE_TENANT_ID
export ARM_SUBSCRIPTION_ID=$ADE_SUBSCRIPTION_ID

echo -e "\n>>>Deploying Terraform...\n"
terraform init
terraform plan -no-color -compact-warnings -refresh=true -lock=true -state=$EnvironmentState -out=$EnvironmentPlan -var-file="$EnvironmentVars"
terraform apply -no-color -compact-warnings -auto-approve -lock=true -state=$EnvironmentState $EnvironmentPlan

tfOutputs=$(terraform output -state=$EnvironmentState -json)
# Convert Terraform output format to ADE format.
tfOutputs=$(jq 'walk(if type == "object" then
            if .type == "bool" then .type = "boolean"
            elif .type == "list" then .type = "array"
            elif .type == "map" then .type = "object"
            elif .type == "set" then .type = "array"
            elif (.type | type) == "array" then
                if .type[0] == "tuple" then .type = "array"
                elif .type[0] == "object" then .type = "object"
                elif .type[0] == "set" then .type = "array"
                else .
                end
            else .
            end
        else .
        end)' <<< "$tfOutputs")

echo "{\"outputs\": $tfOutputs}" > $ADE_OUTPUTS
#!/bin/bash

set -e

echo "Signing into Azure using MSI"
while true; do
    az login --identity --allow-no-subscriptions --only-show-errors --output none && {
        echo "Successfully signed into Azure"
        break
    } || sleep 5
done

EnvironmentState="$ADE_STORAGE/environment.tfstate"
EnvironmentPlan="/environment.tfplan"
EnvironmentVars="/environment.tfvars.json"

echo "$ADE_OPERATION_PARAMETERS" > $EnvironmentVars

export TF_VAR_resource_group_name=$ADE_RESOURCE_GROUP_NAME
export ARM_USE_MSI=true
export ARM_CLIENT_ID=$ADE_CLIENT_ID
export ARM_TENANT_ID=$ADE_TENANT_ID
export ARM_SUBSCRIPTION_ID=$ADE_SUBSCRIPTION_ID

echo -e "\n>>>Destroy...\n"
terraform init
terraform plan -no-color -compact-warnings -destroy -refresh=true -lock=true -state=$EnvironmentState -out=$EnvironmentPlan -var-file="$EnvironmentVars"
terraform apply -no-color -compact-warnings -auto-approve -lock=true -state=$EnvironmentState $EnvironmentPlan

tfOutputs=$(terraform output -state=$EnvironmentState -json)
# Convert Terraform output format to ADE format.
tfOutputs=$(jq 'walk(if type == "object" then
            if .type == "bool" then .type = "boolean"
            elif .type == "list" then .type = "array"
            elif .type == "map" then .type = "object"
            elif .type == "set" then .type = "array"
            elif (.type | type) == "array" then
                if .type[0] == "tuple" then .type = "array"
                elif .type[0] == "object" then .type = "object"
                elif .type[0] == "set" then .type = "array"
                else .
                end
            else .
            end
        else .
        end)' <<< "$tfOutputs")

echo "{\"outputs\": $tfOutputs}" > $ADE_OUTPUTS
environment.yamlで定義したパラメーターはADE実行時にADE_OPERATION_PARAMETERSという環境変数にJson形式で格納されています。それを"environment.tfvars.json"に出力し、terraform plan実行時にパラメータファイルとして指定します。
また、実行時のパラメータで指定できないリソースグループ名などはADEの環境変数から取得して、TF_VAR_××で設定しています。※詳細は以下のドキュメントをご確認ください。
これらをコンテナイメージにビルドしてACR (Azure Container Registry) にプッシュし、environment.yamlのrunner:"<REGISTRY_NAME>.azurecr.io/<REPOSITORY_NAME>:<TAG>” を正しく書き換えます。ACRの作成方法ついてもドキュメントに記載があるのでここでは割愛します🙏
カタログを追加する
続いてカタログを追加していきます。※手順としては以下の箇所↓
ここで追加したカタログが開発者ポータルからデプロイできるようになります。
カタログはAzure Repos リポジトリまたは GitHub リポジトリを指定して作成します。その為、さきほど作成したIaCもろもろをGitHubレポジトリにプッシュしておきます。
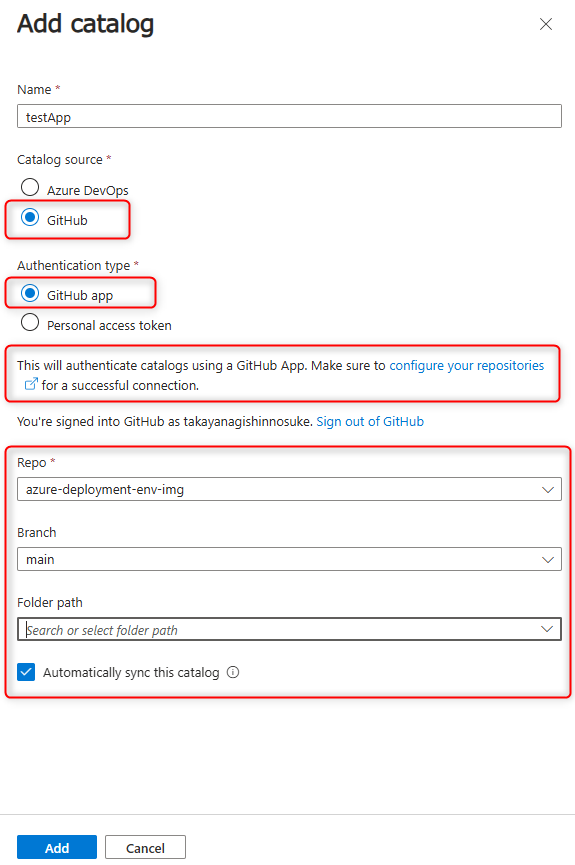
認証方式にはPAT (Personal access tokens)かMicrosoft Dev Centerアプリのどちらかが選べますが、今回はMicrosoft Dev Centerアプリを使用します。
Azureポータルで作成したプロジェクトを選択し、[カタログ] → [ Add ] からカタログを追加していきます。
レポジトリにMicrosoft Dev Centerアプリがインストールされると、選択するレポジトリとブランチ、パスの指定が可能になります。
ちなみに、Automatically sync this catalogのチェックを入れていると、レポジトリとの同期が定期的に行われるようですが、syncボタンを押すことで手動同期させることも可能です。

開発者ポータルにアクセスしてボタンポチ
追加したカタログをデプロイするべく、開発者ポータルにアクセスしてボタンポチしてみます。
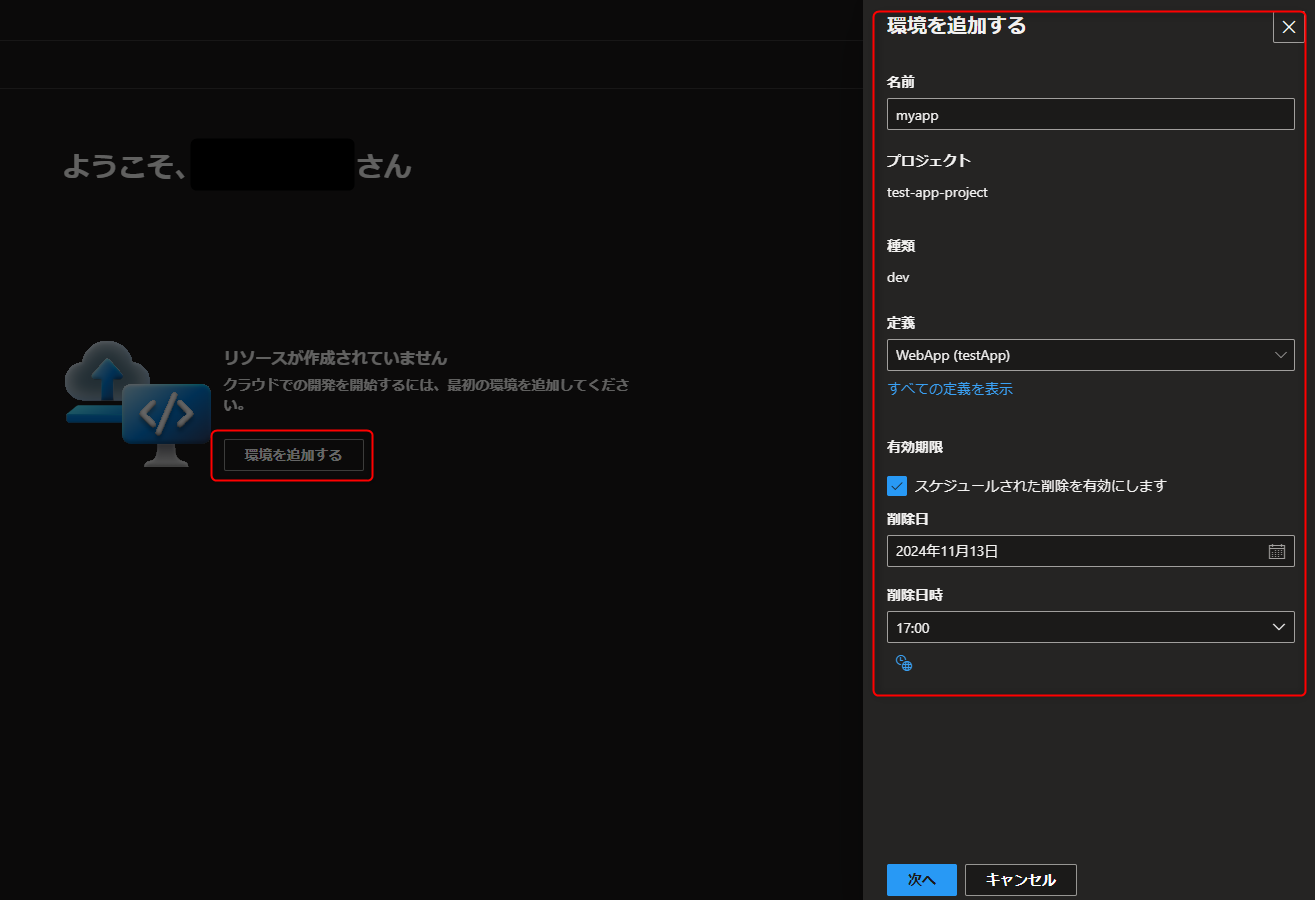
[環境を追加する] から名前と作成したカタログを選択します。※スケジュール設定をしておくと環境削除が自動で実行されます。便利!🙌
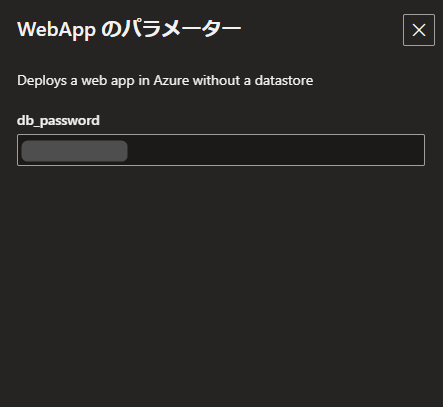
environment.yaml で定義したパラメータはここで入力をおこないます。
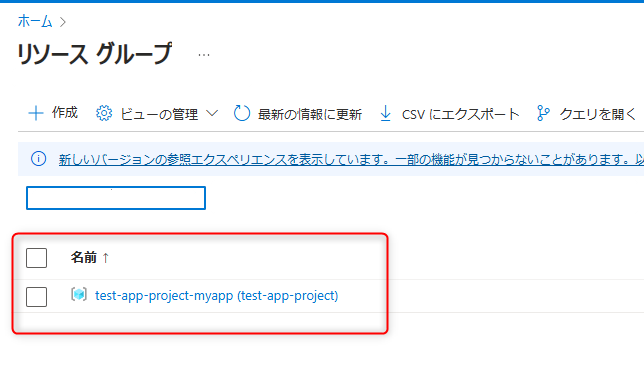
環境の作成を実行し、しばらく待つとデプロイが完了しました!
<プロジェクト名>-<環境名>のリソースグループができてその配下に各リソースが展開されます。
さいごに(補足)
何度か環境の作成を試していて、作成が正常終了していないと環境削除が全くできない状態になりました。(リソース構築は完了しているが、開発者ポータルではエラーになっている状態。アクティビティログにもエラーは出ておらず、CLIでの削除もできない)
ポータルで表示されているエラー内容だけでは分からず、CLIでログの確認をおこなうなどして、なんとか正常に環境の再作成が完了した後は問題なく削除できるようになりました。
# operationIdを確認
az devcenter dev environment list-operation -d <dev-center-name> --project <project-name> --environment-name <env-name>

# operationIdからログを確認
az devcenter dev environment show-logs-by-operation -d <dev-center-name> --project <project-name> --operation-id <operationId>
強制的な削除機能があるといいのになーと思ったらIssueにも同じような機能リクエストが書いてありました。今後のアップデートに期待です!
以上、拙い内容で恐縮ですが最後までご覧頂きありがとうございました!
参考にさせて頂いた記事等
