以前、Pineconeを使用したQA検索ボットを試した際に気になっていたのですが、
Eコマースを例にしたハイブリッド検索のデモがGoogleColabで公開されています。
今回、ポケモンのデータセットを用いて挙動を確認してみました。
最後にAWS ECSへデプロイし、APIとして動くか超簡単(いや、雑に…)検証してみます😇
本記事はその際の備忘録になります。
因みに、使用したデータセットと過去の記事はこちらです。
動かしてみる
公式を参照しながら動かしていきます。
コードはローカル(VS Codeにjupyter拡張を入れて)動かしてましたが、結構パワー使うので自身のColabを使うのがいいかもです。
まずは必要なパッケージをインストール/インポートします。
pip install -U datasets transformers sentence-transformers \
                 pinecone-client pinecone-text protobuf==3.20.3
import os
import pinecone
import pandas as pd
import pickle
# pinecone-textのライブラリからBM25関数をインポート。
from pinecone_text.sparse import BM25Encoder
#CLIPを使って、画像をベクトルにする用
from sentence_transformers import SentenceTransformer
import torch
PineconeのAPIキーをセットします。
api_key = "<APIキー>"
env = "<Environment名>"
Pineconeの初期化をおこないます。
pinecone.init(
    api_key=api_key,
    environment=env
)

#hybrid-image-searchという名前のindexを作成
index_name = "hybrid-image-search"

# 同名のindexがない場合は作成する
if index_name not in pinecone.list_indexes():
    # create the index
    pinecone.create_index(
      index_name,
      dimension=512,
      metric="dotproduct",
      pod_type="s1"
    )

index = pinecone.Index(index_name)
次にデータセットを準備します。
from datasets import load_dataset

dataset = load_dataset("lambdalabs/pokemon-blip-captions",
    split="train"
)
因みに、ここからデータセットのパスが分かります。
画像とテキストデータを分割します。
#データを分割
images = dataset["image"]
metadata = dataset.remove_columns("image")

# pandas の DataFrame に変換
df = pd.DataFrame(metadata, columns=['text'])

df.head()
	text
0	a drawing of a green pokemon with red eyes
1	a green and yellow toy with a red nose
2	a red and white ball with an angry look on its...
3	a cartoon ball with a smile on it's face
4	a bunch of balls with faces drawn on them
次に疎ベクトルを作成する為のモデル
bm25 = BM25Encoder()

#BM25で、学習を行います。
bm25.fit(df['text'])

#textを使ったテスト用疎ベクトルを作成
df['text'][0]
bm25.encode_queries(df['text'][0])
#保存されたドキュメントについては、「IDF」(逆文書頻度)の部分だけが必要。他のスコア等の情報は不要。
#IDF? = どんな文書にも出てくるような単語のフィルタとして機能。
#IDF値が高いと重要で、小さいとそんなに重要ではないと考えることができる。
bm25.encode_documents(df['text'][0])
学習済みモデルは後で使うので塩漬けにして固めておきます。
with open('bm25_model.pkl', 'wb') as f:
    pickle.dump(bm25, f)
密ベクトルを作成する為のモデル
#CLIPを使って、画像の密なベクトルを生成していきます。
#CUDAが利用可能であればGPU('cuda')をデバイスとして選択し、利用できない場合はCPU('cpu')
device = 'cuda' if torch.cuda.is_available() else 'cpu'

# HuggingfaceからCLIPモデルを読み込む
model = SentenceTransformer(
    'sentence-transformers/clip-ViT-B-32',
    device=device
)

dense_vec = model.encode([df['text'][0]])
dense_vec.shape
#このモデルは512次元であることを確認
(1, 512)
Pineconeにデータを移行
from tqdm.auto import tqdm

"""
データをバッチで分割処理し、テキストデータと画像データに対してベクトル化を行います。
それらを含むドキュメントを先程作成したPineconeインデックスにアップロードしています。
それを進捗バーで表示させます。
"""

batch_size = 200

for i in tqdm(range(0, len(df), batch_size)):
    i_end = min(i+batch_size, len(df))
    meta_batch = df.iloc[i:i_end]
    meta_dict = meta_batch.to_dict(orient="records")
    meta_batch = meta_batch['text'].values.tolist()
    img_batch = images[i:i_end]
    # 疎ベクトルを作成する
    sparse_embeds = bm25.encode_documents([text for text in meta_batch])
    # 密ベクトルを作成する
    dense_embeds = model.encode(img_batch).tolist()
    # IDを作成する
    ids = [str(x) for x in range(i, i_end)]

    upserts = []
    # pinecone indexにドキュメントをアップロード。
    for _id, sparse, dense, meta in zip(ids, sparse_embeds, dense_embeds, meta_dict):
        upserts.append({
            'id': _id,
            'sparse_values': sparse,
            'values': dense,
            'metadata': meta
        })
    index.upsert(upserts)

# 確認
index.describe_index_stats()
格納できたら早速、検索クエリを投げてみます。
# query = 虫の見た目をしている
query = "They look like insects."

sparse = bm25.encode_queries(query)
dense = model.encode(query).tolist()
# 検索
result = index.query(
    top_k=4, #検索結果上位4つを取得
    vector=dense, #検索パラメータ1 密ベクトル
    sparse_vector=sparse, #検索パラメータ2 疎ベクトル
    include_metadata=True #取得した類似ドキュメントにメタデータも含めるか否か
)

# 確認
result
{'matches': [{'id': '765',
              'metadata': {'text': 'a cartoon character flying through the '
                                   'air'},
              'score': 31.8589554,
              'values': []},
             {'id': '815',
              'metadata': {'text': 'a drawing of a bird with two wings'},
              'score': 31.1504841,
              'values': []},
               ...
返ってきますね。
わかりにくいので画像を表示させます。
"""
画像をBase64エンコードし、
HTMLコード内のimgタグのソースとして使用する事で画像を表示させる。
"""
from IPython.core.display import HTML
from io import BytesIO
from base64 import b64encode

def display_result(image_batch):
    figures = []
    for img in image_batch:
        b = BytesIO()
        img.save(b, format='png')
        figures.append(f'''
            <figure style="margin: 5px !important;">
              <img src="data:image/png;base64,{b64encode(b.getvalue()).decode('utf-8')}" style="width: 90px; height: 120px" >
            </figure>
        ''')
    return HTML(data=f'''
        <div style="display: flex; flex-flow: row wrap; text-align: center;">
        {''.join(figures)}
        </div>
    ''')
imgs = [images[int(r["id"])] for r in result["matches"]]
display_result(imgs)
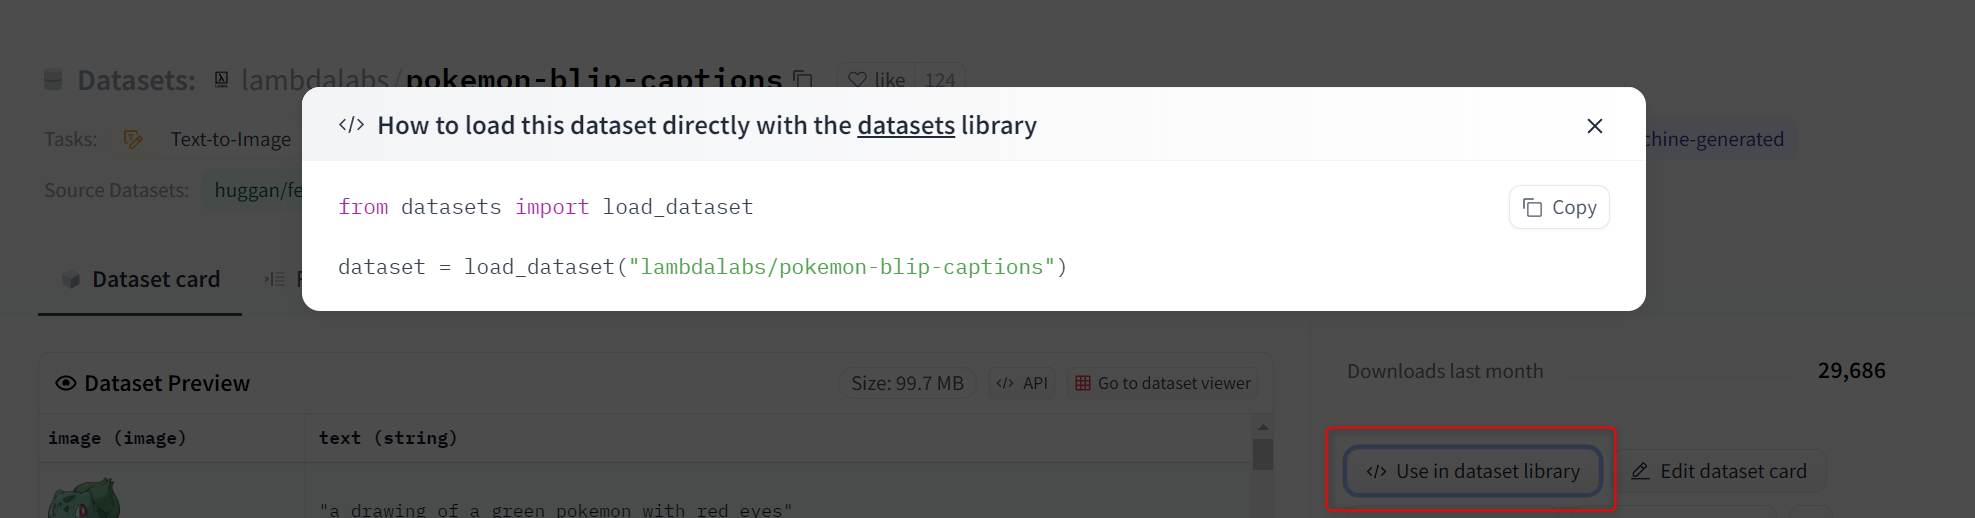
あれれ…虫っぽくないヤツがいる🙄
そこで新しい関数の登場です。
"""
密なベクトル(dense)と疎なベクトル(sparse)を取り、両者を組み合わせた新しいベクトルを生成します。
"""

def hybrid_scale(dense, sparse, alpha: float):
    """Hybrid vector scaling

    alpha * dense + (1 - alpha) * sparse

    Args:
        dense: dense vector(密ベクトル)
        sparse: sparse vector(疎ベクトル)
        alpha: 0に近いほど疎ベクトルの重みが高く、1に近いほど密ベクトルの重みが高い。
    """
    # alpha の値が0から1の範囲外の場合、ValueError を発生させます
    if alpha < 0 or alpha > 1:
        raise ValueError("Alpha must be between 0 and 1")

    # 新たな疎ベクトルを作成します
    hsparse = {
        'indices': sparse['indices'], #sparseのindicesと同じ値
        'values':  [v * (1 - alpha) for v in sparse['values']] #sparseの各要素に (1 - alpha) をかける
    }

    # 新たな密ベクトルを作成します
    hdense = [v * alpha for v in dense] #denseの各要素にalphaをかける

    return hdense, hsparse
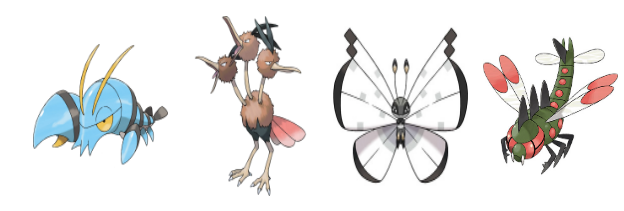
再度検索をかけてみます。
#query = 虫の見た目をしている
query = "They look like insects."
sparse = bm25.encode_queries(query)
dense = model.encode(query).tolist()

# ベクトル調整 (alpha=0.06)
hdense, hsparse = hybrid_scale(dense, sparse, alpha=0.06)

# 検索
result = index.query(
    top_k=4,
    vector=hdense,
    sparse_vector=hsparse,
    include_metadata=True
)

imgs = [images[int(r["id"])] for r in result["matches"]]

display_result(imgs)
虫?っぽい見た目のヤツに調整できました。
ここは調整して何回か試してみると面白いです。
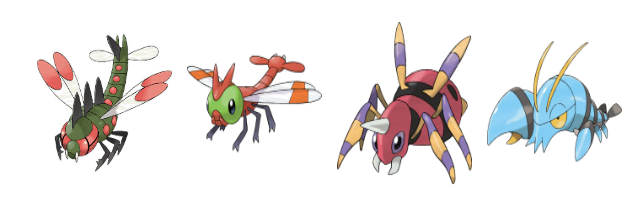
最後に画像から検索をしてみます。
サッカーボールの画像を用意しました。
from PIL import Image

image_path = "image1.jpg"
query_image = Image.open(image_path)
query_image

サッカーボールで検索してみます。
〇マインとか、〇〇〇ダマとかが検索されてほしいところです。
#query = 虫の見た目をしている
query = "They look like insects."
sparse = bm25.encode_queries(query)
# サッカーの画像を与える
dense = model.encode(query_image).tolist()

# ベクトル調整 (alpha=0.06)
hdense, hsparse = hybrid_scale(dense, sparse, alpha=0.06)

# 検索
result = index.query(
    top_k=4,
    vector=hdense,
    sparse_vector=hsparse,
    include_metadata=True
)


imgs = [images[int(r["id"])] for r in result["matches"]]
display_result(imgs)
サッカーボールに引っ張られている感じです。
電気鼠ポケモンがいるのは解せませんね。
公式にデモがありますが、フィルターを使い、予めメタデータから絞り込む事で目的に沿った検索ができそうです。
ただ、今回はメタデータにText以外のデータを加えてないので、元データの加工が必要そうです。
result = index.query(
    top_k=4,
    vector=hdense,
    sparse_vector=hsparse,
    include_metadata=True,
    filter={"tag": "<タグ名やカテゴリなどでフィルター>"}  #メタデータフィルターを使用する場合
)
ECSへデプロイしてみる
それではECSへデプロイしてAPIにしていきます。
検証目的の為、終わったら速攻リソースを削除します。
まず、FastAPI仕様に整えます。こちらは本筋外なので詳細割愛します。
pip install fastapi Gunicorn uvicorn[standard] python-dotenv
from fastapi import FastAPI
import os
import pinecone
import pickle
from pinecone_text.sparse import BM25Encoder
from sentence_transformers import SentenceTransformer
from dotenv import load_dotenv

#pineconeの初期化
load_dotenv()
api_key = os.environ.get("PINECONE_API_KEY")
env = os.environ.get("PINECONE_ENVIRONMENT")
pinecone.init(
    api_key=api_key,
    environment=env
)
index_name = "hybrid-image-search"
index = pinecone.Index(index_name)

#疎ベクトル作成用のトレーニング済みモデルを読み込んでおく。
with open("bm25_model.pkl", "rb") as f:
    bm25 = pickle.load(f)

#密ベクトル作成の為のモデルを初期化
model = SentenceTransformer(
    "sentence-transformers/clip-ViT-B-32",
    device="cpu"
)

def hybrid_scale(dense, sparse, alpha: float):
    """Hybrid vector scaling

    alpha * dense + (1 - alpha) * sparse

    Args:
        dense: dense vector(密ベクトル)
        sparse: sparse vector(疎ベクトル)
        alpha: 0に近いほど疎ベクトルの重みが高く、1に近いほど密ベクトルの重みが高い。
    """
    if alpha < 0 or alpha > 1:
        raise ValueError("Alpha must be between 0 and 1")

    hsparse = {
        'indices': sparse['indices'],
        'values':  [v * (1 - alpha) for v in sparse['values']]
    }
    hdense = [v * alpha for v in dense]
    return hdense, hsparse

app = FastAPI()
@app.get("/search/")
async def root(q:str = None):
    sparse = bm25.encode_queries(q)
    dense = model.encode(q).tolist()
    hdense, hsparse = hybrid_scale(dense, sparse, alpha=0.06)

    #検索クエリ
    result = index.query(
	    top_k=3,
	    vector=hdense,
	    sparse_vector=hsparse,
	    include_metadata=True)

    ans = [{"id": match["id"], "text": match["metadata"]["text"]} for match in result["matches"]]

    return {"res": ans}
.envを配置しておきます。
PINECONE_API_KEY=<APIキー>
PINECONE_ENVIRONMENT=<Environment名>
Gunicornサーバを起動して疎通確認します。
gunicorn -k uvicorn.workers.UvicornWorker main:app --timeout 180
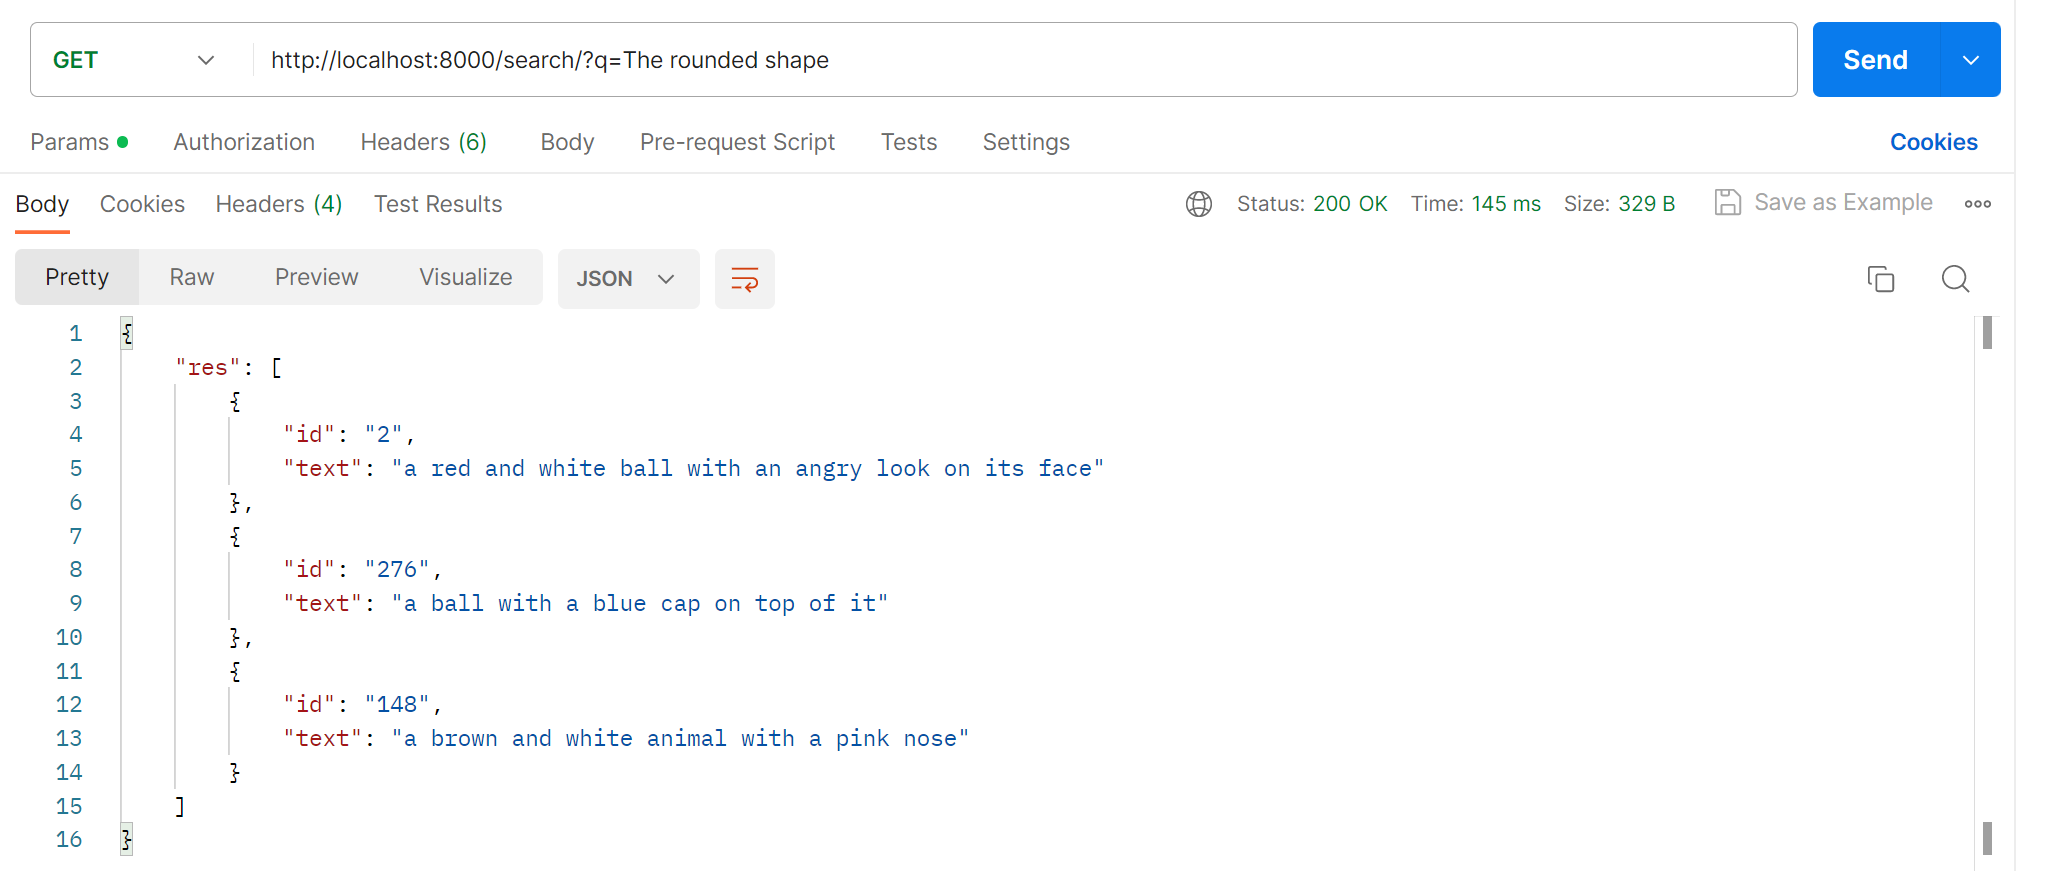
クエリパラメータに「丸い見た目」と入れて叩くと返ってくる事を確認しました。
次にDockerfileを準備します。
その前にrequirements.txtを出力しておきます。
pip freeze > requirements.txt
ちなみに現在のディレクトリ構造は下記のような状態👇
root/
├ src/
│ └ main.py
│ └ bm25_model.pkl
│ └ .env
│ └ requirements.txt
└ Dockerfile
# マルチステージビルドでイメージサイズを小さく
# Build stage
FROM python:3.10 AS build
WORKDIR /app

COPY src/requirements.txt .
RUN pip install --upgrade pip
RUN pip install -r requirements.txt --target .

COPY src/main.py .
COPY src/bm25_model.pkl .

# Final stage
FROM python:3.10
COPY --from=build /app .
RUN pip install Gunicorn #明示的に追加。

EXPOSE 8000
CMD ["gunicorn", "-k", "uvicorn.workers.UvicornWorker", "-b", "0.0.0.0:8000", "main:app", "--timeout", "180"]
ビルドします。タグにsearchと付けておきます。
docker build -t search .
起動します。
docker run --rm -p 8000:8000 -e PINECONE_API_KEY=<APIキー> -e PINECONE_ENVIRONMENT=<Environment名> search:latest
疎通確認します。(虫の見た目をしているで検索)
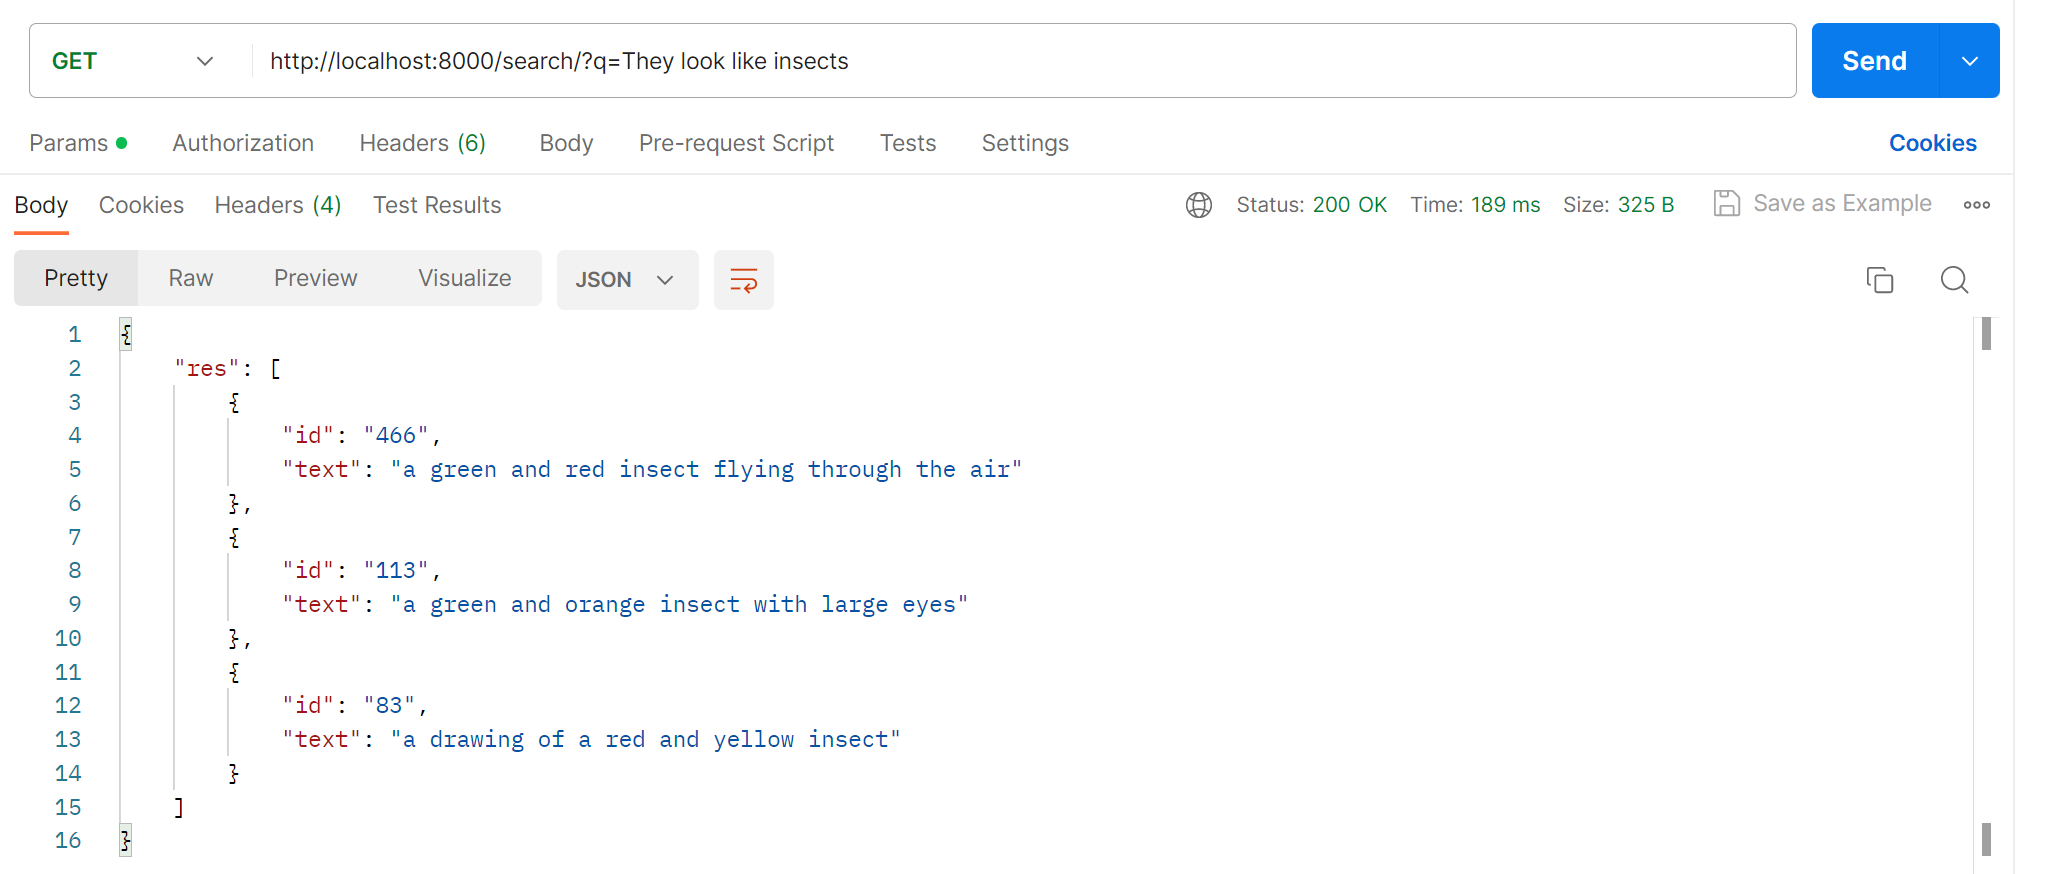
無事疎通確認できました。
ECSへプロビジョニング
VPCとセキリュティグループを構成します。
- SubNet
- Public ×2
- Rt ×1
- Igw ×1
- セキリュティグループ
- inbound: 8000: ALL
- outbound: ALL: ALL
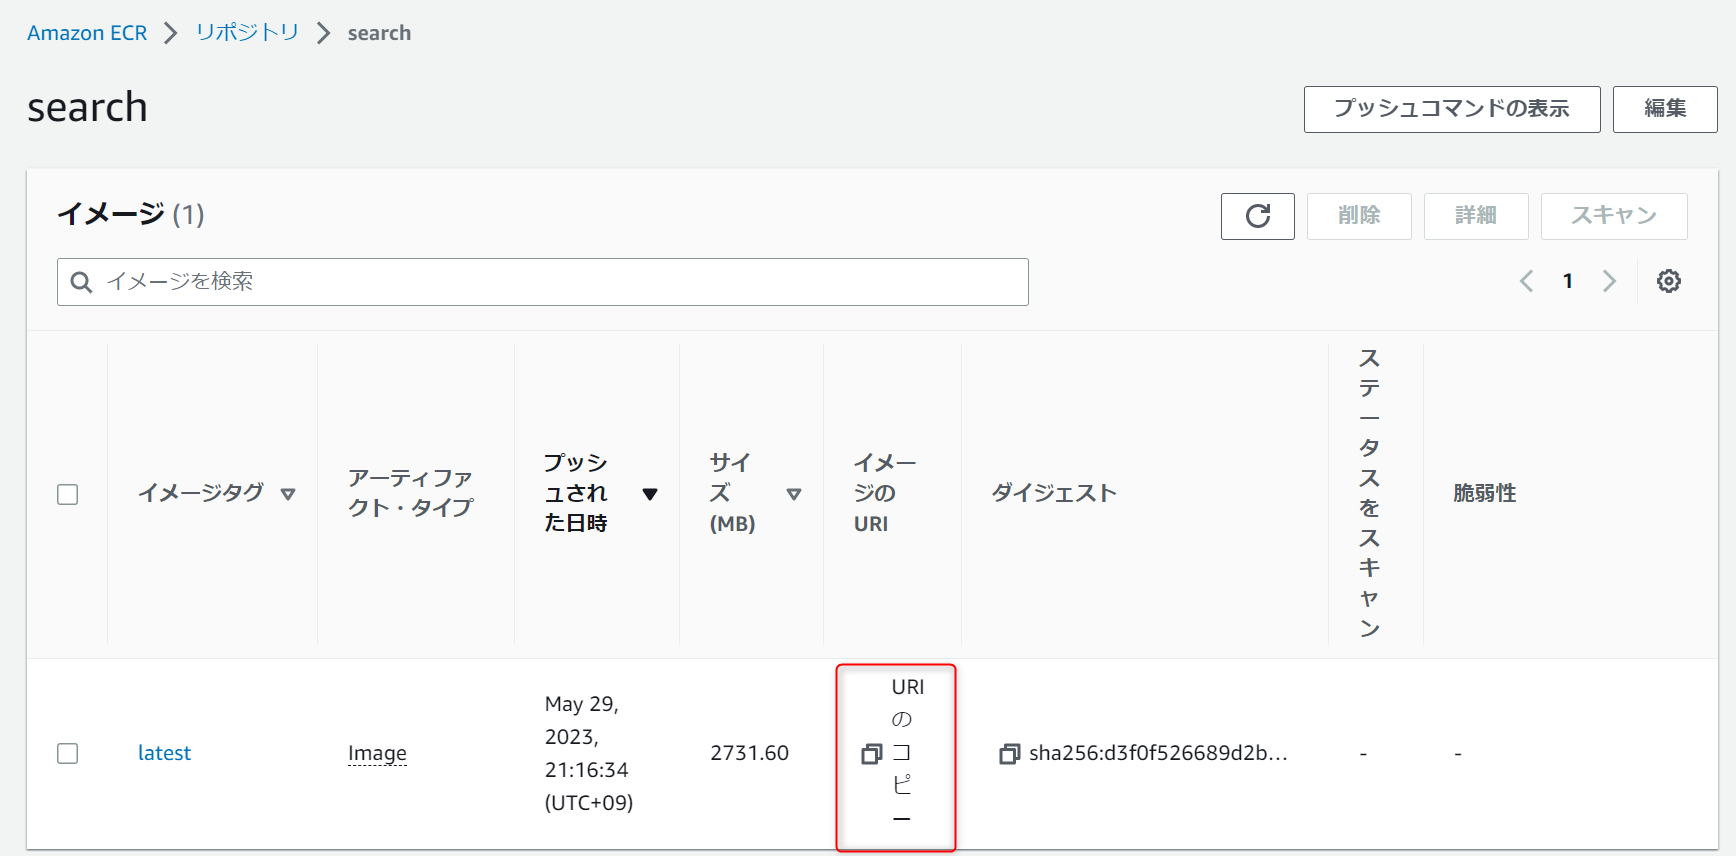
ECRにレポジトリを作成しておきます。
-
レポジトリ名 →
search
レポジトリにPushします。( プッシュコマンドの表示からコマンドを確認できます。)
#レジストリに対して Docker クライアントを認証
aws ecr get-login-password --region ap-northeast-1 | docker login --username AWS --password-stdin 505447703947.dkr.ecr.ap-northeast-1.amazonaws.com

#リポジトリにイメージをプッシュできるように、イメージにタグを付けます。
docker tag search:latest 000000000000.dkr.ecr.ap-northeast-1.amazonaws.com/search:latest

#イメージをプッシュします
docker push 000000000000.dkr.ecr.ap-northeast-1.amazonaws.com/search:latest
pushできたらURIをコピーしておきます。
次にECSです。FARGATEで起動します。
-
クラスターを作成 →
ネットワーキングのみ-
名前 →
任意
-
名前 →
-
タスク定義 →
FARGATE-
タスク定義名 →
任意 -
タスクロール →
IAMロールをアタッチ -
OSファミリー →
Linux -
メモリ →
2GB -
CPU →
1vCPU -
コンテナの追加
-
コンテナ名 →
search -
イメージ →
コピーしたURI -
ポートマッピング →
8000 -
環境変数 →
PINECONE_API_KEYとPINECONE_ENVIRONMENTを追加
-
コンテナ名 →
-
タスク定義名 →
-
サービスの設定 →
クラスターを選択してサービスの設定から-
起動タイプ →
FARGATE -
OSファミリー →
Linux -
タスク定義 →
先程作ったタスク -
サービス名 →
任意 -
タスクの数 →
1 -
クラスターVPC →
作成したVPC -
サブネット →
作成したサブネットをアタッチ -
セキリュティグループ →
作成したSG -
パブリックIPの自動割当 →
ENABLED
-
起動タイプ →

RUNNINGに変われば起動。
起動したタスクの詳細から割り当てられたパブリックIPアドレスをコピーして疎通確認をおこないます。
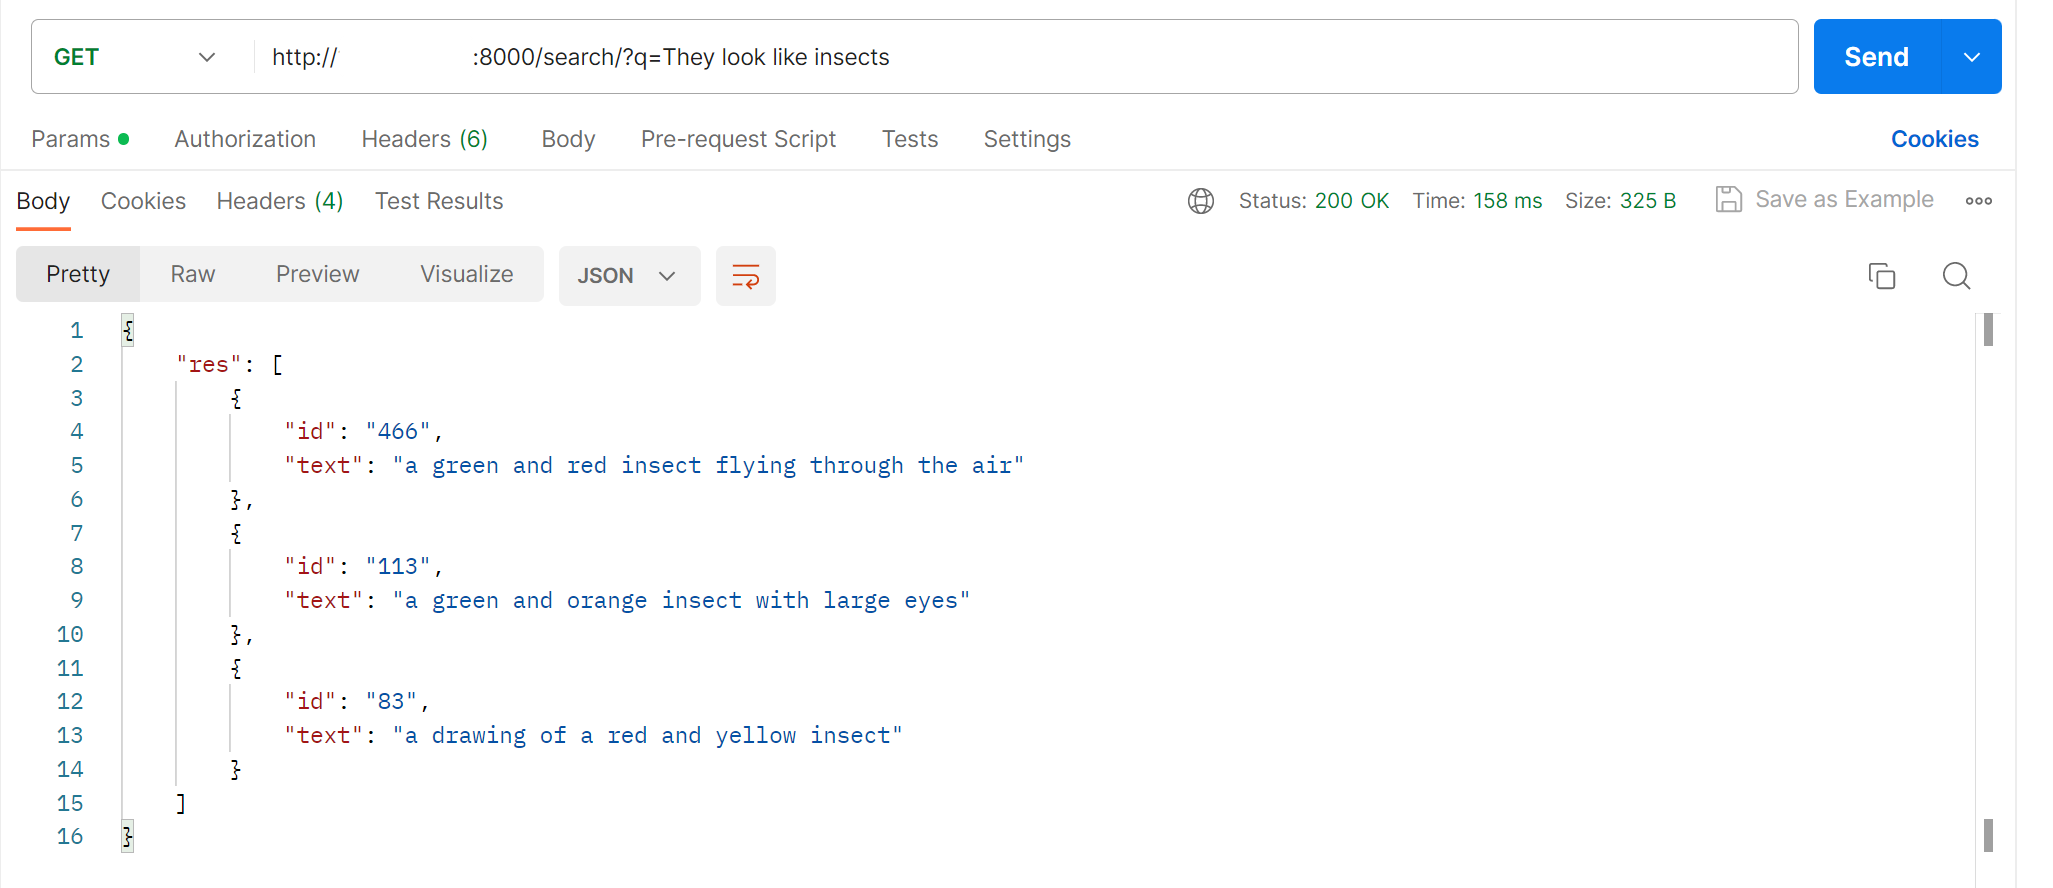
確認できました👌
Pineconeに限らずベクトル検索は色々な場面で使えそうで面白いです。
コツコツ勉強して精進します😄
使い終わったリソースは削除する事を忘れずに👍
参考