普段私はインフラエンジニアをしてます。日頃、全くといっていいほどフロントエンド周りに触れないため、Amplifyの存在は知っていましたが、なかなか手を出せずにいました。
ただ、Amplify Gen 2 が登場し、バックエンドのリソースの構築はどうもAWS CDKだという話を聞いて少しだけ親近感あるし…やってみようかな…という気持ちが芽生えてました。
そんなときにちょうど良く、仲間内で自主開催しているハッカソンイベントのオンライン視聴サイトを作りたい~といった話が出てきたので「よしやってみるか」と、ついに重い腰を上げたのです。
ちなみにReactはズブの素人。TypeScriptに関してはCDKを書くときくらいしかほぼ触ってないので、Copilot先生に色々聞きながらやってみました💦
試作品
まず先にどういったものを作ってみたか。です。
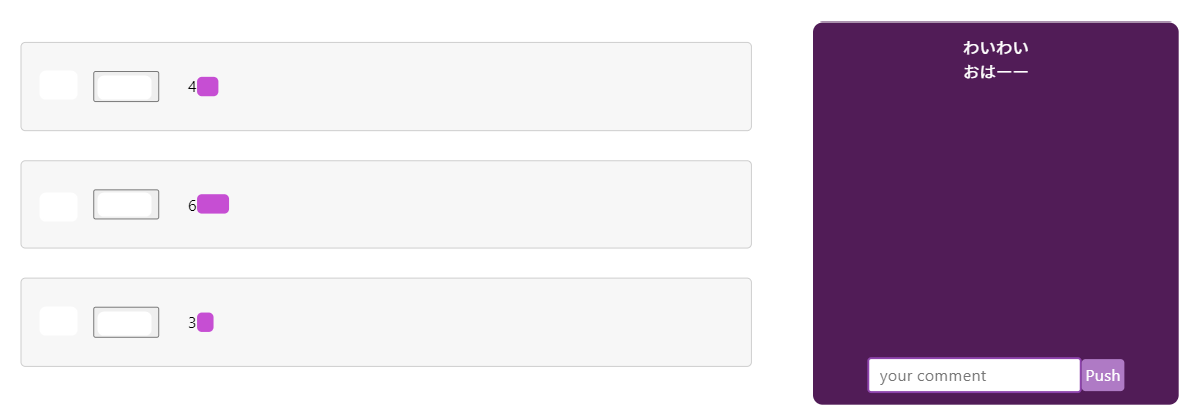
まだ試作段階ですが、いいねボタンやコメント投稿機能など入れてます。数時間でできたのは間違いなくAmplify Gen2のおかげです。(あとCopilot先生)

配信にはAWS IVSを使ってます。
そこまでのリアルタイム性は求められてなかったので、こちらの低レイテンシーストリーミングを用います。といってもここは超簡単です。
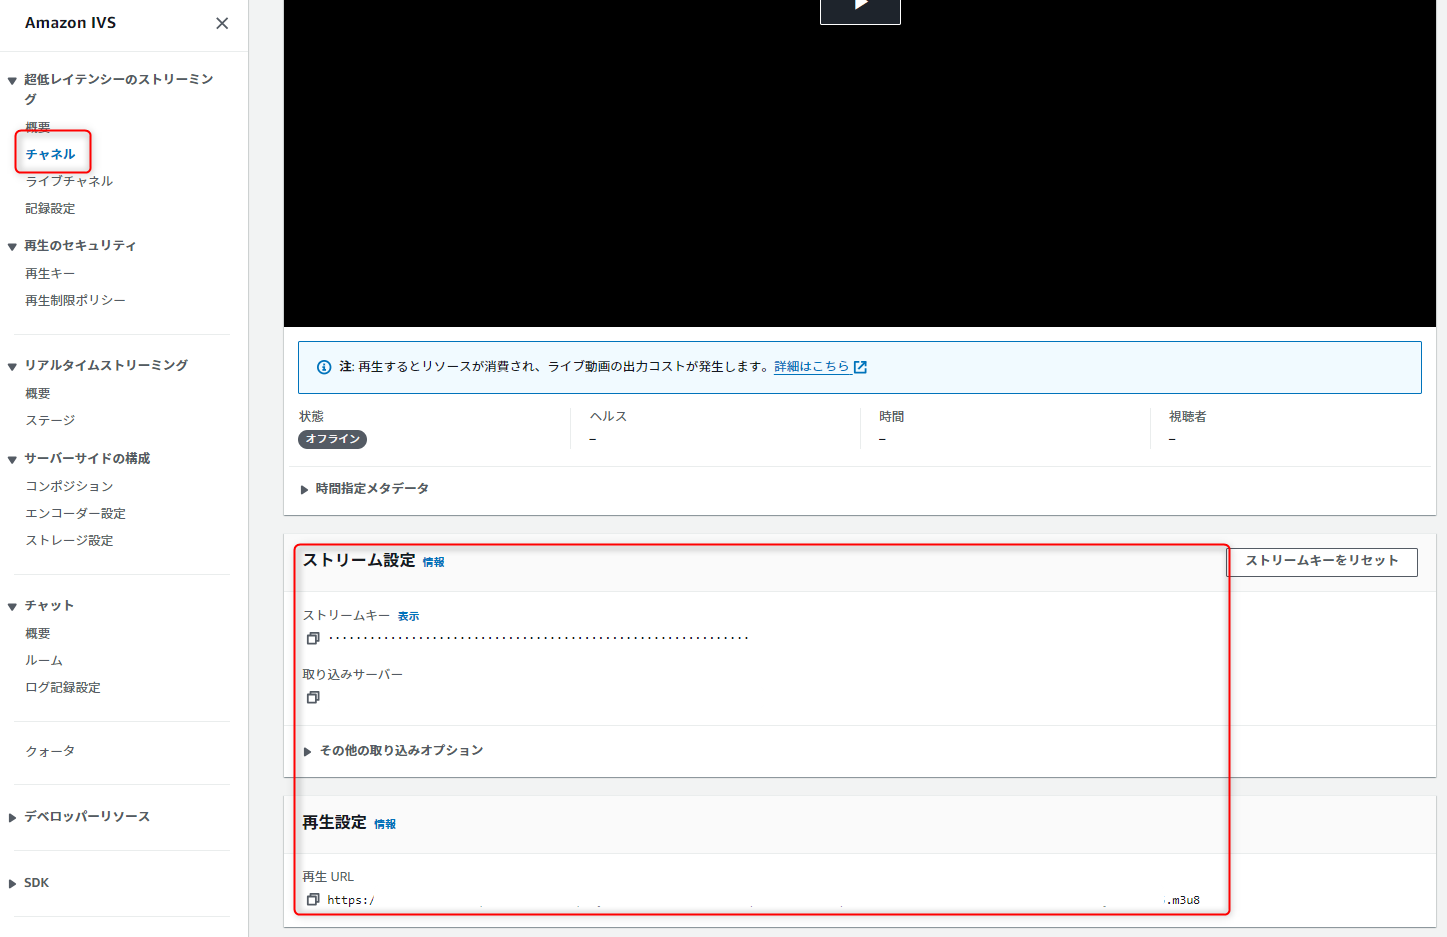
以下の画面のように IVS > チャネル > 設定事項入力 でストリームキーと再生URLがゲットできます。この再生URLをAmplifyでこれから作るアプリに埋め込むだけです。
配信はZoomでおこなう予定だったので、ストリームキー等をZoomに設定してテストしたところ大丈夫そうだったので、一旦はこれでOKとしました。

Amplify Gen2
Amplify Gen2とは何者か?については割愛します。詳細は↓
まずは、Reactプロジェクトを作成します。
npm create vite@latest <ProjectName>
フレームワークはReact、言語はTypeScriptを選択します。
プロジェクトのディレクトリに移動してnpm install ,npm run dev で起動を確認します。
その後、Amplify関連モジュールをインストールします。
npm add --save-dev @aws-amplify/backend@latest @aws-amplify/backend-cli@latest
ちなみに、ここらで参考にしていたのはこちらのドキュメントです。
プロジェクトのルートディレクトリにamplifyというフォルダを作成し、backend.tsというファイルを作成します。
import { defineBackend } from '@aws-amplify/backend';

defineBackend({});
Now you can run npx ampx sandbox to create your first backend!
(これでnpx ampx sandboxを実行して最初のバックエンドを作成できる!)
との事。ほう?
サンドボックスを起動してみます。
npx ampx sandbox --profile ***
本番ブランチに影響を与えずにバックエンドを更新するには、Amplify のクラウド サンドボックスを使用します。この機能は、チーム内の各開発者に個別のバックエンド環境を提供するため、ローカル開発とテストに最適です。
つまり、開発用途のバックエンドで使用するAWSリソースって事ですかね。
ちなみに、CDK流した事のないアカウントの場合はブートストラップがかかるみたいです。
(CDKリソースの初回プロビジョニング時のアレかーって感じです)
以下のメッセージが表示されたら、サンドボックスは出来上がりです。
[Sandbox] Watching for file changes...
File written: amplify_outputs.json
どうやらこの状態のまま作業をしていくようです。
作業の更新を検知して自動で必要なリソースが自動でプロビジョニングされるとのこと…
ほえー。
それでは、まず認証機能を入れてみることにします。
amplify/auth/resource.tsを作成し...
import { defineAuth } from '@aws-amplify/backend';

export const auth = defineAuth({
    loginWith: {
        email: true
    }
});
先程のamplify/backend.tsに追記します。
import { defineBackend } from '@aws-amplify/backend';
import { auth } from './auth/resource';

defineBackend({
	auth,
});
すると、変更を自動で検知してCognitoのプロビジョニングが始まります。
コンソールで見てみるとちゃんとできていることが確認できました。(すごっっ。)
フロント側はドキュメントに記載のとおりにnpm add @aws-amplify/ui-react をして、
src/main.tsxとsrc/App.tsxに以下を書き足します。
import React from 'react'
import ReactDOM from 'react-dom/client'
import App from './App.tsx'
import './index.css'
+ import '@aws-amplify/ui-react/styles.css'
+ import { Amplify } from 'aws-amplify'
+ import outputs from '../amplify_outputs.json'

+ Amplify.configure(outputs)

ReactDOM.createRoot(document.getElementById('root')!).render(
  <React.StrictMode>
    <App />
  </React.StrictMode>,
)
function App() {
 ...
  return (
+    <Authenticator>
+    {({ signOut }) => (
    <>
     ...
    </>
+    )}
+  </Authenticator>
  )
}

export default App
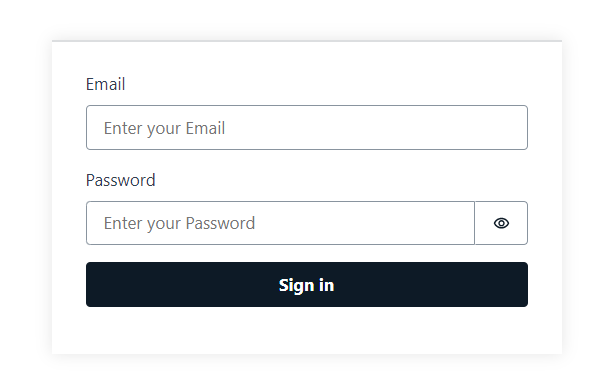
npm run dev で確認すると、ちゃんとCognitoの認証画面が表示されました。は!はやい!

(サインアップとかパスワード再設定は無くしたくて、最終的にこうなった)
では、次にAmplify Data リアルタイムAPIの構築にチャンレンジしてみます。
amplify/data/resource.ts を作成します。
ドキュメントの内容から少し変えて、いいねポイント用のテーブルと、コメント用のテーブルを想定します。
import { a, defineData, type ClientSchema } from '@aws-amplify/backend';

const schema = a.schema({
  Point: a
    .model({
      name: a.string(),
      point: a.integer(),
    })
    .authorization((allow) => [allow.publicApiKey()]),
  Commnet: a
    .model({
      comment: a.string(),
    })
    .authorization((allow) => [allow.publicApiKey()]),
});

// Used for code completion / highlighting when making requests from frontend
export type Schema = ClientSchema<typeof schema>;

// defines the data resource to be deployed
export const data = defineData({
  schema,
  authorizationModes: {
    defaultAuthorizationMode: 'apiKey',
    apiKeyAuthorizationMode: { expiresInDays: 30 },
  },
});
allow.publicApiKey()はグルーバル承認ルールとなるようですが、とりあえずは一旦このまま続けます。認証されたユーザーのAPIアクセスに関してはこちらに記載があるのでこの通りやれば良さそうですね。
ふむふむ。例えばCognitoで認証されているユーザーに全ての読み書きを許可するには、
.authorization((allow) => [allow.authenticated()]) にして、defaultAuthorizationMode: 'userPool', のようにする感じですかね。
さてさて一旦はこのまま進めるとして、先ほどの調子でamplify/backend.ts に追記すると、自動でサンドボックス環境にDynamoDBとAppSyncがプロビジョニングされます。すごーー
import { defineBackend } from '@aws-amplify/backend';
import { auth } from './auth/resource';
+ import { data } from './data/resource';

defineBackend({
	auth,
+	data
});
フロント側ではこのようになりました。
import './App.css'
import { useState, useEffect } from 'react'
import type { Schema } from '../amplify/data/resource'

import { Authenticator } from '@aws-amplify/ui-react'
import { generateClient } from 'aws-amplify/data'

const client = generateClient<Schema>()

function App() {
  const [points, setPoints] = useState<Schema["Point"]["type"][]>([]);
  const [comment, setComment] = useState("");
  const [receivedComments, setReceivedComments] = useState<string[]>([]);

  useEffect(() => {
	  //いいねポイント数のサブスクライブ
    const sub = client.models.Point.observeQuery().subscribe({
      next: ({ items }) => {
        setPoints([...items]);
      },
    });
	//コメントのサブスクライブ (コメント作成時)
    const subComments = client.models.Commnet.onCreate().subscribe({
      next: (items) => {
        const newComment = items.comment || "";
        setReceivedComments(prevComments => {
          const updateComments = [newComment, ...prevComments];
          return updateComments.slice(0, 8); //最新8件だけ表示させたかったので
        });
      },
    });
    return () => {
      sub.unsubscribe();
      subComments.unsubscribe();
    };
  }, []);
	//いいねポイントを増やす
  const updataPoint = async (id:string) => {
    const point = await client.models.Point.get({id: id});
    if (point.data && typeof point.data.point === 'number') {
      const newPoint = point.data?.point + 1;
      await client.models.Point.update({ id: point.data.id, point: newPoint });
    }
    else{
      console.error("Failed to update point");
    }
  }
	//コメント書き込み
  const saveComment = async () => {
    await client.models.Commnet.create({
      comment: comment,
    },{ authMode: 'userPool'} );
    console.log("Saving comment: ", comment);
    setComment("");
  };
  ...
  ...
DynamoDBのテーブルに仮のデータを入れて確認すると...はい!すごい早く視聴者参加型の機能ができちゃいました。

(分かりづらいけど、いいねボタン的なのとコメント投稿機能。)
最後にIVSでコピーしておいた再生URLを埋め込みんだら試作品は完成です。
再生方法を調べたらこの react-player というのが簡単そうだったのでこれを使用しました。
+ import ReactPlayer from 'react-player'
...

return (
...
+  <div>
+     <ReactPlayer
+          url=<コピーした再生URL>
+          width="100%"
+          height="100%"
+          controls={true}
+          playing={true}
+        />
+   </div>
...
デプロイは単純にGitHubのレポジトリとブランチを設定するだけです。簡単!
さいごに
ということで、本当ににちょっとだけやってみた感じですが、
「え、なんかすごい。なにこれーー」ってなりました 笑
正直まだそこまでちゃんと触ってないので、CDK感は体感できてはいませんが、「Amplifyすごいなー。ちょっと楽しいかも」という気持ちになったのでとりあえず満足です。
拙い内容ですが、ここまでご覧頂き有難うございました!