表題の通り、Azure Load Testingを使って簡単な負荷テストをGithubActionで自動化するといった内容をやってみた際の備忘録です。
ほぼ、こちらのドキュメントをなぞっている形になります🙏
テスト用のサンプルサイトを作成
Next.jsでサンプルサイトは作りました。GETリクエストが合った度に適当なデータをCosmosDBへ保存し、格納されているデータの合計数を表示する。といった簡単なものをWebAppにGithub Actionsでデプロイできるようにしておきます。
こんなサイトをテスト用に用意👇

ターゲットとなるアプリはなんでもいいので、こちらについては省略します。
サービスプリンシパルの作成
それでは本題。まずはGithub ActionsのワークフローからAzureにアクセスできるように共同作成者ロールを割り当てる作業です。
AzureにログインしてCloud Shell を立ち上げます。

以下のコマンドを入力します。
subscription=$(az account show --query "id" -o tsv)
echo $subscription
az ad sp create-for-rbac --name "my-load-test-cicd" --role contributor \
                         --scopes /subscriptions/$subscription \
                         --sdk-auth
するとサービスプリンシパルを表すJSONが出力されます、
これをコピーしてメモっておきます。
{
  "clientId": "00000000-0000-0000-0000-000000000000",
  "clientSecret": "00000000-0000-0000-0000-000000000000",
  "subscriptionId": "00000000-0000-0000-0000-000000000000",
  "tenantId": "00000000-0000-0000-0000-000000000000",
  "activeDirectoryEndpointUrl": "https://login.microsoftonline.com",
  "resourceManagerEndpointUrl": "https://management.azure.com/",
  "activeDirectoryGraphResourceId": "https://graph.windows.net/",
  "sqlManagementEndpointUrl": "https://management.core.windows.net:8443/",
  "galleryEndpointUrl": "https://gallery.azure.com/",
  "managementEndpointUrl": "https://management.core.windows.net/"
}
続いて、サービスプリンシパルに Load Test Contributor ロールを割り当てます。
object_id=$(az ad sp list --filter "displayname eq 'my-load-test-cicd'" --query "[0].id" -o tsv)

az role assignment create --assignee $object_id --role "Load Test Contributor" --scope /subscriptions/$subscription --subscription $subscription
Azure Load Testing
AzureポータルからLoad Testingをデプロイしておきます。

今回、テスト用のスクリプトはJMeterで簡単なものを作成しました。
<?xml version="1.0" encoding="UTF-8"?>
<jmeterTestPlan version="1.2" properties="5.0" jmeter="5.4.1">
  <hashTree>
    <TestPlan guiclass="TestPlanGui" testclass="TestPlan" testname="Test Plan" enabled="true">
      <stringProp name="TestPlan.comments"></stringProp>
      <boolProp name="TestPlan.functional_mode">false</boolProp>
      <boolProp name="TestPlan.tearDown_on_shutdown">true</boolProp>
      <boolProp name="TestPlan.serialize_threadgroups">false</boolProp>
      <elementProp name="TestPlan.user_defined_variables" elementType="Arguments" guiclass="ArgumentsPanel" testclass="Arguments" testname="User Defined Variables" enabled="true">
        <collectionProp name="Arguments.arguments"/>
      </elementProp>
      <stringProp name="TestPlan.user_define_classpath"></stringProp>
    </TestPlan>
    <hashTree>
      <ThreadGroup guiclass="ThreadGroupGui" testclass="ThreadGroup" testname="Thread Group" enabled="true">
        <stringProp name="ThreadGroup.on_sample_error">continue</stringProp>
        <elementProp name="ThreadGroup.main_controller" elementType="LoopController" guiclass="LoopControlPanel" testclass="LoopController" testname="Loop Controller" enabled="true">
          <boolProp name="LoopController.continue_forever">false</boolProp>
          <stringProp name="LoopController.loops">1</stringProp>
        </elementProp>
        <stringProp name="ThreadGroup.num_threads">500</stringProp>
        <stringProp name="ThreadGroup.ramp_time">0</stringProp>
        <boolProp name="ThreadGroup.scheduler">true</boolProp>
        <stringProp name="ThreadGroup.duration">100</stringProp>
        <stringProp name="ThreadGroup.delay"></stringProp>
        <boolProp name="ThreadGroup.same_user_on_next_iteration">true</boolProp>
      </ThreadGroup>
      <hashTree>
        <HTTPSamplerProxy guiclass="HttpTestSampleGui" testclass="HTTPSamplerProxy" testname="HTTP Request" enabled="true">
          <elementProp name="HTTPsampler.Arguments" elementType="Arguments" guiclass="HTTPArgumentsPanel" testclass="Arguments" testname="User Defined Variables" enabled="true">
            <collectionProp name="Arguments.arguments"/>
          </elementProp>
          <stringProp name="HTTPSampler.domain">******.azurewebsites.net</stringProp>
          <stringProp name="HTTPSampler.port"></stringProp>
          <stringProp name="HTTPSampler.protocol">https</stringProp>
          <stringProp name="HTTPSampler.contentEncoding"></stringProp>
          <stringProp name="HTTPSampler.path">/</stringProp>
          <stringProp name="HTTPSampler.method">GET</stringProp>
          <boolProp name="HTTPSampler.follow_redirects">true</boolProp>
          <boolProp name="HTTPSampler.auto_redirects">false</boolProp>
          <boolProp name="HTTPSampler.use_keepalive">true</boolProp>
          <boolProp name="HTTPSampler.DO_MULTIPART_POST">false</boolProp>
          <stringProp name="HTTPSampler.embedded_url_re"></stringProp>
          <stringProp name="HTTPSampler.connect_timeout"></stringProp>
          <stringProp name="HTTPSampler.response_timeout"></stringProp>
        </HTTPSamplerProxy>
        <hashTree/>
      </hashTree>
    </hashTree>
  </hashTree>
</jmeterTestPlan>
-
ThreadGroup.main_controller:
- ループコントローラーがどのように動作するかを制御します。ここでは、"continue_forever"が"false"、"loops"が"1"なので、テストは一回だけ実行されます。
-
ThreadGroup.num_threads:
- このパラメータはスレッドの数(つまり仮想ユーザーの数)を指定します。ここでは500と設定したので、500の仮想ユーザーがテストを行います。
-
ThreadGroup.ramp_time:
- これは全てのユーザーが起動するまでの時間(秒)を指定します。ここでは0と設定したので、すべてのユーザーがすぐに起動します。
-
ThreadGroup.scheduler:
- スケジューラを使用するかどうかを制御します。ここでは"true"と設定したので、スケジューラが使用されます。
-
ThreadGroup.duration:
- スケジューラが有効な場合、このパラメータはテストの実行時間(秒)を指定します。ここでは100と設定したので、テストは100秒間実行されます。
-
HTTPSampler.domain:
- これはリクエストが送信されるドメイン(またはIPアドレス)を指定します。
-
HTTPSampler.port:
- これは接続するポート番号を指定します。ここでは空欄です。
-
HTTPSampler.protocol:
- これは使用するプロトコルを指定します。ここでは "https" を指定しています。
-
HTTPSampler.path:
- これはリクエストのパスを指定します。
-
HTTPSampler.method:
- これは使用するHTTPメソッド(GET、POST、PUTなど)を指定します。ここでは "GET" を指定してます。
設定ファイルはこちらを用意。
displayName: Get_load-test-apps-001.azurewebsites.net
testPlan: quick_test.jmx
description:
engineInstances: 3 #エンジンインタンスの数
testId: 5886d1f4-2033-45c5-b80c-c40f3df317a5
Github
Githubレポジトリのシークレットに先程のJSONで出力されたサービスプリンシパルの情報を設定しておきます。
名前はAZURE_CREDENTIALSとして、値には先程のJSONを貼り付けます。


デプロイしてテスト実行
quick_test.jmx と quick_test.yamlをワークディレクトリの直下に保存します。
.github/workflow/内のyamlファイルを編集します。
以下を追記しました。
  loadTest:
    name: Load Test
    needs: deploy
    runs-on: ubuntu-latest
    steps:
      - name: Checkout GitHub Actions
        uses: actions/checkout@v2

      - name: Login to Azure
        uses: azure/login@v1
        continue-on-error: false
        with:
          creds: ${{ secrets.AZURE_CREDENTIALS }}

      - name: 'Azure Load Testing'
        uses: azure/load-testing@v1
        with:
          loadTestConfigFile: 'quick_test.yaml' #configFileName
          loadTestResource: 'my-load-test-test' #ResourceName
          resourceGroup: 'my-load-test-rg' #ResourceGroupName

      - uses: actions/upload-artifact@v2
        with:
          name: loadTestResults
          path: ${{ github.workspace }}/loadTest
変更が終わったら、Pushします。
無事デプロイからテストが実行されたようです。

因みに、こういった条件を追加する事でテストに不合格の条件を追加できます。
displayName: Get_load-test-apps-001.azurewebsites.net
testPlan: quick_test.jmx
description:
engineInstances: 3
testId: 5886d1f4-2033-45c5-b80c-c40f3df317a5

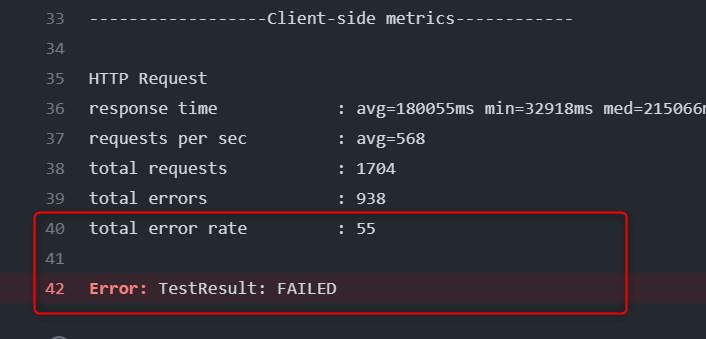
+ failureCriteria:
+  - percentage(error) > 50
エラー割合が50%以上なので不合格になりました。
ぽんこつアプリが爆誕しました…

さいごに
今回、CI/CDに組み込むという部分だけ抜粋しましたが、公式のチュートリアルではここからボトルネックを特定して改善するといった一連の流れも記載されています。
負荷テスト初心者なので、JMeterの使い方含めて継続して学習していこうと思います。
Azureに作成したリソースは使い終わったら削除する事を忘れずに!
参考

