- Oracle MySQL Database Serviceの使い方メモ〜その4
- WordPressコンテナからMySQL Database Serviceインスタンスへ接続する
- Oracle Linux 8 + SELinux + podman + WordPress + MySQL Database Service
はじめに
Oracle Cloud Infrastructure (OCI) でマネージドサービスとして利用可能なOracle MySQL Database Serviceを利用してWordPressの環境を構築してみました。また、WordpressはOracle Linux 8上のPodmanを利用したコンテナ環境で稼働させています。podmanの利用方法については下記の記事を参照ください。
OCI上のOracle Linux 8 + podmanでWordPressを動かす
検証環境
- MySQL 8.0.22-u2-cloud (Oracle MySQL Database Service)
- Oracle Linux Server release 8.2 : Wordpressサーバ、Bastionサーバで利用
- docker.io/library/wordpress:latest (Wordpress 5.5.3, PHP 7.4.12)
- podman 2.0.5
OCI上の検証環境の構築
検証環境構成
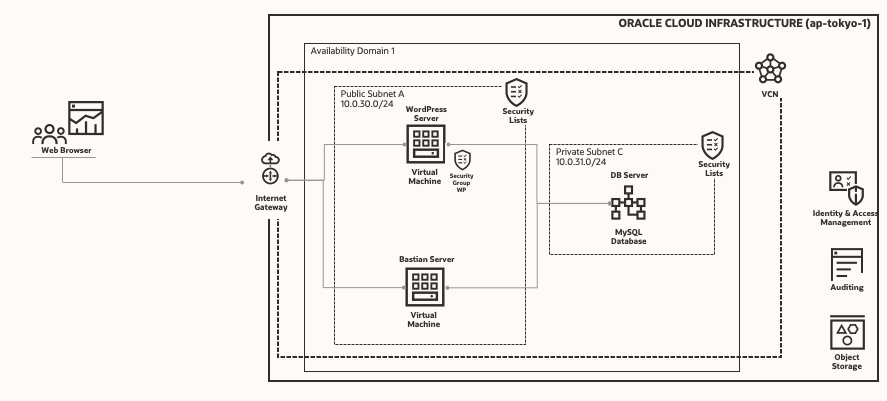
前回の検証環境に加えてWordPressが稼働するWPサーバを作成します。また、ネットワークはBastionサーバと同じパブリック・サブネットに配置し、セキュリティ・グループによってWPサーバ固有のポート(8080番)を経由したアクセスを許可します。

OCI上のVCN構成 ~ Bastionサーバの作成 ~ MySQL Database Serviceインスタンスの作成
作業手順については前回の記事 を参照ください。Bastionサーバには、MySQL ShellやMySQLクライアントなどMySQL Database Serviceインスタンスへアクセスできるクライアント・ツールをご用意ください。
セキュリティ・グループの作成
クライアントのWebブラウザからWordpressの検証環境にアクセスするために、インターネットからのInbound通信で8080ポートを許可するようにセキュリティ・グループ WPを作成します。
OCIダッシュボードメニューから、コア・インフラストラクチャ>ネットワーキング>仮想クラウド・ネットワークにアクセスし、作成したVCN (本記事内ではMySQLTest) を選択、画面左下のリソースメニューよりネットワーク・セキュリティ・グループを選択、画面中央のネットワーク・セキュリティ・グループの作成ボタンをクリックし、下記の設定を有したセキュリティ・グループ WPを作成してください。
| ステートレス | ソース・タイプ | ソースCIDR | IPプロトコル | ソース・ポート範囲 | 宛先ポート範囲 |
|---|---|---|---|---|---|
| いいえ | CIDR | 0.0.0.0/0 | TCP | All | 8080 |
WordPressが稼働するCompute VMインスタンスの作成
OCIダッシュボードメニューから、コア・インフラストラクチャ>コンピュート>インスタンスにアクセスします。インスタンスの作成ボタンを押してComputeインスタンスの作成ウィザードを開始します。ウィザード内の入力例を下記に示します。
-
名前 : 任意名前 WP
-
コンパートメントの選択 : 任意のコンパートメント名 /dev
-
配置とハードウェアの構成
- 可用性ドメインの選択 :デフォルト Fubk:AP-TOKYO-1-AD-1
- フォルト・ドメインの選択 :デフォルト FAULT-DOMAIN-1
- イメージ:Oracle Linux 8
- シェイプの選択:デフォルト VM.Standard.E2.1
-
ネットワーキングの構成
- 仮想クラウド・ネットワーク: MySQLTest
- サブネット: パブリック・サブネット-MySQLTest
- ネットワーク・セキュリティ・グループを使用してトラフィックを制御: WP
- パブリックIPv4アドレスの割当て: はい
-
SSHキーの追加:公開キー・ファイルの選択
-
ブート・ボリュームの構成 :デフォルト設定
Oracle MySQL Database Serviceインスタンスの構成
WordPress用のデータベース・スキーマの作成
BastionサーバにアクセスしMySQL Shellなどクライアント・ツールをMySQL Database Serviceインスタンス作成時に設定した管理者ユーザー・管理者パスワードでアクセスします。下記にはMySQL Shellを利用した例を記しますが、SQLモードに切り替え後、WordPressが利用するデータベース・スキーマwpdbを作成しています。
$ mysqlsh mdsadmin@10.0.31.11
MySQL Shell 8.0.22

Copyright (c) 2016, 2020, Oracle and/or its affiliates.
Oracle is a registered trademark of Oracle Corporation and/or its affiliates.
Other names may be trademarks of their respective owners.

Type '\help' or '\?' for help; '\quit' to exit.
Creating a session to 'mdsadmin@10.0.31.11'
Fetching schema names for autocompletion... Press ^C to stop.
Your MySQL connection id is 24 (X protocol)
Server version: 8.0.22-u2-cloud MySQL Enterprise - Cloud
No default schema selected; type \use <schema> to set one.

 MySQL  10.0.31.11:33060+ ssl  JS > \sql
Switching to SQL mode... Commands end with ;

 MySQL  10.0.31.11:33060+ ssl  SQL > CREATE DATABASE wpdb;
Query OK, 1 row affected (0.0042 sec)
WordPress用のデータベース・ユーザーの作成と権限の付与
WordPress用のデータベース・ユーザーwpuserの作成とwpdbスキーマに対する権限の付与を行います。ここでのポイントはWordPressが稼働するWPサーバが配置されるサブネット10.0.30.0/24からリモート・アクセスを許可するようにワイルドカードを利用してhost部分を'10.0.30.%'としているところです。
 MySQL  10.0.31.11:33060+ ssl  SQL > CREATE USER 'wpuser'@'10.0.30.%' IDENTIFIED BY 'PASSWORD';
Query OK, 0 rows affected (0.0068 sec)

 MySQL  10.0.31.11:33060+ ssl  SQL > GRANT ALL ON wpdb.* TO 'wpuser'@'10.0.30.%' WITH GRANT OPTION;
Query OK, 0 rows affected (0.0029 sec)

 MySQL  10.0.31.11:33060+ ssl  SQL > \q
Bye!
WordPressのインストールと構成
podmanのインストール
WPサーバにアクセス後、下記のコマンドを実行してpodmanと関連のcontainer-toolsをインストールします。
$ cat /etc/oracle-release
  Oracle Linux Server release 8.2
$ sudo dnf install -y podman
$ sudo dnf module install -y container-tools:ol8
WordPressサーバのセキュリティ設定
Firewallの設定
はじめにfirewall-cmdを利用して、ブラウザアクセス検証用の8080ポートとMySQL Database Serviceへのアクセスに利用する3306ポートを経由した通信を許可するように設定します。3306ポートを経由した通信に関しては、リッチルールを利用して10.0.31.0/24サブネットからの通信に限定して許可するように設定しています。
$ sudo firewall-cmd --add-port=8080/tcp --zone=public --permanent
$ sudo firewall-cmd --permanent --add-rich-rule 'rule family="ipv4" source address="10.0.31.0/24" port protocol="tcp" port="3306" accept'
$ sudo firewall-cmd --reload
SELinuxの設定
今回はSELinuxはEnforcingのままで利用します。1つ目のhttpd_can_network_connectはhttpdがネットワークへの接続を許可する設定、2つ目のsetsebool -P httpd_can_network_connect_dbはhttpdがデータベースへの接続を許可する設定になります。
$ sudo setsebool -P httpd_can_network_connect=1
$ sudo setsebool -P httpd_can_network_connect_db=1
なお、コンテナ内のプロセスの権限についてはKubernetes YAML内のallowPrivilegeEscalation: trueとseLinuxOptions: type: spc_tを記述して設定しています。
WordPressコンテナ用永続化ディレクトリの準備
WordPressコンテナが利用するディレクトリを永続化することで追加したテーマやPluginを永続化できます。作業ディレクトリ配下にそれぞれのディレクトリを作成し、適切なパーミッションを設定します。
$ mkdir -p wordpress
$ chmod 777 wordpress
Kubernetes YAMLの編集
事前に作成しておいたKubernetes YAMLをGithubリポジトリに配置してあるので、curlコマンドでダウンロードします。
$ curl -o podman_k8s_WPMDS.yaml https://raw.githubusercontent.com/orakurara/WPonOCI/main/podman_k8s_WPMDS/podman_k8s_WPMDS.yaml
ダウンロードされたYAMLファイルを編集し、MySQL Database Serviceへのアクセス情報を記述します。下記を参考にWORDPRESS_DB_HOSTにMySQL Database Serviceのプライベート・エンドポイントのIPアドレスとポート番号を10.0.31.11:3306の様に指定し、WORDPRESS_DB_NAMEにWordPress用のデータベース・スキーマ名wpdbを、WORDPRESS_DB_USERにWordPress用のデータベース・スキーマにアクセス可能なデータベース・ユーザー名wpuserを、WORDPRESS_DB_PASSWORDにデータベース・ユーザーのパスワードをそれぞれ記述してください。
apiVersion: v1
kind: Pod
metadata:
  labels:
    app: opc_wp
  name: opc_wp
spec:
  containers:
  - name: wordpress
    env:
    - name: PATH
      value: /usr/local/sbin:/usr/local/bin:/usr/sbin:/usr/bin:/sbin:/bin
    - name: WORDPRESS_DB_PASSWORD
      value: PASSWORD
    - name: WORDPRESS_DB_USER
      value: wpuser
    - name: WORDPRESS_DB_NAME
      value: wpdb
    - name: WORDPRESS_DB_HOST
      value: 10.0.31.11:3306
    - name: APACHE_CONFDIR
      value: /etc/apache2
    - name: APACHE_ENVVARS
      value: /etc/apache2/envvars
    - name: PHP_INI_DIR
      value: /usr/local/etc/php
    - name: HOSTNAME
    image: docker.io/library/wordpress:latest
    name: opcwordpress1
    ports:
    - containerPort: 80
      hostPort: 8080
      protocol: TCP
    - containerPort: 3306
      hostPort: 3306
      protocol: TCP
    securityContext:
      allowPrivilegeEscalation: true
      readOnlyRootFilesystem: false
      seLinuxOptions:
        type: spc_t
    volumeMounts:
    - mountPath: /var/www/html
      name: home-opc-wordpress
      workingDir: /var/www/html
  volumes:
  - name: home-opc-wordpress
    hostPath:
      path: /home/opc/wordpress
      type: Directory
それではいよいよpodman play kubeを実行してWordpressを構築します。
$ podman play kube podman_k8s_WPMySQL.yaml
Trying to pull docker.io/library/wordpress:latest...
Getting image source signatures
Copying blob 345b578c1a78 skipped: already exists
Copying blob 852e50cd189d skipped: already exists
Copying blob 0266fc315b01 skipped: already exists
Copying blob 4c8a5fa787a1 skipped: already exists
Copying blob 46fc127c1884 skipped: already exists
Copying blob f768b7fadf16 skipped: already exists
Copying blob 90aafe41e78d skipped: already exists
Copying blob af01fae4e5fc skipped: already exists
Copying blob 9e463236c8bc skipped: already exists
Copying blob cd12b0a220f2 skipped: already exists
Copying blob d9f76220cef4 skipped: already exists
Copying blob c09cf9a96ea9 skipped: already exists
Copying blob 6dda8bec068c skipped: already exists
Copying blob fd36a10c28fe skipped: already exists
Copying blob e11e483ab28e skipped: already exists
Copying blob ab40cb22800e skipped: already exists
Copying blob b08636db59dd skipped: already exists
Copying blob d2c7678bc02b skipped: already exists
Copying blob f903e014412a skipped: already exists
Copying blob 114ff1eb7cb0 [--------------------------------------] 0.0b / 0.0b
Copying config cfb931188d done
Writing manifest to image destination
Storing signatures
Trying to pull docker.io/library/mysql:latest...
Getting image source signatures
Copying blob 938c64119969 skipped: already exists
Copying blob 852e50cd189d skipped: already exists
Copying blob a43f41a44c48 skipped: already exists
Copying blob 29969ddb0ffb skipped: already exists
Copying blob 5cdd802543a3 skipped: already exists
Copying blob b79b040de953 skipped: already exists
Copying blob 7689ec51a0d9 skipped: already exists
Copying blob a880ba7c411f skipped: already exists
Copying blob 984f656ec6ca skipped: already exists
Copying blob 9f497bce458a skipped: already exists
Copying blob b9940f97694b skipped: already exists
Copying blob 2f069358dc96 [--------------------------------------] 0.0b / 0.0b
Copying config dd7265748b done
Writing manifest to image destination
Storing signatures
Pod:
e872e98923c6135f83e685804d77bb239ed9ea5c23d87557afbe25e016f1a0f4
Containers:
f507c83777327644e8cd3f32aa0e595bb53986673e7dc90bb2ad5dcf78792938
557ee2109cee2c4dc51d4a1b44c217f512b46eff3074a2c311199dee9c1a179d
下記URLでアクセスすればWordpressの初期セットアップ画面にアクセスできます。
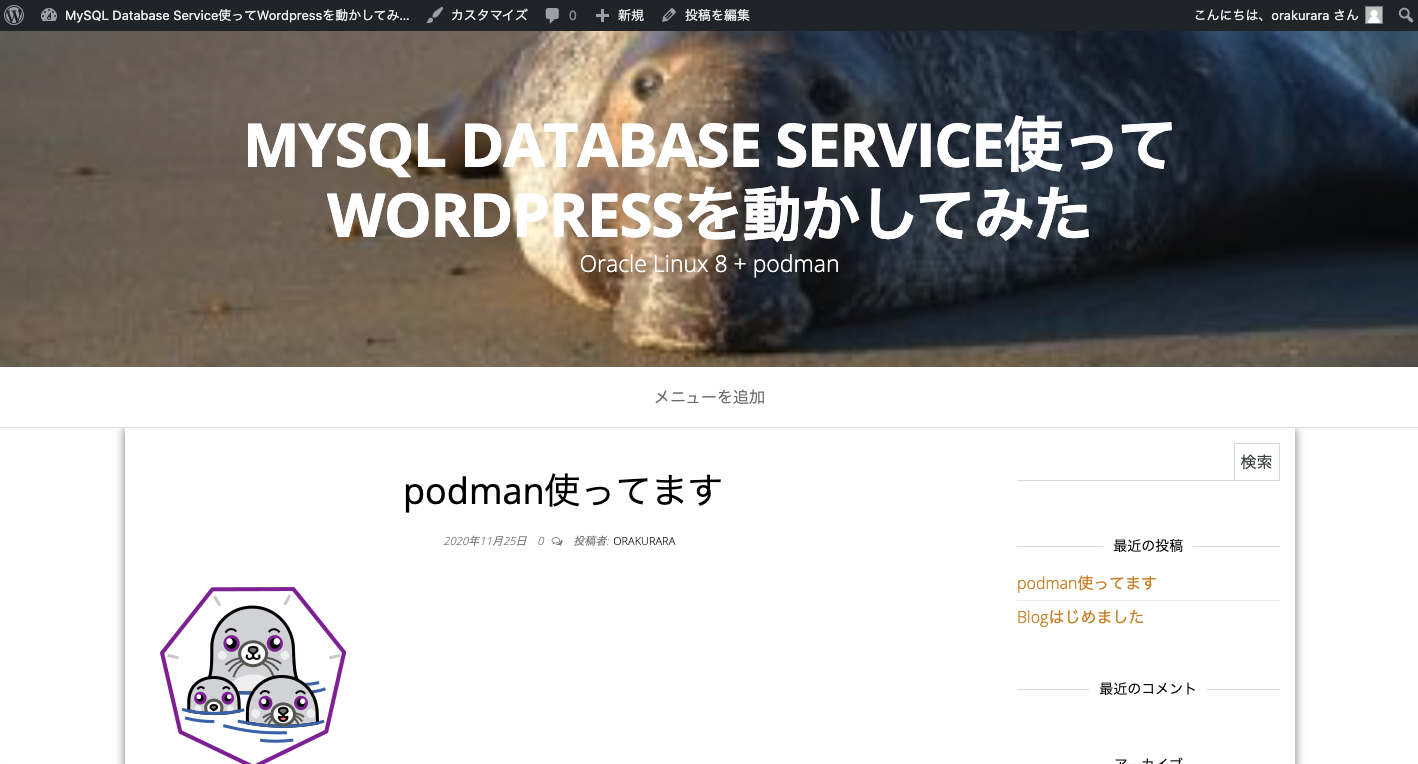
初期セットアップを完了し、ブログテーマの追加、ブログの投稿を行ってみました。
まとめ
Oracle MySQL Database Serviceを利用してWordPressを構築することができました。WordPressの標準機能しか試していませんが特に問題なく利用できています。Oracle MySQL Database Serviceはこれから新規でWordPressを立ち上げようとしている方だけでなく、パフォーマンスにお困りの方やセキュリティ運用にお困りの方に移行先として検討いただきたいサービスです。
関連情報
Oracle MySQL Database Serviceのインスタンスを作ってMySQL Workbenchから接続してみた
