OCI の Compute に mongosh をインストールして Autonomous JSON Database に接続してみますやで。
彡(゚)(゚)
1. 参考&スペシャルサンクス
下記記事を大変参考にさせて頂きました。感謝感激雨あられ
彡(^)(^)
2. Autonomous JSON Database とは?
Oracle SODA や MongoDB互換 の API を備えた NoSQL形式の PaaSデータベースとなります。詳細は下記を参照して下さい。
Autonomous JSON Database
https://www.oracle.com/jp/autonomous-database/autonomous-json-database/
3. 接続トポロジー&環境
以下のような接続トポロジーとなります。Autonomous JSON Database を Private Subnet に作成して、Private Subnet の Compute から接続します。
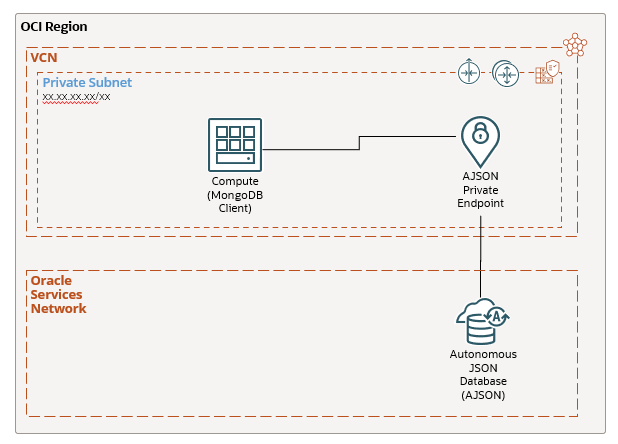
各環境の製品やバージョンは以下の通りです。
Autonomous JSON Database 19c
Oracle Linux 8.9
mongosh 2.2.1
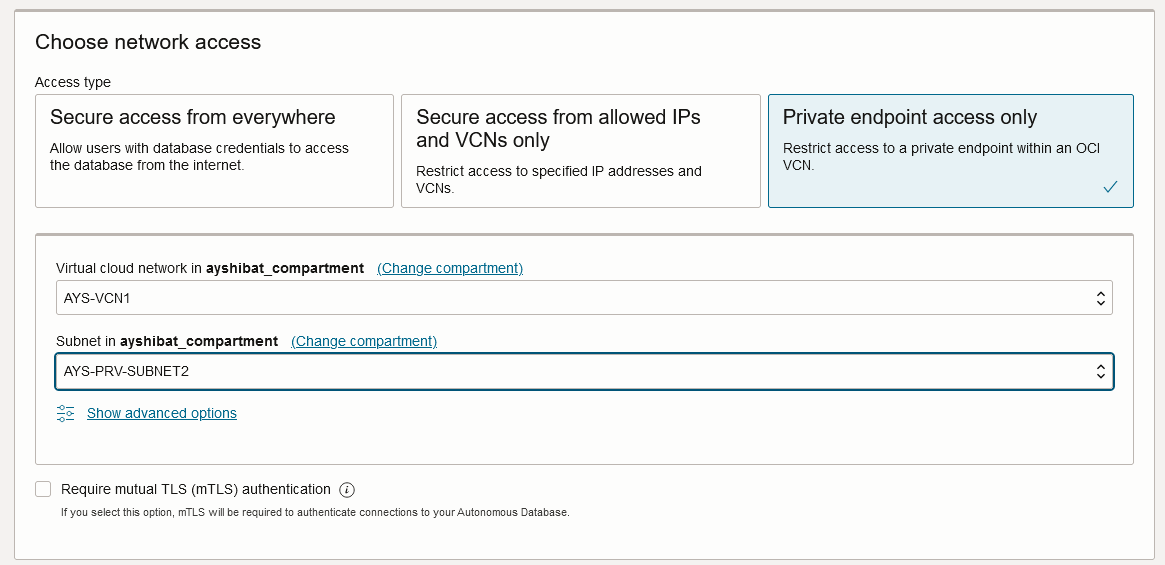
4. Autonomous JSON Database(AJSON) の作成
Autonomous JSON Database(AJSON) を作成します。とくに難しいところは無いので詳細は省略します。Private Subnet に作成するところは留意して下さい。
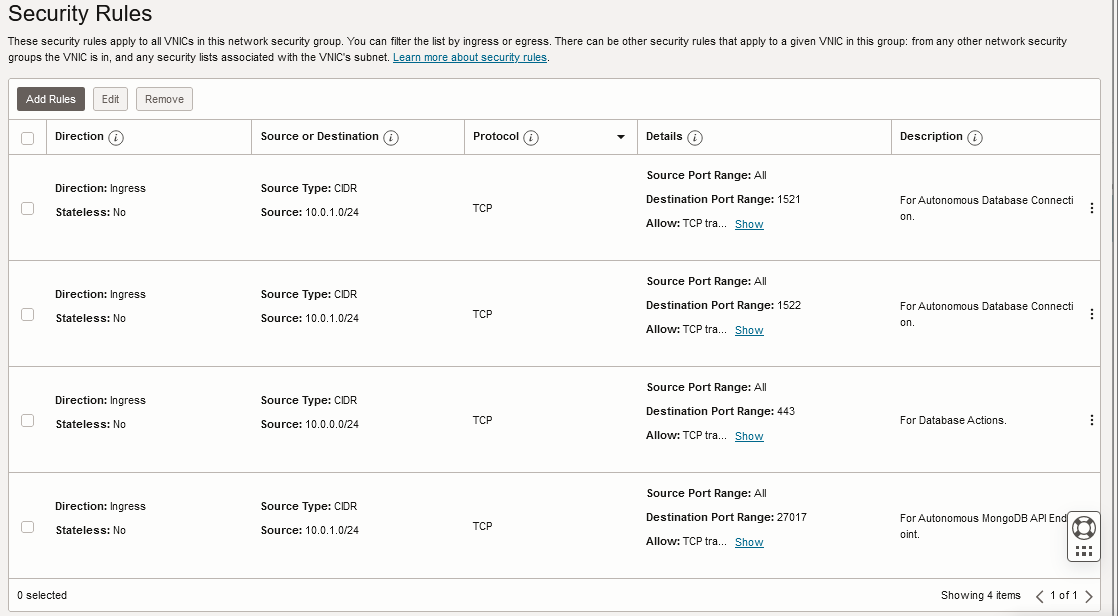
ポートは 1521(TLS), 1522(mTLS), 27017(この後出てくる MongoDB用API のエンドポイント)等の Ingress を開けておきます。今回は NSG(Network Security Group) を作成して AJSON の Private Endpoint に適用しました。
5. sqlplus による AJSON への接続
Compute に sqlplus をインストールして作成した AJSON への接続を確認します。下記はインストール時のコマンドです。
sudo dnf install oracle-instantclient-release-el8
sudo dnf install oracle-instantclient-basic
sudo dnf install oracle-instantclient-sqlplus.x86_64
sudo dnf install oracle-instantclient-tools.x86_64
sudo dnf install oracle-instantclient-jdbc.x86_64
接続文字列は OCIコンソール の Database Connection から入手しておいて下さい。
sqlplus を起動して MONGOユーザーで AJSON への接続を確認します。
export ORACLE_HOME=/usr/lib/oracle/21/client64
export PATH=${ORACLE_HOME}/bin:${PATH}
export LD_LIBRARY_PATH=${ORACLE_HOME}/lib
sqlplus /nolog
CONNECT ADMIN/xxxxxxxx@(description=(retry_count=20)(retry_delay=3)(address=(protocol=tcps)(port=1521)(host=xxxxxxxx.adb.ap-osaka-1.oraclecloud.com))(connect_data=(service_name=xxxxxxxx_aysajson001_tpurgent.adb.oraclecloud.com))(security=(ssl_server_dn_match=no)))

SQL*Plus: Release 21.0.0.0.0 - Production on Mon Mar 25 10:30:40 2024
Version 21.13.0.0.0

Copyright (c) 1982, 2022, Oracle.  All rights reserved.

SQL>
Connected.
6. MongoDB用DBユーザー作成
AJSON に MongoDB用DBユーザーを作成します。下記マニュアルが参考になります。
9 Oracle API for MongoDB Support
https://docs.oracle.com/en/database/oracle/oracle-rest-data-services/22.4/ordig/oracle-api-mongodb-support.html#GUID-8C4D54C1-C2BF-4C94-A2E4-2183F25FD462
今回は「MONGO」というDBユーザーを作成しました。
CREATE USER MONGO IDENTIFIED BY xxxxxxxx
DEFAULT TABLESPACE USERS
TEMPORARY TABLESPACE TEMP;
GRANT SODA_APP, CREATE SESSION, CREATE TABLE, CREATE VIEW, CREATE SEQUENCE, CREATE PROCEDURE, CREATE JOB, UNLIMITED TABLESPACE, DWROLE TO MONGO;
EXECUTE ORDS.ENABLE_SCHEMA(p_schema => 'MONGO');
ユーザー作成後に sqlplus で接続を確認します。
CONNECT MONGO/xxxxxxxx@(description=(retry_count=20)(retry_delay=3)(address=(protocol=tcps)(port=1521)(host=xxxxxxxx.adb.ap-osaka-1.oraclecloud.com))(connect_data=(service_name=xxxxxxxx_aysajson001_tpurgent.adb.oraclecloud.com))(security=(ssl_server_dn_match=no)))
Connected.
7. mongosh のインストール
下記を参照して OCI Compute に mongosh をインストールします。
Install mongosh
https://www.mongodb.com/docs/mongodb-shell/install/
Oracle Linux は Red Hat互換の OS なので Red Hat のインストール方法を試します。下記のyumリポジトリを vi等(sudo vi /etc/yum.repos.d/mongodb-org-7.0.repo)で設定します。
[mongodb-org-7.0]
name=MongoDB Repository
baseurl=https://repo.mongodb.org/yum/redhat/$releasever/mongodb-org/7.0/$basearch/
gpgcheck=1
enabled=1
gpgkey=https://www.mongodb.org/static/pgp/server-7.0.asc
リポジトリの設定後に yumコマンドで mongosh をインストールします。
sudo yum install -y mongodb-mongosh
:
MongoDB Repository                                                             [===                                                                       ] ---  B/s |   0  B     --:-- Running transaction
:
Running scriptlet: mongodb-mongosh-2.2.1-1.el8.x86_64                                                                                                                                 1/1
Verifying        : mongodb-mongosh-2.2.1-1.el8.x86_64                                                                                                                                 1/1

Installed:
  mongodb-mongosh-2.2.1-1.el8.x86_64

Complete!
8. mongosh の起動と AJSON への接続
まず OCIコンソールで MongoDB API の URL を確認します。Autonomous Database → 作成済みのAJSON → Tool Configuration のサブタブから、MondoDB API の行を確認します。

mongosh で MongoDB API の URL に接続します。以下のようなコマンドになります。パスワード部分の ! 等の記号は%でクォート(※下記例だと ! を %21 としている)する必要があります。
mongosh 'mongodb://MONGO:xxxxxxxx%21%21@xxxxxxxx.adb.ap-osaka-1.oraclecloudapps.com:27017/mongo?authMechanism=PLAIN&authSource=$external&ssl=true&retryWrites=false&loadBalanced=true'
Current Mongosh Log ID: 66015a92b031f50b6ac00e7d
Connecting to:          mongodb://<credentials>@xxxxxxxx.adb.ap-osaka-1.oraclecloudapps.com:27017/mongo?authMechanism=PLAIN&authSource=%24external&ssl=true&retryWrites=false&loadBalanced=true&appName=mongosh+2.2.1
Using MongoDB:          4.2.14
Using Mongosh:          2.2.1

For mongosh info see: https://docs.mongodb.com/mongodb-shell/


To help improve our products, anonymous usage data is collected and sent to MongoDB periodically (https://www.mongodb.com/legal/privacy-policy).
You can opt-out by running the disableTelemetry() command.

mongo> db.createCollection('dept')
{ ok: 1 }
mongo> show collections
dept
mongo> exit
mongosh で AJSON に接続できました。
9. まとめ
mongosh で AJSON に接続できました。次回は今回作った環境で Java で接続してみたいと思います。
彡(^)(^)
※(追記)次回はこちらとなります。