JUnit5 とは
言わずと知れた Java のテスティングフレームワークの、2019年現在最新のメジャーバージョン。
環境
> gradle --version
------------------------------------------------------------
Gradle 5.6.2
------------------------------------------------------------

Build time:   2019-09-05 16:13:54 UTC
Revision:     55a5e53d855db8fc7b0e494412fc624051a8e781

Kotlin:       1.3.41
Groovy:       2.5.4
Ant:          Apache Ant(TM) version 1.9.14 compiled on March 12 2019
JVM:          11.0.4 (AdoptOpenJDK 11.0.4+11)
OS:           Windows 10 10.0 amd64
Hello World
実装
plugins {
    id "java"
}

sourceCompatibility = 11
targetCompatibility = 11
[compileJava, compileTestJava]*.options*.encoding = "UTF-8"

repositories {
    mavenCentral()
}

dependencies {
    testImplementation "org.junit.jupiter:junit-jupiter:5.5.2"
}
- JUnit5 をとりあえず使い始めるなら、依存関係に
org.junit.jupiter:junit-jupiterを指定する(詳細後述)
Gradle 9 からは junit-platform-launcher も指定する必要がある。
bom も利用すると、以下のような書き方になる。
dependencies {
    testImplementation(platform("org.junit:junit-bom:5.14.2"))
    testImplementation("org.junit.jupiter:junit-jupiter")
    testRuntimeOnly("org.junit.platform:junit-platform-launcher")
}
理由については以下を参照。
Gradle 9.x で Failed to load JUnit Platform というエラーが出る原因と対応方法 #Java - Qiita
|-build.gradle
`-src/test/java/
  `-sample/junit5/
    |-JUnit5Test.java
    |-JUnit5Tests.java
    |-TestJUnit5.java
    `-Hoge.java
- 4種類のテストクラスを用意している
package sample.junit5;

import org.junit.jupiter.api.Assertions;
import org.junit.jupiter.api.Test;
import org.junit.jupiter.api.DisplayName;

class JUnit5Test {
    @Test
    void fail() {
        Assertions.assertEquals(10, 8);
    }

    static class StaticClass {
        @Test
        void fail() {
            Assertions.assertEquals(10, 8);
        }
    }

    static class StaticTest {
        @Test
        void fail() {
            Assertions.assertEquals(10, 8);
        }
    }

    class InnerTest {
        @Test
        void fail() {
            Assertions.assertEquals(10, 8);
        }
    }
}
- 各クラスは、必ず失敗する
fail()メソッドだけを定義している - 静的な入れ子クラスとして
StaticClassとStaticTestの2つを、
内部クラスとしてInnerTestクラスを定義している - 上の例は
JUnit5Test.javaだが、残りの3つ(JUnit5Tests.java,TestJUnit5.java,Hoge.java)も中身の実装は全部同じにしている
ConsoleLauncher で実行する
コマンドラインで JUnit5 を実行するためのツールとして、 ConsoleLauncher というものが用意されている。
実体は JUnit5 の各モジュールが1つに固められた jar ファイルで、Maven のセントラルリポジトリからダウンロードしてくる。
ここでは junit-platform-console-standalone-1.5.2.jar をダウンロードして検証してみる。
# コンパイルして
> gradle compileTestJava

# 実行
> java -jar junit-platform-console-standalone-1.5.2.jar ^
       -cp build\classes\java\test ^
       --scan-classpath build\classes\java\test

...

Failures (8):
  JUnit Jupiter:Hoge$StaticTest:fail()
    MethodSource [className = 'sample.junit5.Hoge$StaticTest', methodName = 'fail', methodParameterTypes = '']
    => org.opentest4j.AssertionFailedError: expected: <10> but was: <8>
       ...
  JUnit Jupiter:TestJUnit5:fail()
    MethodSource [className = 'sample.junit5.TestJUnit5', methodName = 'fail', methodParameterTypes = '']
    => org.opentest4j.AssertionFailedError: expected: <10> but was: <8>
       ...
  JUnit Jupiter:TestJUnit5$StaticTest:fail()
    MethodSource [className = 'sample.junit5.TestJUnit5$StaticTest', methodName = 'fail', methodParameterTypes = '']
    => org.opentest4j.AssertionFailedError: expected: <10> but was: <8>
       ...
  JUnit Jupiter:JUnit5Test:fail()
    MethodSource [className = 'sample.junit5.JUnit5Test', methodName = 'fail', methodParameterTypes = '']
    => org.opentest4j.AssertionFailedError: expected: <10> but was: <8>
       ...
  JUnit Jupiter:JUnit5Tests:fail()
    MethodSource [className = 'sample.junit5.JUnit5Tests', methodName = 'fail', methodParameterTypes = '']
    => org.opentest4j.AssertionFailedError: expected: <10> but was: <8>
       ...
  JUnit Jupiter:TestJUnit5$StaticClass:fail()
    MethodSource [className = 'sample.junit5.TestJUnit5$StaticClass', methodName = 'fail', methodParameterTypes = '']
    => org.opentest4j.AssertionFailedError: expected: <10> but was: <8>
       ...
  JUnit Jupiter:JUnit5Test$StaticTest:fail()
    MethodSource [className = 'sample.junit5.JUnit5Test$StaticTest', methodName = 'fail', methodParameterTypes = '']
    => org.opentest4j.AssertionFailedError: expected: <10> but was: <8>
       ...
  JUnit Jupiter:JUnit5Tests$StaticTest:fail()
    MethodSource [className = 'sample.junit5.JUnit5Tests$StaticTest', methodName = 'fail', methodParameterTypes = '']
    => org.opentest4j.AssertionFailedError: expected: <10> but was: <8>
       ...

Test run finished after 91 ms
[        10 containers found      ]
[         0 containers skipped    ]
[        10 containers started    ]
[         0 containers aborted    ]
[        10 containers successful ]
[         0 containers failed     ]
[         8 tests found           ]
[         0 tests skipped         ]
[         8 tests started         ]
[         0 tests aborted         ]
[         0 tests successful      ]
[         8 tests failed          ]
-
-cpオプションでテストで使用する依存関係(JUnit5 以外)をクラスパスに追加する。- JUnit5 のクラス達は
junit-platform-console-standalone-1.5.2.jarに入っている
- JUnit5 のクラス達は
-
--scan-classpathで、実行したいテストクラスを検索する場所を指定する - テストの結果はコンソールに出力される
テストクラスの検索条件
> java -jar junit-platform-console-standalone-1.5.2.jar --help
...
  -n, --include-classname=PATTERN
                             Provide a regular expression to include only classes whose fully
                               qualified names match. To avoid loading classes unnecessarily,
                               the default pattern only includes class names that begin with
                               "Test" or end with "Test" or "Tests". When this option is
                               repeated, all patterns will be combined using OR semantics.
                               Default: [^(Test.*|.+[.$]Test.*|.*Tests?)$]
...
- 上の例で実行されたテストクラスは以下の通り
Hoge$StaticTestJUnit5TestJUnit5Test$StaticTestJUnit5TestsJUnit5Tests$StaticTestTestJUnit5TestJUnit5$StaticClassTestJUnit5$StaticTest
- 逆に、次のクラスのテストは実行されていない
HogeHoge$InnerTestHoge$StaticClassJUnit5Test$InnerTestJUnit5Test$StaticClassJUnit5Tests$InnerTestJUnit5Tests$StaticClassTestJUnit5$InnerTest
- テストクラスの検索条件は
-nまたは--include-classnameオプションで指定する(正規表現指定) - デフォルトは
^(Test.*|.+[.$]Test.*|.*Tests?)$ - したがって、
Testではじまるか、TestまたはTestsで終わるクラスが対象になる(静的な入れ子クラスも含む)- 内部クラスは対象外(後述の
@Nestedが必要)
- 内部クラスは対象外(後述の
- テストクラスは
publicでなくてもいい
Gradle から実行する
でも、普通は使用しているビルドツールから実行すると思う。
Gradle は 4.6 から JUnit5 の実行をネイティブサポートしているので、 Gradle から実行してみる。
...

test {
    useJUnitPlatform() // ★追加
}
- Gradle は JUni4 や TestNG など他のテスティングフレームワークもサポートしている
- JUnit5 を使う場合は、 JUnit5 を使うということを明示的に宣言する必要がある
- そのための設定が、
test { useJUnitPlatform() }になる
> gradle test
...

> Task :test FAILED

sample.junit5.Hoge > fail() FAILED
    org.opentest4j.AssertionFailedError at Hoge.java:10

sample.junit5.JUnit5Test > fail() FAILED
    org.opentest4j.AssertionFailedError at JUnit5Test.java:10

sample.junit5.JUnit5Tests$StaticTest > fail() FAILED
    org.opentest4j.AssertionFailedError at JUnit5Tests.java:23

sample.junit5.JUnit5Tests > fail() FAILED
    org.opentest4j.AssertionFailedError at JUnit5Tests.java:10

sample.junit5.TestJUnit5 > fail() FAILED
    org.opentest4j.AssertionFailedError at TestJUnit5.java:10

sample.junit5.Hoge$StaticClass > fail() FAILED
    org.opentest4j.AssertionFailedError at Hoge.java:16

sample.junit5.Hoge$StaticTest > fail() FAILED
    org.opentest4j.AssertionFailedError at Hoge.java:23

sample.junit5.JUnit5Test$StaticClass > fail() FAILED
    org.opentest4j.AssertionFailedError at JUnit5Test.java:16

sample.junit5.JUnit5Test$StaticTest > fail() FAILED
    org.opentest4j.AssertionFailedError at JUnit5Test.java:23

sample.junit5.JUnit5Tests$StaticClass > fail() FAILED
    org.opentest4j.AssertionFailedError at JUnit5Tests.java:16

sample.junit5.TestJUnit5$StaticClass > fail() FAILED
    org.opentest4j.AssertionFailedError at TestJUnit5.java:16

sample.junit5.TestJUnit5$StaticTest > fail() FAILED
    org.opentest4j.AssertionFailedError at TestJUnit5.java:23

12 tests completed, 12 failed
...

BUILD FAILED in 6s
2 actionable tasks: 1 executed, 1 up-to-date
- 実行されたのは以下のクラスたち
-
Hoge* -
Hoge$StaticClass* Hoge$StaticTestJUnit5Test-
JUnit5Test$StaticClass* JUnit5Test$StaticTestJUnit5Tests-
JUnit5Tests$StaticClass* JUnit5Tests$StaticTestTestJUnit5TestJUnit5$StaticClassTestJUnit5$StaticTest
-
- ConsoleLauncher で実行した場合よりも実行されたクラスが増えている(* がついているのが増えたクラス)
- Gradle からテストを実行した場合、デフォルトは Test タスクの testClassesDirs プロパティ で指定された場所に存在するクラスが全て対象になる
- ただし、内部クラス(
InnerTest)がデフォルトで対象外なのは ConsoleLauncher と同じ
Eclipse で実行した場合に対象となるクラス
確認したバージョンは Pleiades の 2019-09 Standard Edition。
実行方法は、 src/test/java フォルダを右クリックして「実行」→「JUnitテスト」。
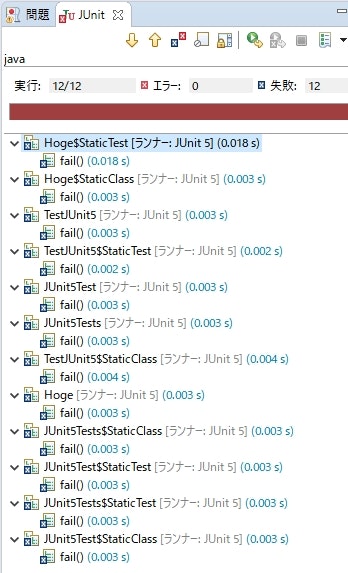
Hoge や StaticClass も対象になった。
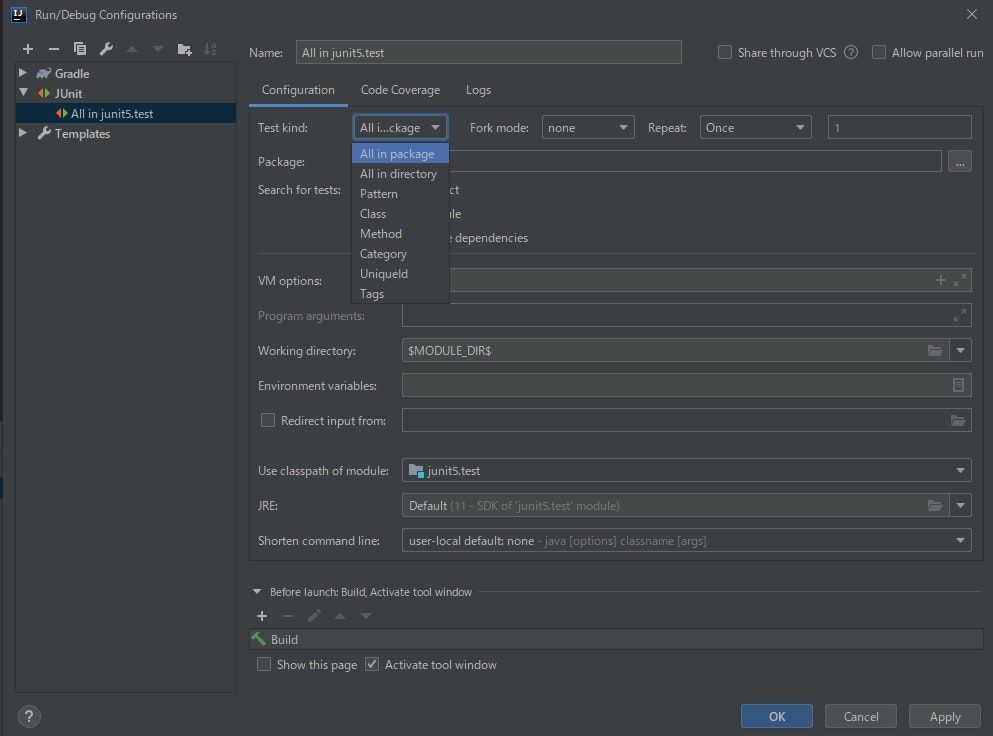
IntelliJ IDEA で実行した場合に対象となるクラス
確認したバージョンは Community 版の 2019.2.3。
IDEA の場合、 Gradle のプロジェクトとして Open していると Gradle の test タスクでテストが実行される。
なので、その場合の動作は Gradle から実行した場合と同じになる。
Gradle を使わずに [Run/Debug Configurations] から実行の構成を指定することもできる。
ただ、その場合は「Test kind」の指定次第となる。
アーキテクチャ
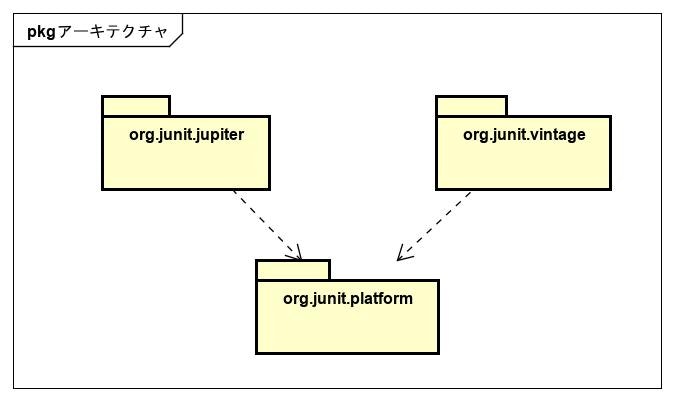
JUnit5 は、大きく3つのモジュール(サブプロジェクト)から成る。
JUnit Platform
JVM 上でテストフレームワークを実行するための基盤。
TestEngine というインターフェースを実装したモジュールを実行する仕組みを提供する。
コンソールから起動するための ConsoleLauncher なども提供している。
JUnit Jupiter
JUnit 5 のテストを作成・実行するためのモジュール。
JUnit 5 向けに TestEngine を実装した JupiterTestEngine を提供する。
Jupiter といえば JUnit 5 のことを指していると思えばいいと思う。
JUnit Vintage
JUnit Platform 上で JUnit 3, 4 を動かすために TestEngine を実装したクラス ― VintageTestEngine を提供するモジュール。
多分、移行期の互換用に用意されたものだと思うので、新しく JUnit 5 を導入するような場合は不要。
要するに
JUnit 5 は、大きく次の2つのモジュールから成る。
- テストフレームワークを実行するための基盤モジュール(Platform)
- 具体的なテストフレームワークのモジュール(Jupiter, Vintage)
Platform はテストを実行するために必要となる。
Jupiter は JUnit 5 でテストを書きたいときに必要で、 Vintage は JUnit 4 を JUnit Platform 上で動かしたいときに必要となる。
必要なアーティファクト
Platform や Jupiter というモジュールは、 Maven の分類でいうところの Group に対応している。
それぞれの Group の中には、さらにいくつもの Artifact が存在する。
各モジュール内の Artifact の依存関係
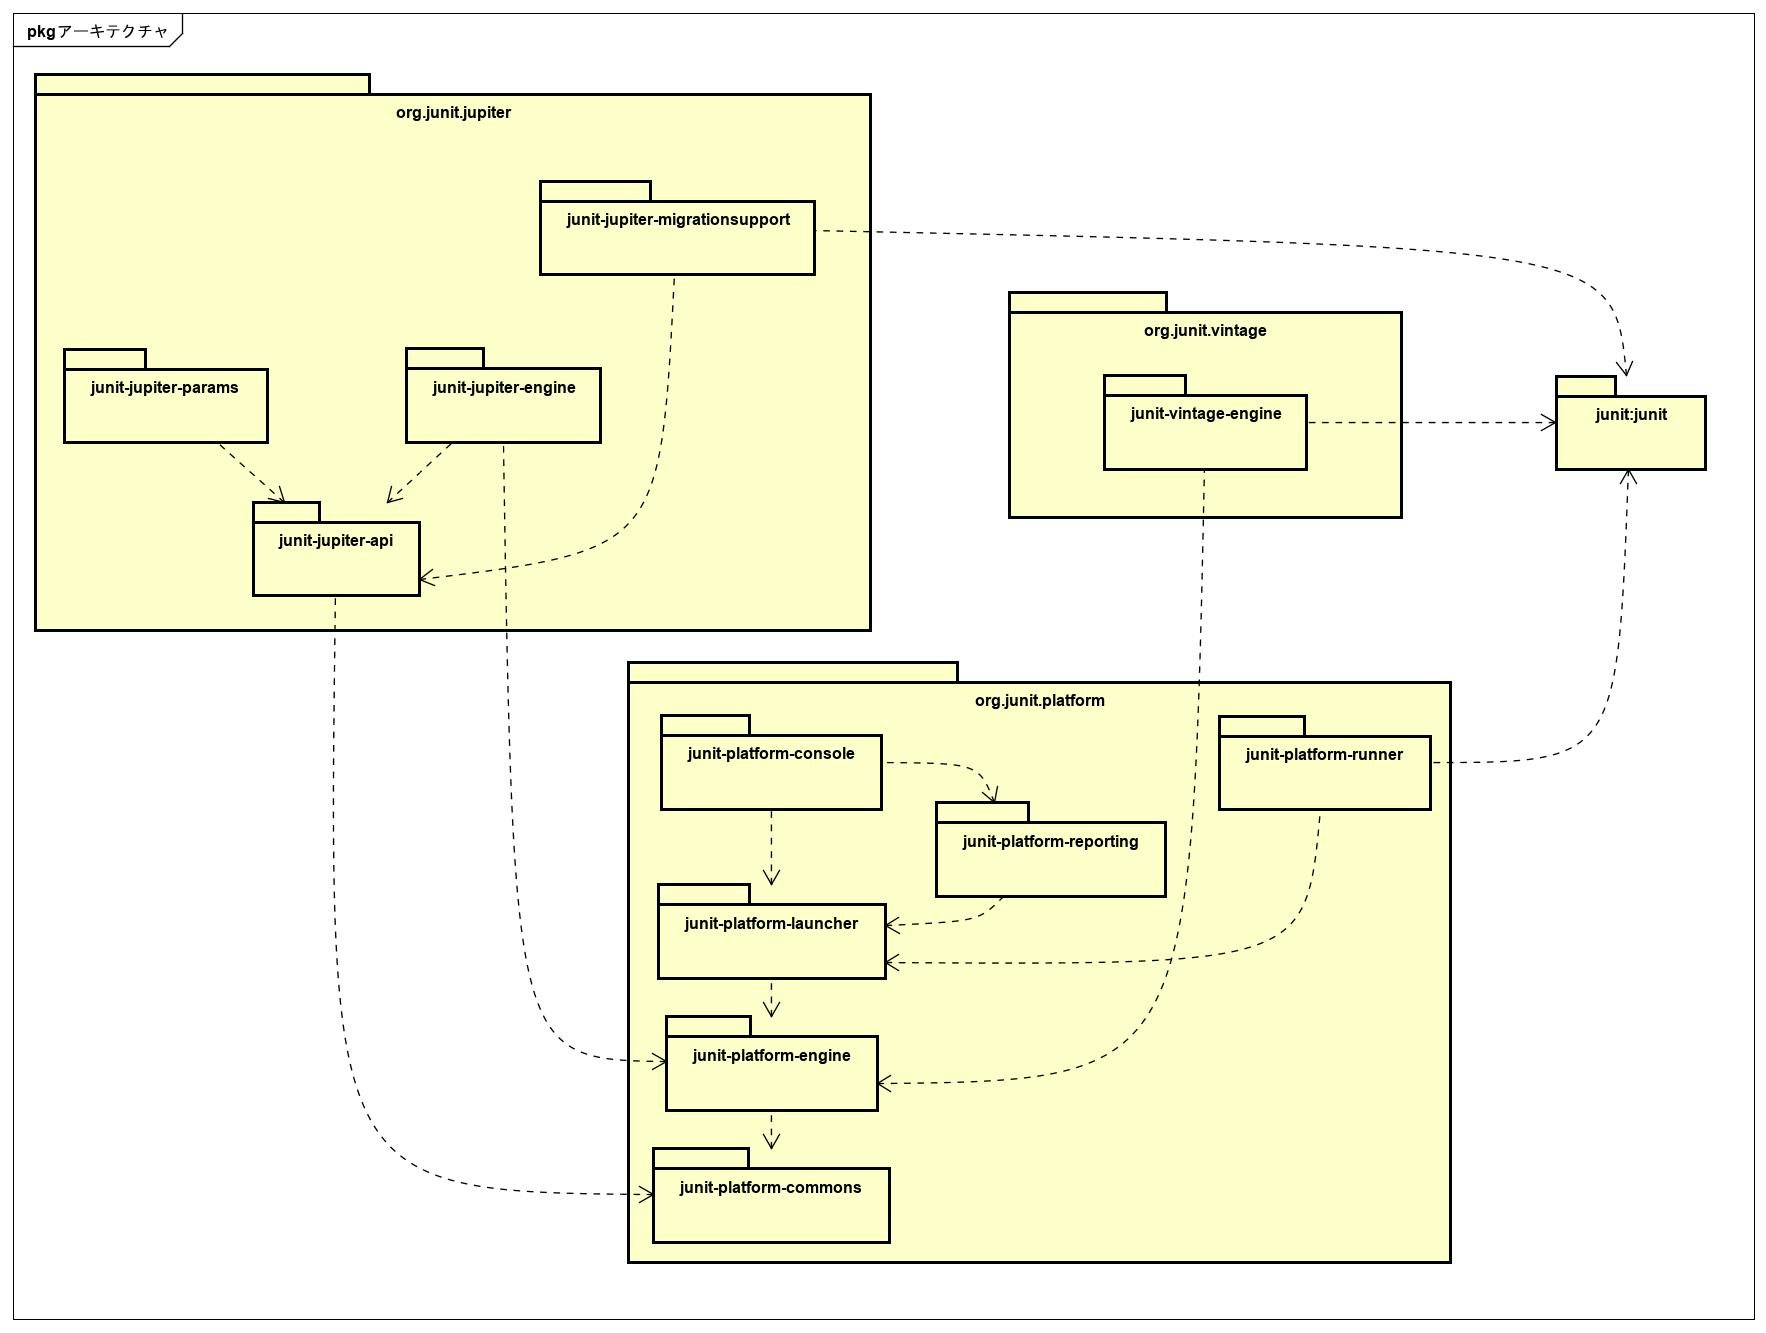
実際に JUnit 5 のテストを書くときは、これらの Artifact から必要なものだけを適切に選択して依存関係に追加する必要がある。
上図からも分かるように、どれが必要かを判断することは、初見では難しい。
そこで、 5.4.0 で org.junit.jupiter Group に、 junit-jupiter という Artifact が追加された。
junit-jupiter が追加された図
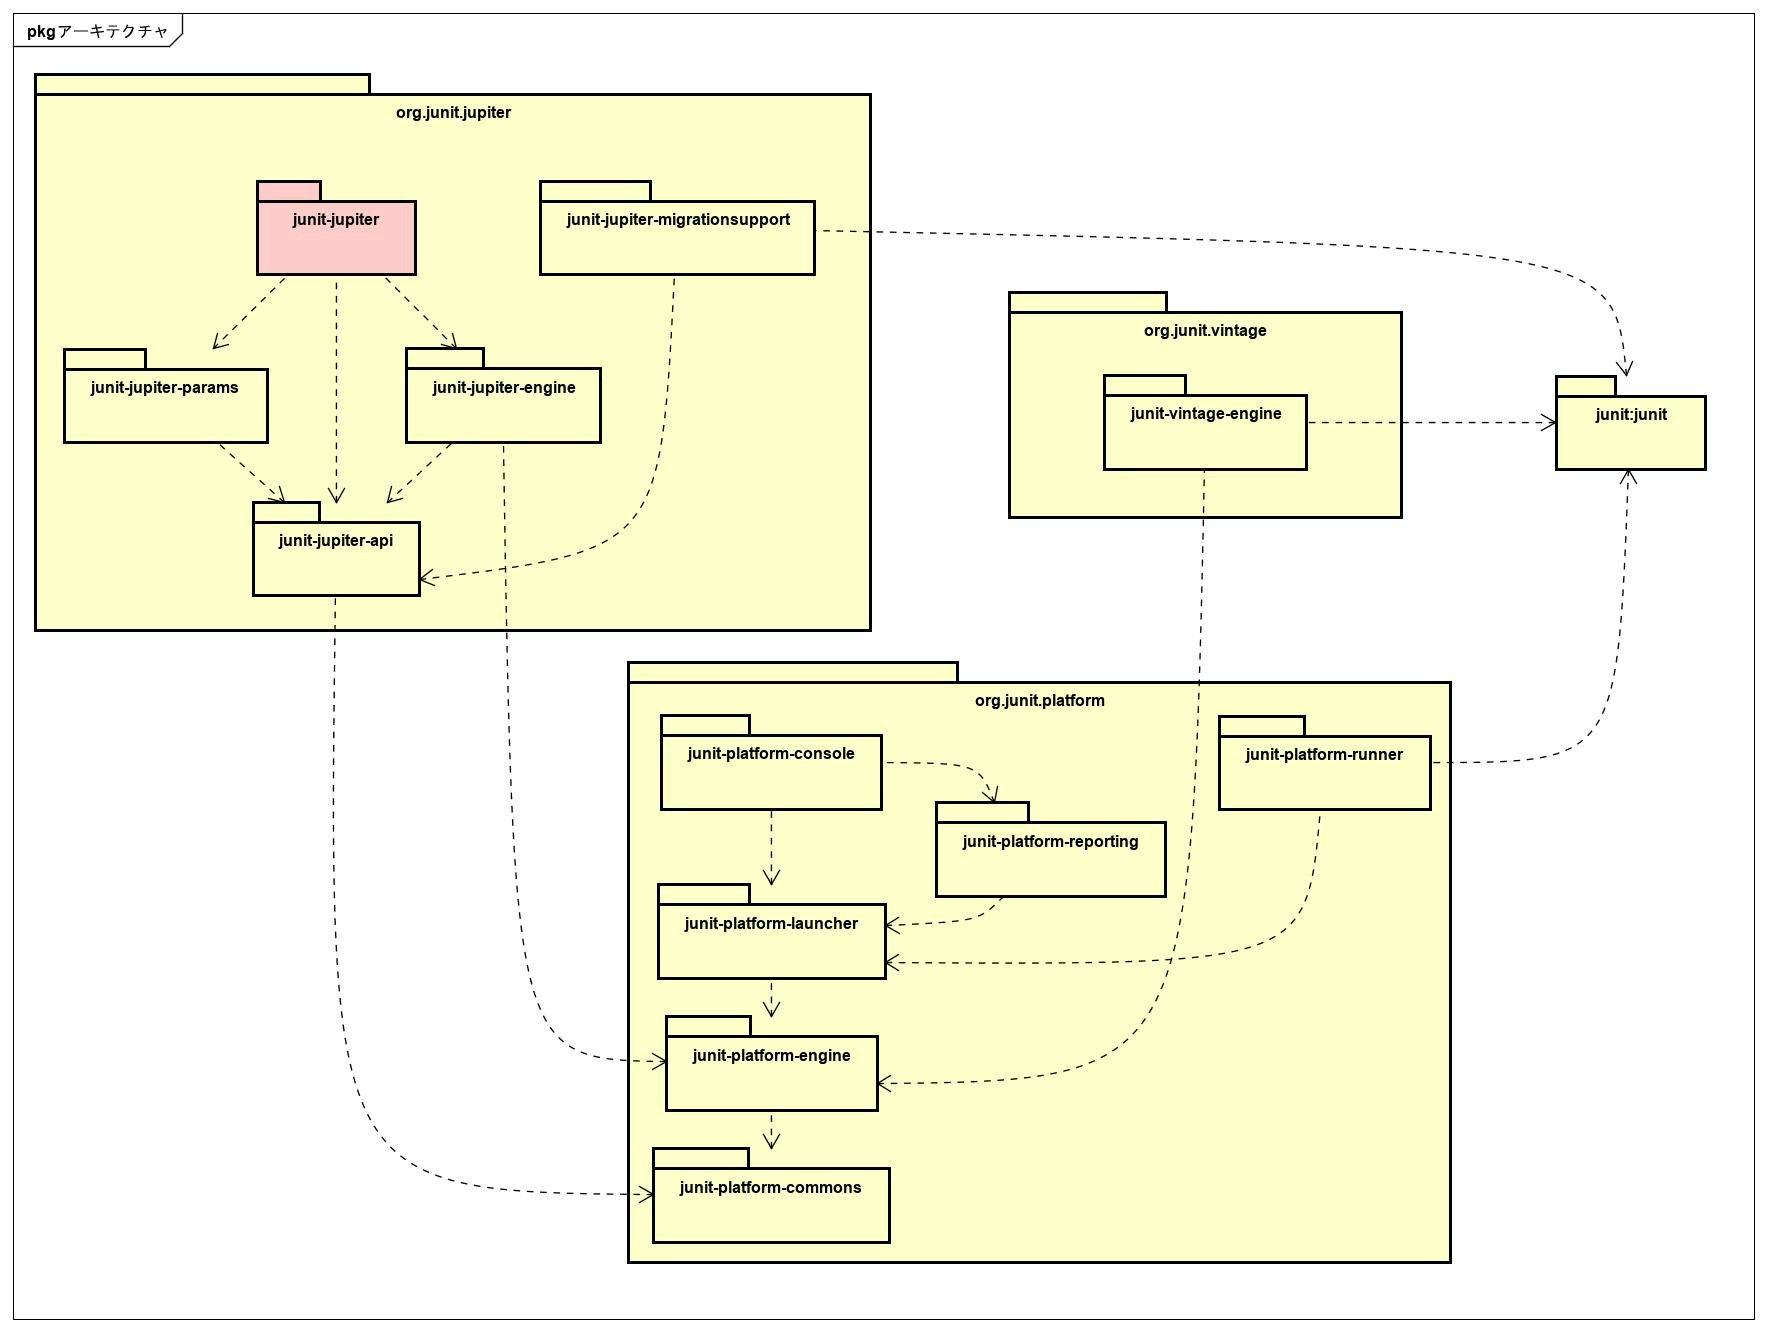
junit-jupiter は、 JUnit 5 でテストを書くために最低限必要な依存関係だけをまとめた Artifact となっている。
したがって、 JUnit 5 でテストを書くだけなら、この Artifact を1つだけ依存関係に追加すれば良いようになっている。
テストの書き方
テストメソッド
package sample.junit5;

import org.junit.jupiter.api.Assertions;
import org.junit.jupiter.api.Test;

class JUnit5Test {
    @Test
    void success() {
        Assertions.assertEquals(10, 10);
    }

    @Test
    void fail() {
        Assertions.assertEquals(10, 8);
    }
}
- @Test で注釈されたメソッドがテストメソッドとなる
- JUnit4 までの org.junit.Test とはパッケージが異なる
- 4 -> 5 への移行期間中に 4, 5 両方のテストを混在させられるようにするためらしい
前処理・後処理
package sample.junit5;

import org.junit.jupiter.api.AfterAll;
import org.junit.jupiter.api.AfterEach;
import org.junit.jupiter.api.BeforeAll;
import org.junit.jupiter.api.BeforeEach;
import org.junit.jupiter.api.Test;

class JUnit5Test {

    @BeforeAll
    static void beforeAll() {
        System.out.println("JUnit5Test#beforeAll()");
    }

    @BeforeEach
    void beforeEach() {
        System.out.println("  JUnit5Test#beforeEach()");
    }

    @Test
    void test1() {
        System.out.println("    JUnit5Test#test1()");
    }

    @Test
    void test2() {
        System.out.println("    JUnit5Test#test2()");
    }

    @AfterEach
    void afterEach() {
        System.out.println("  JUnit5Test#afterEach()");
    }

    @AfterAll
    static void afterAll() {
        System.out.println("JUnit5Test#afterAll()");
    }
}
JUnit5Test#beforeAll()
  JUnit5Test#beforeEach()
    JUnit5Test#test1()
  JUnit5Test#afterEach()
  JUnit5Test#beforeEach()
    JUnit5Test#test2()
  JUnit5Test#afterEach()
JUnit5Test#afterAll()
-
@BeforeAll をつけたメソッドは、テストクラス内で一番最初に一度だけ実行される
- メソッドが
staticである必要がある
- メソッドが
- @BeforeEach をつけたメソッドは、各テストメソッドの前に実行される
-
@AfterAll をつけたメソッドは、テストクラス内で一番最後に一度だけ実行される
- メソッドが
staticである必要がある
- メソッドが
- @AfterEach をつけたメソッドは、各テストメソッドの後に実行される
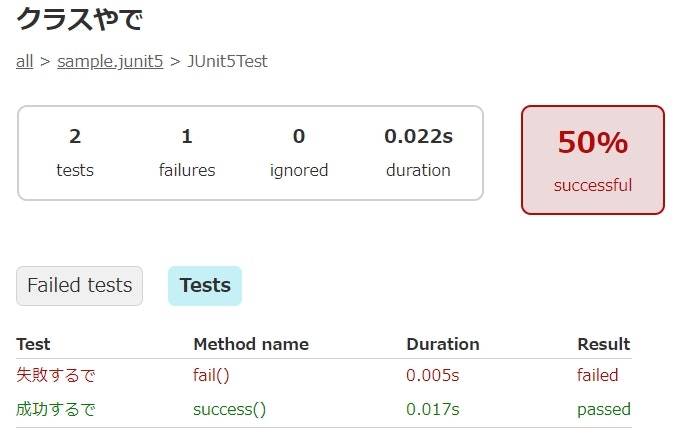
表示名
package sample.junit5;

import org.junit.jupiter.api.Assertions;
import org.junit.jupiter.api.Test;
import org.junit.jupiter.api.DisplayName;

@DisplayName("クラスやで")
class JUnit5Test {
    @Test
    @DisplayName("成功するで")
    void success() {
        Assertions.assertEquals(10, 10);
    }

    @Test
    @DisplayName("失敗するで")
    void fail() {
        Assertions.assertEquals(10, 8);
    }
}
ConsoleLauncher で実行した場合
> java -jar junit-platform-console-standalone-1.5.2.jar ^
       -cp build\classes\java\test ^
       --scan-classpath build\classes\java\test

...

.
+-- JUnit Jupiter [OK]
| '-- クラスやで [OK]
|   +-- 成功するで [OK]
|   '-- 失敗するで [X] expected: <10> but was: <8>
'-- JUnit Vintage [OK]

Failures (1):
  JUnit Jupiter:クラスやで:失敗するで
    MethodSource [className = 'sample.junit5.JUnit5Test', methodName = 'fail', methodParameterTypes = '']
    => org.opentest4j.AssertionFailedError: expected: <10> but was: <8>
       ...
       [...]

Test run finished after 87 ms
[         3 containers found      ]
[         0 containers skipped    ]
[         3 containers started    ]
[         0 containers aborted    ]
[         3 containers successful ]
[         0 containers failed     ]
[         2 tests found           ]
[         0 tests skipped         ]
[         2 tests started         ]
[         0 tests aborted         ]
[         1 tests successful      ]
[         1 tests failed          ]
Gradle で実行した場合
> gradle test
...
> Task :test FAILED

sample.junit5.JUnit5Test > fail() FAILED
    org.opentest4j.AssertionFailedError at JUnit5Test.java:18

2 tests completed, 1 failed

FAILURE: Build failed with an exception.

...

BUILD FAILED in 6s
2 actionable tasks: 1 executed, 1 up-to-date
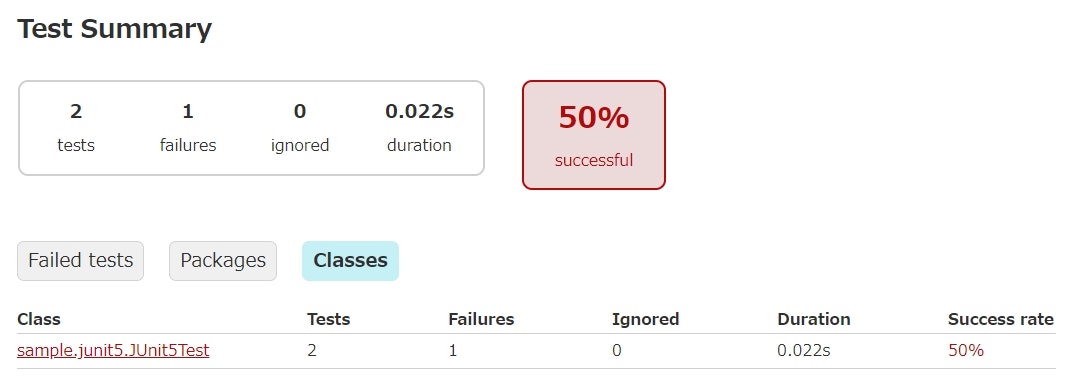
HTML レポート
XML レポート
<?xml version="1.0" encoding="UTF-8"?>
<testsuite name="sample.junit5.JUnit5Test" tests="2" skipped="0" failures="1" errors="0" timestamp="2019-10-08T13:55:57" hostname="niconico" time="0.022">
<properties/>
<testcase name="success()" classname="sample.junit5.JUnit5Test" time="0.016"/>
<testcase name="fail()" classname="sample.junit5.JUnit5Test" time="0.005">
<failure message="org.opentest4j.AssertionFailedError: expected: <10> but was: <8>" type="org.opentest4j.AssertionFailedError">org.opentest4j.AssertionFailedError: expected: <10> but was: <8>
...
-
@DisplayNameをクラスやメソッドにつけることで、テストの名前を任意の文字列で指定できるようになる - ただし、 Gradle のレポートは対応がマチマチっぽい
ネストしたテスト
package sample.junit5;

import org.junit.jupiter.api.AfterEach;
import org.junit.jupiter.api.BeforeEach;
import org.junit.jupiter.api.Nested;
import org.junit.jupiter.api.Test;

class JUnit5Test {

    @BeforeEach
    void beforeEach() {
        System.out.println("JUnit5Test.beforeEach()");
    }

    @Test
    void test1() {
        System.out.println("  JUnit5Test.test1()");
    }

    @Test
    void test2() {
        System.out.println("  JUnit5Test.test2()");
    }

    @AfterEach
    void afterEach() {
        System.out.println("JUnit5Test.afterEach()");
    }

    @Nested
    class NestedTest {

        @BeforeEach
        void beforeEach() {
            System.out.println("  NestedTest.beforeEach()");
        }

        @Test
        void test1() {
            System.out.println("    NestedTest.test1()");
        }

        @Test
        void test2() {
            System.out.println("    NestedTest.test2()");
        }

        @AfterEach
        void afterEach() {
            System.out.println("  NestedTest.afterEach()");
        }
    }
}
JUnit5Test.beforeEach()
  JUnit5Test.test1()
JUnit5Test.afterEach()
JUnit5Test.beforeEach()
  JUnit5Test.test2()
JUnit5Test.afterEach()
JUnit5Test.beforeEach()
  NestedTest.beforeEach()
    NestedTest.test1()
  NestedTest.afterEach()
JUnit5Test.afterEach()
JUnit5Test.beforeEach()
  NestedTest.beforeEach()
    NestedTest.test2()
  NestedTest.afterEach()
JUnit5Test.afterEach()
- 非
staticな内部クラスを @Nested でアノテートすると、テストクラスを入れ子にできる- 非
staticである必要があるので、必然的に@BeforeAll,@AfterAllはそのままでは指定できない1 - どうしても指定したい場合は、後述のテストインスンタンスのライフサイクルの指定で
PER_CLASSを設定する必要がある
- 非
前提条件を指定する
package sample.junit5;

import org.junit.jupiter.api.Assumptions;
import org.junit.jupiter.api.Assertions;
import org.junit.jupiter.api.Test;

class JUnit5Test {

    @Test
    void test1() {
        Assumptions.assumeTrue(true);

        System.out.println("test1()");
    }

    @Test
    void test2() {
        Assumptions.assumeTrue(false);

        System.out.println("test2()");
    }

    @Test
    void test3() {
        Assumptions.assumingThat(true, () -> {
            System.out.println("test3() assumption.");
        });

        System.out.println("test3()");
    }

    @Test
    void test4() {
        Assumptions.assumingThat(false, () -> {
            System.out.println("test4() assumption.");
        });

        System.out.println("test4()");
    }
}
test1()
test3() assumption.
test3()
test4()

...

.
'-- JUnit Jupiter [OK]
  '-- JUnit5Test [OK]
    +-- test1() [OK]
    +-- test2() [A] Assumption failed: assumption is not true
    +-- test3() [OK]
    '-- test4() [OK]

Test run finished after 84 ms
[         2 containers found      ]
[         0 containers skipped    ]
[         2 containers started    ]
[         0 containers aborted    ]
[         2 containers successful ]
[         0 containers failed     ]
[         4 tests found           ]
[         0 tests skipped         ]
[         4 tests started         ]
[         1 tests aborted         ]
[         3 tests successful      ]
[         0 tests failed          ]
-
Assumptions.assumeTrue(boolean) を使用すると、引数に
trueを渡したときにだけ続きのテストが実行される-
falseだった場合は、そのテストメソッド内の残りの処理は中断される - 中断されたテストは successful でも failed でもなく、 aborted という状態となる
-
-
Assumptions.assumingThat(boolean, Executable) を使用すると、第一引数の値が
trueだったときだけ、第二引数で渡した処理が実行される
テストの無効化
package sample.junit5;

import org.junit.jupiter.api.Disabled;
import org.junit.jupiter.api.Test;

class JUnit5Test {

    @Test
    void test1() {
        System.out.println("test1()");
    }

    @Test
    @Disabled
    void test2() {
        System.out.println("test2()");
    }
}
test1()
- @Disabled をつけたテストメソッドは実行されなくなる
- クラスにつけることも可能(その場合は、テストクラス内の全テストメソッドが実行されなくなる)
条件付きテスト
OS
package sample.junit5;

import org.junit.jupiter.api.Test;
import org.junit.jupiter.api.condition.DisabledOnOs;
import org.junit.jupiter.api.condition.EnabledOnOs;
import org.junit.jupiter.api.condition.OS;

class JUnit5Test {

    @Test
    @EnabledOnOs(OS.WINDOWS)
    void test1() {
        System.out.println("enabled on windows");
    }

    @Test
    @EnabledOnOs(OS.MAC)
    void test2() {
        System.out.println("enabled on mac");
    }

    @Test
    @DisabledOnOs(OS.WINDOWS)
    void test3() {
        System.out.println("disabled on windows");
    }

    @Test
    @DisabledOnOs(OS.MAC)
    void test4() {
        System.out.println("disabled on mac");
    }
}
enabled on windows
disabled on mac
※実行環境は Windows
- @EnabledOnOs をつけると、特定の OS でだけテストを有効にできる
- @DisabledOnOs をつけると、特定の OS でだけテストを無効にできる
-
valueには OS で定義された定数を指定する
Java バージョン
package sample.junit5;

import org.junit.jupiter.api.Test;
import org.junit.jupiter.api.condition.DisabledOnJre;
import org.junit.jupiter.api.condition.EnabledOnJre;
import org.junit.jupiter.api.condition.JRE;

class JUnit5Test {

    @Test
    @EnabledOnJre(JRE.JAVA_11)
    void test1() {
        System.out.println("enabled on java 11");
    }

    @Test
    @EnabledOnJre(JRE.JAVA_12)
    void test2() {
        System.out.println("enabled on java 12");
    }

    @Test
    @DisabledOnJre(JRE.JAVA_11)
    void test3() {
        System.out.println("disabled on java 11");
    }

    @Test
    @DisabledOnJre(JRE.JAVA_12)
    void test4() {
        System.out.println("disabled on java 12");
    }
}
enabled on java 11
disabled on java 12
※実行環境は Java 11
- @EnabledOnJre をつけると、特定の Java バージョンでだけテストを有効にできる
- @DisabledOnJre をつけると、特定の Java バージョンでだけテストを無効にできる
-
valueには JRE で定義された定数を指定する
システムプロパティ
package sample.junit5;

import org.junit.jupiter.api.Test;
import org.junit.jupiter.api.condition.DisabledIfSystemProperty;
import org.junit.jupiter.api.condition.EnabledIfSystemProperty;

class JUnit5Test {

    @Test
    @EnabledIfSystemProperty(named = "java.vendor", matches = "AdoptOpenJDK")
    void test1() {
        System.out.println("enabled if AdoptOpenJDK");
    }

    @Test
    @EnabledIfSystemProperty(named = "java.vendor", matches = "Oracle.*")
    void test2() {
        System.out.println("enabled if Oracle");
    }

    @Test
    @DisabledIfSystemProperty(named = "java.vendor", matches = "AdoptOpenJDK")
    void test3() {
        System.out.println("disabled if AdoptOpenJDK");
    }

    @Test
    @DisabledIfSystemProperty(named = "java.vendor", matches = "Oracle.*")
    void test4() {
        System.out.println("disabled if Oracle");
    }
}
enabled if AdoptOpenJDK
disabled if Oracle
- @EnabledIfSystemProperty をつけると、システムプロパティの値を条件にしてテストを有効にできる
- @DisabledIfSystemProperty をつけると、システムプロパティの値を条件にしてテストを無効にできる
-
namedに、条件にしたいシステムプロパティの名前を指定する -
matchesに、条件となる値を正規表現で指定する(全体一致)
環境変数
package sample.junit5;

import org.junit.jupiter.api.Test;
import org.junit.jupiter.api.condition.DisabledIfEnvironmentVariable;
import org.junit.jupiter.api.condition.EnabledIfEnvironmentVariable;

class JUnit5Test {

    @Test
    @EnabledIfEnvironmentVariable(named = "JAVA_HOME", matches = ".*\\\\AdoptOpenJDK\\\\.*")
    void test1() {
        System.out.println("enabled if AdoptOpenJDK");
    }

    @Test
    @EnabledIfEnvironmentVariable(named = "JAVA_HOME", matches = ".*\\\\OpenJDK\\\\.*")
    void test2() {
        System.out.println("enabled if OpenJDK");
    }

    @Test
    @DisabledIfEnvironmentVariable(named = "JAVA_HOME", matches = ".*\\\\AdoptOpenJDK\\\\.*")
    void test3() {
        System.out.println("disabled if AdoptOpenJDK");
    }

    @Test
    @DisabledIfEnvironmentVariable(named = "JAVA_HOME", matches = ".*\\\\OpenJDK\\\\.*")
    void test4() {
        System.out.println("disabled if OpenJDK");
    }
}
enabled if AdoptOpenJDK
disabled if OpenJDK
- @EnabledIfEnvironmentVariable をつけると、環境変数の値を条件にしてテストを有効にできる
- @DisabledIfEnvironmentVariable をつけると、環境変数の値を条件にしてテストを無効にできる
-
namedに、条件にしたい環境変数の名前を指定する -
matchesに、条件となる値を正規表現で指定する(全体一致)
タグ・フィルタリング
package sample.junit5;

import org.junit.jupiter.api.Tag;
import org.junit.jupiter.api.Test;

class JUnit5Test {

    @Test
    @Tag("foo")
    @Tag("fizz")
    void test1() {
        System.out.println("test1@(foo, fizz)");
    }

    @Test
    @Tag("bar")
    @Tag("fizz")
    void test2() {
        System.out.println("test2@(bar, fizz)");
    }

    @Test
    @Tag("fizz")
    void test3() {
        System.out.println("test3@(fizz)");
    }

    @Test
    @Tag("buzz")
    void test4() {
        System.out.println("test4@(buzz)");
    }
}
普通に実行した場合
> java -jar junit-platform-console-standalone-1.5.2.jar ^
       -cp build\classes\java\test ^
       --scan-classpath build\classes\java\test ^
       -e junit-jupiter

...
test1@(foo, fizz)
test2@(bar, fizz)
test3@(fizz)
test4@(buzz)
--include-tag で対象を絞り込んだ場合
> java -jar junit-platform-console-standalone-1.5.2.jar ... --include-tag "fizz"
...
test1@(foo, fizz)
test2@(bar, fizz)
test3@(fizz)

> java -jar junit-platform-console-standalone-1.5.2.jar ... --include-tag "foo & fizz"
...
test1@(foo, fizz)

> java -jar junit-platform-console-standalone-1.5.2.jar ... --include-tag "foo | bar"
...
test1@(foo, fizz)
test2@(bar, fizz)

> java -jar junit-platform-console-standalone-1.5.2.jar ... --include-tag "!foo & fizz"
...
test2@(bar, fizz)
test3@(fizz)

> java -jar junit-platform-console-standalone-1.5.2.jar ... --include-tag "foo | !fizz"
...
test1@(foo, fizz)
test4@(buzz)
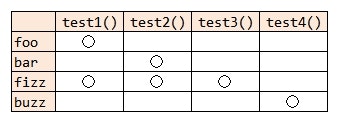
- @Tag をテストクラスやメソッドにつけることで、テストケースをタグ付けできる
- タグ名に指定する文字列は、次の条件を満たしている必要がある
-
nullまたは空文字ではない - 空白文字を含まない
- 制御文字を含まない
- 以下の予約済みの文字を含まない
(),&|!
-
- タグは、実行時に指定する条件でフィルタリングできる
- ConsoleLauncher の場合は、
-
--include-tagで、条件に一致するタグだけを対象にできる -
--exclude-tagで、条件に一致しないタグだけを対象にできる
-
- Gradle から実行する場合は次のような感じで指定する
...
test {
    useJUnitPlatform {
        includeTags "foo | !fizz"
    }
}
- includeTags または excludeTags で指定できる
- タグを絞り込む条件は、専用のタグ式で記述できる
- タグ式では演算子を使って複雑な条件を記述できる
-
!:NOT -
&:AND -
|:OR
-
- 括弧
()で条件をまとめることも可能
> java -jar junit-platform-console-standalone-1.5.2.jar ... --include-tag "(!foo & fizz) | buzz"
...
test2@(bar, fizz)
test3@(fizz)
test4@(buzz)
テストの実行順序
package sample.junit5;

import org.junit.jupiter.api.Test;

class JUnit5Test {

    @Test
    void bear() {
        System.out.println("bear");
    }

    @Test
    void ant() {
        System.out.println("ant");
    }

    @Test
    void cat() {
        System.out.println("cat");
    }

    @Test
    void dog() {
        System.out.println("dog");
    }
}
ant
cat
dog
bear
デフォルトでは、テストメソッドの実行順序は意図的に非自明なアルゴリズムで決定されるようになっている2。
というのも、本来単体テストは実行順序に依存しないことが望ましい。
しかし、結合テストや機能テストのときは、実行順序が重要になる場合がありえる。3
そういったときに、テストの実行順序を制御するための仕組みが用意されている。
アルファベット順
package sample.junit5;

import org.junit.jupiter.api.MethodOrderer;
import org.junit.jupiter.api.Test;
import org.junit.jupiter.api.TestMethodOrder;

@TestMethodOrder(MethodOrderer.Alphanumeric.class)
class JUnit5Test {

    @Test
    void bear() {
        System.out.println("bear");
    }

    @Test
    void ant() {
        System.out.println("ant");
    }

    @Test
    void cat() {
        System.out.println("cat");
    }

    @Test
    void dog() {
        System.out.println("dog");
    }
}
ant
bear
cat
dog
- テストクラスに @TestMethodOrder アノテーションを設定する
-
valueには、 MethodOrderer を実装したクラスのClassオブジェクトを指定する-
MethodOrderは、メソッドの実行順序を制御する機能を提供する
-
-
MethodOrderには、標準で3つの実装が用意されている -
Alphanumeric は、メソッド名を String.compareTo(String) で比較してソートする
- メソッド名が同じ場合は、引数を含めて文字列で表現したものを比較する
Order アノテーションで指定する
package sample.junit5;

import org.junit.jupiter.api.MethodOrderer;
import org.junit.jupiter.api.Order;
import org.junit.jupiter.api.Test;
import org.junit.jupiter.api.TestMethodOrder;

@TestMethodOrder(MethodOrderer.OrderAnnotation.class)
class JUnit5Test {

    @Test
    @Order(3)
    void bear() {
        System.out.println("bear");
    }

    @Test
    @Order(4)
    void ant() {
        System.out.println("ant");
    }

    @Test
    @Order(2)
    void cat() {
        System.out.println("cat");
    }

    @Test
    @Order(1)
    void dog() {
        System.out.println("dog");
    }
}
dog
cat
bear
ant
- OrderAnnotation を使用すると、 @Order アノテーションで順序を明示できる
-
@Orderが指定されていないメソッドは、デフォルトでInteger.MAX_VALUEが割り当てられる
ランダム
package sample.junit5;

import org.junit.jupiter.api.MethodOrderer;
import org.junit.jupiter.api.Test;
import org.junit.jupiter.api.TestMethodOrder;

@TestMethodOrder(MethodOrderer.Random.class)
class JUnit5Test {

    @Test
    void bear() {
        System.out.println("bear");
    }

    @Test
    void ant() {
        System.out.println("ant");
    }

    @Test
    void cat() {
        System.out.println("cat");
    }

    @Test
    void dog() {
        System.out.println("dog");
    }
}
# 1回目
ant
dog
cat
bear

# 2回目
bear
ant
cat
dog
- Random を指定すると、メソッドの実行順序はランダムになる
テストインスタンスのライフサイクル
デフォルトのライフサイクル
package sample.junit5;

import org.junit.jupiter.api.BeforeEach;
import org.junit.jupiter.api.Test;

class JUnit5Test {

    @BeforeEach
    void before() {
        System.out.println("before@" + this.hashCode());
    }

    @Test
    void test1() {
        System.out.println("test1@" + this.hashCode());
    }

    @Test
    void test2() {
        System.out.println("test2@" + this.hashCode());
    }

    @Test
    void test3() {
        System.out.println("test3@" + this.hashCode());
    }
}
before@278240974
test1@278240974
before@370370379
test2@370370379
before@671046933
test3@671046933
- デフォルトは、テストメソッドが実行されるたびに新しいテストクラスのインスタンスが生成される
ライフサイクルをテストクラスごとに変更する
package sample.junit5;

import org.junit.jupiter.api.BeforeEach;
import org.junit.jupiter.api.Test;
import org.junit.jupiter.api.TestInstance;

@TestInstance(TestInstance.Lifecycle.PER_CLASS) // ★
class JUnit5Test {

    @BeforeEach
    void before() {
        System.out.println("before@" + this.hashCode());
    }

    @Test
    void test1() {
        System.out.println("test1@" + this.hashCode());
    }

    @Test
    void test2() {
        System.out.println("test2@" + this.hashCode());
    }

    @Test
    void test3() {
        System.out.println("test3@" + this.hashCode());
    }
}
before@1504642150
test1@1504642150
before@1504642150
test2@1504642150
before@1504642150
test3@1504642150
- テストクラスに @TestInstance アノテーションを設定し、
valueに PER_CLASS を指定する - すると、テストインスタンスがテストクラスごとに生成されるようになる
- したがって、同一テストクラス内のテストメソッドは、全て同じインスタンスで実行されている
- なお、ライフサイクルを
PER_CLASSにした場合、@BeforeAllや@AfterAllはインスタンスメソッドに設定できるようになる
package sample.junit5;

import org.junit.jupiter.api.AfterAll;
import org.junit.jupiter.api.BeforeAll;
import org.junit.jupiter.api.Test;
import org.junit.jupiter.api.TestInstance;

@TestInstance(TestInstance.Lifecycle.PER_CLASS)
class JUnit5Test {

    @BeforeAll
    static void staticBeforeAll() {
        System.out.println("staticBeforeAll()");
    }

    @BeforeAll
    void beforeAll() {
        System.out.println("beforeAll()");
    }

    @Test
    void test() {
        System.out.println("test()");
    }

    @AfterAll
    void afterAll() {
        System.out.println("afterAll()");
    }

    @AfterAll
    static void staticAfterAll() {
        System.out.println("staticAfterAll()");
    }
}
beforeAll()
staticBeforeAll()
test()
staticAfterAll()
afterAll()
-
staticメソッドにつけたままにしておくことも可能 - これのメリットは、
@Nestedで入れ子にしたテストクラスにも@BeforeAllや@AfterAllをつけられるようになる点-
PER_CLASSを指定しない場合、@BeforeAll,@AfterAllはメソッドをstaticにしなければならない - しかし、
@Nestedを設定したクラスは内部クラスなので、 Java の言語仕様上staticメソッドを定義できない - したがって、
@Nestedクラスの中だけで最初と最後に実行したい処理が定義できなかった
-
package sample.junit5;

import org.junit.jupiter.api.AfterAll;
import org.junit.jupiter.api.AfterEach;
import org.junit.jupiter.api.BeforeAll;
import org.junit.jupiter.api.BeforeEach;
import org.junit.jupiter.api.Nested;
import org.junit.jupiter.api.Test;
import org.junit.jupiter.api.TestInstance;

class JUnit5Test {

    @BeforeAll
    static void beforeAll() {
        System.out.println("JUnit5Test.beforeAll()");
    }

    @BeforeEach
    void beforeEach() {
        System.out.println("  JUnit5Test.beforeEach()");
    }

    @Test
    void test1() {
        System.out.println("    JUnit5Test.test1()");
    }

    @Test
    void test2() {
        System.out.println("    JUnit5Test.test2()");
    }

    @AfterEach
    void afterEach() {
        System.out.println("  JUnit5Test.afterEach()");
    }

    @AfterAll
    static void afterAll() {
        System.out.println("JUnit5Test.afterAll()");
    }

    @Nested
    @TestInstance(TestInstance.Lifecycle.PER_CLASS)
    class NestedTest {

        @BeforeAll
        void beforeAll() {
            System.out.println(" NestedTest.beforeAll() *");
        }

        @BeforeEach
        void beforeEach() {
            System.out.println("   NestedTest.beforeEach()");
        }

        @Test
        void test1() {
            System.out.println("     NestedTest.test1()");
        }

        @Test
        void test2() {
            System.out.println("     NestedTest.test2()");
        }

        @AfterEach
        void afterEach() {
            System.out.println("   NestedTest.afterEach()");
        }

        @AfterAll
        void afterAll() {
            System.out.println(" NestedTest.afterAll() *");
        }
    }
}
JUnit5Test.beforeAll()
  JUnit5Test.beforeEach()
    JUnit5Test.test1()
  JUnit5Test.afterEach()
  JUnit5Test.beforeEach()
    JUnit5Test.test2()
  JUnit5Test.afterEach()
 NestedTest.beforeAll() *
  JUnit5Test.beforeEach()
   NestedTest.beforeEach()
     NestedTest.test1()
   NestedTest.afterEach()
  JUnit5Test.afterEach()
  JUnit5Test.beforeEach()
   NestedTest.beforeEach()
     NestedTest.test2()
   NestedTest.afterEach()
  JUnit5Test.afterEach()
 NestedTest.afterAll() *
JUnit5Test.afterAll()
-
@Nestedの中だけで最初と最後に行う処理を定義できるようになった
デフォルトのライフサイクルを変更する
- デフォルトはテストメソッドごとにテストインスタンスが生成される
- これを、デフォルトでテストクラスごとにインスタンスを生成させるように変更できる
- 方法は次のいずれか
- システムプロパティで指定する
- JUnit Platform 設定ファイルで指定する
- システムプロパティで指定する場合は、
-Djunit.jupiter.testinstance.lifecycle.default=per_classと指定する - JUnit Platform 設定ファイルで指定する場合は、まずクラスパスルートに
junit-platform.propertiesファイルを配置する- そして、このプロパティファイルで
junit.jupiter.testinstance.lifecycle.default=per_classと指定する
- そして、このプロパティファイルで
- 推奨されるのは JUnit Platform 設定ファイルを使う方
- システムプロパティを使用する場合、全ての実行環境で忘れずに指定しなければならなくなる
- システムプロパティの設定し忘れで挙動が変わると、エラーの原因解明が難航するかもしれない
繰り返しテスト
package sample.junit5;

import org.junit.jupiter.api.RepeatedTest;

class JUnit5Test {

    @RepeatedTest(3)
    void test() {
        System.out.println("test");
    }
}
実行結果(ConsoleLauncher の場合)
test
test
test

...

.
'-- JUnit Jupiter [OK]
  '-- JUnit5Test [OK]
    '-- test() [OK]
      +-- repetition 1 of 3 [OK]
      +-- repetition 2 of 3 [OK]
      '-- repetition 3 of 3 [OK]

Test run finished after 98 ms
[         3 containers found      ]
[         0 containers skipped    ]
[         3 containers started    ]
[         0 containers aborted    ]
[         3 containers successful ]
[         0 containers failed     ]
[         3 tests found           ]
[         0 tests skipped         ]
[         3 tests started         ]
[         0 tests aborted         ]
[         3 tests successful      ]
[         0 tests failed          ]
実行結果(Gradle の場合)

-
@RepeatedTest でメソッドをアノテートすると、
valueで指定した回数だけテストが繰り返されるようになる - 繰り返される各テストの表示名は、
repetition <現在の繰り返し回数> of <総繰り返し回数>になる
表示名を指定する
package sample.junit5;

import org.junit.jupiter.api.RepeatedTest;

class JUnit5Test {

    @RepeatedTest(
        name = "displayName={displayName}, currentRepetition={currentRepetition}, totalRepetitions={totalRepetitions}",
        value = 3
    )
    void test() {
        System.out.println("test");
    }
}
実行結果(ConsoleLauncher の場合)
.
'-- JUnit Jupiter [OK]
  '-- JUnit5Test [OK]
    '-- test() [OK]
      +-- displayName=test(), currentRepetition=1, totalRepetitions=3 [OK]
      +-- displayName=test(), currentRepetition=2, totalRepetitions=3 [OK]
      '-- displayName=test(), currentRepetition=3, totalRepetitions=3 [OK]
実行結果(Gradle の場合)
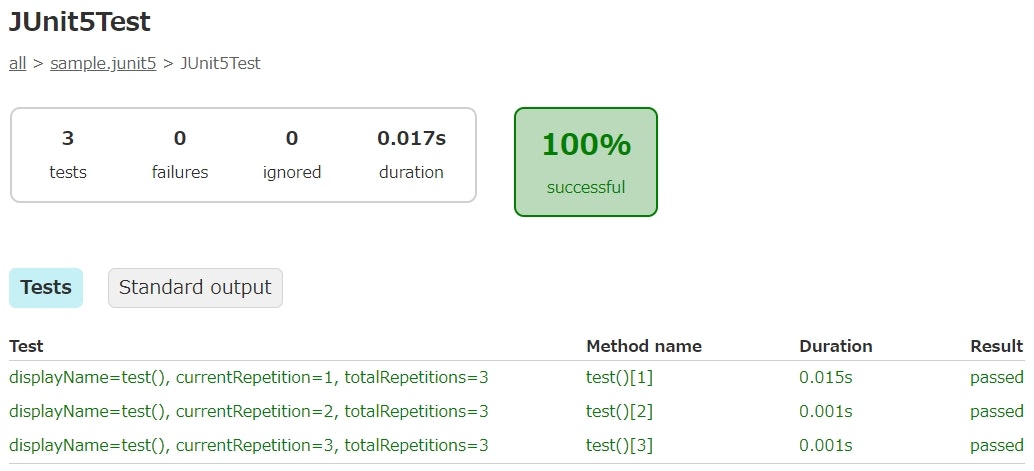
-
name属性で繰り返しテストの表示名を指定できる - 表示名の指定では専用のプレースホルダが用意されていて、繰り返しの情報を表示名に反映することができる
-
displayName: テストメソッドの表示名- デフォルトはテストメソッドの名前
-
@DisplayNameが指定されている場合は、そちらが使用される
-
currentRepetition: 現在の繰り返し回数(1始まり) -
totalRepetitions: 総繰り返し回数
-
- 定義済みの表示名のパターンが
@RepetedTestに用意されている- LONG_DISPLAY_NAME
- パターンは
"{displayName} :: repetition {currentRepetition} of {totalRepetitions}"
繰り返しの情報をテストメソッドで受け取る
package sample.junit5;

import org.junit.jupiter.api.AfterEach;
import org.junit.jupiter.api.BeforeEach;
import org.junit.jupiter.api.RepeatedTest;
import org.junit.jupiter.api.RepetitionInfo;

class JUnit5Test {

    @BeforeEach
    void before(RepetitionInfo repetitionInfo) {
        printRepetitionInfo("before", repetitionInfo);
    }

    @RepeatedTest(3)
    void test(RepetitionInfo repetitionInfo) {
        printRepetitionInfo("  test", repetitionInfo);
    }

    @AfterEach
    void after(RepetitionInfo repetitionInfo) {
        printRepetitionInfo("after", repetitionInfo);
    }

    private void printRepetitionInfo(String method, RepetitionInfo repetitionInfo) {
        int currentRepetition = repetitionInfo.getCurrentRepetition();
        int totalRepetitions = repetitionInfo.getTotalRepetitions();

        System.out.printf("%s (%d/%d)%n", method, currentRepetition, totalRepetitions);
    }
}
before (1/3)
  test (1/3)
after (1/3)
before (2/3)
  test (2/3)
after (2/3)
before (3/3)
  test (3/3)
after (3/3)
-
@RepeatedTestでアノテートされたテストメソッドは、現在の繰り返しの情報を保持した RepetitionInfo オブジェクトを引数で受け取ることができる -
@BeforeEach,@AfterEachでも受け取ることができる- ただし、ここに
@Testで宣言した通常のテストメソッドが混ざっていると、RepetitionInfoが解決できずに実行時エラーになる
- ただし、ここに
-
getCurrentRepetition()で、現在の繰り返し回数を取得できる(1始まり) -
getTotalRepetitions()で、総繰り返し回数を取得できる
パラメータ化テスト
package sample.junit5;

import org.junit.jupiter.params.ParameterizedTest;
import org.junit.jupiter.params.provider.ValueSource;

class JUnit5Test {

    @ParameterizedTest
    @ValueSource(strings = {"hoge", "fuga", "piyo"})
    void test(String value) {
        System.out.println("value=" + value);
    }
}
実行結果(ConsoleLauncher の場合)
value=hoge
value=fuga
value=piyo

Thanks for using JUnit! Support its development at https://junit.org/sponsoring

.
'-- JUnit Jupiter [OK]
  '-- JUnit5Test [OK]
    '-- test(String) [OK]
      +-- [1] hoge [OK]
      +-- [2] fuga [OK]
      '-- [3] piyo [OK]

Test run finished after 116 ms
[         3 containers found      ]
[         0 containers skipped    ]
[         3 containers started    ]
[         0 containers aborted    ]
[         3 containers successful ]
[         0 containers failed     ]
[         3 tests found           ]
[         0 tests skipped         ]
[         3 tests started         ]
[         0 tests aborted         ]
[         3 tests successful      ]
[         0 tests failed          ]
実行結果(Gradle の場合)
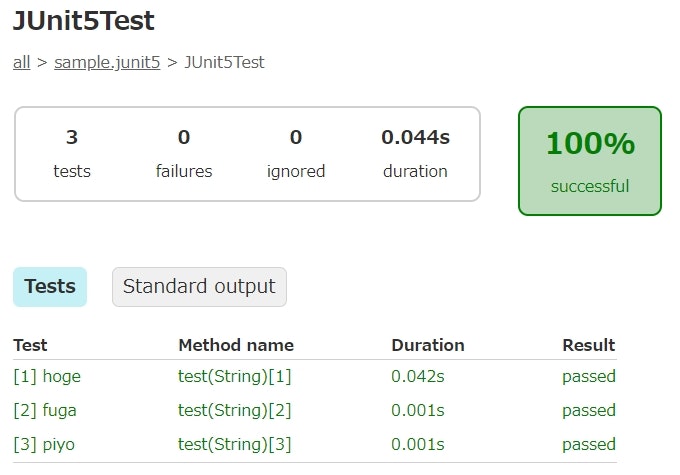
- @ParameterizedTest でアノテートされたメソッドは、テストで使用する値を引数で受け取りながら実行されるようになる
- 引数に渡す値を宣言する方法は複数用意されているが、ここでは @ValueSource アノテーションを使用している
-
@ValueSourceは、stringsやintsなどの属性でテストメソッドに渡すパラメータを静的に宣言できる - パラメータを生成する元(↑の例の場合は
@ValueSource)のことをパラメータの**ソース (Source)**と呼ぶ
Enum をソースにする
package sample.junit5;

import org.junit.jupiter.params.ParameterizedTest;
import org.junit.jupiter.params.provider.EnumSource;

class JUnit5Test {

    @ParameterizedTest
    @EnumSource(TestEnum.class)
    void test(TestEnum value) {
        System.out.println("value=" + value);
    }

    enum TestEnum {
        HOGE, FUGA, PIYO
    }
}
value=HOGE
value=FUGA
value=PIYO
-
@EnumSource アノテーションを使用すると、
enumに定義されている定数をパラメータとして使用できる -
valueにenumのClassオブジェクトを渡すと、定義されている全ての定数がパラメータとして使用される
特定の定数だけを使用する
package sample.junit5;

import org.junit.jupiter.params.ParameterizedTest;
import org.junit.jupiter.params.provider.EnumSource;

class JUnit5Test {

    @ParameterizedTest
    @EnumSource(value = TestEnum.class , names = {"HOGE", "PIYO"})
    void test(TestEnum value) {
        System.out.println("value=" + value);
    }

    enum TestEnum {
        HOGE, FUGA, PIYO
    }
}
value=HOGE
value=PIYO
- names で使用する定数を絞ることができる
特定の定数を除外する
package sample.junit5;

import org.junit.jupiter.params.ParameterizedTest;
import org.junit.jupiter.params.provider.EnumSource;

class JUnit5Test {

    @ParameterizedTest
    @EnumSource(value = TestEnum.class, mode = EnumSource.Mode.EXCLUDE , names = {"HOGE", "PIYO"})
    void test(TestEnum value) {
        System.out.println("value=" + value);
    }

    enum TestEnum {
        HOGE, FUGA, PIYO
    }
}
value=FUGA
正規表現で指定する
package sample.junit5;

import org.junit.jupiter.params.ParameterizedTest;
import org.junit.jupiter.params.provider.EnumSource;

class JUnit5Test {

    @ParameterizedTest
    @EnumSource(
        value = TestEnum.class,
        mode = EnumSource.Mode.MATCH_ALL,
        names = {"^F.*", ".*H$"}
    )
    void matchAll(TestEnum value) {
        System.out.println("matchAll() value=" + value);
    }

    @ParameterizedTest
    @EnumSource(
            value = TestEnum.class,
            mode = EnumSource.Mode.MATCH_ANY,
            names = {"^F.*", ".*H$"}
    )
    void matchAny(TestEnum value) {
        System.out.println("matchAny() value=" + value);
    }

    enum TestEnum {
        FIRST, SECOND, THIRD, FOURTH, FIFTH, SIXTH
    }
}
matchAll() value=FOURTH
matchAll() value=FIFTH
matchAny() value=FIRST
matchAny() value=FOURTH
matchAny() value=FIFTH
matchAny() value=SIXTH
- MATCH_ALL または MATCH_ANY を使用すると、正規表現で対象の定数を絞り込むことができる
-
MATCH_ALLは、全ての条件に一致した定数だけに絞り込むことができる -
MATCH_ANYは、いずれかの条件に一致した定数だけに絞り込むことができる
メソッドをソースにする
package sample.junit5;

import org.junit.jupiter.params.ParameterizedTest;
import org.junit.jupiter.params.provider.MethodSource;

import java.util.List;

class JUnit5Test {

    @ParameterizedTest
    @MethodSource
    void test(String value) {
        System.out.println("value=" + value);
    }

    static List<String> test() {
        return List.of("hoge", "fuga", "piyo");
    }
}
value=hoge
value=fuga
value=piyo
- @MethodSource を使用すると、メソッドをパラメータのソースにできる
- デフォルトでは、テストメソッドと同じ名前で引数を持たない
staticメソッドがソースとして自動的に選択される - ソースメソッドは、パラメータとして渡す値を「Stream に変換できる型」で返す必要がある
- 何が「
Streamに変換できる型」なのかは、MethodSourceの Javadoc やユーザーガイドに次のように記載してある -
Stream,DoubleStream,LongStream,IntStream,Collection,Iterator,Iterable, オブジェクトの配列、プリミティブ型の配列 - ということで、たいていのそれっぽい型は良しなにしてくれる感じ
- 何が「
ソースメソッドを明示する
package sample.junit5;

import org.junit.jupiter.params.ParameterizedTest;
import org.junit.jupiter.params.provider.MethodSource;

import java.util.List;

class JUnit5Test {

    @ParameterizedTest
    @MethodSource("sourceMethod")
    void test(String value) {
        System.out.println("value=" + value);
    }

    static List<String> sourceMethod() {
        return List.of("HOGE", "FUGA", "PIYO");
    }

    static List<String> test() {
        return List.of("hoge", "fuga", "piyo");
    }
}
value=HOGE
value=FUGA
value=PIYO
-
@MethodSourceのvalueでソースメソッドの名前を明示することができる
他のクラスのメソッドをソースにする
package sample.junit5;

import java.util.List;

class SourceClass {
    static List<String> createSource() {
        return List.of("foo", "bar");
    }
}
package sample.junit5;

import org.junit.jupiter.params.ParameterizedTest;
import org.junit.jupiter.params.provider.MethodSource;

import java.util.List;

class JUnit5Test {

    @ParameterizedTest
    @MethodSource("sample.junit5.SourceClass#createSource")
    void test(String value) {
        System.out.println("value=" + value);
    }
}
value=foo
value=bar
-
@MethodSourceのvalueで、クラスの完全修飾名#メソッド名と指定することで、外部のクラスのメソッドをソースにできる
1回のパラメータで複数の仮引数を渡す
package sample.junit5;

import org.junit.jupiter.params.ParameterizedTest;
import org.junit.jupiter.params.provider.Arguments;
import org.junit.jupiter.params.provider.MethodSource;

import java.util.List;

import static org.junit.jupiter.params.provider.Arguments.*;

class JUnit5Test {

    @ParameterizedTest
    @MethodSource
    void test1(String string, int i, boolean bool) {
        System.out.printf("test1() string=%s, i=%d, bool=%s%n", string, i, bool);
    }

    static List<Object[]> test1() {
        return List.of(
            new Object[]{"hoge", 11, false},
            new Object[]{"fuga", 17, true},
            new Object[]{"piyo", 19, true}
        );
    }

    @ParameterizedTest
    @MethodSource
    void test2(String string, int i, boolean bool) {
        System.out.printf("test2() string=%s, i=%d, bool=%s%n", string, i, bool);
    }

    static List<Arguments> test2() {
        return List.of(
            arguments("HOGE", 20, true),
            arguments("FUGA", 23, false),
            arguments("PIYO", 28, true)
        );
    }
}
test1() string=hoge, i=11, bool=false
test1() string=fuga, i=17, bool=true
test1() string=piyo, i=19, bool=true
test2() string=HOGE, i=20, bool=true
test2() string=FUGA, i=23, bool=false
test2() string=PIYO, i=28, bool=true
- 1回のパラメータで複数の仮引数に値を渡すこともできる
- その場合、ソースメソッドは
Object[]のStream(にできるもの)を返すように実装しなければならない- この例では
List<Object[]>を返すようにしている
- この例では
- jupiter が用意している Arguments という専用の入れ物クラスを使うこともできる
- arguments(Object...) または of(Object...) というファクトリメソッドが用意されているので、それを使ってインスタンスを生成できる
CSV テキストをソースにする
package sample.junit5;

import org.junit.jupiter.params.ParameterizedTest;
import org.junit.jupiter.params.provider.CsvSource;

class JUnit5Test {

    @ParameterizedTest
    @CsvSource({"foo,bar,1", "'hoge,fuga','',2", "fizz,,3"})
    void test(String s1, String s2, int i) {
        System.out.printf("s1=[%s], s2=[%s], i=[%d]%n", s1, s2, i);
    }
}
s1=[foo], s2=[bar], i=[1]
s1=[hoge,fuga], s2=[], i=[2]
s1=[fizz], s2=[null], i=[3]
- @CsvSource を使用すると、静的な CSV 形式のテキストをソースにできる
- 引用符にはシングルクォーテーション(
')を使用する -
''は空文字に、完全な空白はnullとして処理される
CSV ファイルをソースにする
`-src/test/
  |-resources/
  | `-test.csv
  `-java/
    `-sample/junit5/
      `-JUnit5Test.java
hoge,1
fuga,2
piyo,3
package sample.junit5;

import org.junit.jupiter.params.ParameterizedTest;
import org.junit.jupiter.params.provider.CsvFileSource;

class JUnit5Test {

    @ParameterizedTest
    @CsvFileSource(resources = "/test.csv")
    void test(String string, int i) {
        System.out.printf("string=[%s], i=[%d]%n", string, i);
    }
}
string=[hoge], i=[1]
string=[fuga], i=[2]
string=[piyo], i=[3]
- @CsvFileSource を使用すると、クラスパス内の CSV ファイルをソースに指定できる
-
resourcesで、使用する CSV ファイルのパスを指定する - エンコーディングや改行コードなどは、アノテーションの属性で指定できる(Javadoc 参照)
再利用可能なソースクラスを作成する
package sample.junit5;

import org.junit.jupiter.api.extension.ExtensionContext;
import org.junit.jupiter.params.provider.Arguments;
import org.junit.jupiter.params.provider.ArgumentsProvider;

import java.util.stream.Stream;

import static org.junit.jupiter.params.provider.Arguments.*;

public class MyArgumentsProvider implements ArgumentsProvider {

    @Override
    public Stream<? extends Arguments> provideArguments(ExtensionContext context) throws Exception {
        return Stream.of(
            arguments("hoge", 1),
            arguments("fuga", 2),
            arguments("piyo", 3)
        );
    }
}
package sample.junit5;

import org.junit.jupiter.params.ParameterizedTest;
import org.junit.jupiter.params.provider.ArgumentsSource;

class JUnit5Test {

    @ParameterizedTest
    @ArgumentsSource(MyArgumentsProvider.class)
    void test(String string, int i) {
        System.out.printf("string=[%s], i=[%d]%n", string, i);
    }
}
string=[hoge], i=[1]
string=[fuga], i=[2]
string=[piyo], i=[3]
- @ArgumentsSource を使用すると、 ArgumentsProvider を実装したクラスをソースとして利用できる
-
valueにArgumentsProviderを実装したクラスのClassオブジェクトを指定する - 複数のテストクラスでソースを再利用する場合に活用できる
パラメータの変換
拡大変換
package sample.junit5;

import org.junit.jupiter.params.ParameterizedTest;
import org.junit.jupiter.params.provider.Arguments;
import org.junit.jupiter.params.provider.MethodSource;

import java.util.List;

import static org.junit.jupiter.params.provider.Arguments.*;

class JUnit5Test {

    @ParameterizedTest
    @MethodSource
    void test(int i, long l, double d) {
        System.out.printf("i=%s, l=%s, d=%s%n", i, l, d);
    }

    static List<Arguments> test() {
        return List.of(arguments(10, 20, 30));
    }
}
i=10, l=20, d=30.0
- パラメータはプリミティブの拡大変換(widening primitive conversions)に対応している
-
byte -> shortやint -> longなどのように、より大きなサイズのプリミティブ型に変換する仕組み
-
- パラメータの実体が
intでも、テストメソッドの引数はlongやdoubleで受けることができる
暗黙的な変換
package sample.junit5;

import org.junit.jupiter.params.ParameterizedTest;
import org.junit.jupiter.params.provider.Arguments;
import org.junit.jupiter.params.provider.ArgumentsSource;
import org.junit.jupiter.params.provider.MethodSource;

import java.io.File;
import java.math.BigDecimal;
import java.nio.charset.Charset;
import java.time.LocalDateTime;
import java.util.List;

import static org.junit.jupiter.params.provider.Arguments.*;

class JUnit5Test {

    @ParameterizedTest
    @MethodSource
    void test(
        boolean bool, char c, double d, TestEnum e, File file,
        Class<?> clazz, BigDecimal bd, Charset charset, LocalDateTime dateTime
    ) {
        System.out.printf(
            "bool=%s, c=%s, d=%s, e=%s, file=%s, clazz=%s, bd=%s, charset=%s, dateTime=%s%n",
            bool, c, d, e, file, clazz, bd, charset, dateTime
        );
    }

    static List<Arguments> test() {
        return List.of(
            arguments(
                "true", "c", "12.34", "FOO", "path/to/file",
                "java.lang.String", "98.76", "MS932", "2019-10-01T12:34:56"
            )
        );
    }

    enum TestEnum {
        FOO, BAR
    }
}
bool=true, c=c, d=12.34, e=FOO, file=path\to\file, clazz=class java.lang.String, bd=98.76, charset=windows-31j, dateTime=2019-10-01T12:34:56
- パラメータが文字列であっても、テストメソッドの仮引数の型から暗黙的に型変換を行ってくれる
- 様々な型に対応していて、標準 API に存在するよく使う型はだいたいサポートしている
暗黙的な型変換がサポートされている型と変換方法
java.lang.Class の変換
package sample.junit5;

import org.junit.jupiter.params.ParameterizedTest;
import org.junit.jupiter.params.provider.MethodSource;

import java.util.Arrays;
import java.util.List;

class JUnit5Test {

    @ParameterizedTest
    @MethodSource
    void test(Class<?> clazz) {
        System.out.println(clazz);
    }

    static List<String> test() {
        return Arrays.asList(
            "int",
            "int[]",
            "int[][]",
            "[I",
            "[[I",
            "java.lang.String",
            "java.lang.String[]",
            "java.lang.String[][]",
            "[Ljava.lang.String;",
            "[[Ljava.lang.String;",
            "sample.junit5.JUnit5Test",
            "sample.junit5.JUnit5Test$InnerClass"
        );
    }

    class InnerClass {}
}
int
class [I
class [[I
class [I
class [[I
class java.lang.String
class [Ljava.lang.String;
class [[Ljava.lang.String;
class [Ljava.lang.String;
class [[Ljava.lang.String;
class sample.junit5.JUnit5Test
class sample.junit5.JUnit5Test$InnerClass
- プリミティブ型は、型の名前をそのまま指定できる(
int,long,float, etc...) - プリミティブ型の配列は、
int[],int[][]のような表記で指定できる - 配列は Class.getName() で得られる文字列と同じ形式でも指定できる(
[[I,[Ljava.lang.String;, etc...) - その他の参照型は、バイナリ名で指定する(内部的には ClassLoader.loadClass(String) が使用される)
動的テスト
package sample.junit5;

import org.junit.jupiter.api.DynamicNode;
import org.junit.jupiter.api.TestFactory;

import java.util.List;

import static org.junit.jupiter.api.DynamicTest.*;

class JUnit5Test {

    @TestFactory
    List<DynamicNode> testFactory() {
        return List.of(
            dynamicTest("Hoge", () -> System.out.println("Dynamic Hoge!!")),
            dynamicTest("Fuga", () -> System.out.println("Dynamic Fuga!!"))
        );
    }
}
Dynamic Hoge!!
Dynamic Fuga!!

...
.
'-- JUnit Jupiter [OK]
  '-- JUnit5Test [OK]
    '-- testFactory() [OK]
      +-- Hoge [OK]
      '-- Fuga [OK]
- @TestFactory アノテーションを使うことで、テストケースを動的に生成できる
-
@TestFactoryでアノテートされたメソッドは、 DynamicNode のコレクションを返すように実装する- 「コレクション」というのは、厳密には次のいずれかであればいい
java.util.Collectionjava.lang.Iterablejava.util.Iteratorjava.util.stream.Stream- 配列
-
Streamで返した場合は Jupiter 側でclose()してくれるので、Files.lines()で生成したStreamを使ったりしていても安全
- 「コレクション」というのは、厳密には次のいずれかであればいい
-
DynamicNode自体は抽象クラスなので、実際はサブクラスの DynamicTest か DynamicContainer のいずれかを使用する- 上記例では dynamicTest(String, Executable) というファクトリメソッドを使って
DynamicTestのインスタンスを生成している - 第一引数はテストの名前
- 第二引数はテストの内容
- 上記例では dynamicTest(String, Executable) というファクトリメソッドを使って
動的テストのライフサイクル
package sample.junit5;

import org.junit.jupiter.api.AfterEach;
import org.junit.jupiter.api.BeforeEach;
import org.junit.jupiter.api.DynamicNode;
import org.junit.jupiter.api.Test;
import org.junit.jupiter.api.TestFactory;

import java.util.List;

import static org.junit.jupiter.api.DynamicTest.*;

class JUnit5Test {

    @BeforeEach
    void beforeEach() {
        System.out.println("beforeEach()");
    }

    @TestFactory
    List<DynamicNode> testFactory() {
        System.out.println("  testFactory()");
        return List.of(
            dynamicTest("Hoge", () -> System.out.println("    Dynamic Hoge!!")),
            dynamicTest("Fuga", () -> System.out.println("    Dynamic Fuga!!"))
        );
    }

    @Test
    void test() {
        System.out.println("  test()");
    }

    @AfterEach
    void afterEach() {
        System.out.println("afterEach()");
    }
}
beforeEach()
  testFactory()
    Dynamic Hoge!!
    Dynamic Fuga!!
afterEach()
beforeEach()
  test()
afterEach()
-
@BeforeEachや@AfterEachは、@TestFactoryが設定されたメソッドの前後で実行されるだけで、各動的テストの前後では実行されない
動的テストを入れ子構造にする
package sample.junit5;

import org.junit.jupiter.api.DynamicNode;
import org.junit.jupiter.api.TestFactory;

import java.util.List;

import static org.junit.jupiter.api.DynamicContainer.*;
import static org.junit.jupiter.api.DynamicTest.*;

class JUnit5Test {

    @TestFactory
    List<DynamicNode> testFactory() {
        return List.of(
            dynamicContainer("Dynamic Container 1", List.of(
                dynamicTest("Foo", () -> System.out.println("Dynamic Foo.")),
                dynamicContainer("Dynamic Container 1-1", List.of(
                    dynamicTest("Hoge", () -> System.out.println("Dynamic Hoge.")),
                    dynamicTest("Fuga", () -> System.out.println("Dynamic Fuga."))
                ))
            )),
            dynamicContainer("Dynamic Container 2", List.of(
                dynamicTest("Fizz", () -> System.out.println("Dynamic Fizz.")),
                dynamicTest("Buzz", () -> System.out.println("Dynamic Buzz."))
            ))
        );
    }
}
Dynamic Foo.
Dynamic Hoge.
Dynamic Fuga.
Dynamic Fizz.
Dynamic Buzz.

.
'-- JUnit Jupiter [OK]
  '-- JUnit5Test [OK]
    '-- testFactory() [OK]
      +-- Dynamic Container 1 [OK]
      | +-- Foo [OK]
      | '-- Dynamic Container 1-1 [OK]
      |   +-- Hoge [OK]
      |   '-- Fuga [OK]
      '-- Dynamic Container 2 [OK]
        +-- Fizz [OK]
        '-- Buzz [OK]
- DynamicContainer を使うと、動的テストを入れ子構造にできる
並列実行
junit.jupiter.execution.parallel.enabled=true
-
junit-platform.propertiesはクラスパスルートに配置している
package sample.junit5;

import org.junit.jupiter.api.AfterAll;
import org.junit.jupiter.api.AfterEach;
import org.junit.jupiter.api.BeforeAll;
import org.junit.jupiter.api.BeforeEach;
import org.junit.jupiter.api.Test;
import org.junit.jupiter.api.TestInfo;
import org.junit.jupiter.api.parallel.Execution;
import org.junit.jupiter.api.parallel.ExecutionMode;

@Execution(ExecutionMode.CONCURRENT) // ★これを忘れずにつける!
class JUnit5Test {
    @BeforeAll
    static void beforeAll() {
        printThread("beforeAll()");
    }

    @BeforeEach
    void beforeEach(TestInfo testInfo) {
        String name = testInfo.getDisplayName();
        printThread("  " + name + ":beforeEach()");
    }

    @Test
    void test1() {
        printThread("    test1()");
    }

    @Test
    void test2() {
        printThread("    test2()");
    }

    @AfterEach
    void afterEach(TestInfo testInfo) {
        String name = testInfo.getDisplayName();
        printThread("  " + name + ":afterEach()");
    }

    @AfterAll
    static void afterAll() {
        printThread("afterAll()");
    }

    private static void printThread(String test) {
        String name = Thread.currentThread().getName();
        System.out.printf("%s@%s%n", test, name);
    }
}
beforeAll()@ForkJoinPool-1-worker-3
  test1():beforeEach()@ForkJoinPool-1-worker-5
  test2():beforeEach()@ForkJoinPool-1-worker-7
    test2()@ForkJoinPool-1-worker-7
    test1()@ForkJoinPool-1-worker-5
  test1():afterEach()@ForkJoinPool-1-worker-5
  test2():afterEach()@ForkJoinPool-1-worker-7
afterAll()@ForkJoinPool-1-worker-3
- デフォルトでは、全てのテストメソッドは単一のスレッドで順次実行される
- 設定ファイル(クラスパスルートに配置した
junit-platform.properties)でjunit.jupiter.execution.parallel.enabled=trueと設定すると、並列実行が有効になる - ただし、この設定だけではテストメソッドは変わらず単一スレッドで順次実行される
- テストメソッドを並列実行させるためには、テストクラスに @Execution アノテーションを設定して
valueに CONCURRENT を指定する必要がある -
SAME_THREAD を指定した場合は親と同じスレッドで実行される
- デフォルトはこちらの設定になっている
デフォルトの実行モードを変更する
junit.jupiter.execution.parallel.enabled=true
junit.jupiter.execution.parallel.mode.default=concurrent
package sample.junit5;

import org.junit.jupiter.api.Test;

class JUnit5Test {

    @Test
    void test1() {
        printThread("test1()");
    }

    @Test
    void test2() {
        printThread("test2()");
    }

    private static void printThread(String test) {
        String name = Thread.currentThread().getName();
        System.out.printf("%s@%s%n", test, name);
    }
}
test1()@ForkJoinPool-1-worker-5
test2()@ForkJoinPool-1-worker-7
- 設定ファイルで
junit.jupiter.execution.parallel.mode.default=concurrentと指定すると、デフォルトの実行モードが並列実行(ExecutionMode.CONCURRENTを指定した状態)になる
デフォルトの実行モードが適用されない例外
-
junit.jupiter.execution.parallel.mode.default=concurrentを指定すると、ほとんどのテストメソッドは並列実行されるようになる - ただし、例外として次の設定がされたテストクラスやメソッドは、デフォルトの実行モードを変更しても並列実行されないようになっている
-
Lifecycle.PER_CLASSを指定したテストクラス -
MethodOrderer.Random以外のMethodOrdererが指定されたテストメソッド
-
package sample.junit5;

import org.junit.jupiter.api.MethodOrderer;
import org.junit.jupiter.api.Nested;
import org.junit.jupiter.api.Test;
import org.junit.jupiter.api.TestInstance;
import org.junit.jupiter.api.TestMethodOrder;

class JUnit5Test {

    @Nested
    class StandardNestedTest {

        @Test
        void test1() {
            printThread("StandardNestedTest.test1()");
        }

        @Test
        void test2() {
            printThread("StandardNestedTest.test2()");
        }
    }

    @Nested
    @TestInstance(TestInstance.Lifecycle.PER_CLASS)
    class PerClassTest {

        @Test
        void test1() {
            printThread("PerClassTest.test1()");
        }

        @Test
        void test2() {
            printThread("PerClassTest.test2()");
        }
    }

    @Nested
    @TestMethodOrder(MethodOrderer.Alphanumeric.class)
    class OrderedTest {

        @Test
        void test1() {
            printThread("OrderedTest.test1()");
        }

        @Test
        void test2() {
            printThread("OrderedTest.test2()");
        }
    }

    private static void printThread(String test) {
        String name = Thread.currentThread().getName();
        System.out.printf("%s@%s%n", test, name);
    }
}
StandardNestedTest.test1()@ForkJoinPool-1-worker-15
StandardNestedTest.test2()@ForkJoinPool-1-worker-13
PerClassTest.test1()@ForkJoinPool-1-worker-7
OrderedTest.test1()@ForkJoinPool-1-worker-5
PerClassTest.test2()@ForkJoinPool-1-worker-7
OrderedTest.test2()@ForkJoinPool-1-worker-5
-
StandardNestedTestのテストメソッドは異なるスレッドで実行されている - しかし、
PerClassTestとOrderedTestのテストメソッドは、それぞれ同じスレッドで実行されている - これらのクラスのテストメソッドも並列実行させたい場合は6、そのテストクラスがスレッドセーフであることを確認したうえで、明示的に
@Execution(ExecutionMode.CONCURRENT)を指定する
package sample.junit5;

...
import org.junit.jupiter.api.parallel.Execution;
import org.junit.jupiter.api.parallel.ExecutionMode;

class JUnit5Test {

    @Nested
    class StandardNestedTest {
        ...
    }

    @Nested
    @TestInstance(TestInstance.Lifecycle.PER_CLASS)
    @Execution(ExecutionMode.CONCURRENT)
    class PerClassTest {
        ...
    }

    @Nested
    @TestMethodOrder(MethodOrderer.Alphanumeric.class)
    @Execution(ExecutionMode.CONCURRENT)
    class OrderedTest {
        ...
    }

    private static void printThread(String test) {...}
}
PerClassTest.test1()@ForkJoinPool-1-worker-15
StandardNestedTest.test1()@ForkJoinPool-1-worker-13
PerClassTest.test2()@ForkJoinPool-1-worker-7
OrderedTest.test1()@ForkJoinPool-1-worker-11
OrderedTest.test2()@ForkJoinPool-1-worker-5
StandardNestedTest.test2()@ForkJoinPool-1-worker-9
トップレベルのクラスのデフォルト実行モードを変更する
junit.jupiter.execution.parallel.enabled=true
junit.jupiter.execution.parallel.mode.classes.default=concurrent
package sample.junit5;

import org.junit.jupiter.api.Test;

class FooTest {

    @Test
    void test1() {
        printThread("FooTest.test1()");
    }

    @Test
    void test2() {
        printThread("FooTest.test2()");
    }

    private static void printThread(String test) {
        String name = Thread.currentThread().getName();
        System.out.printf("%s@%s%n", test, name);
    }
}
package sample.junit5;

import org.junit.jupiter.api.Test;

class BarTest {

    @Test
    void test1() {
        printThread("BarTest.test1()");
    }

    @Test
    void test2() {
        printThread("BarTest.test2()");
    }

    private static void printThread(String test) {
        String name = Thread.currentThread().getName();
        System.out.printf("%s@%s%n", test, name);
    }
}
BarTest.test1()@ForkJoinPool-1-worker-3
FooTest.test1()@ForkJoinPool-1-worker-7
BarTest.test2()@ForkJoinPool-1-worker-3
FooTest.test2()@ForkJoinPool-1-worker-7
- 設定ファイルで
junit.jupiter.execution.parallel.mode.classes.default=concurrentと指定すると、トップレベルのクラスのデフォルトの実行モードだけを変更できる - 先程設定していた
junit.jupiter.execution.parallel.mode.default=concurrentはメソッドレベルの並列実行を制御するもので、今回はその設定をしていない(したがって、デフォルトのsame_threadを指定しているのと同じ状態) - この結果、テストクラス単位で別スレッドで実行し、テストクラス内のメソッドは単一スレッドで順次実行されるようになっている
-
FooTestとBarTestは異なるスレッドで実行されている(ForkJoinPool-1-worker-7とForkJoinPool-1-worker-3) - しかし、
FooTest内の各メソッドは1つのスレッド(ForkJoinPool-1-worker-7)で実行されている
-
-
junit.jupiter.execution.parallel.mode.defaultとjunit.jupiter.execution.parallel.mode.classes.defaultの設定の組み合わせは全部で4通りあり、それぞれ次のような動作になる
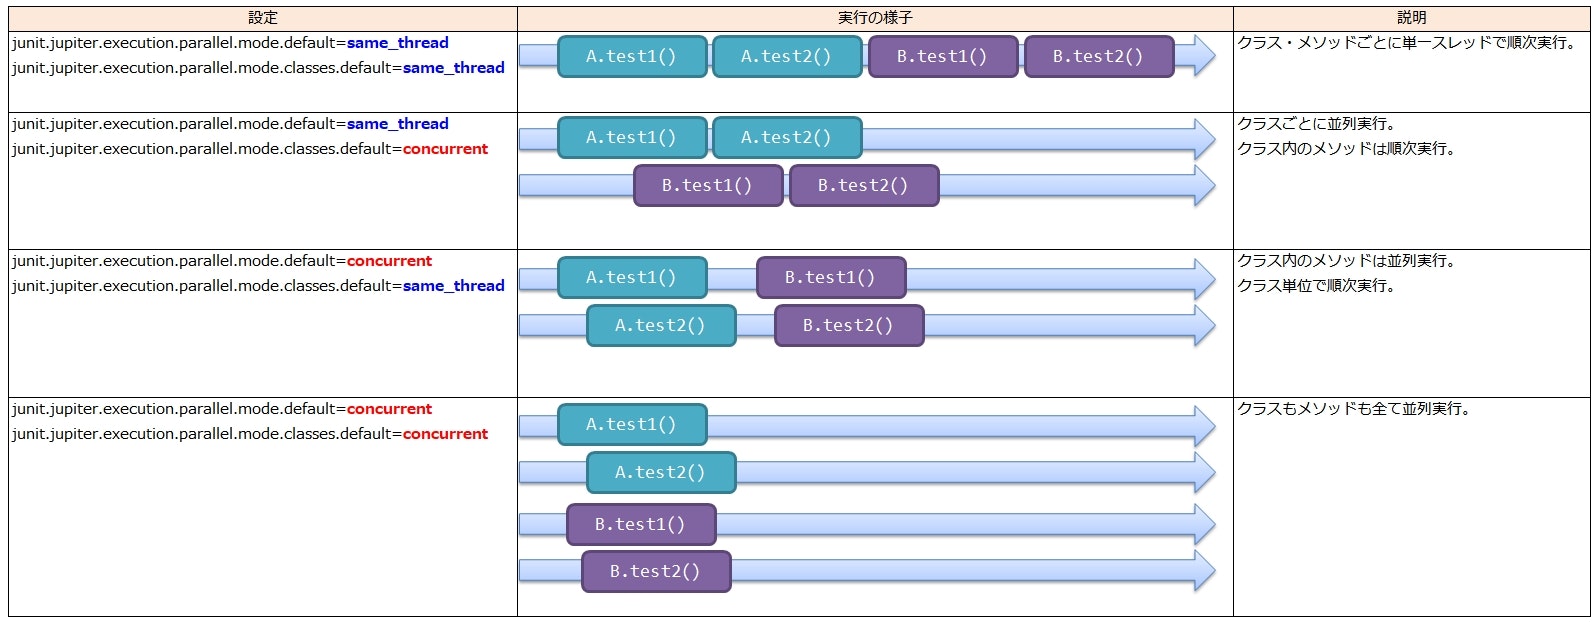
- なお、
junit.jupiter.execution.parallel.mode.classes.default(クラスごとのデフォルト動作)が未指定だった場合は、junit.jupiter.execution.parallel.mode.defaultと同じ設定値になる
同時並行数を調整する
プロセッサ(コア)数に合わせて動的に変更する
jjunit.jupiter.execution.parallel.enabled=true
junit.jupiter.execution.parallel.config.strategy=dynamic
junit.jupiter.execution.parallel.mode.default=concurrent
junit.jupiter.execution.parallel.config.dynamic.factor=2
package sample.junit5;

import java.util.concurrent.atomic.AtomicInteger;

public class ParallelismCounter {
    private final AtomicInteger counter = new AtomicInteger(0);
    private final AtomicInteger max = new AtomicInteger(0);

    public void increment() {
        this.max.set(Math.max(this.max.get(), this.counter.incrementAndGet()));
    }

    public void decrement() {
        this.counter.decrementAndGet();
    }

    public int getMaxCount() {
        return this.max.get();
    }
}
- 同時実行されているスレッドの数をカウントするためのクラス
package sample.junit5;

import org.junit.jupiter.api.AfterEach;
import org.junit.jupiter.api.BeforeEach;
import org.junit.jupiter.api.DynamicNode;
import org.junit.jupiter.api.DynamicTest;
import org.junit.jupiter.api.TestFactory;

import java.util.stream.IntStream;
import java.util.stream.Stream;

class JUnit5Test {
    private long begin;
    private ParallelismCounter counter = new ParallelismCounter();

    @BeforeEach
    void beforeEach() {
        begin = System.currentTimeMillis();
    }

    @TestFactory
    Stream<DynamicNode> testFactory() {
        return IntStream
                .range(0, 20)
                .mapToObj(i -> DynamicTest.dynamicTest("test" + i, () -> {
                    counter.increment();
                    Thread.sleep(1000);
                    counter.decrement();
                }));
    }

    @AfterEach
    void printThreadNames() {
        System.out.println(System.currentTimeMillis() - begin + "ms");
        System.out.println("Available Processors = " + Runtime.getRuntime().availableProcessors());
        System.out.println("Max Parallelism Count = " + counter.getMaxCount());
        System.out.println("Active Thread Count = " + Thread.activeCount());
        Thread[] activeThreads = new Thread[Thread.activeCount()];
        Thread.enumerate(activeThreads);
        IntStream.range(0, activeThreads.length)
                .mapToObj(i -> "[" + i + "] " + activeThreads[i].getName())
                .forEach(System.out::println);
    }
}
- 動的テストの仕組みを使って、処理が1秒かかるテストを 20 個作成している
- テスト終了後に、各種情報を出力している
2033ms
Available Processors = 8
Max Parallelism Count = 16
Active Thread Count = 18
[0] main
[1] ForkJoinPool-1-worker-19
[2] ForkJoinPool-1-worker-5
[3] ForkJoinPool-1-worker-23
[4] ForkJoinPool-1-worker-9
[5] ForkJoinPool-1-worker-27
[6] ForkJoinPool-1-worker-13
[7] ForkJoinPool-1-worker-31
[8] ForkJoinPool-1-worker-17
[9] ForkJoinPool-1-worker-3
[10] ForkJoinPool-1-worker-21
[11] ForkJoinPool-1-worker-7
[12] ForkJoinPool-1-worker-25
[13] ForkJoinPool-1-worker-11
[14] ForkJoinPool-1-worker-29
[15] ForkJoinPool-1-worker-15
[16] ForkJoinPool-1-worker-1
[17] ForkJoinPool-1-worker-33
- 設定ファイルで
junit.jupiter.execution.parallel.config.dynamic.factorを指定することで、並列実行するスレッドの数を調整できる-
factorに指定した値に実行環境のプロセッサ数(コア数)を掛けた数が、並列実行されるスレッド数になる - 検証した環境はコア数が8で
factorに2を指定していたので、並列実行されたスレッド数は16となっている - なお、並列実行の実行には ForkJoinPool が使われており、プールされるスレッド数は並列実行されるスレッド数よりも多くなることがある(アクティブなスレッド数が並列実行数よりも多くなっている)
-
-
factorが指定されていない場合、デフォルトは1になる - ちなみに、
factorは裏でBigDecimalに変換されているので、少数を指定することもできる- 小数点以下は切り捨て(最終的に intValue() で
intに変換してる)
- 小数点以下は切り捨て(最終的に intValue() で
junit.jupiter.execution.parallel.enabled=true
junit.jupiter.execution.parallel.config.strategy=dynamic
junit.jupiter.execution.parallel.mode.default=concurrent
junit.jupiter.execution.parallel.config.dynamic.factor=0.5
5042ms
Available Processors = 8
Max Parallelism Count = 4
Active Thread Count = 6
[0] main
[1] ForkJoinPool-1-worker-3
[2] ForkJoinPool-1-worker-5
[3] ForkJoinPool-1-worker-7
[4] ForkJoinPool-1-worker-1
[5] ForkJoinPool-1-worker-9
固定値にする
junit.jupiter.execution.parallel.enabled=true
junit.jupiter.execution.parallel.config.strategy=fixed
junit.jupiter.execution.parallel.mode.default=concurrent
junit.jupiter.execution.parallel.config.fixed.parallelism=6
※テストの実装は dynamic を指定したときのものと同じ
4031ms
Available Processors = 8
Max Parallelism Count = 6
Active Thread Count = 8
[0] main
[1] ForkJoinPool-1-worker-3
[2] ForkJoinPool-1-worker-5
[3] ForkJoinPool-1-worker-7
[4] ForkJoinPool-1-worker-9
[5] ForkJoinPool-1-worker-11
[6] ForkJoinPool-1-worker-13
[7] ForkJoinPool-1-worker-15
-
junit.jupiter.execution.parallel.config.strategyにfixedを指定すると、固定の並列数を指定できるようになる - 並列数は
junit.jupiter.execution.parallel.config.fixed.parallelismで指定する
任意にカスタマイズする
...
dependencies {
    testImplementation "org.junit.jupiter:junit-jupiter:5.5.2"
    testImplementation "org.junit.jupiter:junit-jupiter-engine:5.5.2" // ★
}
-
junit-jupiter-engineはデフォルトでは実行時だけしか参照できないので、コンパイル時も参照できるようにtestImplementationに指定している
package sample.junit5;

import org.junit.platform.engine.ConfigurationParameters;
import org.junit.platform.engine.support.hierarchical.ParallelExecutionConfiguration;
import org.junit.platform.engine.support.hierarchical.ParallelExecutionConfigurationStrategy;

public class MyParallelExecutionConfigurationStrategy implements ParallelExecutionConfigurationStrategy {

    @Override
    public ParallelExecutionConfiguration createConfiguration(ConfigurationParameters configurationParameters) {
        return new ParallelExecutionConfiguration() {

            @Override
            public int getParallelism() {
                return 7;
            }

            @Override
            public int getMinimumRunnable() {
                return 7;
            }

            @Override
            public int getMaxPoolSize() {
                return 7;
            }

            @Override
            public int getCorePoolSize() {
                return 7;
            }

            @Override
            public int getKeepAliveSeconds() {
                return 30;
            }
        };
    }
}
-
ParallelExecutionConfigurationStrategyを実装したクラスを作成する -
createConfiguration()メソッドでParallelExecutionConfigurationを実装したインスタンスを返すようにする -
ParallelExecutionConfigurationに定義されている Getter は、ForkJoinPoolを生成するときに使用される - 各値の意味は、
ForkJoinPoolのコンストラクタの Javadoc を参照
junit.jupiter.execution.parallel.enabled=true
junit.jupiter.execution.parallel.config.strategy=custom
junit.jupiter.execution.parallel.mode.default=concurrent
junit.jupiter.execution.parallel.config.custom.class=sample.junit5.MyParallelExecutionConfigurationStrategy
-
junit.jupiter.execution.parallel.config.strategyで、customを指定する -
junit.jupiter.execution.parallel.config.custom.classで、自作したParallelExecutionConfigurationStrategyの実装クラスを指定する
※テストの実装は dynamic のときと同じ
4034ms
Available Processors = 8
Max Parallelism Count = 7
Active Thread Count = 8
[0] main
[1] ForkJoinPool-1-worker-3
[2] ForkJoinPool-1-worker-5
[3] ForkJoinPool-1-worker-7
[4] ForkJoinPool-1-worker-9
[5] ForkJoinPool-1-worker-11
[6] ForkJoinPool-1-worker-13
[7] ForkJoinPool-1-worker-15
-
MyParallelExecutionConfigurationStrategyが返したParallelExecutionConfigurationの設定に従って並列実行されていることが分かる
排他制御
package sample.junit5;

import org.junit.jupiter.api.AfterAll;
import org.junit.jupiter.api.Test;
import org.junit.jupiter.api.parallel.Execution;
import org.junit.jupiter.api.parallel.ExecutionMode;

@Execution(ExecutionMode.CONCURRENT)
class JUnit5Test {

    static int n = 0;

    @Test
    void test1() throws Exception {
        process("test1");
    }

    @Test
    void test2() throws Exception {
        process("test2");
    }

    @Test
    void test3() throws Exception {
        process("test3");
    }

    private void process(String name) {
        System.out.println("begin " + name);
        for (int i=0; i<10000; i++) {
            n++;
        }
        System.out.println("end " + name);
    }

    @AfterAll
    static void afterAll() {
        System.out.println("n = " + n);
    }
}
- クラスを並列実行にして、
static変数nを3つのテストメソッドから1万回ずつインクリメントしている
begin test3
begin test1
begin test2
end test1
end test2
end test3
n = 13394
- 当然、同期が取られていないので結果は 30,000 にはならない
package sample.junit5;

...
import org.junit.jupiter.api.parallel.ResourceLock;

@Execution(ExecutionMode.CONCURRENT)
class JUnit5Test {

    static int n = 0;

    @Test
    @ResourceLock("hoge")
    void test1() throws Exception { ... }

    @Test
    @ResourceLock("hoge")
    void test2() throws Exception { ... }

    @Test
    @ResourceLock("hoge")
    void test3() throws Exception { ... }

    private void process(String name) { ... }

    @AfterAll
    static void afterAll() { ... }
}
- 各メソッドに
@ResourceLockアノテーションを設定する
begin test1
end test1
begin test2
end test2
begin test3
end test3
n = 30000
- 各メソッドの実行で同期が取られて、
nの値は 30,000 になった - @ResourceLock をクラスやメソッドに設定すると、その中のテストケースは同期がとられるようになる
-
valueには排他を制御するためのキーとなる文字列を指定する- 同じキー文字列が設定された
@ResourceLock間で同期がとられる
- 同じキー文字列が設定された
アクセスモードを指定する
package sample.junit5;

import org.junit.jupiter.api.Test;
import org.junit.jupiter.api.parallel.Execution;
import org.junit.jupiter.api.parallel.ExecutionMode;
import org.junit.jupiter.api.parallel.ResourceAccessMode;
import org.junit.jupiter.api.parallel.ResourceLock;

@Execution(ExecutionMode.CONCURRENT)
class JUnit5Test {

    @Test
    @ResourceLock(value = "hoge", mode = ResourceAccessMode.READ_WRITE)
    void test1() throws Exception {
        process("test1(READ_WRITE)");
    }

    @Test
    @ResourceLock(value = "hoge", mode = ResourceAccessMode.READ)
    void test2() throws Exception {
        process("test2(READ)");
    }

    @Test
    @ResourceLock(value = "hoge", mode = ResourceAccessMode.READ)
    void test3() throws Exception {
        process("test3(READ)");
    }

    private void process(String name) throws Exception {
        System.out.println("begin " + name);
        Thread.sleep(500);
        System.out.println("end " + name);
    }
}
begin test1(READ_WRITE)
end test1(READ_WRITE)
begin test2(READ)
begin test3(READ)
end test2(READ)
end test3(READ)
-
@ResourceLockのmodeで、アクセスモードを指定できる- アクセスモードは ResourceAccessMode で定義された定数で指定する
- 各アクセスモードによる排他制御の組み合わせは次のような感じになる
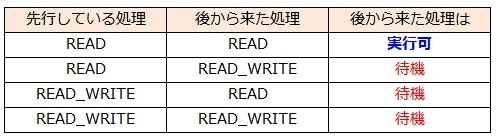
-
READ同士なら並列実行可能だが、READ_WRITEがからむと排他制御される -
READはデータの読み取りのみで更新を行わないテストメソッドに指定し、READ_WRITEはデータの更新を行うテストメソッドに指定する感じ
インターフェースのデフォルトメソッドを利用する
package sample.junit5;

import org.junit.jupiter.api.AfterAll;
import org.junit.jupiter.api.AfterEach;
import org.junit.jupiter.api.BeforeAll;
import org.junit.jupiter.api.BeforeEach;
import org.junit.jupiter.api.DynamicNode;
import org.junit.jupiter.api.RepeatedTest;
import org.junit.jupiter.api.Test;
import org.junit.jupiter.api.TestFactory;
import org.junit.jupiter.params.ParameterizedTest;
import org.junit.jupiter.params.provider.ValueSource;

import java.util.List;

import static org.junit.jupiter.api.DynamicTest.*;

interface DefaultMethodTest {
    @BeforeAll
    static void beforeAll() {
        System.out.println("beforeAll()");
    }

    @BeforeEach
    default void beforeEach() {
        System.out.println("  beforeEach()");
    }

    @Test
    default void test() {
        System.out.println("    test()");
    }

    @RepeatedTest(3)
    default void repeatedTest() {
        System.out.println("    repeatedTest()");
    }

    @ParameterizedTest
    @ValueSource(strings = {"one", "two", "three"})
    default void parameterizedTest(String param) {
        System.out.println("    parameterizedTest(" + param + ")");
    }

    @TestFactory
    default List<DynamicNode> testFactory() {
        return List.of(
            dynamicTest("DynamicTest1", () -> System.out.println("    testFactory(1)")),
            dynamicTest("DynamicTest2", () -> System.out.println("    testFactory(2)"))
        );
    }

    @AfterEach
    default void afterEach() {
        System.out.println("  afterEach()");
    }

    @AfterAll
    static void afterAll() {
        System.out.println("afterAll()");
    }
}
package sample.junit5;

class JUnit5Test implements DefaultMethodTest {}
beforeAll()
  beforeEach()
    repeatedTest()
  afterEach()
  beforeEach()
    repeatedTest()
  afterEach()
  beforeEach()
    repeatedTest()
  afterEach()
  beforeEach()
    testFactory(1)
    testFactory(2)
  afterEach()
  beforeEach()
    test()
  afterEach()
  beforeEach()
    parameterizedTest(one)
  afterEach()
  beforeEach()
    parameterizedTest(two)
  afterEach()
  beforeEach()
    parameterizedTest(three)
  afterEach()
afterAll()
- インターフェースのデフォルトメソッドでもテストを定義できる
- インターフェースを実行対象となるクラスで
implementsすれば、テストが実行される
- インターフェースを実行対象となるクラスで
拡張モデル
JUnit Jupiter には拡張モデルと呼ばれる仕組みが用意されており、任意の拡張機能を簡単に導入できるようになっている。
Hello World
package sample.junit5;

import org.junit.jupiter.api.extension.AfterEachCallback;
import org.junit.jupiter.api.extension.BeforeEachCallback;
import org.junit.jupiter.api.extension.ExtensionContext;

public class MyExtension implements BeforeEachCallback, AfterEachCallback {

    @Override
    public void beforeEach(ExtensionContext context) throws Exception {
        System.out.println("MyExtension.beforeEach()");
    }

    @Override
    public void afterEach(ExtensionContext context) throws Exception {
        System.out.println("MyExtension.afterEach()");
    }
}
- 拡張機能を作るには、まずは Extension インターフェースを実装したクラスを作成する
- ただし、
Extension自体はマーカーインターフェースでメソッドは定義されていない- 実際には、
Extensionを継承した BeforeEachCallback や AfterEachCallback といった拡張ポイントごとに定義されたサブインターフェースを実装する -
BeforeEachCallbackなら、各テスト前にコールバックされるbeforeEach()メソッドが定義されており、
AfterEachCallbackなら、各テスト後にコールバックされるafterEach()メソッドが定義されている
- 実際には、
package sample.junit5;

import org.junit.jupiter.api.Test;
import org.junit.jupiter.api.extension.ExtendWith;

@ExtendWith(MyExtension.class)
class JUnit5Test {

    @Test
    void test1() {
        System.out.println("  test1()");
    }

    @Test
    void test2() {
        System.out.println("  test2()");
    }
}
- 拡張機能を実装したクラスを実際にテストで使用する方法の1つとして、 @ExtendWith アノテーションを使う方法がある
- 拡張機能を適用したい場所に
@ExtendWithアノテーションを設定し、valueに適用したい拡張機能のClassオブジェクトを指定する
MyExtension.beforeEach()
  test1()
MyExtension.afterEach()
MyExtension.beforeEach()
  test2()
MyExtension.afterEach()
- これだけで、各テストの前後で拡張機能で定義した処理が実行されるようになった
- なお、例ではクラスに対して
@ExtendWithを指定したが、メソッドに指定することで部分的に拡張機能を適用することもできる
package sample.junit5;

import org.junit.jupiter.api.Test;
import org.junit.jupiter.api.extension.ExtendWith;

class JUnit5Test {

    @Test
    @ExtendWith(MyExtension.class)
    void test1() {
        System.out.println("  test1()");
    }

    @Test
    void test2() {
        System.out.println("test2()");
    }
}
MyExtension.beforeEach()
  test1()
MyExtension.afterEach()
test2()
拡張ポイント
Extension インターフェースを継承した拡張ポイントとなるインターフェースには次のようなものがある。
| インターフェース | 説明 |
|---|---|
| ExecutionCondition | テストを実行するかどうかを制御する。 |
| TestInstanceFactory | テストインスタンスを生成する。 |
| TestInstancePostProcessor | テストインスタンス生成後の初期化処理などを行う。 |
| ParameterResolver | テストメソッドやライフサイクルメソッドなどの引数を解決する。 |
|
BeforeAllCallback BeforeEachCallback BeforeTestExecutionCallback AfterTestExecutionCallback AfterEachCallback AfterAllCallback |
テストの実行前後などライフサイクルに沿った処理を実行する。 |
| TestWatcher | テストメソッドの実行結果に合わせた後処理を実行する。 |
| TestExecutionExceptionHandler | テスト実行時に投げられた例外をハンドリングする。 |
| LifecycleMethodExecutionExceptionHandler |
@BeforeEach などのライフサイクルメソッドで投げられた例外をハンドリングする。 |
| TestTemplateInvocationContextProvider | 同じテストを異なるコンテキストで実行するための準備処理などを行う。 |
サポートクラス
拡張クラスを実装するときに、汎用的に利用できるユーティリティクラス(サポートクラス)が提供されている。
-
AnnotationSupport
- アノテーションに関するユーティリティクラス
- アノテートされた要素の検索
- アノテートされているかの判定
- などなど
- アノテーションに関するユーティリティクラス
-
ClassSupport
-
Classの文字列表現に関する処理を提供するユーティリティ
-
-
ReflectionSupport
- リフレクション操作に関するユーティリティ
- クラス・メソッド・フィールド・コンストラクタの検索
- メソッド・コンストラクタの実行
- インスタンスの生成
- などなど
- リフレクション操作に関するユーティリティ
-
ModifierSupport
- 修飾子の判定メソッドを定義したユーティリティ
例外処理や面倒な記述を省き、簡潔な方法で操作ができるようになっている。
とりあえず「こういうものが存在する」ということを頭の片隅に入れておいて、いざ拡張クラスを作り始めたら「あ、これサポートクラス使えるんじゃね?」と考えて、欲しいメソッドがあるか探す感じでいいと思う。
これらのクラスは内部ユーティリティではなく、第三者が独自の TestEngine や拡張機能を作るときの補助として用意されているものなので安心して使って問題ない。
テストの実行条件を制御する
package sample.junit5.extension;

import org.junit.jupiter.api.extension.ConditionEvaluationResult;
import org.junit.jupiter.api.extension.ExecutionCondition;
import org.junit.jupiter.api.extension.ExtensionContext;

public class MyExecutionCondition implements ExecutionCondition {

    @Override
    public ConditionEvaluationResult evaluateExecutionCondition(ExtensionContext context) {
        if (context.getTestMethod().isPresent()) {
            System.out.println("# Test method = " + context.getRequiredTestMethod().getName());
            return context.getDisplayName().contains("o")
                    ? ConditionEvaluationResult.enabled("Test name has 'o'.")
                    : ConditionEvaluationResult.disabled("Test name does not have 'o'.");
        } else {
            System.out.println("# Test class = " + context.getRequiredTestClass().getSimpleName());
            return ConditionEvaluationResult.enabled("This is test class.");
        }
    }
}
- テストメソッドの表示名に
"o"が含まれているものだけ有効にしている
package sample.junit5;

import org.junit.jupiter.api.BeforeEach;
import org.junit.jupiter.api.DynamicNode;
import org.junit.jupiter.api.DynamicTest;
import org.junit.jupiter.api.Nested;
import org.junit.jupiter.api.Test;
import org.junit.jupiter.api.TestFactory;
import org.junit.jupiter.api.extension.ExtendWith;
import sample.junit5.extension.MyExecutionCondition;

import java.util.List;

@ExtendWith(MyExecutionCondition.class)
class JUnit5Test {

    @BeforeEach
    void beforeEach() {
        System.out.println("beforeEach()");
    }

    @Test
    void hoge() {
        System.out.println("  hoge()");
    }

    @Test
    void fuga() {
        System.out.println("  fuga()");
    }

    @Nested
    class NestedClass {

        @Test
        void piyo() {
            System.out.println("  piyo()");
        }
    }

    @TestFactory
    List<DynamicNode> testFactory() {
        return List.of(
            DynamicTest.dynamicTest("DynamicTest1", () -> System.out.println("  dynamicTest1")),
            DynamicTest.dynamicTest("DynamicTest2", () -> System.out.println("  dynamicTest2"))
        );
    }
}
# Test class = JUnit5Test
# Test method = testFactory
beforeEach()
  dynamicTest1
  dynamicTest2
# Test method = fuga
# Test method = hoge
beforeEach()
  hoge()
# Test class = NestedClass
# Test method = piyo
beforeEach()
  piyo()
- ExecutionCondition を使用すると、テストを実行するかどうかを制御できる
- コンテナ7およびメソッドごとに
evaluateExecutionCondition(ExtensionContext)メソッドがコールされるので、対象のテストを実行するかどうかを戻り値で制御する- 実行する場合は ConditionEvaluationResult.enabled(String) で生成した値を返す
- 実行しない場合は ConditionEvaluationResult.disabled(String) で生成した値を返す
- 引数には、対象を有効/無効にした理由を記述する
-
evaluateExecutionCondition(ExtensionContext)メソッドが引数で受け取る ExtensionContext を使うと、対象のテストメソッドやコンテナについての情報を参照できる-
getTestMethod() など、一部のメソッドは条件次第で値が存在しない可能性があるため、戻り値の型が
Optionalになっている - 必ず
nullにならないことが分かっているのであれば、 getRequiredTestMethod() のようにRequiredがついたメソッドを使う手もある
-
getTestMethod() など、一部のメソッドは条件次第で値が存在しない可能性があるため、戻り値の型が
テストインスタンスを生成する
package sample.junit5.extension;

import org.junit.jupiter.api.extension.ExtensionContext;
import org.junit.jupiter.api.extension.TestInstanceFactory;
import org.junit.jupiter.api.extension.TestInstanceFactoryContext;
import org.junit.jupiter.api.extension.TestInstantiationException;
import org.junit.platform.commons.support.ReflectionSupport;

public class MyTestInstanceFactory implements TestInstanceFactory {
    @Override
    public Object createTestInstance(TestInstanceFactoryContext factoryContext, ExtensionContext extensionContext) throws TestInstantiationException {
        Class<?> testClass = factoryContext.getTestClass();
        System.out.println("===========================================");
        System.out.println("* testClass=" + testClass);
        System.out.println("* outerInstance=" + factoryContext.getOuterInstance().orElse("<empty>"));


        return factoryContext
                .getOuterInstance()
                .map(outerInstance -> {
                    Object instance = ReflectionSupport.newInstance(testClass, outerInstance);
                    System.out.println("* outerInstance [" + outerInstance.hashCode() + "]");
                    System.out.println("* testInstance [" + instance.hashCode() + "]");
                    return instance;
                })
                .orElseGet(() -> {
                    Object instance = ReflectionSupport.newInstance(testClass);
                    System.out.println("* testInstance [" + instance.hashCode() + "]");
                    return instance;
                });
    }
}
package sample.junit5;

import org.junit.jupiter.api.DynamicNode;
import org.junit.jupiter.api.DynamicTest;
import org.junit.jupiter.api.Nested;
import org.junit.jupiter.api.Test;
import org.junit.jupiter.api.TestFactory;
import org.junit.jupiter.api.extension.ExtendWith;
import sample.junit5.extension.MyTestInstanceFactory;

import java.util.List;

@ExtendWith(MyTestInstanceFactory.class)
class JUnit5Test {

    @Test
    void test() {
        System.out.println("JUnit5Test.test() [" + this.hashCode() + "]");
    }

    @Nested
    class NestedClass {

        @Test
        void test() {
            System.out.println("NestedClass.test() [" + this.hashCode() + "]");
        }
    }

    @TestFactory
    List<DynamicNode> testFactory() {
        return List.of(
            DynamicTest.dynamicTest("DynamicTest1", () -> System.out.println("JUnit5Test.dynamicTest1() [" + this.hashCode() + "]")),
            DynamicTest.dynamicTest("DynamicTest2", () -> System.out.println("JUnit5Test.dynamicTest2() [" + this.hashCode() + "]"))
        );
    }
}
===========================================
* testClass=class sample.junit5.JUnit5Test
* outerInstance=<empty>
* testInstance [1781155104]
JUnit5Test.dynamicTest1() [1781155104]
JUnit5Test.dynamicTest2() [1781155104]
===========================================
* testClass=class sample.junit5.JUnit5Test
* outerInstance=<empty>
* testInstance [667449440]
JUnit5Test.test() [667449440]
===========================================
* testClass=class sample.junit5.JUnit5Test
* outerInstance=<empty>
* testInstance [1846668301]
===========================================
* testClass=class sample.junit5.JUnit5Test$NestedClass
* outerInstance=sample.junit5.JUnit5Test@6e11ec0d
* outerInstance [1846668301]
* testInstance [1282836833]
NestedClass.test() [1282836833]
- TestInstanceFactory を使用すると、テストインスタンスの生成をマニュアル化できる
- 各テストメソッドが実行される前に
createTestInstance()メソッドがコールされる- ※ライフサイクルを
PER_CLASSにしている場合は、クラスごとに1回だけコールされる
- ※ライフサイクルを
-
createTestInstance()が返したインスタンスがテストで利用される -
@Nestedで定義した内部テストクラスがある場合は、一旦外側のクラスの生成のためにコールされたあとで、内部テストクラス生成のためにもう一度メソッドがコールされる- 内部クラスのときは
TestInstanceFactoryContextのgetOuterInstance()が空でなくなるので、それで判断できる
- 内部クラスのときは
テストインスタンス生成後の初期化処理を行う
package sample.junit5.extension;

import org.junit.jupiter.api.extension.ExtensionContext;
import org.junit.jupiter.api.extension.TestInstancePostProcessor;

public class MyTestInstancePostProcessor implements TestInstancePostProcessor {

    @Override
    public void postProcessTestInstance(Object testInstance, ExtensionContext context) throws Exception {
        System.out.println("testInstance.hash = " + testInstance.hashCode());
    }
}
package sample.junit5;

import org.junit.jupiter.api.Test;
import org.junit.jupiter.api.extension.ExtendWith;
import sample.junit5.extension.MyTestInstancePostProcessor;

@ExtendWith(MyTestInstancePostProcessor.class)
class JUnit5Test {

    @Test
    void test1() {
        System.out.println("test1() [" + this.hashCode() + "]");
    }

    @Test
    void test2() {
        System.out.println("test2() [" + this.hashCode() + "]");
    }
}
testInstance.hash = 756008141
test1() [756008141]
testInstance.hash = 282044315
test2() [282044315]
- TestInstancePostProcessor を使用すると、テストメソッドが実行される前にテストインスタンスを受け取って任意の処理を実行することができる
- テストインスタンスに何か依存性を注入したり、初期化メソッドを呼んだりするのに使うらしい
-
BeforeEachCallbackでよくね?-
BeforeEachCallbackだと、テストインスタンスをExtensionContextから取得することになるから、OptionalになったりgetRequiredInstance()になったいするのがアレなのかな - あとは、「テストインスタンスに対する後処理を行う」という実装の意図を明確にできるというメリットがあるのかもしれない(憶測)
-
パラメータを解決する
package sample.junit5.extension;

import org.junit.jupiter.api.extension.ExtensionContext;
import org.junit.jupiter.api.extension.ParameterContext;
import org.junit.jupiter.api.extension.ParameterResolutionException;
import org.junit.jupiter.api.extension.ParameterResolver;

import java.lang.reflect.Executable;
import java.lang.reflect.Parameter;
import java.util.Optional;

public class MyParameterResolver implements ParameterResolver {

    @Override
    public boolean supportsParameter(ParameterContext parameterContext, ExtensionContext extensionContext) throws ParameterResolutionException {
        Executable executable = parameterContext.getDeclaringExecutable();
        int index = parameterContext.getIndex();
        Parameter parameter = parameterContext.getParameter();
        Optional<Object> target = parameterContext.getTarget();

        System.out.printf(
            "target=%s, executable=%s, index=%d, parameter=%s%n",
            target.orElse("<empty>"),
            executable.getName(),
            index,
            parameter.getName()
        );

        return true;
    }

    @Override
    public Object resolveParameter(ParameterContext parameterContext, ExtensionContext extensionContext) throws ParameterResolutionException {
        Class<?> type = parameterContext.getParameter().getType();
        if (type.equals(String.class)) {
            return "Hello";
        } else if (type.equals(int.class)) {
            return 999;
        } else {
            return 12.34;
        }
    }
}
package sample.junit5;

import org.junit.jupiter.api.AfterEach;
import org.junit.jupiter.api.BeforeEach;
import org.junit.jupiter.api.DynamicNode;
import org.junit.jupiter.api.DynamicTest;
import org.junit.jupiter.api.Nested;
import org.junit.jupiter.api.Test;
import org.junit.jupiter.api.TestFactory;
import org.junit.jupiter.api.extension.ExtendWith;
import sample.junit5.extension.MyParameterResolver;

import java.util.List;

@ExtendWith(MyParameterResolver.class)
class JUnit5Test {

    @BeforeEach
    void beforeEach(int i) {
        System.out.printf("beforeEach(i=%d)%n", i);
    }

    @TestFactory
    List<DynamicNode> dynamicTest(String string) {
        return List.of(DynamicTest.dynamicTest("DynamicTest", () -> System.out.printf("dynamicTest(string=%s)%n", string)));
    }

    @Test
    void test1(String string, double d, int i) {
        System.out.printf("test1(string=%s, d=%f, i=%d)%n", string, d, i);
    }

    @Nested
    class NestedClass {

        @Test
        void test2(double d) {
            System.out.printf("test2(d=%f)%n", d);
        }
    }

    @AfterEach
    void afterEach() {
        System.out.println("-----------------------------------------");
    }
}
target=sample.junit5.JUnit5Test@5e101011, executable=beforeEach, index=0, parameter=i
beforeEach(i=999)
target=sample.junit5.JUnit5Test@5e101011, executable=dynamicTest, index=0, parameter=string
dynamicTest(string=Hello)
-----------------------------------------
target=sample.junit5.JUnit5Test@4d3b0c46, executable=beforeEach, index=0, parameter=i
beforeEach(i=999)
target=sample.junit5.JUnit5Test@4d3b0c46, executable=test1, index=0, parameter=string
target=sample.junit5.JUnit5Test@4d3b0c46, executable=test1, index=1, parameter=d
target=sample.junit5.JUnit5Test@4d3b0c46, executable=test1, index=2, parameter=i
test1(string=Hello, d=12.340000, i=999)
-----------------------------------------
target=sample.junit5.JUnit5Test@7d9ea927, executable=beforeEach, index=0, parameter=i
beforeEach(i=999)
target=sample.junit5.JUnit5Test$NestedClass@710edef, executable=test2, index=0, parameter=d
test2(d=12.340000)
-----------------------------------------
-
ParameterResolver を使用すると、各種メソッドの引数を任意に解決できるようになる
-
@Testだけでなく、@TestFactoryや@BeforeEachといったメソッドの引数も解決できる
-
- 各メソッド引数ごとに
supportsParameter()がコールされる- ParameterContext から、引数のメタ情を参照できる
- 引数の解決をサポートする場合は
trueを返し、そうでない場合はfalseを返すように実装する
-
supportsParameter()がtrueを返した場合、次にresolveParameter()がコールされる- このメソッドで、解決した引数の値を返すように実装する
- なお、
Parameter.getName()で引数名を取得するためには、javacでコンパイルするときに-parametersオプションをつけておく必要がある点に注意- オプションがない場合は、
arg0,arg1のような名前になる - Gradle でビルドしている場合は、
compileTestJava.options.complierArgs += "-parameters"みたいな感じで設定できる
- オプションがない場合は、
ライフサイクルに沿った処理を行う
package sample.junit5.extension;

import org.junit.jupiter.api.extension.AfterAllCallback;
import org.junit.jupiter.api.extension.AfterEachCallback;
import org.junit.jupiter.api.extension.AfterTestExecutionCallback;
import org.junit.jupiter.api.extension.BeforeAllCallback;
import org.junit.jupiter.api.extension.BeforeEachCallback;
import org.junit.jupiter.api.extension.BeforeTestExecutionCallback;
import org.junit.jupiter.api.extension.ExtensionContext;

public class MyLifeCycleCallback
    implements BeforeAllCallback,
               BeforeEachCallback,
               BeforeTestExecutionCallback,
               AfterTestExecutionCallback,
               AfterEachCallback,
               AfterAllCallback {

    @Override
    public void beforeAll(ExtensionContext context) throws Exception {
        System.out.println("BeforeAllCallback");
    }

    @Override
    public void beforeEach(ExtensionContext context) throws Exception {
        System.out.println("    BeforeEachCallback");
    }

    @Override
    public void beforeTestExecution(ExtensionContext context) throws Exception {
        System.out.println("        BeforeTestExecutionCallback");
    }

    @Override
    public void afterTestExecution(ExtensionContext context) throws Exception {
        System.out.println("        AfterTestExecutionCallback");
    }

    @Override
    public void afterEach(ExtensionContext context) throws Exception {
        System.out.println("    AfterEachCallback");
    }

    @Override
    public void afterAll(ExtensionContext context) throws Exception {
        System.out.println("AfterAllCallback");
    }
}
package sample.junit5;

import org.junit.jupiter.api.AfterAll;
import org.junit.jupiter.api.AfterEach;
import org.junit.jupiter.api.BeforeAll;
import org.junit.jupiter.api.BeforeEach;
import org.junit.jupiter.api.Test;
import org.junit.jupiter.api.extension.ExtendWith;
import sample.junit5.extension.MyLifeCycleCallback;

@ExtendWith(MyLifeCycleCallback.class)
class JUnit5Test {
    @BeforeAll
    static void beforeAll() {
        System.out.println("  beforeAll()");
    }

    @BeforeEach
    void beforeEach() {
        System.out.println("      beforeEach()");
    }

    @Test
    void test() {
        System.out.println("          test()");
    }

    @AfterEach
    void afterEach() {
        System.out.println("      afterEach()");
    }

    @AfterAll
    static void afterAll() {
        System.out.println("  afterAll()");
    }
}
BeforeAllCallback
  beforeAll()
    BeforeEachCallback
      beforeEach()
        BeforeTestExecutionCallback
          test()
        AfterTestExecutionCallback
      afterEach()
    AfterEachCallback
  afterAll()
AfterAllCallback
-
BeforeAllCallback
-
@BeforeAllより前に実行する処理を実装できる
-
-
BeforeEachCallback
-
@BeforeEachより前に実行する処理を実装できる
-
-
BeforeTestExecutionCallback
-
@BeforeEachより後で、テストメソッドより前に実行する処理を実装できる
-
-
AfterTestExecutionCallback
-
@AfterEachより前で、テストメソッドより後に実行する処理を実装できる
-
-
AfterEachCallback
-
@AfterEachより後で実行する処理を実装できる
-
-
AfterAllCallback
-
@AfterAllより後で実行する処理を実装できる
-
テスト結果に合わせた処理を行う
package sample.junit5.extension;

import org.junit.jupiter.api.extension.AfterEachCallback;
import org.junit.jupiter.api.extension.ExtensionContext;
import org.junit.jupiter.api.extension.TestWatcher;

import java.util.Optional;

public class MyTestWatcher implements TestWatcher, AfterEachCallback {

    @Override
    public void testDisabled(ExtensionContext context, Optional<String> reason) {
        System.out.println("disabled : test=" + context.getDisplayName() + ", reason=" + reason.orElse("<empty>"));
    }

    @Override
    public void testSuccessful(ExtensionContext context) {
        System.out.println("successful : test=" + context.getDisplayName());
    }

    @Override
    public void testAborted(ExtensionContext context, Throwable cause) {
        System.out.println("aborted : test=" + context.getDisplayName() + ", cause=" + cause);
    }

    @Override
    public void testFailed(ExtensionContext context, Throwable cause) {
        System.out.println("failed : test=" + context.getDisplayName() + ", cause=" + cause);
    }

    @Override
    public void afterEach(ExtensionContext context) throws Exception {
        System.out.println("AfterEachCallback");
    }
}
package sample.junit5;

import org.junit.jupiter.api.Disabled;
import org.junit.jupiter.api.Test;
import org.junit.jupiter.api.extension.ExtendWith;
import sample.junit5.extension.MyTestWatcher;

import static org.junit.jupiter.api.Assertions.*;
import static org.junit.jupiter.api.Assumptions.*;

@ExtendWith(MyTestWatcher.class)
class JUnit5Test {

    @Test
    void testSuccessful() {
        System.out.println("testSuccessful()");
        assertEquals(10, 10);
    }

    @Test
    void testFailed() {
        System.out.println("testFailed()");
        assertEquals(10, 20);
    }

    @Test
    @Disabled("REASON")
    void testDisabled() {
        System.out.println("testDisabled()");
    }

    @Test
    void testAborted() {
        System.out.println("testAborted()");
        assumeTrue(false, "test abort");
    }
}
testAborted()
AfterEachCallback
aborted : test=testAborted(), cause=org.opentest4j.TestAbortedException: Assumption failed: test abort

testSuccessful()
AfterEachCallback
successful : test=testSuccessful()

disabled : test=testDisabled(), reason=REASON

testFailed()
AfterEachCallback
failed : test=testFailed(), cause=org.opentest4j.AssertionFailedError: expected: <10> but was: <20>
- TestWatcher を使用すると、テスト結果に合わせた処理を実装できる
-
TestWatcherには次の4つのメソッドが定義されている-
testDisabled()- テストが無効だったときに実行される
-
testSuccessful()- テストが成功したときに実行される
-
testAborted()- テストが中断(
assumeThat()など)されたときに実行される
- テストが中断(
-
testFailed()- テストが失敗したときに実行される
-
- 各メソッドは中身が空の
defaultメソッドとして定義されている- したがって、デフォルトでは何も処理が行われない
- 必要に応じて各メソッドをオーバーライドして具体的な実装を記述する
- 各メソッドは、
AfterEachCallbackよりも後に実行される
テストでスローされた例外を処理する
package sample.junit5.extension;

import org.junit.jupiter.api.extension.ExtensionContext;
import org.junit.jupiter.api.extension.TestExecutionExceptionHandler;

public class MyTestExecutionExceptionHandler implements TestExecutionExceptionHandler {

    @Override
    public void handleTestExecutionException(ExtensionContext context, Throwable throwable) throws Throwable {
        System.out.println(" * throwable=" + throwable);
        if (throwable instanceof NullPointerException) {
            throw throwable;
        } else if (throwable instanceof IllegalStateException) {
            throw new UnsupportedOperationException("test");
        }
    }
}
-
NullPointerExceptionを受け取った場合は、そのまま再スロー -
IllegalStateExceptionを受け取った場合は、UnsupportedOperationExceptionをスロー - それ以外は何もせずに終了
package sample.junit5;

import org.junit.jupiter.api.Test;
import org.junit.jupiter.api.extension.ExtendWith;
import sample.junit5.extension.MyTestExecutionExceptionHandler;

import java.io.IOException;

import static org.junit.jupiter.api.Assertions.*;

@ExtendWith(MyTestExecutionExceptionHandler.class)
class JUnit5Test {

    @Test
    void success() {
        System.out.println("success()");
        assertEquals(10, 10);
    }

    @Test
    void fail() {
        System.out.println("fail()");
        assertEquals(10, 20);
    }

    @Test
    void throwsIOException() throws Exception {
        System.out.println("throwsIOException()");
        throw new IOException("test");
    }

    @Test
    void throwsNullPointerException() {
        System.out.println("throwsNullPointerException()");
        throw new NullPointerException("test");
    }

    @Test
    void throwsIllegalStateException() {
        System.out.println("throwsIllegalStateException()");
        throw new IllegalStateException("test");
    }
}
success()
fail()
 * throwable=org.opentest4j.AssertionFailedError: expected: <10> but was: <20>
throwsNullPointerException()
 * throwable=java.lang.NullPointerException: test
throwsIllegalStateException()
 * throwable=java.lang.IllegalStateException: test
throwsIOException()
 * throwable=java.io.IOException: test
.
'-- JUnit Jupiter [OK]
  +-- JUnit5Test [OK]
  | +-- success() [OK]
  | +-- fail() [OK]
  | +-- throwsNullPointerException() [X] test
  | +-- throwsIllegalStateException() [X] test
  | '-- throwsIOException() [OK]
  '-- ParallelismCheck [S] class sample.junit5.ParallelismCheck is @Disabled

Failures (2):
  JUnit Jupiter:JUnit5Test:throwsNullPointerException()
    MethodSource [className = 'sample.junit5.JUnit5Test', methodName = 'throwsNullPointerException', methodParameterTypes = '']
    => java.lang.NullPointerException: test
       ...

  JUnit Jupiter:JUnit5Test:throwsIllegalStateException()
    MethodSource [className = 'sample.junit5.JUnit5Test', methodName = 'throwsIllegalStateException', methodParameterTypes = '']
    => java.lang.UnsupportedOperationException: test
- TestExecutionExceptionHandler を使うと、テストで発生した例外をハンドリングできる
- テストで例外がスローされると、
handleTestExecutionException()がコールされる- 第二引数でスローされた例外を受け取ることができる
- このメソッドが例外をスローすればテストは失敗になる
- 何も例外をスローせずに終了した場合は、テストは成功になる(例外が握りつぶされる)
- 受け取った例外とは別の例外を投げることも可能
- アサーションエラー(
AssertionFailedError)も対象なので要注意- 再スローを忘れてると、アサーションエラーも握りつぶしてしまう
ライフサイクルメソッドでスローされた例外を処理する
package sample.junit5.extension;

import org.junit.jupiter.api.extension.ExtensionContext;
import org.junit.jupiter.api.extension.TestExecutionExceptionHandler;

public class MyTestExecutionExceptionHandler implements TestExecutionExceptionHandler {

    @Override
    public void handleTestExecutionException(ExtensionContext context, Throwable throwable) throws Throwable {
        System.out.println("[TestExecutionExceptionHandler] throwable=" + throwable);
    }
}
package sample.junit5.extension;

import org.junit.jupiter.api.extension.ExtensionContext;
import org.junit.jupiter.api.extension.LifecycleMethodExecutionExceptionHandler;

public class MyLifecycleMethodExecutionExceptionHandler implements LifecycleMethodExecutionExceptionHandler {

    @Override
    public void handleBeforeEachMethodExecutionException(ExtensionContext context, Throwable throwable) throws Throwable {
        System.out.println("[LifecycleMethodExecutionExceptionHandler] throwable=" + throwable);
        throw throwable;
    }

    @Override
    public void handleAfterEachMethodExecutionException(ExtensionContext context, Throwable throwable) throws Throwable {
        System.out.println("[LifecycleMethodExecutionExceptionHandler] throwable=" + throwable);
    }
}
package sample.junit5;

import org.junit.jupiter.api.AfterEach;
import org.junit.jupiter.api.BeforeEach;
import org.junit.jupiter.api.DisplayName;
import org.junit.jupiter.api.Nested;
import org.junit.jupiter.api.Test;
import org.junit.jupiter.api.TestInfo;
import org.junit.jupiter.api.extension.ExtendWith;
import sample.junit5.extension.MyLifecycleMethodExecutionExceptionHandler;
import sample.junit5.extension.MyTestExecutionExceptionHandler;

class JUnit5Test {

    @Nested
    class InnerClass1 {

        @Test
        @DisplayName("普通にライフサイクルメソッドで例外がスローされた場合")
        void test() {
            System.out.println("InnerClass1");
        }
    }

    @Nested
    @ExtendWith(MyTestExecutionExceptionHandler.class)
    class InnerClass2 {

        @Test
        @DisplayName("TestExecutionExceptionHandler はライフサイクルメソッドでスローされた例外に対してどう動くか")
        void test() {
            System.out.println("InnerClass2");
        }
    }

    @Nested
    @ExtendWith(MyLifecycleMethodExecutionExceptionHandler.class)
    class InnerClass3 {

        @Test
        @DisplayName("ライフサイクルメソッドでスローされた例外を LifecycleMethodExecutionExceptionHandler で握りつぶした場合")
        void test() {
            System.out.println("InnerClass3");
        }
    }

    @Nested
    @ExtendWith(MyLifecycleMethodExecutionExceptionHandler.class)
    class InnerClass4 {

        @BeforeEach
        void beforeEach(TestInfo testInfo) {
            throw new RuntimeException("beforeEach@" + simpleClassName(testInfo));
        }

        @Test
        @DisplayName("ライフサイクルメソッドでスローされた例外を LifecycleMethodExecutionExceptionHandler で握りつぶさなかった場合")
        void test() {
            System.out.println("InnerClass4");
        }
    }

    @AfterEach
    void afterEach(TestInfo testInfo) {
        throw new RuntimeException("afterEach@" + simpleClassName(testInfo));
    }

    static String simpleClassName(TestInfo testInfo) {
        return testInfo.getTestClass().map(Class::getSimpleName).orElse("<empty>");
    }
}
[LifecycleMethodExecutionExceptionHandler] throwable=java.lang.RuntimeException: beforeEach@InnerClass4
[LifecycleMethodExecutionExceptionHandler] throwable=java.lang.RuntimeException: afterEach@InnerClass4
InnerClass3
[LifecycleMethodExecutionExceptionHandler] throwable=java.lang.RuntimeException: afterEach@InnerClass3
InnerClass2
InnerClass1

.
'-- JUnit Jupiter [OK]
  '-- JUnit5Test [OK]
    +-- InnerClass4 [OK]
    | '-- ライフサイクルメソッドでスローされた例外を LifecycleMethodExecutionExceptionHandler で握りつぶさなかった場合 [X] beforeEach@InnerClass4
    +-- InnerClass3 [OK]
    | '-- ライフサイクルメソッドでスローされた例外を LifecycleMethodExecutionExceptionHandler で握りつぶした場合 [OK]
    +-- InnerClass2 [OK]
    | '-- TestExecutionExceptionHandler はライフサイクルメソッドでスローされた例外に対してどう動くか [X] afterEach@InnerClass2
    '-- InnerClass1 [OK]
      '-- 普通にライフサイクルメソッドで例外がスローされた場合 [X] afterEach@InnerClass1
-
LifecycleMethodExecutionExceptionHandler を使うと、ライフサイクルメソッドで発生した例外をハンドリングできる
- 前節の
TestExecutionExceptionHandlerは、あくまでテストメソッド本体で例外が発生した場合しかハンドリングできない -
TestExecutionExceptionHandlerは、ライフサイクルメソッドで例外がスローされてもコールバックされない
- 前節の
-
LifecycleMethodExecutionExceptionHandlerには、4つのメソッドが定義されている- 各メソッドは、それぞれ
@BeforeAll,@BeforeEach,@AfterEach,@AfterAllに対応している - ライフサイクルメソッドで例外がスローされると、対応するメソッドがコールされる
- 各メソッドはデフォルトメソッドで定義されており、デフォルトでは受け取った例外をそのままスローしなおすようになっている
- 各メソッドは、それぞれ
-
TestExecutionExceptionHandlerのときと同じで、引数で受け取った例外を再スローしなければ、例外を握りつぶすことができる
同じテストを異なるコンテキストで実行する
package sample.junit5.extension;

import org.junit.jupiter.api.extension.ExtensionContext;
import org.junit.jupiter.api.extension.TestTemplateInvocationContext;
import org.junit.jupiter.api.extension.TestTemplateInvocationContextProvider;

import java.util.stream.Stream;

public class MyTestTemplateInvocationContextProvider implements TestTemplateInvocationContextProvider {
    @Override
    public boolean supportsTestTemplate(ExtensionContext context) {
        System.out.println("[supportsTestTemplate] displayName=" + context.getDisplayName());
        return context.getDisplayName().equals("test1()");
    }

    @Override
    public Stream<TestTemplateInvocationContext> provideTestTemplateInvocationContexts(ExtensionContext context) {
        System.out.println("[provideTestTemplateInvocationContexts] displayName=" + context.getDisplayName());
        return Stream.of(
            new MyTestTemplateInvocationContext(),
            new MyTestTemplateInvocationContext(),
            new MyTestTemplateInvocationContext()
        );
    }

    public static class MyTestTemplateInvocationContext implements TestTemplateInvocationContext {
    }
}
package sample.junit5;

import org.junit.jupiter.api.Test;
import org.junit.jupiter.api.TestTemplate;
import org.junit.jupiter.api.extension.ExtendWith;
import sample.junit5.extension.MyTestTemplateInvocationContextProvider;

@ExtendWith(MyTestTemplateInvocationContextProvider.class)
class JUnit5Test {

    @TestTemplate
    void test1() {
        System.out.println("test1()");
    }

    @TestTemplate
    void test2() {
        System.out.println("test2()");
    }

    @Test
    void test3() {
        System.out.println("test3()");
    }
}
[supportsTestTemplate] displayName=test1()
[provideTestTemplateInvocationContexts] displayName=test1()
test1()
test1()
test1()
[supportsTestTemplate] displayName=test2()
test3()

.
'-- JUnit Jupiter [OK]
  '-- JUnit5Test [OK]
    +-- test1() [OK]
    | +-- [1] [OK]
    | +-- [2] [OK]
    | '-- [3] [OK]
    +-- test2() [X] You must register at least one TestTemplateInvocationContextProvider that supports @TestTemplate method [void sample.junit5.JUnit5Test.test2()]
    '-- test3() [OK]

Failures (1):
  JUnit Jupiter:JUnit5Test:test2()
    MethodSource [className = 'sample.junit5.JUnit5Test', methodName = 'test2', methodParameterTypes = '']
    => org.junit.platform.commons.PreconditionViolationException: You must register at least one TestTemplateInvocationContextProvider that supports @TestTemplate method [void sample.junit5.JUnit5Test.test2()]
       ...
- TestTemplateInvocationContextProvider を使用すると、同じテストメソッドを異なるコンテキストで複数回実行できる
- 異なるコンテキストで実行したいテストは @TestTemplate でアノテートしておく必要がある
-
@TestTemplateが設定されたメソッドごとにTestTemplateInvocationContextProviderのsupportsTestTemplate()がコールされる- 対象のテストを処理対象にする(サポートする)場合は
trueを返すように実装する -
@TestTemplateを設定しているのにサポートするTestTemplateInvocationContextProviderが1つも存在しない場合は、エラーになる
- 対象のテストを処理対象にする(サポートする)場合は
- サポートするとした場合は、
provideTestTemplateInvocationContexts()がコールされる- このメソッドは、 TestTemplateInvocationContext の
Streamを返すように実装する -
TestTemplateInvocationContextが、テストを実行するときの1つのコンテキストを表している - 複数のコンテキストで実行する場合は、複数の要素を返すように
Streamを構築する - 上記実装例では3つの
MyTestTemplateInvocationContextを持つStreamを返しているので、test1()メソッドは3回(3つのコンテキストで)実行されている
- このメソッドは、 TestTemplateInvocationContext の
コンテキストで表示名を指定する
package sample.junit5.extension;

...

public class MyTestTemplateInvocationContextProvider implements TestTemplateInvocationContextProvider {
    ...

    @Override
    public Stream<TestTemplateInvocationContext> provideTestTemplateInvocationContexts(ExtensionContext context) {
        System.out.println("[provideTestTemplateInvocationContexts] displayName=" + context.getDisplayName());
        return Stream.of(
            new MyTestTemplateInvocationContext("Hoge"),
            new MyTestTemplateInvocationContext("Fuga"),
            new MyTestTemplateInvocationContext("Piyo")
        );
    }

    public static class MyTestTemplateInvocationContext implements TestTemplateInvocationContext {
        private final String name;

        public MyTestTemplateInvocationContext(String name) {
            this.name = name;
        }

        @Override
        public String getDisplayName(int invocationIndex) {
            return this.name + "[" + invocationIndex + "]";
        }
    }
}
.
'-- JUnit Jupiter [OK]
  '-- JUnit5Test [OK]
    +-- test1() [OK]
    | +-- Hoge[1] [OK]
    | +-- Fuga[2] [OK]
    | '-- Piyo[3] [OK]
    :
-
TestTemplateInvocationContextにはgetDisplayName()というメソッドが定義されている - このメソッドはデフォルトメソッドで定義されていて、デフォルト実装では
"[" + invocationIndex + "]"を返すようになっている-
invocationIndexは、現在のコンテキストのインデックス(1はじまり)が渡されている
-
- このメソッドをオーバーライドすることで、任意の表示名を返せるようになる
コンテキストごとに任意の拡張を追加する
package sample.junit5.extension;

import org.junit.jupiter.api.extension.AfterEachCallback;
import org.junit.jupiter.api.extension.BeforeEachCallback;
import org.junit.jupiter.api.extension.Extension;
import org.junit.jupiter.api.extension.ExtensionContext;
import org.junit.jupiter.api.extension.TestTemplateInvocationContext;
import org.junit.jupiter.api.extension.TestTemplateInvocationContextProvider;

import java.util.List;
import java.util.stream.Stream;

public class MyTestTemplateInvocationContextProvider implements TestTemplateInvocationContextProvider {
    ...

    @Override
    public Stream<TestTemplateInvocationContext> provideTestTemplateInvocationContexts(ExtensionContext context) {
        System.out.println("[provideTestTemplateInvocationContexts] displayName=" + context.getDisplayName());
        return Stream.of(
            new MyTestTemplateInvocationContext("BeforeEach", (BeforeEachCallback) ctx -> {
                System.out.println("beforeEachCallback()");
            }),
            new MyTestTemplateInvocationContext("AfterEach", (AfterEachCallback) ctx -> {
                System.out.println("afterEachCallback()");
            })
        );
    }

    public static class MyTestTemplateInvocationContext implements TestTemplateInvocationContext {
        private final String name;
        private final Extension extension;

        public MyTestTemplateInvocationContext(String name, Extension extension) {
            this.name = name;
            this.extension = extension;
        }

        @Override
        public String getDisplayName(int invocationIndex) {
            return this.name;
        }

        @Override
        public List<Extension> getAdditionalExtensions() {
            return List.of(this.extension);
        }
    }
}
...
beforeEachCallback()
test1()
test1()
afterEachCallback()
...

.
'-- JUnit Jupiter [OK]
  '-- JUnit5Test [OK]
    +-- test1() [OK]
    | +-- BeforeEach [OK]
    | '-- AfterEach [OK]
    :
-
TestTemplateInvocationContextにはgetAdditionalExtensions()というメソッドが定義されている - このメソッドは、そのコンテキストで使用する拡張機能を
List<Extension>で返す- このメソッドもデフォルトメソッドで、デフォルト実装では空の
List<Extension>を返すようになっている
- このメソッドもデフォルトメソッドで、デフォルト実装では空の
- 上記実装例では、1つ目のコンテキストでは
BeforeEachCallbackを、2つ目のコンテキストではAfterEachCallbakを設定するように実装している -
ParameterResolverを適用すれば、コンテキストごとに異なるパラメータを渡して同じテストメソッドを実行する、といったことが実現できるようになる
拡張機能を手続き的に登録する
package sample.junit5.extension;

import org.junit.jupiter.api.extension.BeforeAllCallback;
import org.junit.jupiter.api.extension.BeforeEachCallback;
import org.junit.jupiter.api.extension.ExtensionContext;

public class MyRegisterExtension implements BeforeEachCallback, BeforeAllCallback {
    private final String name;

    public MyRegisterExtension(String name) {
        this.name = name;
    }

    @Override
    public void beforeAll(ExtensionContext context) throws Exception {
        System.out.println("[" + this.name + "] beforeAll()");
    }

    @Override
    public void beforeEach(ExtensionContext context) throws Exception {
        System.out.println("[" + this.name + "] beforeEach()");
    }
}
package sample.junit5;

import org.junit.jupiter.api.BeforeAll;
import org.junit.jupiter.api.BeforeEach;
import org.junit.jupiter.api.Test;
import org.junit.jupiter.api.extension.RegisterExtension;
import sample.junit5.extension.MyRegisterExtension;

class JUnit5Test {
    @RegisterExtension
    static MyRegisterExtension classField = new MyRegisterExtension("classField");
    @RegisterExtension
    MyRegisterExtension instanceField = new MyRegisterExtension("instanceField");

    @BeforeAll
    static void beforeAll() {
        System.out.println("beforeAll()");
    }

    @BeforeEach
    void beforeEach() {
        System.out.println("beforeEach()");
    }

    @Test
    void test1() {
        System.out.println("test1()");
    }
}
[classField] beforeAll()
beforeAll()
[classField] beforeEach()
[instanceField] beforeEach()
beforeEach()
test1()
-
@ExtendWithを使った方法の場合、拡張機能クラスの調整は基本的に静的なものになる- 拡張機能を実装したクラスのインスタンスは、 Jupiter によって裏で生成される
- このため、拡張機能クラスのインスタンスに対して細かい調整は基本的にできない
- 一方で @RegisterExtension を使用すると、拡張機能クラスの調整を動的に指定できるようになる
- 使用する拡張機能クラスのインスタンスを、拡張機能を使用したいテストクラスのフィールド(
staticor インスタンス)として宣言する- このフィールドを
@RegisterExtensionでアノテートすることで、そのフィールドに設定されたインスタンスを拡張機能として登録できる - フィールドへのインスタンスの設定は任意のプログラム8で記述できるので、自由に調整したインスタンスを使用できることになる
- このフィールドを
-
staticで宣言したフィールドを使用した場合は、任意の拡張機能を利用できる - インスタンスフィールドを使用した場合、
BeforeAllCallbackのようなクラスレベルの拡張機能や、TestInstancePostProcessorのようなインスタンスレベルの拡張機能は利用できない- 実装していても無視される
-
BeforeEachCallbackのようなメソッドレベルの拡張機能は利用できる
ServiceLoader を使って自動的に登録する
`-src/test/
  |-java/
  | `-sample/junit5/
  |   `-JUnit5Test.java
  `-resources/
    |-junit-platform.properties
    `-META-INF/services/
      `-org.junit.jupiter.api.extension.Extension
sample.junit5.extension.MyServiceLoaderExtension
junit.jupiter.extensions.autodetection.enabled=true
package sample.junit5.extension;

import org.junit.jupiter.api.extension.BeforeEachCallback;
import org.junit.jupiter.api.extension.ExtensionContext;

public class MyServiceLoaderExtension implements BeforeEachCallback {
    @Override
    public void beforeEach(ExtensionContext context) throws Exception {
        System.out.println("MyServiceLoaderExtension.beforeEach()");
    }
}
package sample.junit5;

import org.junit.jupiter.api.Test;

class JUnit5Test {

    @Test
    void test1() {
        System.out.println("test1()");
    }
}
MyServiceLoaderExtension.beforeEach()
test1()
- 拡張機能は、 ServiceLoader の仕組みを使って自動的に登録することもできる
- クラスパス配下に
/META-INF/services/フォルダを作成し、その中にorg.junit.jupiter.api.extension.Extensionという名前のファイルを作成する - ファイルの中には、登録する拡張機能クラスの完全修飾名を記述する
- 複数登録する場合は改行区切りで列挙する
- クラスパス配下に
- ServiceLoader を使った自動登録を有効にするには、設定パラメータ
junit.jupiter.extensions.autodetection.enabledにtrueを指定する必要がある- 設定ファイル(
junit-platform.properties) で指定する方法があるが、システムプロパティで指定することもできる
- 設定ファイル(
Extension 間でデータを共有する
ある Extension が実行されたときに記録した情報を、別の Extension が実行されたときに参照する方法を考える。
例えば、 BeforeEachCallback でテストメソッドの開始時間を記録しておき、 AfterEachCallback のときに現在時刻と開始時刻の差から実行時間を出力するようなイメージ。
拡張機能を単一のクラスで作っていれば、手っ取り早くインスタンス変数を使う方法が思い浮かぶ。
package sample.junit5.extension;

import org.junit.jupiter.api.extension.AfterEachCallback;
import org.junit.jupiter.api.extension.BeforeEachCallback;
import org.junit.jupiter.api.extension.ExtensionContext;

public class MyStopwatch implements BeforeEachCallback, AfterEachCallback {

    private long startTime;

    @Override
    public void beforeEach(ExtensionContext context) throws Exception {
        this.startTime = System.currentTimeMillis();
    }

    @Override
    public void afterEach(ExtensionContext context) throws Exception {
        String displayName = context.getDisplayName();
        long endTime = System.currentTimeMillis();
        long time = endTime - this.startTime;
        System.out.println("[" + displayName + "] time=" + time + " (startTime=" + this.startTime + ", endTime=" + endTime + ")");
    }
}
実際に次のようなテストに適用して実行してみる。
package sample.junit5;

import org.junit.jupiter.api.Test;
import org.junit.jupiter.api.extension.ExtendWith;
import sample.junit5.extension.MyStopwatch;

import java.util.concurrent.TimeUnit;

@ExtendWith(MyStopwatch.class)
class JUnit5Test {

    @Test
    void test1() throws Exception {
        TimeUnit.MILLISECONDS.sleep(200);
    }

    @Test
    void test2() throws Exception {
        TimeUnit.MILLISECONDS.sleep(400);
    }

    @Test
    void test3() throws Exception {
        TimeUnit.MILLISECONDS.sleep(600);
    }
}
[test1()] time=211 (startTime=1577191073870, endTime=1577191074081)
[test2()] time=400 (startTime=1577191074126, endTime=1577191074526)
[test3()] time=602 (startTime=1577191074529, endTime=1577191075131)
それっぽく動いた。
しかし、この実装には問題がある。
これのテストを、並列実行してみると問題が顕在化する。
junit.jupiter.execution.parallel.enabled=true
junit.jupiter.execution.parallel.config.strategy=fixed
junit.jupiter.execution.parallel.config.fixed.parallelism=2
junit.jupiter.execution.parallel.mode.default=concurrent
※確実に問題を再現させるため、同時並列数を2に固定している
[test1()] time=214 (startTime=1577191442987, endTime=1577191443201)
[test3()] time=363 (startTime=1577191443234, endTime=1577191443597)
[test2()] time=402 (startTime=1577191443234, endTime=1577191443636)
test3() の実行時間が 300ms 程度になってしまっている(実際は 600ms スリープしているので、この値はありえない)。
よく見ると、 test3() と test2() の startTime が同じ値になっていることがわかる。
これはつまり、 test3() の時間計測のために使用した startTime が、 test2() の開始時間になってしまっていることを意味している。
この問題が起こる原因は、 startTime の共有を MyStopwatch のインスタンス変数で行ってしまっていることにある。
MyStopwatch は JUnit5Test のテストが実行されている間、同じインスタンスが使用されている。
つまり、各テストメソッドが実行されるときに利用される MyStopwatch は、全て同じインスタンスとなっている。
test3() が実行されると、 beforeEach() で開始時間が startTime に記録される。
しかし、直後に test2() が並列実行され、 startTime の値が test2() の開始時間で上書きされてしまっている。
この結果、上述のような問題が発生してしまっている。
このように、 Extension 間でのデータ共有に実装クラスのインスタンス変数を使うと、テストの実行方法次第で予期せぬ問題が起こる可能性がある。
(他にも問題が起こるパターンがあるかもしれないけど、とりあえず思いつくのはこの並列実行のケースくらい)
Store を使う
この問題を解決するためのものかどうかはわからないが、 Store を使うと並列実行されても問題が起らないようにデータ共有を実装できる。
package sample.junit5.extension;

import org.junit.jupiter.api.extension.AfterEachCallback;
import org.junit.jupiter.api.extension.BeforeEachCallback;
import org.junit.jupiter.api.extension.ExtensionContext;

public class MyStopwatch implements BeforeEachCallback, AfterEachCallback {

    @Override
    public void beforeEach(ExtensionContext context) throws Exception {
        ExtensionContext.Store store = context.getStore(ExtensionContext.Namespace.create("stopwatch"));
        store.put("startTime", System.currentTimeMillis());
    }

    @Override
    public void afterEach(ExtensionContext context) throws Exception {
        ExtensionContext.Store store = context.getStore(ExtensionContext.Namespace.create("stopwatch"));
        long startTime = store.get("startTime", long.class);

        long endTime = System.currentTimeMillis();
        long time = endTime - startTime;

        String displayName = context.getDisplayName();
        System.out.println("[" + displayName + "] time=" + time + " (startTime=" + startTime + ", endTime=" + endTime + ")");
    }
}
[test1()] time=213 (startTime=1577193397891, endTime=1577193398104)
[test3()] time=609 (startTime=1577193397891, endTime=1577193398500)
[test2()] time=401 (startTime=1577193398142, endTime=1577193398543)
test3() の時間が 600ms 程度になって、うまく動いている。
(startTime が test1() と同じになっているのは、並列数2で test1() と test3() が同時に開始されたからなので問題ない)
この実装では、 Store という仕組みを利用している。
Store とは ExtensionContext ごとに用意されたデータの入れ物で、任意のデータを Key-Value 形式で保存できるようになっている。
ExtensionContext.Store store = context.getStore(ExtensionContext.Namespace.create("stopwatch"));
store.put("startTime", System.currentTimeMillis());

...

long startTime = store.get("startTime", long.class);
Store のインスタンスは ExtensionContext の getStore(Namespace) メソッドで取得できる。
引数には Namespace を指定する。
イメージとしては、 ExtensionContext の中には複数の Store が格納されており、どの Store を取得するかを Namespace で指定しているような感じ。
(実際には Namespace がキーの一部として利用されているだけで Store の実体は単一の Map で実装されているけど、イメージとしてはこれでいいと思う)
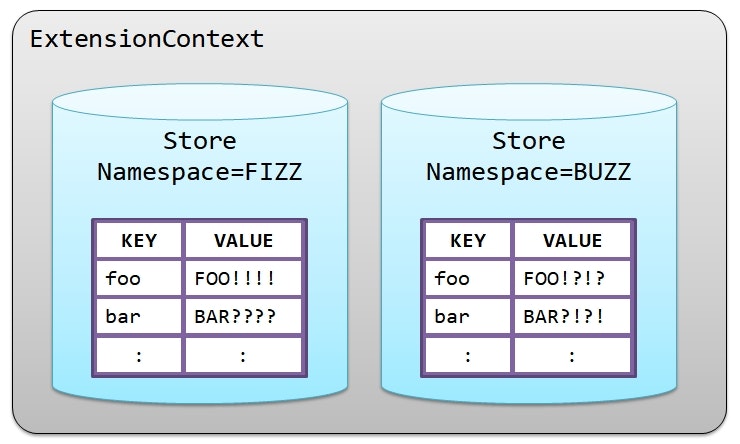
このように Namespace で Store が別れていることで、同じキーを使う拡張機能が複数存在した場合も Store を分けてデータを共有できる。
ちなみに、全ての拡張機能でデータを共有したいのであれば、 Namespace.GLOBAL という事前定義された定数を使う方法もある。
Namespace の生成には create(Object...) メソッドを使用する。
引数には任意のオブジェクトを指定できるが、 equals() メソッドで比較検証ができるオブジェクトでなければならない。
Store のライフサイクルとキーの検索方法
Store のライフサイクルは、取得元の ExtensionContext と一致している。
package sample.junit5.extension;

import org.junit.jupiter.api.extension.AfterAllCallback;
import org.junit.jupiter.api.extension.AfterEachCallback;
import org.junit.jupiter.api.extension.BeforeAllCallback;
import org.junit.jupiter.api.extension.BeforeEachCallback;
import org.junit.jupiter.api.extension.ExtensionContext;

public class MyExtension implements BeforeAllCallback, BeforeEachCallback, AfterEachCallback, AfterAllCallback {

    @Override
    public void beforeAll(ExtensionContext context) throws Exception {
        System.out.println("[beforeAll]");
        this.printStoreValues(context);

        ExtensionContext.Store store = context.getStore(ExtensionContext.Namespace.create("foo"));
        store.put("hoge", "INITIAL VALUE");
    }

    @Override
    public void beforeEach(ExtensionContext context) throws Exception {
        System.out.println("[beforeEach@" + context.getDisplayName() + "]");
        this.printStoreValues(context);

        ExtensionContext.Store store = context.getStore(ExtensionContext.Namespace.create("foo"));
        store.put("hoge", context.getDisplayName());
    }

    @Override
    public void afterEach(ExtensionContext context) throws Exception {
        System.out.println("[afterEach@" + context.getDisplayName() + "]");
        this.printStoreValues(context);
    }

    @Override
    public void afterAll(ExtensionContext context) throws Exception {
        System.out.println("[afterAll]");
        this.printStoreValues(context);
    }

    private void printStoreValues(ExtensionContext context) {
        ExtensionContext.Store store = context.getStore(ExtensionContext.Namespace.create("foo"));
        System.out.println("  hoge=" + store.get("hoge"));
        System.out.println("  context.class=" + context.getClass().getCanonicalName());
    }
}
-
beforeAll()とbeforeEach()では、まずStoreの情報を出力してからhogeの値をセットしている - そして、
afterEach()とafterAll()ではそのままStoreの情報を出力している - それぞれ、
ExtensionContextのクラス名についても合わせて出力するようにしている
package sample.junit5;

import org.junit.jupiter.api.Test;
import org.junit.jupiter.api.extension.ExtendWith;
import sample.junit5.extension.MyExtension;

@ExtendWith(MyExtension.class)
class JUnit5Test {

    @Test
    void test1() throws Exception {}

    @Test
    void test2() throws Exception {}
}
[beforeAll]
  hoge=null
  context.class=org.junit.jupiter.engine.descriptor.ClassExtensionContext

[beforeEach@test1()]
  hoge=INITIAL VALUE
  context.class=org.junit.jupiter.engine.descriptor.MethodExtensionContext
[afterEach@test1()]
  hoge=test1()
  context.class=org.junit.jupiter.engine.descriptor.MethodExtensionContext

[beforeEach@test2()]
  hoge=INITIAL VALUE
  context.class=org.junit.jupiter.engine.descriptor.MethodExtensionContext
[afterEach@test2()]
  hoge=test2()
  context.class=org.junit.jupiter.engine.descriptor.MethodExtensionContext

[afterAll]
  hoge=INITIAL VALUE
  context.class=org.junit.jupiter.engine.descriptor.ClassExtensionContext
-
BeforeAllCallbackやAfterAllCallbackのようなクラスレベルの Extension では、ExtensionContextとしてClassExtensionContextが渡されている - 一方で、
BeforeEachCallbackやAfterEachCallbackのようなメソッドレベルの Extension では、MethodExtensionContextが渡されている - このように
ExtensionContextは、その拡張機能が実行されているレベルに合わせた実装インスタンスが渡されるようになっている - これらの
ExtensionContextには親子関係があり、MethodExtensionContextの親がClassExtensionContextとなっている- 親のコンテキストをたどっていくと、最終的に
JupiterEngineExtensionContextへと行き着く- 親のコンテキストは、
ExtensionContextの getParent() メソッドで取得できる
- 親のコンテキストは、
-
JupiterEngineExtensionContextは、一番親(ルート)のコンテキストとなる- ルートのコンテキストは、
ExtensionContextの getRoot() メソッドで取得できる
- ルートのコンテキストは、
- なお、
ExtensionContextの実装クラスには、他にもTestTemplateExtensionContextやDynamicExtensionContextというのも存在するが、ここでは割愛
- 親のコンテキストをたどっていくと、最終的に
-
Storeは、これらコンテキストのインスタンスごとに保持されている-
MethodExtensionContextは、テストメソッドごとに生成される - つまり、
test1()とtest2()のMethodExtensionContextは、異なるインスタンスが渡されている - したがって、
Storeもそれぞれ別モノとなる - この結果、
test1()でStoreに保存した情報はtest2()では参照できていない -
MyStopwatchがStoreを利用することで並列実行時の問題を回避できたのは、このおかげ-
BeforeEachCallbackとAfterEachCallbackはメソッドレベルの Extension - 実行されるテストメソッドごとにコンテキストが分かれるので、
Storeも別々になる - このため、並列実行されてもデータが競合せず、正常に動作できるようになっていた
-
-
- 親コンテキストの
Storeに保存した情報は、子コンテキストのStoreからも参照できるようになっている- そして、子コンテキスト内で上書きすることもできている
- しかし、上書きされた情報は子コンテキストのスコープが終了して別のコンテキストに移ると、親コンテキストで設定された元の値に戻っている
-
test1()で設定した値がtest2()のbeforeEach()やafterAll()の段階では元の"INITIAL VALUE"に戻っている
-
- この動作は、指定されたキーの情報が
Storeに存在しなかった場合に、親のStoreを再帰的に検索することで実現されている - つまり、
MethodExtensionContextのStoreに存在しなかった場合は、親のClassExtensionContextのStoreを、そこにも無ければルートのStoreまでたどりながら検索するようになっている - これにより、
test1()からは親コンテキストで設定された値が参照できるようになっている - しかし、子コンテキストで
Storeに値を設定しても親コンテキストのStoreはそのままなので、子コンテキストが終了すると親コンテキストの情報が復活したかのような動作になる
-
ExtensionContextとStoreの関係を図で書くと下のような感じになる
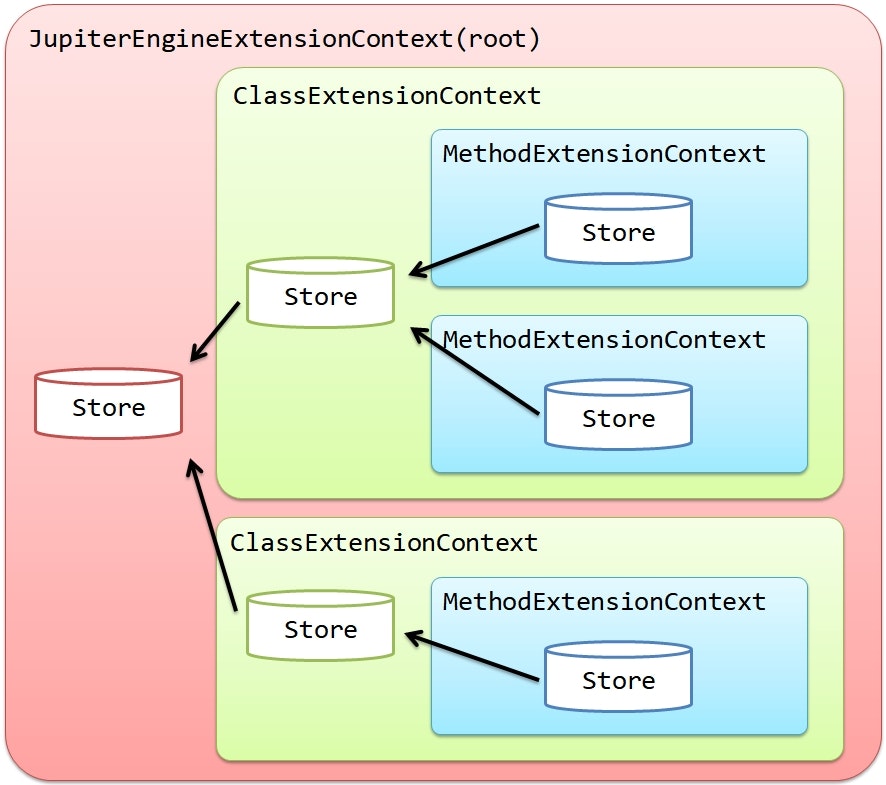
ライフサイクル終了時に処理を実行する
package sample.junit5.extension;

import org.junit.jupiter.api.extension.ExtensionContext;

public class MyCloseableResource implements ExtensionContext.Store.CloseableResource {
    private final String name;

    public MyCloseableResource(String name) {
        this.name = name;
    }

    @Override
    public void close() throws Throwable {
        System.out.println("  Close Resource > " + this.name);
    }
}
package sample.junit5.extension;

import org.junit.jupiter.api.extension.BeforeAllCallback;
import org.junit.jupiter.api.extension.BeforeEachCallback;
import org.junit.jupiter.api.extension.ExtensionContext;

public class MyExtension implements BeforeEachCallback, BeforeAllCallback {

    @Override
    public void beforeAll(ExtensionContext context) throws Exception {
        MyCloseableResource resource = new MyCloseableResource("BeforeAll");
        context.getStore(ExtensionContext.Namespace.GLOBAL).put("foo", resource);
    }

    @Override
    public void beforeEach(ExtensionContext context) throws Exception {
        MyCloseableResource resource = new MyCloseableResource("BeforeEach(" + context.getDisplayName() + ")");
        context.getStore(ExtensionContext.Namespace.GLOBAL).put("foo", resource);
    }
}
package sample.junit5;

import org.junit.jupiter.api.AfterAll;
import org.junit.jupiter.api.Test;
import org.junit.jupiter.api.extension.ExtendWith;
import sample.junit5.extension.MyExtension;

@ExtendWith(MyExtension.class)
class JUnit5Test {

    @Test
    void test1() throws Exception {
        System.out.println("test1()");
    }

    @Test
    void test2() throws Exception {
        System.out.println("test2()");
    }

    @AfterAll
    static void afterAll() {
        System.out.println("afterAll()");
    }
}
test1()
  Close Resource > BeforeEach(test1())
test2()
  Close Resource > BeforeEach(test2())
afterAll()
  Close Resource > BeforeAll
-
CloseableResource を実装したインスタンスが
Storeに保存されている場合、そのStoreのライフサイクルが終了するときに close() メソッドが自動的にコールされる
メタアノテーション
package sample.junit5.extension;

import org.junit.jupiter.api.extension.ExtensionContext;
import org.junit.jupiter.api.extension.ParameterContext;
import org.junit.jupiter.api.extension.ParameterResolutionException;
import org.junit.jupiter.api.extension.ParameterResolver;

public class MyParameterResolver implements ParameterResolver {

    @Override
    public boolean supportsParameter(ParameterContext parameterContext, ExtensionContext extensionContext) throws ParameterResolutionException {
        return parameterContext.getParameter().getType().equals(String.class);
    }

    @Override
    public Object resolveParameter(ParameterContext parameterContext, ExtensionContext extensionContext) throws ParameterResolutionException {
        return extensionContext.getRequiredTestMethod().getName();
    }
}
package sample.junit5.extension;

import org.junit.jupiter.api.extension.ExtendWith;

import java.lang.annotation.ElementType;
import java.lang.annotation.Retention;
import java.lang.annotation.RetentionPolicy;
import java.lang.annotation.Target;

@Retention(RetentionPolicy.RUNTIME)
@Target(ElementType.TYPE)
@ExtendWith(MyParameterResolver.class)
public @interface MyParameterResolverExtension {}
package sample.junit5;

import org.junit.jupiter.api.Test;
import sample.junit5.extension.MyParameterResolverExtension;

@MyParameterResolverExtension
class JUnit5Test {

    @Test
    void test1(String testMethodName) {
        System.out.println("[test1] testMethodName=" + testMethodName);
    }

    @Test
    void test2(String testMethodName) {
        System.out.println("[test2] testMethodName=" + testMethodName);
    }
}
[test1] testMethodName=test1
[test2] testMethodName=test2
- JUnit Jupiter はメタアノテーションの仕組みをサポートしている
- つまり、任意のアノテーションをまとめた別の自作アノテーションを定義できる
- 同じアノテーションの組み合わせを複数箇所で利用しているような場合は、単一の自作アノテーションにまとめて再利用性を高めるようなことができる
- 拡張機能を
@ExtendWithでClassオブジェクトを直接指定するよりも、自作アノテーションを挟むことで具体的な実装から切り離せるというメリットがあるかも
設定パラメータ
テストインスタンスのデフォルトライフサイクルを変更する junit.jupiter.testinstance.lifecycle.default や、並列実行を有効にするための junit.jupiter.execution.parallel.enabled といったテストの挙動を調整するためのパラメータのことを、 設定パラメータ と呼ぶ。
設定パラメータを指定する方法には、次の3つが用意されている。
- Launcher ごとに用意された方法で指定する
- JVM システムプロパティで指定する
-
junit-platform.propertiesで指定する
1つ目の Launcher ごとに用意されている方法とは、たとえば ConsoleLauncher を使う場合は --config オプションで指定する。
Gradle は、現在この方法での指定はサポートされていないらしい(代わりにシステムプロパティか junit-platform.properties を使った方法を採用する)。
Maven の場合は、 configurationParameters プロパティで指定する。
2つ目の JVM システムプロパティは、そのままシステムプロパティで指定する(指定方法は、各 Launcher によって異なる)。
3つ目は、 junit-platform.properties というプロパティファイルをクラスパスのルートに配置することで有効になる。
同じキーの設定パラメータがこれらの異なる方法で指定されていた場合、上の方で定義された値のほうが優先される。
つまり、 Launcher ごとに用意された値の優先度が最も高くなり、 junit-platform.properties で定義された値の優先度は最も低くなる。
実際に、 ConsoleLauncher で試してみる。
package sample.junit5.extension;

import org.junit.jupiter.api.extension.BeforeEachCallback;
import org.junit.jupiter.api.extension.ExtensionContext;

public class MyExtension implements BeforeEachCallback {
    @Override
    public void beforeEach(ExtensionContext context) throws Exception {
        this.printConfigurationParameter(context, "hoge");
        this.printConfigurationParameter(context, "fuga");
        this.printConfigurationParameter(context, "piyo");
    }

    private void printConfigurationParameter(ExtensionContext context, String key) {
        System.out.println("key=" + key + ", value=" + context.getConfigurationParameter(key).orElse("<empty>"));
    }
}
- 設定パラメータの値は
ExtensionContextのgetConfigurationParameter()で参照できる - ここでは、
hoge,fuga,piyoの3つの設定パラメータの値を出力してみている
package sample.junit5;

import org.junit.jupiter.api.Test;
import org.junit.jupiter.api.extension.ExtendWith;
import sample.junit5.extension.MyExtension;

@ExtendWith(MyExtension.class)
class JUnit5Test {

    @Test
    void test1() {
        System.out.println("test1()");
    }
}
hoge=HOGE@properties
fuga=FUGA@properties
piyo=PIYO@properties
-
hoge,fuga,piyoすべてを定義している
> java -Dfuga=FUGA@SystemProperty ^
       -Dpiyo=PIYO@SystemProperty ^
       -jar junit-platform-console-standalone-1.5.2.jar ^
       --config piyo=PIYO@ConfigOption ^
...
-
fugaとpiyoを JVM のシステムプロパティで指定している -
piyoだけは--configオプションでも指定している
key=hoge, value=HOGE@properties
key=fuga, value=FUGA@SystemProperty
key=piyo, value=PIYO@ConfigOption
test1()
各キーと、それぞれの設定方法ごとに指定していた値の関係を表にすると、下のようになる。
(* が付いているのが、最終的に採用された値)
| キー | junit-platform.properties | JVMシステムプロパティ | --config |
|---|---|---|---|
hoge |
HOGE@properties * |
||
fuga |
FUGA@properties |
FUGA@SystemProperty * |
|
piyo |
PIYO@properties |
PIYO@SystemProperty |
PIYO@ConfigOption * |
--config で指定した値の方が優先され、 junit-platform.properties で指定した値の優先度が低いことがわかる。
アサーション
JUnit5 には、 Assertions というアサーション用のクラスが用意されている。
ここには、 assertEquals() などの基本的なアサーションメソッドが用意されている。
また、 assertTimeout() や、 assertAll() のような、ちょっと便利そうなメソッドも用意されている。
ただ、あくまで必要最低限程度のものしか用意されていない印象。
JUnit5 は、任意のサードパーティのアサーションライブラリを使用できるようになっている。
つまり、 AssertJ や Hamcrest などを依存ライブラリに追加すれば、 JUnit4 のときのように普通に使うことができる。
以下は、 AssertJ を依存関係に追加した場合の例になる。
dependencies {
    ...
    testImplementation "org.assertj:assertj-core:3.11.1"
}
package sample.junit5;

import org.junit.jupiter.api.Test;

import static org.assertj.core.api.Assertions.*;

class JUnit5Test {

    @Test
    void test() throws Exception {
        assertThat(10).isEqualTo(8);
    }
}
...
.
'-- JUnit Jupiter [OK]
  '-- JUnit5Test [OK]
    '-- test() [X]
          Expecting:
           <10>
          to be equal to:
           <8>
          but was not.
...
実際は、これらサードパーティのアサーションを使うことになると思うので、標準のアサーションの使い方については割愛。
参考
-
@BeforeAll,@AfterAllはstaticなメソッドに指定しなければならないが、非staticな内部クラスでは Java 言語仕様上staticなメソッドを定義できない ↩ -
要するに、ランダムではないが推測はできない順序付けがされるということだと思う ↩
-
マスタ登録してから個別機能を動かす、とか(たぶん) ↩
-
nullはエラー ↩ -
元の
Stringのlength()が1でない場合はエラー ↩ -
@TestMethodOrderでわざわざ順序を指定しているテストを並列実行させるというは変な話だが ↩ -
ドキュメントでは
containerと表現されているが、containerが具体的に何を指しているのかは書かれていない(たぶん、テストクラスや動的テストのDynamicContainerなどのテストメソッドをまとめたカタマリを指していると思う) ↩ -
単純にコンストラクタで生成するもよし、ビルダーのような仕組みを用意するもよし、ファクトリメソッドにするもよし ↩