これは JavaFX Advent Calendar 2017 の 17 日目の記事です。
明日は @planet-az さんです。
JavaFX で FXML を利用してアプリケーションを作っていると、画面の一部を別の FXML に分割したくなることが稀によくあると思います。
ここでは、 FXML の埋め込みを Scene Builder (Gluon) でやる方法について書きたいと思います。
環境
OS
Windows 10 64bit
Java
1.8.0_151
Scene Builder
8.4.1
Scene Builder を使って埋め込む
`-src/main/
  |-java/
  | `-sample/javafx/
  |   `-EmbeddedController.java
  |
  `-resources/
    `-fxml/
      |-main.fxml
      `-embedded.fxml
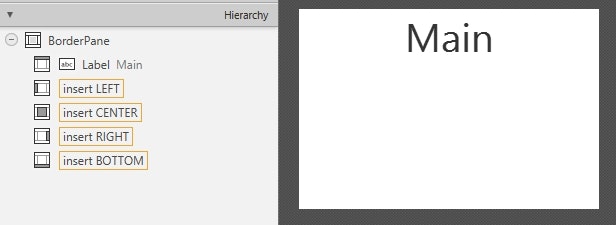
main.fxml
この FXML ファイルの CENTER の部分に、
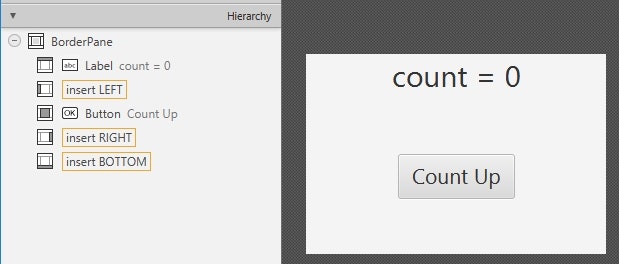
embedded.fxml
この FXML を埋め込んでみます。
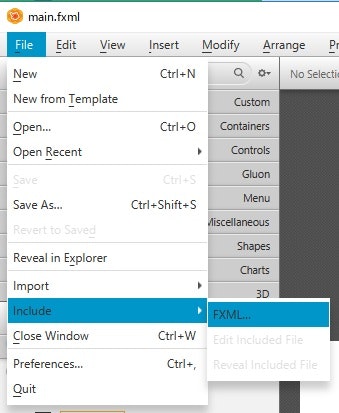
Scene Builder のメニューから、 [File] -> [Include] -> [FXML] と選択します。
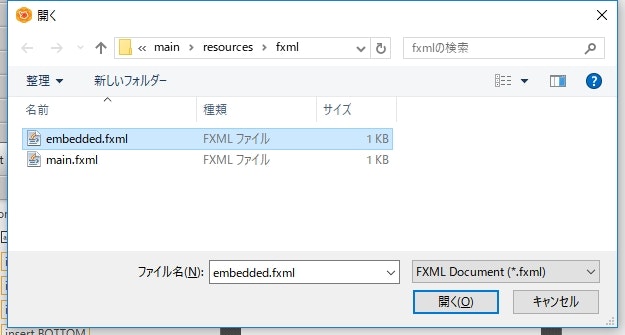
ファイル選択のダイアログが開くので、埋め込む FXML (embedded.fxml) を選択します。
失敗します。
Scene Builder では埋め込めない???
上記方法で FXML を埋め込もうとすると、だいたい成功しませんでした。
たまに Hierarchy をいじってたら、なぜか突然埋め込みが成功することもありましたが、何が条件になって成功したのかは全く分かりませんでした。
Stackoverflow とかには、上記方法でできるみたいな説明があったりしましたが、自分の環境ではダメでした。
JavaFX Scene Builder and fx:include - Stack Overflow
一応 Scene Builder の 9.0.1 でも試してみましたが、結果は同じでした。
では Scene Builder で FXML を埋め込むことは諦めたほうがいいのかというと、
JavaFX Scene Builder 2.0 "Failed to include '*.fxml' " - Stack Overflow
directly in the FXML file, it works as expected.
(訳)
直接 FXML ファイルを触れば期待した動きになるよ
ということで直接 FXML ファイルを触ってみます。
<?xml version="1.0" encoding="UTF-8"?>

<?import javafx.scene.control.Label?>
<?import javafx.scene.layout.BorderPane?>
<?import javafx.scene.text.Font?>

<BorderPane maxHeight="-Infinity" maxWidth="-Infinity" minHeight="-Infinity" minWidth="-Infinity" prefHeight="200.0" prefWidth="300.0" xmlns="http://javafx.com/javafx/8.0.151" xmlns:fx="http://javafx.com/fxml/1">
   <top>
      <Label alignment="CENTER" maxWidth="1.7976931348623157E308" text="Main" BorderPane.alignment="CENTER">
         <font>
            <Font size="40.0" />
         </font>
      </Label>
   </top>
   <center>
      <fx:include source="embedded.fxml" />
   </center>
</BorderPane>
main.fxml を直接修正して、 <center> の下に <fx:include> を追加しました。
この状態で main.fxml を Scene Builder で確認してみます。
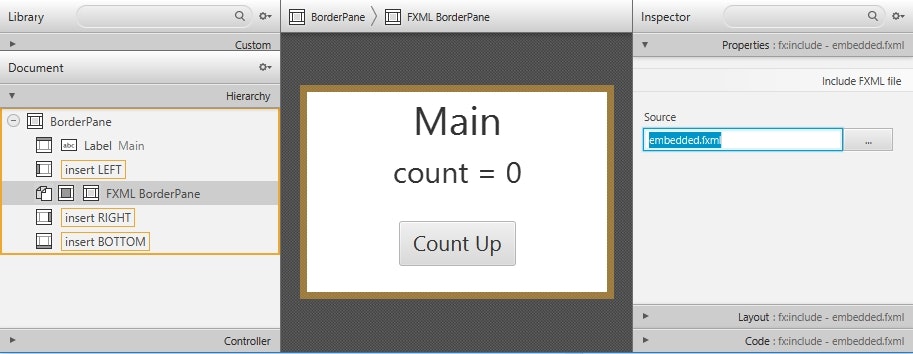
埋め込まれてる!
ちゃんと <fx:include> として認識されており、プロパティの編集とかも問題なくできるようになっています。
一応 Scene Builder としては <fx:include> はしっかりサポートしているということみたいですが、 include するところだけ何かおかしいんでしょうかね。
あとは embedded.fxml 側のコントローラを実装して、
package sample.javafx;

import javafx.beans.binding.StringBinding;
import javafx.beans.property.IntegerProperty;
import javafx.beans.property.SimpleIntegerProperty;
import javafx.fxml.FXML;
import javafx.fxml.Initializable;
import javafx.scene.control.Label;

import java.net.URL;
import java.util.ResourceBundle;

public class EmbeddedController implements Initializable {

    private IntegerProperty count = new SimpleIntegerProperty(0);

    @FXML
    private Label label;

    @Override
    public void initialize(URL location, ResourceBundle resources) {
        StringBinding output = this.count.asString("count = %d");
        this.label.textProperty().bind(output);
    }

    @FXML
    public void countUp() {
        int now = this.count.get();
        this.count.set(now + 1);
    }
}
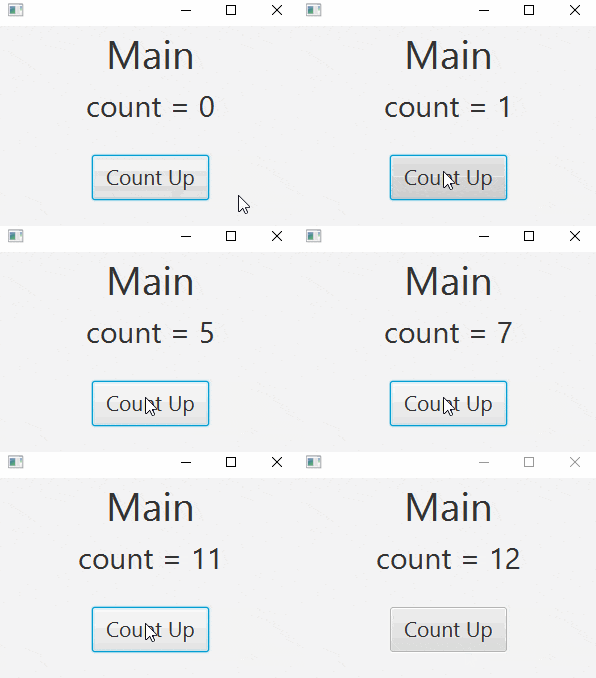
起動すれば、
ちゃんと動作しました。
<fx:include> の書き方とかは、公式のリファレンス を参照してください。
結論?
- Scene Builder だけで別の FXML を埋め込もうとすると、なんか知らんがエラーになる
- FXML ファイルを直接編集して
<fx:include>を書き込めば Scene Builder もちゃんと認識してくれる
おまけ
実は、最初は Task, Service まわりの非同期処理の話を書こうと思っていました。
ただ、二日前に急遽枠を取ったものの、よく見ると 6日目の内容 とダダ被りしていることに気付きました。
ということで、慌てて↑の内容に変更した次第です。
しかし、もともと書こうと思った話を闇に葬るのもなんかもったいない気がしたので、おまけでちょこっとだけ書かせてください。
非同期処理の実装
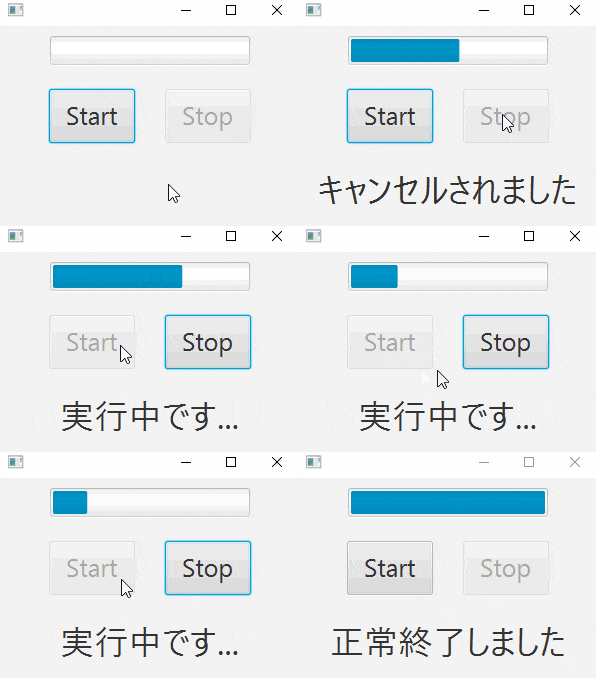
↑のようなプログラムを書こうとしたときに、 JavaFX が不勉強だった私は↓のような実装を書いていました。
package sample.javafx;

import javafx.application.Platform;
import javafx.fxml.FXML;
import javafx.fxml.Initializable;
import javafx.scene.control.Button;
import javafx.scene.control.Label;
import javafx.scene.control.ProgressBar;

import java.net.URL;
import java.util.ResourceBundle;
import java.util.concurrent.ExecutorService;
import java.util.concurrent.Executors;
import java.util.concurrent.Future;

public class MainController implements Initializable {

    @FXML
    private ProgressBar progressBar;
    @FXML
    private Label statusLabel;
    @FXML
    private Button startButton;
    @FXML
    private Button stopButton;

    private ExecutorService executorService = Executors.newSingleThreadExecutor(runnable -> {
        Thread thread = new Thread(runnable);
        thread.setDaemon(true);
        return thread;
    });
    private Future<Void> future;

    @Override
    public void initialize(URL location, ResourceBundle resources) {
        this.changeButtonStatusToStopped();
        this.progressBar.setProgress(0.0);
        this.statusLabel.setText("");
    }

    @FXML
    public void start() {
        this.future = this.executorService.submit(() -> {
            final long max = 1000000000L;
            final long interval = max / 20L;

            for (long i=0; i<=max; i++) {
                if (Thread.currentThread().isInterrupted()) {
                    Platform.runLater(() -> this.statusLabel.setText("キャンセルされました"));
                    return null;
                }

                if (i%interval == 0) {
                    double progress = (double)i/max;
                    Platform.runLater(() -> this.progressBar.setProgress(progress));
                }
            }

            Platform.runLater(() -> {
                this.statusLabel.setText("正常終了しました");
                this.changeButtonStatusToStopped();
            });

            return null;
        });

        this.changeButtonStatusToRunning();
        this.statusLabel.setText("実行中です...");
    }

    @FXML
    public void stop() {
        this.future.cancel(true);
        this.changeButtonStatusToStopped();
    }

    private void changeButtonStatusToRunning() {
        this.startButton.setDisable(true);
        this.stopButton.setDisable(false);
    }

    private void changeButtonStatusToStopped() {
        this.startButton.setDisable(false);
        this.stopButton.setDisable(true);
    }
}
それが、 JavaFX が提供している Task や Service 、そしてプロパティの bind の仕組みなどを利用することで、↓のように書けることを最近学びました。
package sample.javafx;

import javafx.concurrent.Service;
import javafx.concurrent.Task;
import javafx.fxml.FXML;
import javafx.fxml.Initializable;
import javafx.scene.control.Button;
import javafx.scene.control.Label;
import javafx.scene.control.ProgressBar;

import java.net.URL;
import java.util.ResourceBundle;

public class MainController implements Initializable {

    @FXML
    private ProgressBar progressBar;
    @FXML
    private Label statusLabel;
    @FXML
    private Button startButton;
    @FXML
    private Button stopButton;

    private Service<Void> service = new MyService();

    @Override
    public void initialize(URL location, ResourceBundle resources) {
        this.startButton.disableProperty().bind(this.service.runningProperty());
        this.stopButton.disableProperty().bind(this.service.runningProperty().not());
        this.statusLabel.textProperty().bind(this.service.messageProperty());
        this.progressBar.setProgress(0.0);
    }

    @FXML
    public void start() {
        this.service.restart();
        this.progressBar.progressProperty().bind(this.service.progressProperty());
    }

    @FXML
    public void stop() {
        this.service.cancel();
    }

    private static class MyService extends Service<Void> {

        @Override
        protected Task<Void> createTask() {
            return new MyTask();
        }
    }

    private static class MyTask extends Task<Void> {

        @Override
        protected Void call() throws Exception {
            final long max = 100000000L;
            for (long i=0L; i<=max && !this.isCancelled(); i++) {
                this.updateProgress(i, max);
            }
            return null;
        }

        @Override
        protected void running() {
            super.running();
            this.updateMessage("実行中です...");
        }

        @Override
        protected void cancelled() {
            super.cancelled();
            this.updateMessage("キャンセルされました");
        }

        @Override
        protected void succeeded() {
            super.succeeded();
            this.updateMessage("正常終了しました");
        }
    }
}
Platform.runLater() が無くなったり、ボタンの状態制御が宣言的にできることが結構感動的でした。
