どうも。Mediawikiを構築する上で、本家ウィキペディアにある、直感的にページを編集することができる画面を自分のWikiに導入したくなりました。なのでその備忘録です。
また、自分のwikiはhttps化して証明書も取ってありますが、そうではない方は適宜httpsをhttpに読み替えてください。
VisualEditorの導入
ここからバージョンを選択し、tar.gz形式のファイルをダウンロードします。場所はどこでも良いのですか、自分はextensions/に直接ダウンロードしました。
$ cd extensions
$ wget https://extdist.wmflabs.org/dist/extensions/VisualEditor-REL1_30-61f161a.tar.gz
展開します。
$ tar xvf ./Visu..(略)..tar.gz
そして、LocalSettings.phpに以下を追記します。
wfLoadExtension( 'VisualEditor' );
$wgDefaultUserOptions['visualeditor-enable'] = 1;
$wgDefaultUserOptions['visualeditor-editor'] = "visualeditor";
$wgHiddenPrefs[] = 'visualeditor-enable';
$wgDefaultUserOptions['visualeditor-enable-experimental'] = 1;
$wgVisualEditorAvailableNamespaces = [
    NS_MAIN => true,
    NS_USER => true,
    102 => true,
    "_merge_strategy" => "array_plus"
];
$wgVirtualRestConfig['modules']['parsoid'] = array(
    'url' => 'http://localhost:8000',
    'domain' => 'localhost',
    'prefix' => 'localhost'
);
Parsoidの導入
旧Wikimedia形式とビジュアルエディタ間でファイルを変換するために、Mediawikiが利用するAPIサーバーを構築する必要があります。
ソースをダウンロードします。
$ git clone https://gerrit.wikimedia.org/r/p/mediawiki/services/parsoid
モジュールをインストールします。
$ cd parsoid
$ npm install
設定ファイルを作成します。
$ cp config.example.yaml config.yaml
そして、Wikimedia側のパスを指定します。
mwApis:
    - # This is the only required parameter,
      # the URL of you MediaWiki API endpoint.
      uri: 'http://localhost/hoge/api.php'
uriを自分がMediawikiをインストールしたパスに変更してください。ドキュメントルート直下にインストールした場合はuri: 'http://localhost/api.php'で大丈夫なはずです。
次に、parsoidの設定ファイルを作成します。parsoid.envを以下のように作成してください。
PORT=8000
NODE_PATH=/path/to/parsoid/node_modules
NODE_PATHは、parsoid内のnode_modulesディレクトリを指すように適宜変更してください。
そして、systemdで自動起動をさせるため、以下のようなファイルを/etc/systemd/system/parsoid.serviceに作成します。
[Unit]
Description=Mediawiki Parsoid web service on node.js
Documentation=http://www.mediawiki.org/wiki/Parsoid
Wants=local-fs.target network.target
After=local-fs.target network.target

[Install]
WantedBy=multi-user.target

[Service]
Type=simple
User=www-data
Group=www-data
WorkingDirectory=/path/to/parsoid
EnvironmentFile=-/path/to/parsoid/parsoid.env
ExecStart=/usr/bin/nodejs /path/to/parsoid/bin/server.js
KillMode=process
Restart=on-success
PrivateTmp=true
StandardOutput=syslog
WorkingDirectoryには、parsoidをgit cloneしたパス、EnvironmentFileにはparsoid.envのパス、ExecStartにはnodejsのパスとparsoidのbin/server.jsがあるパスに自分で適宜変更してください。
最後に、サービスを起動させます。
$ sudo systemctl daemon-reload
$ sudo systemctl start parsoid
$ sudo systemctl status parsoid
$ sudo systemctl enable parsoid #自動起動の設定
以下のようになっていれば成功です。
$ sudo systemctl status parsoid
● parsoid.service - Mediawiki Parsoid web service on node.js
   Loaded: loaded (/etc/systemd/system/parsoid.service; disabled)
   Active: active (running) since Sun 2018-01-07 15:49:07 JST; 52s ago
     Docs: http://www.mediawiki.org/wiki/Parsoid
 Main PID: 11048 (node)
   CGroup: /system.slice/parsoid.service
           └─11105 /usr/bin/nodejs /path/to/parsoid/node_modules/service-runner/service-runner.js

Jan 07 15:49:10 rpi3 node[11048]: {"name":"parsoid","hostname":"localhost","pid":11048,"level":30,"levelPath":"info/service-runner","msg":"master(11048) initializing 4 workers","time":"2018-01-07T06:49:10.607Z","v":0}
RESTBaseの導入
次に、Mediawikiのバックエンドとして、各APIの橋渡し役兼データベースとなるRESTBaseを導入します。コレがないと、編集を保存しない状態でエディタを「ビジュアルエディタ」から「テキストエディタ」に変更したり、その逆ができなくなります。なので必須ではありません。
と、ここでRESTBaseを導入したかったのですが、あまりにも規模が大きすぎる、かつ構築がめんどくさそうなのでやめようと思いました…、が、面白そうなのでやります。
クローンします。
$ git clone https://github.com/wikimedia/restbase.git
モジュールをインストールします。
$ npm install
設定ファイルを作成します。
$ cp config.example.yaml config.yaml
以下のように変更します。
allow:
 - pattern: http://localhost/wiki/api.php
(略)
 - pattern: http://localhost:8000
(略)
 paths:
   /{domain:localhost}:
 action:
   # XXX Check API URL!
   apiUriTemplate: http://localhost/wiki/api.php
(略)
 parsoid:
   # XXX Check Parsoid URL! localhost is the default configuration
   host: http://localhost:8000
api.phpの場所と、parasoidのポート番号は適宜変えてください。
そして、parasoid同じようにsystemd用にserviceファイルを作ります。
[Unit]
Description=Mediawiki RESTBase service
Documentation=https://www.mediawiki.org/wiki/RESTBase
Wants=local-fs.target network.target
After=local-fs.target network.target

[Install]
WantedBy=multi-user.target

[Service]
Type=simple
User=www-data
Group=www-data
WorkingDirectory=/path/to/restbase/node_modules
ExecStart=/usr/bin/node /path/to/restbase/server.js
KillMode=process
Restart=on-success
PrivateTmp=true
StandardOutput=syslog
最後に、サービスを起動させます。
$ sudo systemctl daemon-reload
$ sudo systemctl start parsoid
$ sudo systemctl status parsoid
$ sudo systemctl enable parsoid #自動起動の設定
これで動くはずなのですが、結局自分の手元ではTypeError: Cannot read property 'backend' of undefinedというエラーが出たため、動きませんでした。
ちなみにRESTBaseやParsoidなどのモジュールの関係は以下のようになっているらしいです。
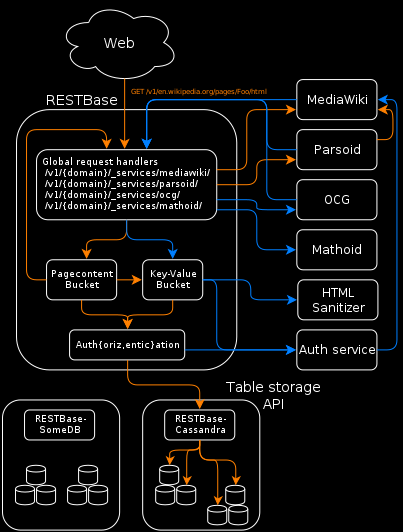
まあ兎にも角にも、これでビジュアルエディタを使えるようになりました。
それにしてもWikipediaの裏側のサービスってすごいなぁ(小並感