はじめに
Python tkinterモジュールについての使い方が各所に散らばっていて、参照したいときにあちこち見て回らないといけないことが多かったので、纏めておこうと思い至ったのでこの記事を執筆する。
記事の内容については逐次更新する
インストールについて
割愛する。
実行環境
・macOS High Sierra 10.13.6
・Python 3.8.8
・tkinter 8.6.10
・エディタ Atom
・AtomはデフォルトでPythonの実行をサポートしていないので、必要なパッケージをダウンロードする必要がある
tkinterのバージョン確認について
筆者の場合はもともとPython3の環境をAnacondaで構築していたので、確認にあたっては以下のように実行してtkのバージョンを確認すれば良い。
$ conda list
(略)
tk                        8.6.10
(略)
Pythonプログラムから
import tkinter
tkinter._test()
として実行すると、以下のようなウィンドウが立ち上がる。Tcl/Tkのバージョンは8.6であると確認できる。
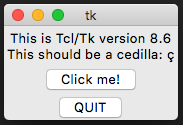
tkinterはTk GUIツールキットに対するPythonインターフェイスで、Tk自体がPythonの一部を成すものではない。
部品設計
ウィンドウを作る
from tkinter import *
from tkinter import ttk

root = Tk()
root.title("はじめてのtkinter")

## ウィンドウの表示
root.mainloop()
上のようにすると、以下のように中身を何も持たないウィンドウが作成される。
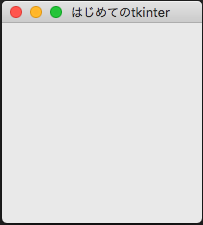
以降では「root=Tk()」を定義したあとから「root.mainloop()」でウィンドウを表示するまでに、その中身を定義していく
ラベルを表示する
from tkinter import *
from tkinter import ttk
root = Tk()
root.title("はじめてのtkinter")
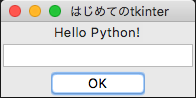
label = ttk.Label(root,text ='Hello Python!')
label.pack()
# ウィンドウの表示
root.mainloop()
以下のように表示される。
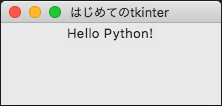
オブジェクト名 = ttk.Label(親要素,text ='表示したい内容')
としてラベルを定義し、
オブジェクト名.pack()
とすることで作成したオブジェクトを配置している。「オブジェクト名.pack()」と「root.mainloop()」以降に書いた場合には、ラベルは表示されない。
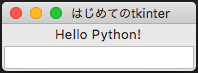
入力ボックスを作る
from tkinter import *
from tkinter import ttk

root = Tk()
root.title("はじめてのtkinter")

# オブジェクトの定義
label = ttk.Label(root,text ='Hello Python!')
entry = ttk.Entry(root)

# レイアウト
label.pack()
entry.pack()

# ウィンドウの表示
root.mainloop()
ラベルを作成したときとあまり変わらないかもしれない。以上のようにすると簡単に入力ボックス(Entryウィジェット)が作成される。
ボタンを作る
from tkinter import *
from tkinter import ttk

root = Tk()
root.title("はじめてのtkinter")

# オブジェクトの定義
label = ttk.Label(root,text ='Hello Python!')
entry = ttk.Entry(root)
button = ttk.Button(root,text = 'OK')

# レイアウト
label.pack()
entry.pack()
button.pack()

# ウィンドウの表示
root.mainloop()
やはりラベルを作成したときと変わらない。ただし、ここで作成したボタンは今の所なんの機能も持たない
各オブジェクトを掘り下げて見る
オブジェクトの作り方の基礎がだいたいわかってきたので、各ウィジェットについてもう少し細かく見ていく
Labelウィジェット
from tkinter import *
from tkinter import ttk

root = Tk()
root.title("はじめてのtkinter")

# オブジェクトの定義
rock_climbing_woman = PhotoImage(file='./images/rock_climbing_woman.png')
label = ttk.Label(
    root,
    text = 'あのイーハトーヴォのすきとおった風、夏でも底に冷たさをもつ青いそら、うつくしい森で飾られたモリーオ市、郊外のぎらぎらひかる草の波。 またそのなかでいっしょになったたくさんのひとたち、ファゼーロとロザーロ、羊飼のミーロや、顔の赤いこどもたち、地主のテーモ、山猫博士のボーガント・デストゥパーゴなど、いまこの暗い巨きな石の建物のなかで考えていると、みんなむかし風のなつかしい青い幻燈のように思われます。では、わたくしはいつかの小さなみだしをつけながら、しずかにあの年のイーハトーヴォの五月から十月までを書きつけましょう。',
    foreground = '#1155ee',
    padding = (5,10),
    font = ('Times New Roman',20),
    wraplength = 400,
    image = rock_climbing_woman,
    compound = 'right')
entry = ttk.Entry(root)
button = ttk.Button(root,text = 'OK')

# レイアウト
label.pack()
entry.pack()
button.pack()

# ウィンドウの表示
root.mainloop()
さて、Labelウィジェットのオプションが増えてきたので改行して適切なインデントを与えて記述していく。
foreground = '#16進数によるテキストのカラーの選択'
paddiing = (パディング値の設定)padding = (引数1) :上下左右すべて同じパディングをとる
padding = (引数1,引数2):左右のパディングを引数1だけ、上下のパディングを引数2だけとる
padding = (引数1,引数2,引数3,引数4):左、上、右、下の順に引数1からパッディングをとる
font = (フォント名,サイズ)
wraplength = :テキストの折返しをピクセルで指定している。上の場合は400ピクセルに達すると改行される
image = イメージオブジェクト:これより前でPhotoImageにて、相対的に指定したイメージを引用している
compound = 'right':イメージを表示する位置を指定している

Entryウィジェット
from tkinter import *
from tkinter import ttk
root = Tk()
root.title("はじめてのtkinter")
# オブジェクトの定義
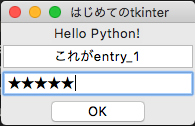
entry_1 = ttk.Entry(
root,
justify = 'center')
entry_2 = ttk.Entry(
root,
#justify =
show = '★')
button = ttk.Button(root,text = 'OK')
# レイアウト
label.pack()
entry_1.pack()
entry_2.pack()
button.pack()
# ウィンドウの表示
root.mainloop()
Entryウィジェットについてはそれほど掘り下げるべき項目はない。強いて言えば「justify」で、入力された文字列の水平位置をどうするのかということと、パスワードを取得するときに、入力されたパスワードの文字列がわからないように変わりに表示する文字を指定することについてくらいだ。それ以外のことについては実践編で記述する。
具体的な実践例
上の例では、OKボタンを押しても何も起こらない。何も定義していないのだから当然だ。
ときにはOKボタンを押してEntryウィジェットに入力された値を取得して何かやりたいことがあるかもしれない。では、どのようにすれば、Entryウィジェットに入力された文字を取得することができるだろうか?
Entryウィジェットに入力された文字列を取得する
from tkinter import *
from tkinter import ttk

# 関数定義
def get_id_pass():
    id = text_1.get()
    password = text_2.get()
    print('ID:',id)
    print('Pass:',password)

def set_clear():
    text_1.set('')
    text_2.set('')

root = Tk()
root.title("はじめてのtkinter")

# オブジェクトの定義
label_1 = ttk.Label(root,text='ユーザ名')
text_1 = StringVar()
entry_1 = ttk.Entry(root,textvariable=text_1)

label_2 = ttk.Label(root,text='パスワード')
text_2 = StringVar()
entry_2 = ttk.Entry(root,show='*',textvariable=text_2)

button_1 = ttk.Button(root,text = 'OK',command=lambda:get_id_pass())
button_2 = ttk.Button(root,text = 'Clear',command=lambda:set_clear())
button_3 = ttk.Button(root,text = 'Quit',command=quit)

# レイアウト
label_1.grid(row=0,column=0)
entry_1.grid(row=0,column=1)
label_2.grid(row=1,column=0)
entry_2.grid(row=1,column=1)
button_1.grid(row=2,column=0)
button_2.grid(row=2,column=1)
button_3.grid(row=2,column=2)

# ウィンドウの表示
root.mainloop()
レイアウトについては.packではなく.grid()にて指定した。エクセルの表の位置を指定するように縦・横の位置関係でウィジェットを配置することを手助けしてくれる。
Entryウィジェットを定義する前に、StringVar()型のオブジェクトを定義している。これをEntryウィジェットのtextvariable属性の値として指定している
text_1 = StringVar()
entry_1 = ttk.Entry(root,textvariable=text_1)
次にボタンを定義している。command=で、そのボタンが押されたときに実行したい関数を呼び出している。
button_1 = ttk.Button(root,text = 'OK',command=lambda:get_id_pass())
button_2 = ttk.Button(root,text = 'Clear',command=lambda:set_clear())
button_3 = ttk.Button(root,text = 'Quit',command=quit)
get_id_pass()関数
id = text_1.get()
とすることで、entry_1の値が可変となったtext_1の値を取得してidに代入している。
def get_id_pass():
    id = text_1.get()
    password = text_2.get()
    print('ID:',id)
    print('Pass:',password)
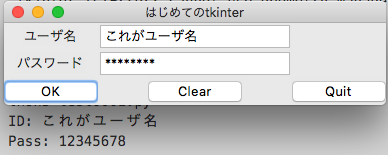
以上のように、Entryウィジェットに入力された値を取得できた。
次にClearボタンの呼び出し関数を見てみると
.set('')
として、入力された文字列を長さのない文字列に置き換えているので、このボタンを押すと入力がすべてクリアーされることがわかる。また、button_3のコマンドは、プログラムを終了させるものである。
def set_clear():
    text_1.set('')
    text_2.set('')