Jovoとは
こんばんは。家に帰って少し暇だったので遊んでみました。JovoとはAlexa SkillとActions on Googleを一つのコードベースで構築できる初のフレームワークです。ちょうど最近ver2.2がリリースされてTypeScriptへのサポートが強化されたとのことだったので触ってみました。今回はサンプルとして簡単な計算をする音声アプリを作ってみます。
インストール
インストールは非常に簡単です。
yarnを利用している場合は下記のコマンドを叩いてjovo-cliをグローバルにインストールしましょう。
$ yarn global add jovo-cli
$ jovo -v
Jovo CLI Version: 2.2.3
プロジェクトの作成
先ほどインストールしたjovo-cliを使用してプロジェクトを作成します。
TypeScriptを使用する場合は、オプションで --language typescriptをつけてください。
$ jovo new <directory> --language typescript
これで前準備が整ったのでまずはmodelを作っていきます。
models配下にen-US.jsonというファイルがあるのでこのファイルをリネームしてja-JP.jsonにします。
そしてこのjsonファイルを使って音声モデルを組み立てます。
今回は簡単な計算をするスキルなので以下のように組み立てました。
{
	"invocation": "Sample Jovo app",
	"intents": [
		{
			"name": "PlusIntent",
			"phrases": [
				"{number}を足して",
				"プラス{number}",
				"{number}を足す"
			],
			"inputs": [
				{
					"name": "number",
					"type": {
						"alexa": "AMAZON.NUMBER",
						"dialogflow": "@sys.number"
					}
				}
			]
		},
		{
			"name": "MinusIntent",
			"phrases": [
				"{number}を引いて",
				"マイナス{number}",
				"{number}を引く"
			],
			"inputs": [
				{
					"name": "number",
					"type": {
						"alexa": "AMAZON.NUMBER",
						"dialogflow": "@sys.number"
					}
				}
			]
		},

		{
			"name": "ResultAnswerIntent",
			"phrases": [
				"答えは{answer}",
				"{answer}"
			],
			"inputs": [
				{
					"name": "answer",
					"type": {
						"alexa": "AMAZON.NUMBER",
						"dialogflow": "@sys.number"
					}
				}
			]
		},

		{
			"name": "ResultHelpIntent",
			"phrases": [
				"結果を教えて",
				"答えを教えて"
			]
		}
	],
	"alexa": {
		"interactionModel": {
			"languageModel": {
				"intents": [
					{
						"name": "AMAZON.CancelIntent",
						"samples": []
					},
					{
						"name": "AMAZON.HelpIntent",
						"samples": []
					},
					{
						"name": "AMAZON.StopIntent",
						"samples": []
					}
				]
			}
		}
	},
	"dialogflow": {
		"intents": [
			{
				"name": "Default Fallback Intent",
				"auto": true,
				"webhookUsed": true,
				"fallbackIntent": true
			},
			{
				"name": "Default Welcome Intent",
				"auto": true,
				"webhookUsed": true,
				"events": [
					{
						"name": "WELCOME"
					}
				]
			}
		]
	}
	}
上記を見ればわかると思いますが、Intent内で変数を利用する場合はAlexa,Dialogflowそれぞれのプラットフォームのスロットやエンティティを定義してあげる必要があります。今回は使っていませんがカスタムのスロットやエンティティを利用する場合は下記のように共有で定義してあげればいいようです。もちろんsynonyms(類義語)などにも対応しているようです。
"inputs": [
    {
        "name": "city",
        // Use your own input type
        "type": "myCityInputType"
    }
]
"inputTypes": [
    {
        "name": "myCityInputType",
        "values": [
            {
                "value": "Berlin"
            },
            {
                "value": "New York",
                "synonyms": [
                    "New York City"
                ]
            }
        ]
    }
]
公式ドキュメントを参考に以下のサンプルを作ってみました。
import {App} from 'jovo-framework';
import {Alexa} from 'jovo-platform-alexa';
import {JovoDebugger} from 'jovo-plugin-debugger';
import {FileDb} from 'jovo-db-filedb';
import {GoogleAssistant} from 'jovo-platform-googleassistant';

// ------------------------------------------------------------------
// APP INITIALIZATION
// ------------------------------------------------------------------

const app = new App();

app.use(
    new Alexa(),
    new GoogleAssistant(),
    new JovoDebugger(),
    new FileDb(),
);


// ------------------------------------------------------------------
// APP LOGIC
// ------------------------------------------------------------------

app.setHandler({
    LAUNCH() {
        return this.toIntent('WelcomeIntent');
    },

    WelcomeIntent() {
        this.ask("簡単な計算スキルです。足し算と引き算ができます。最初は0から始まります。一を足してや三を引いてなどを私に言ってください。");
    },

    PlusIntent() {
        const plusnumber : number = +this.$inputs.number.value;
        // session_attributesから値を引っ張ってくる
        const currentResult : number = +this.$session.$data.result || 0;
        const result : number = currentResult + plusnumber;
        // session_attributesにデータを格納する
        this.$session.$data.result = result;
        this.ask(plusnumber.toString() + "を足しました。計算をやめる場合は答えを言うか、答えを教えてなどと聞いてください");
    },
    MinusIntent() {
        const minusnumber : number = +this.$inputs.number.value;
        // session_attributesから値を引っ張ってくる
        const currentResult : number = +this.$session.$data.result || 0;
        const result : number = currentResult - minusnumber;
        // session_attributesにデータを格納する
        this.$session.$data.result = result;
        this.ask(minusnumber.toString() + "を引きました。計算をやめる場合は答えを言うか、答えを教えてなどと聞いてください");
    },
    ResultAnswerIntent() {
        const answer : number = +this.$inputs.answer.value;
        const currentResult : number = +this.$session.$data.result || 0;
        console.log(answer, currentResult);
        if (answer === currentResult){
            this.tell("正解です。答えは" + currentResult.toString() + "でした。");
        }
        else{
            this.ask("違います。わからなければ答えを教えてと聞いてみてください。");
        }
    },
    ResultHelpIntent(){
        const currentResult : number = +this.$session.$data.result || 0;
        this.tell("答えは" + currentResult.toString() + "でした。");
    }
});

export {app};
テスト
サンプルコードができたので以下のコマンドでローカルでコンパイルして起動をしてみます。
$ npm run tsc
$ jovo run
起動後に「.」を押すとブラウザ上でデバッガーを起動できます。
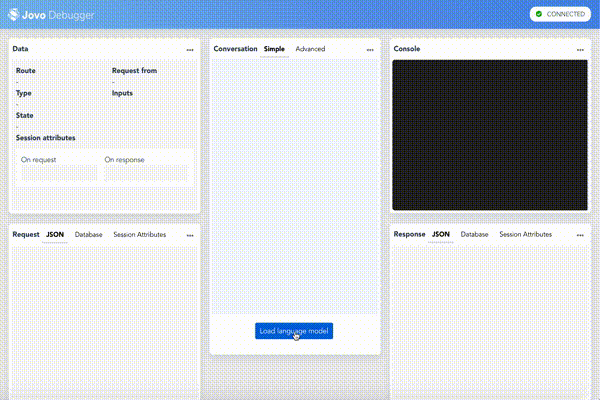
このデバッガーがかなり便利で、直感的にAlexaとGoogle Assistantの両方でマニュアルテストをすることができます。
$ npm run tscwと$ jovo run --watchで実行すれば、ホットリロードをしてくれるのでスピード感を持った開発ができそうですね。
しかし、あくまで、このツールできるのは「文字でのテスト」になるので、実際に喋った時と同じ挙動をするかはまた別の話です。音声アプリを作る際には実機での検証が大切です。
また、ユニットテストをする際にはjestを利用するといいと思います。下記は起動リクエストを飛ばした時に正常なレスポンスが返ってくるかのテストです。
import {Alexa} from 'jovo-platform-alexa';
import {GoogleAssistant} from 'jovo-platform-googleassistant';

jest.setTimeout(500);

const launchMeaage = "簡単な計算スキルです。足し算と引き算ができます。最初は0から始まります。一を足してや三を引いてなどを私に言ってください。";

for (const p of [new Alexa(), new GoogleAssistant()]) {
    const testSuite = p.makeTestSuite();

    describe(`PLATFORM: ${p.constructor.name} INTENTS` , () => {
        test('should return a welcome message and ask for the name at "LAUNCH"', async () => {
            const conversation = testSuite.conversation();

            const launchRequest = await testSuite.requestBuilder.launch();
            const responseLaunchRequest = await conversation.send(launchRequest);
            expect(
                responseLaunchRequest.isAsk(launchMeaage)
            ).toBe(true);

        });
    });
}
  "scripts":{
    "test": "jest"
  },
$ yarn test
yarn run v1.13.0
$ jest
 PASS  test/sample.test.ts
  PLATFORM: Alexa INTENTS
    ✓ should return a welcome message and ask for the name at "LAUNCH" (40ms)
  PLATFORM: GoogleAssistant INTENTS
    ✓ should return a welcome message and ask for the name at "LAUNCH" (12ms)

Test Suites: 1 passed, 1 total
Tests:       2 passed, 2 total
Snapshots:   0 total
Time:        5.1s
Ran all test suites.
✨  Done in 7.44s.
デプロイ
デプロイは$ jovo deployでプロジェクト配下にあるproject.jsの情報をもとに全プラットフォームにデプロイをしてくれるらしいです。Alexaへのデプロイにはask-cliで事前にask initをしておく必要があります。Googleに関してもIAMでDialogFlowのadminユーザを作成してCloud SDKでクレデンシャルを事前に取得しておく必要があります。詳しくは公式のチュートリアルに書いてます。またオプションを指定することで、コードはデプロイせずにAlexaやDialogFlowの音声設計の部分だけデプロイすることとかもできるようです。
感想
簡単にAlexa SkillとActions on Googleの開発環境を整えられて開発ができるのは非常にメリットに感じました。ただ、今後もAmazonもGoogleも本家のSDKをアップデートしていくだろうし、追従していけるかどうか怪しいので業務で使うには少し不安に感じるところです。ただ、DBとのインテグレーションが楽そうだったり、State Managementが便利そうだったりまだまだメリットはたくさんあると思うので、引き続き調査をしてみて機会があれば業務でも使ってみようと思いました。一時間くらいあれば試せるので是非みなさんもJovoを試してみて、Alexa,Google Assistantの両プラットフォームでスキルを作ってみましょう!