TypeScript + React + Sass + Babel利用したWebpack環境構築
最近, TypeScriptを勉強し始めたので
今回はTypeScript + React + Sass + Babelを利用した
Webpackの環境構築を行っていきたいと思います。
前提
- ターミナルが利用できる
- Node.jsを利用環境がある
- npm, yarnの利用環境がある
環境
-
2020/2/12時点での最新モジュール Node v11.10.1ES6+TypeScript v3.7.4React.js v16.12.0Webpack v4.41.2
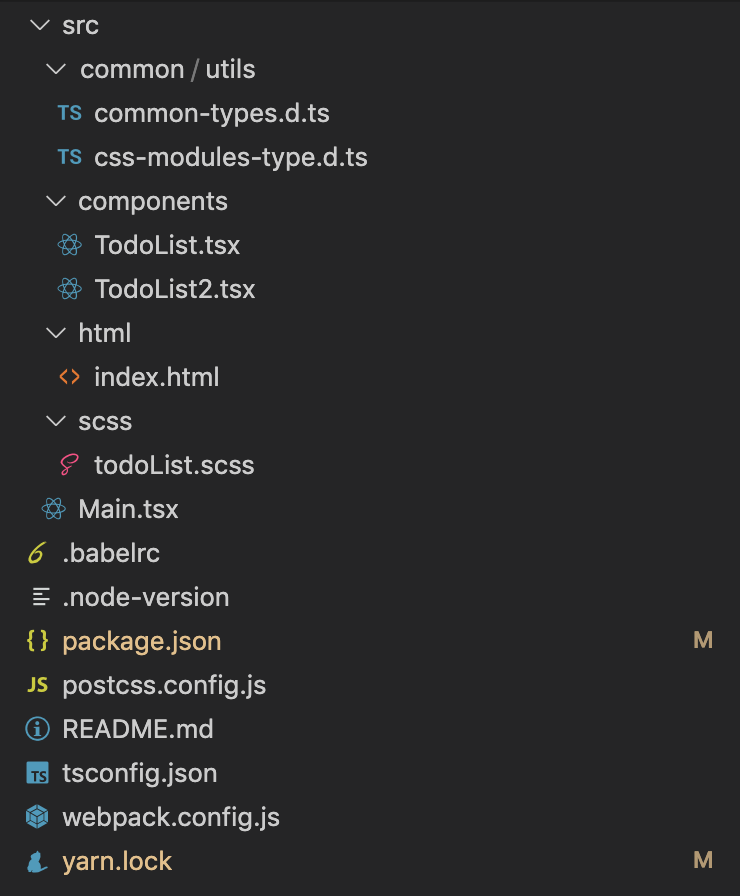
ファイル構成
前準備
以下のpackage.jsonを作成し,各npmモジュールを
npm install もしくは, yarn add package.json
を利用してインストールしてください。
{
  "name": "",
  "version": "1.0.0",
  "description": "",
  "main": "Main.tsx",
  "scripts": {
    "build": "webpack",
    "start": "webpack-dev-server"
  },
  "author": "",
  "license": "ISC",
  "dependencies": {
    "webpack": "^4.41.2",
    "webpack-cli": "^3.3.10",
    "webpack-dev-server": "^3.9.0",
    "@babel/core": "^7.7.4",
    "@babel/preset-env": "^7.7.4",
    "@babel/preset-react": "^7.7.4",
    "@types/react": "^16.9.17",
    "@types/react-dom": "^16.9.4",
    "@types/react-router-dom": "^5.1.3",
    "autoprefixer": "^9.7.4",
    "babel-loader": "^8.0.6",
    "babel-minify-webpack-plugin": "^0.3.1",
    "core-js": "3",
    "css-loader": "^3.2.0",
    "html-webpack-plugin": "^3.2.0",
    "mini-css-extract-plugin": "^0.9.0",
    "node-sass": "^4.13.0",
    "package.json": "^2.0.1",
    "postcss-loader": "^3.0.0",
    "react": "^16.12.0",
    "react-dom": "^16.12.0",
    "react-router-dom": "^5.1.2",
    "sass-loader": "^8.0.0",
    "ts-loader": "^6.2.1",
    "typescript": "^3.7.4"
  },
  "devDependencies": {
  }
}
これで環境構築に必要なモジュールが全てnode_modules配下に
インストールされました。
今回はメイン環境構築ですので, ささっとしたい方については
srcディレクトリ配下のファイルとMain.tsxについて,
こちらを参照して各ディレクトリ上に作成してください。
https://github.com/olt556/react_hooks_ts_tmp
Webpackの設定
次にWebpackの設定ファイルとなる,
webpack.config.jsを作成していきます。
const path = require('path');
// Babelの機能のminifyを利用するため
const BabelMinifyPlugin = require("babel-minify-webpack-plugin");
// ビルドする際にHTMLも同時に出力するため
const HtmlWebpackPlugin = require('html-webpack-plugin');
// CSSをJSにバンドルせずに出力するため
const MiniCssExtractPlugin = require('mini-css-extract-plugin');

module.exports = {
	mode: 'development',
    // pathの設定についてですがpathモジュールを使う必要は特にはありません。
	entry: path.resolve(__dirname, 'src/Main.tsx'),
	output: {
		path: path.resolve(__dirname, 'dist'),
		filename: 'bundle.js'
	},
	devServer: {
		contentBase: path.resolve(__dirname, 'dist'),
		port: 8080,
		historyApiFallback: true, // これがないとルーティングできない
	},
	resolve: {
		modules: [path.resolve(__dirname, 'src'), path.resolve(__dirname, 'node_modules')],
		extensions: ['.ts', '.tsx', '.js']
	},
	module: {
		rules: [
            // scssのローダ設定
			{
                test: [/\.css$/, /\.scss$/],
                exclude: /node_modules/,
				loader: [MiniCssExtractPlugin.loader, 'css-loader?modules', 'postcss-loader', 'sass-loader'],
      		},
            // js,ts,tsxのローダ設定
			{
				test: [/\.ts$/, /\.tsx$/, /\.js$/],
                loader: ['babel-loader', 'ts-loader'],
			},
		],
	},
	plugins: [
		new BabelMinifyPlugin(),
		new HtmlWebpackPlugin({
			publicPath: 'dist', // ビルド後のHTMLの出力先
			filename: 'index.html', //出力するHTMLのファイル名
			template: 'src/html/index.html', //出力するためのHTMLのテンプレート
		}),
		new MiniCssExtractPlugin({
			publicPath: 'dist', // ビルド後のCSSの出力先
			filename: 'app.css', //出力するCSSのファイル名
		}),
    ],
}
webpack.config.jsは以上のようになります。
ちなみに, ローダの設定についてですが,
loader: ['babel-loader', 'ts-loader']
の場合, ts-loader → babel-loaderの順に読み込まれます。
Babelの設定
Babelの設定は .babelrc に記述していきます。
{
    "presets": [
        ["@babel/preset-env", { //babelの設定
            "useBuiltIns": "usage",
            "corejs": 3 // polyfill用の設定
        }],
        "@babel/preset-react", // react用のbabelの設定
        ["minify",{}] // minifyの設定
    ]
}
TypeScriptの設定
続いてTypeScriptのトランスパイル(コンパイル)設定をtsconfig.jsonに
記述してきます。
{
    "compilerOptions": {
        "sourceMap": true,
        "noImplicitAny": true,
        "allowJs": true,
        "strict": true,
        "module": "ES6",
        "target": "es5",
        "jsx": "react"
    },
    "include": [
        "src"
    ],
    "exclude": [
        "node_modules"
    ],
}
各々の compilerOptions のオプションについては,
こちらを参照するといいかもしれません。
https://qiita.com/ryokkkke/items/390647a7c26933940470
AutopreFixerの設定
AutopreFixer はPostCSSの機能ですので,
利用できるようPostCSSの設定をpostcss.config.jsに記述していきます。
module.exports = {
    plugins: [
        require("autoprefixer")({
            grid: "autoplace",
            browsersList: ["ie >= 11"]
        })
    ],
};
ビルドについて
以上の設定ファイルを作成したのち,
npm run build を実行することで,
エントリーポイントであるMain.tsxとsrc配下のファイルを
読み込んでビルドを行い, dist以下に出力することができます。
また, npm run start でリアルタイムでビルドを行い,
出力されたファイルが読み込まれた, ローカルサーバが
htttp://localhost:8080 で起動します。
おわりに
間違えや質問などありましたら,
お気軽にコメントしていただけると幸いです。
今回はTypeScriptのテンプレートについては端折っているため,
そちらの記述方法などは,
GitHubを参照していただけたらと思います。
