この記事は Wano Group Advent Calendar 2019 の13日目の記事となります。
皆さんお待ちかね!
Zabbix 4.4でついに Zabbix Agent 2 が使えるようになりました!
(扱いとしてはテスト版ですけど)
Zabbix Agent 2
先のZabbix 2019 Congerenceでも大きく取り上げられていましたが、Goで書き直された全く新しいZabbix Agentです。従来の機能を踏襲しつつ、色々と柔軟性が向上しています。
特にプラグインによる機能拡張、独自の値収集が容易になった点は見逃せません。
従来のC言語で書かれたZabbix Agentにも独自の値を収集する方法は用意されていました。
しかし……
- がっつりC言語で実装しなければならないカスタムモジュール
- 設定ファイルにシェル芸を書き込むユーザーパラメーター
- システム中の他プログラムを直接実行する超火力のsystem.run[*]
……と、到底お手軽とは言えないカスタムモジュールか、それ以外は自由度が高すぎる(そしてパフォーマンスにも問題が出やすい)手段しか選択肢がありませんでした。
そこでZabbix Agent 2。
goでお手軽にプラグインが作成できるというのだからたまりません。
とりあえず作ってみる
Zabbix Serverに対して延々とyeahと叫ぶプラグインを作成します。実用性は知りません。
まずzabbix 4.4を入手しましょう。
Goの環境は適当に用意してください。Go Modules使ってます。
今回はZabbixのバージョンは4.4.3、goは1.13.3、Amazon Linux 2の上で試しました。
(現時点ではZabbix Agent 2はWindows環境に対応してません)
また、Zabbix ServerとZabbix Agent 2は同一ホスト上で実行しています。
src/go/plugins/下に適当なパスを切って、以下のようなコードを配置します。
package plugin_ex_a

import (
	"zabbix.com/pkg/log"
	"zabbix.com/pkg/plugin"
)

type Plugin struct {
	plugin.Base
}

var impl Plugin

func (p *Plugin) Export(key string, params []string, ctx plugin.ContextProvider) (result interface{}, err error) {

	if len(params) > 0 {
		log.Infof("call exporter key[%s] param[%s]", key, params[0]);
	}else{
		log.Infof("call exporter key[%s]", key);
	}

	return string("yeah"),nil
}

func init() {
	plugin.RegisterMetrics(&impl, "PluginExA", "expoter.ex", "NannDemo Gozare.")
}
各メソッド解説
init()
Zabbix Agent 2 起動時に呼ばれます。メトリクスの登録の他、リソースの確保などもここで行います。
RegisterMetricsの引数は、*pluginのインスタンス, プラグイン名, [pluginに対応するメトリクスのキー、説明], [pluginに対応するメトリクスのキー、説明]...*となっており、一つのプラグインで複数メトリクスを収集できます。プラグイン間の名称やキーの重複は不可。なお説明はドットで終わらないと起動時エラーになる模様。
Export()
Zabbix Agent 2のpluginにはExporter、Watcher、Runner、Collectorといったいくつかのフレームワークが用意されていますが、Export()メソッドを実装することでExporterとして動作します。
ExporterはZabbix Serverから値を取得される時にExport()メソッドが呼ばれ、returnで返した値が現在値として登録されるシンプルかつよく使うやつです。
Exportメソッドの引数は以下の通り。
- key : メトリクスのキー。init()時にRegisterMetricsで指定したもの。
- params : パラメータ付きで呼ばれるキーの場合そのキーの配列。例えばキーが expoter.ex["a"] なら ["a"]
- ctx : クライアントID取得したりzabbix_serverへのレスポンスをいじったりする時に使うやつ。(※まだよくわかってない)
src/go/plugins/plugins.go または src/go/plugins/plugins_linux.go に作ったプラグインの定義を追加します。
import (
        _ "zabbix.com/plugins/kernel"
        _ "zabbix.com/plugins/log"
        _ "zabbix.com/plugins/net/netif"
        _ "zabbix.com/plugins/proc"
        _ "zabbix.com/plugins/system/cpucollector"
        _ "zabbix.com/plugins/system/uname"
        _ "zabbix.com/plugins/system/uptime"
        _ "zabbix.com/plugins/systemd"
        _ "zabbix.com/plugins/vfs/dev"
        _ "zabbix.com/plugins/vfs/file"
        _ "zabbix.com/plugins/zabbix/async"
        _ "zabbix.com/plugins/zabbix/stats"
        _ "zabbix.com/plugins/zabbix/sync"
        _ "zabbix.com/plugins/plugin_ex_a"
)
上記が完了したらビルドし直しましょう。
src/go/bin下に出力される zabbix_agent2 を起動してエラーが出なければ大丈夫です。
動作確認
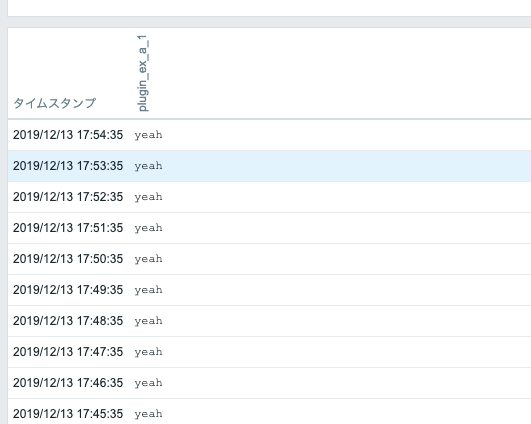
Zabbix Server側のアイテムはこんな感じで設定しておきます。
設定し、待つ事1分。
たったのこれだけで、 毎分yeahと叫ぶAgent ができました。
Zabbix Agent 2のログを確認すると、値の取得毎にExport()が呼ばれていることを確認できます。
2019/12/13 08:58:35.411493 call exporter key[expoter.ex]
2019/12/13 08:59:35.440375 call exporter key[expoter.ex]
2019/12/13 09:00:35.469675 call exporter key[expoter.ex]
パラメータ付きのキーを指定するとこんな感じ。実に簡単。
2019/12/13 08:56:36.359512 call exporter key[expoter.ex] param[hoge]
2019/12/13 08:57:36.385232 call exporter key[expoter.ex] param[hoge]
設定ファイルも使いたい
さすがにyeahと叫ぶだけのプラグインもどうかと思うので
設定ファイルで叫びの内容を変更できるようにしましょう。
親切なことにConfigure()ならびにValidate()の両メソッドを実装するだけで実現できます。
package plugin_ex_a

import (
	"zabbix.com/pkg/conf"
	"zabbix.com/pkg/log"
	"zabbix.com/pkg/plugin"
)

type Options struct {
	Value string `conf:"optional,default=yeah"`
}

type Plugin struct {
	plugin.Base
	options Options
}

var impl Plugin

func (p *Plugin) Configure(global *plugin.GlobalOptions, options interface{}) {
	if err := conf.Unmarshal(options, &p.options); err != nil {
		p.Warningf("cannot unmarshal configuration options: %s", err)
	}
	if p.options.Value == "" {
		p.options.Value = "yeah";
	}
}

func (p *Plugin) Validate(options interface{}) error {
	var o Options
	return conf.Unmarshal(options, &o)
}

func (p *Plugin) Export(key string, params []string, ctx plugin.ContextProvider) (result interface{}, err error) {

	if len(params) > 0 {
		log.Infof("call exporter key[%s] param[%s]", key, params[0]);
	}else{
		log.Infof("call exporter key[%s]", key);
	}

	return string(p.options.Value),nil
}

func init() {
	plugin.RegisterMetrics(&impl, "PluginExA", "expoter.ex", "NannDemo Gozare.")
}
conf.Unmarshal()が読み込みエラーを返してくれる事に頼り切ったValidate()です。
設定ファイル(デフォルトだと/usr/local/etc/zabbix_agent2.conf)に以下の行を追加します。
ここで使用するのはinit()で指定しているプラグイン名です。
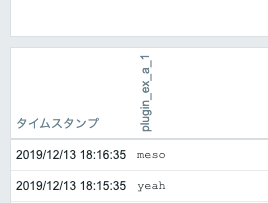
Plugins.PluginExA.Value=meso
Zabbix Agent 2をビルド&再起動するとこの通り。
楽!
他のフレームワーク
基礎となるExporter以外にもいくつかのフレームワークが提供されています。
Runner
Start()、Stop()の両メソッドを実装するとRunnerとして扱われます。
Plugin有効化時(だいたいはZabbix Serverから最初に値取得の要求がきたとき)に自動的にStart()が呼ばれるので、Agent起動中に何らかの処理を走らせたい時に使えます。(公式によるとgoroutineを起動したりとか)
Collector
Collect()、Period()の両メソッドを実装するとCollectorとして扱われます。
Agent起動後、Period()で返した時間(秒単位)毎にCollect()メソッドが呼ばれるようになるので、一定周期で値を更新するようなプラグインを実装する際に使えます。
ログを出すだけの例
起動時にStart()メソッドの実行ログが、2秒毎にClollect()メソッドの実行ログが出る単純な例です。
package plugin_ex

import (
	"zabbix.com/pkg/conf"
	"zabbix.com/pkg/log"
	"zabbix.com/pkg/plugin"
)

type Options struct {
	Value string `conf:"optional,default=ok"`
}

type Plugin struct {
	plugin.Base
	options Options
}

var impl Plugin

func (p *Plugin) Configure(global *plugin.GlobalOptions, options interface{}) {
	if err := conf.Unmarshal(options, &p.options); err != nil {
		p.Warningf("cannot unmarshal configuration options: %s", err)
	}
	if p.options.Value == "" {
		p.options.Value = "ok";
	}
}

func (p *Plugin) Validate(options interface{}) error {
	var o Options
	return conf.Unmarshal(options, &o)
}

func (p *Plugin) Export(key string, params []string, ctx plugin.ContextProvider) (result interface{}, err error) {

	if len(params) > 0 {
		log.Infof("call exporter key[%s] param[%s]", key, params[0]);
	}else{
		log.Infof("call exporter key[%s]", key);
	}

	return string(p.options.Value),nil
}

func (p *Plugin) Start() {
	log.Infof("Runner Start");
}

func (p *Plugin) Stop() {
	log.Infof("Runner Stop");
}

func (p *Plugin) Collect() (err error) {
	log.Infof("Call Collect");
	return;
}

func (p *Plugin) Period() int {
	return 2;
}

func init() {
	plugin.RegisterMetrics(&impl, "ExporterEx", "expoter.ex", "NannDemo Gozare.")
}
Watcher
Watch()メソッドを実装するとWatcherとして扱われます。
トラッパーのようなものを実現するための機能で、ポートの待ち受け処理や通知手段が提供されます。
詳しくは本体付属のsrc/go/plugins/debug/trapper/trapper.goやsrc/go/plugins/debug/filewatcher/filewatcher.goを見ると良いかと思います。
まとめ
Zabbix Agent 2自体がgoで書かれていることもあり、機能拡張の敷居が大きく下がった印象です。
独自の値や固有の環境におけるデータ収集にPluginを用いる事により
従来のZabbix Agentと比較し高速かつ安全な監視手段を用意できるようになりました。
今後とも充実したZabbixライフを!


