こんにちは。モウです。
最近、DynamoDB Local に接続するバックエンドアプリを FastAPI で開発しています。開発環境として、Dev Container と docker compose を組み合わせ、DynamoDB Local を実行するコンテナを同時に起動するように構築しました。
今後も Dev Container を利用する予定のため、今回の環境構築をテンプレートとして、また学習履歴として記事にまとめました。
🎯目標
今回の開発では、以下の2つのコンテナを Docker で同時に立ち上げることを目標とします。
- DynamoDB Local を実行するコンテナ
- FastAPI でバックエンドアプリを開発するための Dev Container
前提
- Windows 環境
- WSL 2 インストール済み
- Docker Desktop インストール済み
- Dev Containers拡張機能インストール済み
🗒️手順
-
プロジェクトルートに requirements.txt を作成
boto3==1.36.25 fastapi[standard]==0.115.8 pydantic-settings==2.8.0 -
.devcontainerフォルダを作成 -
.devcontainerフォルダの中に以下のファイルを作成- Dockerfile
- docker-compose.yml
- devcontainer.json
-
各ファイルの内容は以下のとおり
Dockerfile
# Debian Bookworm ベースのイメージ
FROM python:3.10.14-bookworm
# DynamoDB Local がポート 8000 を使用するため、別のポートを公開
EXPOSE 8080

# Python の標準出力と標準エラー出力のバッファリングを無効化
ENV PYTHONUNBUFFERED 1
# タイムゾーンを JST-9 に設定
ENV TZ JST-9

RUN pip3 install --upgrade pip

COPY ../requirements.txt /tmp
RUN pip install -r /tmp/requirements.txt
docker-compose.yml
version: "3.9"

services:
  dynamodb_dev:
    image: amazon/dynamodb-local:latest
    ports:
      - "8000:8000"
    volumes:
      - dynamodb_data_dev:/data
    command: -Djava.library.path=./DynamoDBLocal_lib -jar DynamoDBLocal.jar /data

  fastapi_dev:
    build:
      context: ../
      dockerfile: ./.devcontainer/Dockerfile
    ports:
      - "8080:8080"
    depends_on:
      - dynamodb_dev
    volumes:
      - ../:/workspace
    command: sleep infinity

volumes:
  dynamodb_data_dev:
devcontainer.json
{ "name": "Dev Container", "dockerComposeFile": "./docker-compose.yml", "service": "fastapi_dev", "workspaceFolder": "/workspace" } -
VS Code で F1 キーを押し、コマンドパレットを開いて「Dev Containers: Reopen in Container」を選択
ここまでの手順で、Dev Container が起動し、DynamoDB Local を実行するコンテナも同時に立ち上がっているはずです。次は、DynamoDB Local に接続して、FastAPI でエンドポイントを実装してみましょう。
🧑💻DynamoDB Local + FastAPI
プロジェクトルートに main.py を作成し、以下のコードを追加します。
from fastapi import FastAPI
from pydantic import BaseModel
import boto3
# DynamoDB Local に接続します
dynamodb = boto3.resource(
"dynamodb",
# IP アドレスが環境によって異なります。
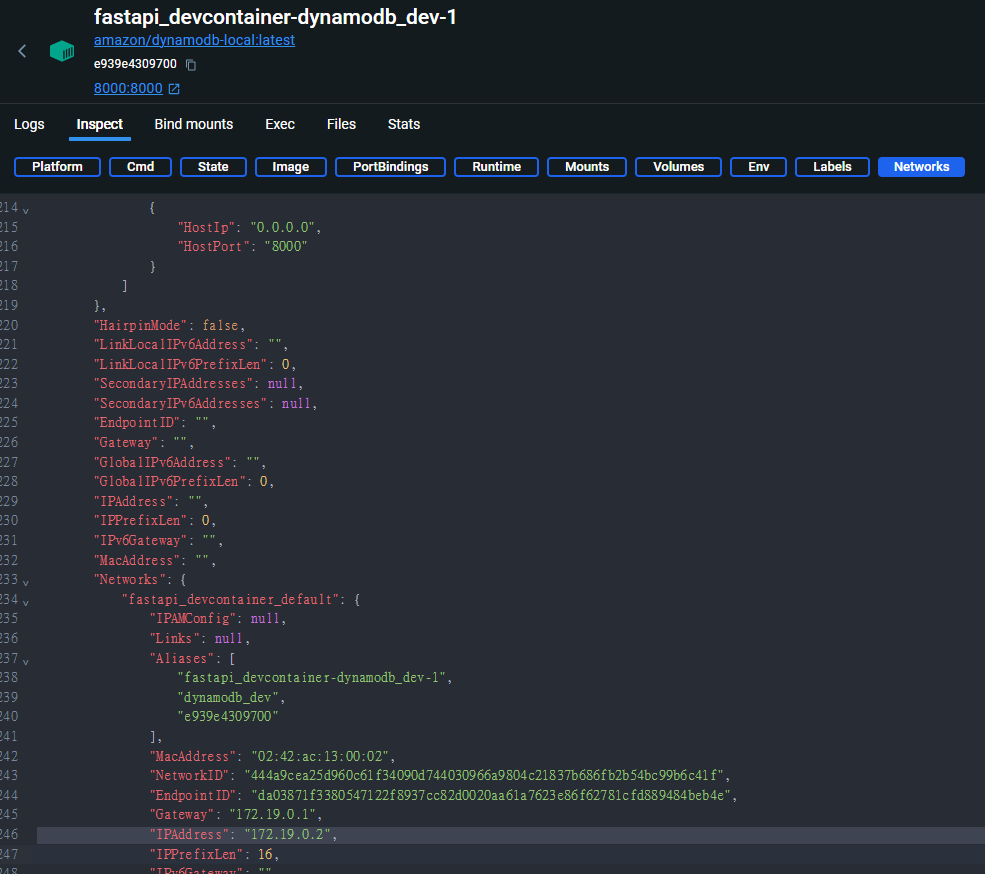
endpoint_url="http://172.19.0.2:8000",
region_name="us-east-1",
# ローカル環境のため、AWS アカウントが不要です。
# アクセスキーとシークレットキーは任意の値で構いません。
aws_access_key_id="key",
aws_secret_access_key="key",
)
# User テーブルを作成します。
tables = list(dynamodb.tables.all())
if "User" not in [table.name for table in tables]:
table = dynamodb.create_table(
TableName="User",
KeySchema=[{"AttributeName": "name", "KeyType": "HASH"}],
AttributeDefinitions=[{"AttributeName": "name", "AttributeType": "S"}],
ProvisionedThroughput={"ReadCapacityUnits": 4, "WriteCapacityUnits": 4},
)
table.wait_until_exists()
app = FastAPI()
class User(BaseModel):
name: str
phone: str
@app.post("/user")
async def create_user(user: User):
table = dynamodb.Table("User")
table.put_item(Item=user.model_dump())
@app.get("/users")
async def scan_users():
table = dynamodb.Table("User")
response = table.scan()
return response["Items"]
❗DynamoDB Local コンテナの IP アドレスは、実行環境によって異なる場合があります。Docker Desktop でコンテナの詳細を確認し、正しい IP アドレスを使用してください。
次に、以下のコマンドをターミナルで実行し、FastAPI アプリケーションを起動します。
uvicorn main:app --reload --log-level debug --host 0.0.0.0 --port 8080
アプリケーションが起動したら、Postman を使用してリクエストを送信してみましょう。以下の内容を JSON ファイルとして保存し、Postman にインポートしてください。
{
	"info": {
		"_postman_id": "86dc26d6-01ab-45ef-9030-58679ad491cd",
		"name": "FastAPI + DynamoDB Local",
		"schema": "https://schema.getpostman.com/json/collection/v2.1.0/collection.json",
		"_exporter_id": "7742960"
	},
	"item": [
		{
			"name": "Users",
			"event": [
				{
					"listen": "test",
					"script": {
						"exec": [
							"pm.test(\"Status code is 200\", function () {",
							"    pm.response.to.have.status(200);",
							"});"
						],
						"type": "text/javascript",
						"packages": {}
					}
				}
			],
			"request": {
				"method": "GET",
				"header": [],
				"url": {
					"raw": "{{base_url}}/users",
					"host": [
						"{{base_url}}"
					],
					"path": [
						"users"
					]
				},
				"description": ""
			},
			"response": []
		},
		{
			"name": "User",
			"event": [
				{
					"listen": "test",
					"script": {
						"exec": [
							"pm.test(\"Successful POST request\", function () {",
							"    pm.expect(pm.response.code).to.be.oneOf([200, 201]);",
							"});",
							""
						],
						"type": "text/javascript",
						"packages": {}
					}
				}
			],
			"request": {
				"method": "POST",
				"header": [],
				"body": {
					"mode": "raw",
					"raw": "{\n\t\"name\": \"User\",\n    \"phone\": \"012-3456-7890\"\n}",
					"options": {
						"raw": {
							"language": "json"
						}
					}
				},
				"url": {
					"raw": "{{base_url}}/user",
					"host": [
						"{{base_url}}"
					],
					"path": [
						"user"
					]
				},
				"description": ""
			},
			"response": []
		}
	],
	"event": [
		{
			"listen": "prerequest",
			"script": {
				"type": "text/javascript",
				"exec": [
					""
				]
			}
		},
		{
			"listen": "test",
			"script": {
				"type": "text/javascript",
				"exec": [
					""
				]
			}
		}
	],
	"variable": [
		{
			"key": "base_url",
			"value": "localhost:8080"
		}
	]
}
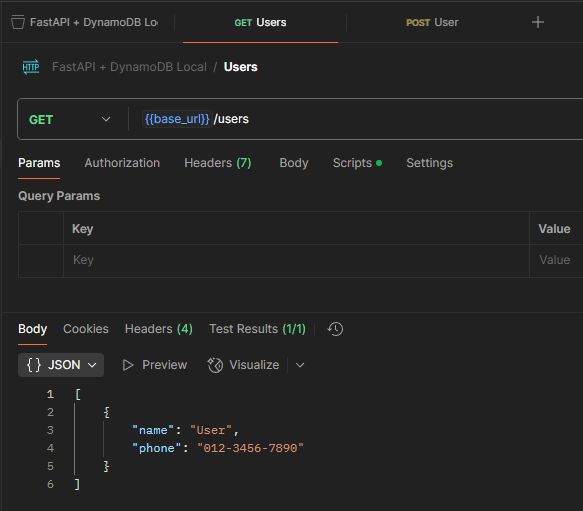
Postman にインポートが完了したら、POST リクエストを送信してユーザーを追加しましょう。その後、GET リクエストを送信すると、先ほど追加したユーザーの情報が取得できるはずです。
🪄VSCode デバッグ設定の追加
FastAPI アプリケーションを起動するたびにターミナルでコマンドを実行するのは面倒ですし、ブレークポイントを設定してデバッグしたい場合もありますよね。そこで、VS Code のデバッガを使用するための設定を追加しましょう。
プロジェクトルートに.vscodeフォルダを作成し、その中にlaunch.jsonファイルを作成し、以下の設定を追記します。
{
    "version": "0.2.0",
    "configurations": [
        {
            "name": "FastAPI",
            "type": "debugpy",
            "request": "launch",
            "module": "uvicorn",
            "args": [
                "main:app",
                "--reload",
                "--log-level",
                "debug",
                "--host",
                "0.0.0.0",
                "--port",
                "8080"
            ]
        }
    ]
}
上記の設定ファイルを追加したら、VS Code で F5 キーを押すことで、FastAPI アプリケーションがデバッグモードで起動します。
❗VS Code で Python デバッガを使用するには、Python拡張機能のインストールが必要です。
🎉終わりに
今回の記事が、DynamoDB Local と FastAPI を使った開発を始める方の参考になれば幸いです。今後も Dev Container を活用した開発を進め、得られた知見を共有していきたいと思います。
最後に、今回のサンプルコードは GitHub にプッシュしたので、ぜひ参考にしてください。