wordpress初心者です。サンプルは調べながら作成しました、間違いなどありましたら指摘お願いします![]()
この記事の編集履歴
参考
- 0からわかるWordPressプラグイン開発(スッテプ・バイ・ステップ) - Qiita
- WordPress Plugin Development - YouTube
- WordPress で Ajaxを利用する | バシャログ。
- jsファイルでWordPressのテンプレートパスを使えるようにする | TECH | 孤独村
- plugins - why does the add_action('the_content) overwrite my page - WordPress Development Stack Exchange
サンプル
Server-Sent Events(SSE)を使用した簡易チャットプラグインを作成してみました
確認バージョン
- PHP 7.2
- wordpress 5.2.1
- Google Chrome 74.0.3729.169
この記事の概要
wordpressの基本的な機能を勉強しながら、簡易チャットプラグインを作成していきます
最終的なコードを見たい方はこちらを見て、本記事は読まなくて良いです。
私が調べながら作っていった手順を一歩ずつ書いていく内容となっています。
間違いやより良いやり方がある場合は教えてください。
対象読者
-
wordpressのplugin作成に壁を感じてる方
- 初心者の私でもやればできたというのが伝わればと、
-
wordpress初心者 (wordpressを画面から操作したことがあり、PHPの基礎的な知識がある)
- plugin作成はそこまで難しくなかったので、初心者がいきなりplugin作成してみる、もありだと思いました
1 プラグインをwordpressに認識させる
1-1 phpファイル作成
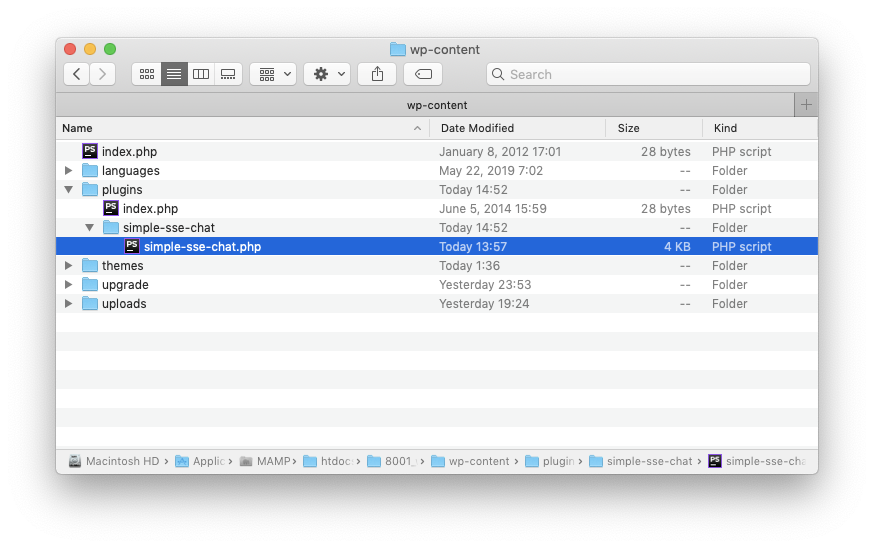
{root}/wp-content/plugins/simple-sse-chat/simple-sse-chat.php
pluginsディレクトリに作成したいプラグイン用のフォルダと、それと同じ名前のphpファイルを作成します
1-2 プラグイン名と説明を設定
<?php
/*
    Plugin Name: Simple SSE Chat
    Description: Server Snet Eventsを使用した簡易チャット
*/

// ↓このファイルに直接アクセスされた場合のために必ず処理の先頭につけましょう
if ( ! defined( 'ABSPATH' ) ) {
   exit;
}
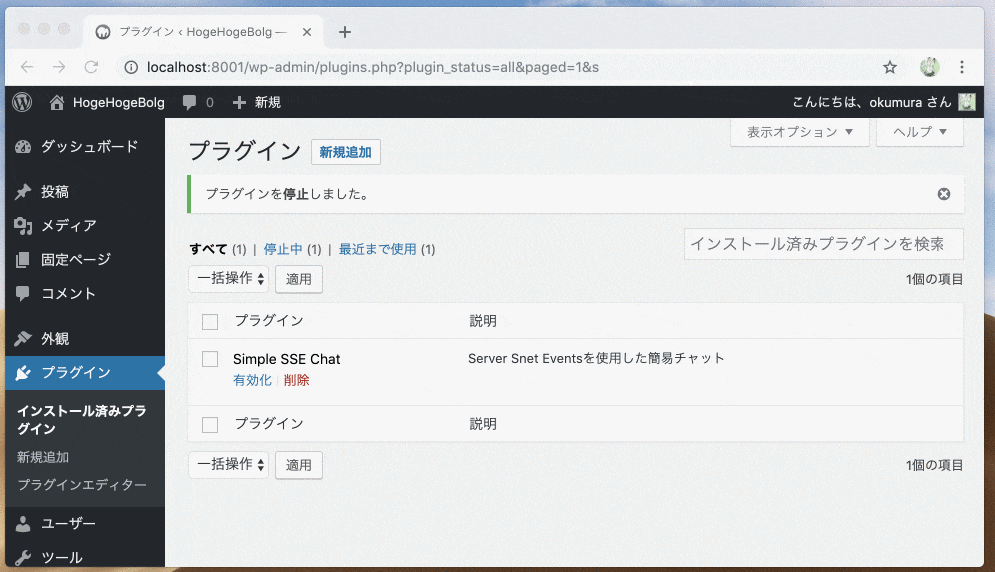
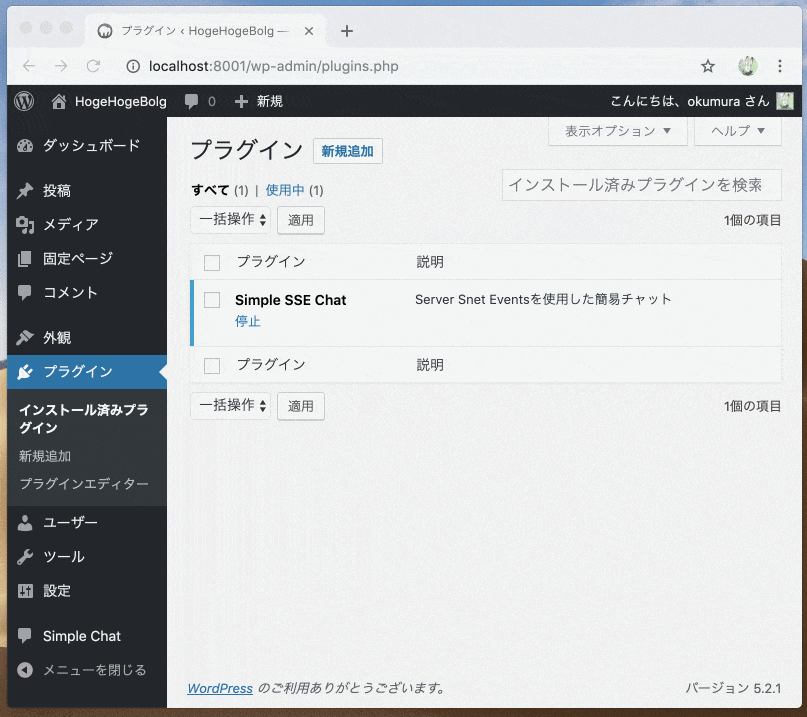
この状態で管理画面のプラグインのページをみると、プラグインを確認することができます

1-3 有効化する
有効化を押すと/wp-content/plugins/simple-sse-chat/simple-sse-chat.phpで書いた内容が実行されることになります。
現時点ではまだ何もおきません。
2 管理画面のメニューに追加
2-1 add_action('admin_menu', $callback)
add_actionまたは、add_filterを使って、フックを設定します。
ここでは、管理メニューが読み込まれる前に実行される admin_menuを指定します。
フックについて参考:
【WordPress入門】アクションフックとフィルターフックを使いこなそう | 滋賀/京都/大阪でホームページ制作ならYUKiYURi WEB
<?php

// ...

add_action('admin_menu', function () {
    add_menu_page(
        'Simple Chat Settings', // <title>タグの内容を設定
        'Simple Chat', // 左メニューに表示される名前を設定
        'manage_options', // 権限
        'simple-sse-chat', // スラッグ
        'admin_menu_simple_sse_chat', // メニューを開いたときに実行される関数名
        'dashicons-admin-comments', // アイコン
        200 // メニューの表示順、200と大きい数字にしたので、メニューの一番下に表示される
    );
});
function admin_menu_simple_sse_chat() {
    ?>
        <div class="wrap">
            <h2>Simple Chat Settings</h2>
        </div>
    <?php
}

メニューに追加され、ページを表示することができました。
2-2 get_option、update_optionで入力値を保存する
<?php

// ...

add_action('admin_menu', function () {
    add_menu_page(
        'Simple Chat Settings', // <title>タグの内容を設定
        'Simple Chat', // 左メニューに表示される名前を設定
        'manage_options', // 権限
        'simple-sse-chat', // スラッグ
        'admin_menu_simple_sse_chat', // メニューを開いたときに実行される関数名
        'dashicons-admin-comments', // アイコン
        200 // メニューの表示順、200と大きい数字にしたので、メニューの一番下に表示
    );
});
function admin_menu_simple_sse_chat() {
    if ($_SERVER['REQUEST_METHOD'] === 'POST') {
        check_admin_referer('hoge-fuga-piyo'); // CSRF対策
        update_option('simple_sse_chat_header', $_POST['chat_heder']);
        ?>
        <div id="setting-error-settings-update" class="update-settings-error notice is-dismissible"><strong>Settings have been saved.</strong></div>
        <?php
    }
    $chat_heder = get_option('simple_sse_chat_header', 'Simple Chat'); // 第2引数は指定のoption_nameがない場合の初期値
    ?>
        <div class="wrap">
            <h2>Simple Chat Settings</h2>
            <form method="POST" action="">
                <?php wp_nonce_field( 'hoge-fuga-piyo'); ?>
                <label for="chat_heder">チャットタイトル</label>
                <textarea name="chat_heder" class="large-text"><?= esc_textarea($chat_heder) ?></textarea>
                <input type="submit" name="submit_scripts_update" class="button button-primary" value="UPDATE">
            </form>
        </div>
    <?php
}
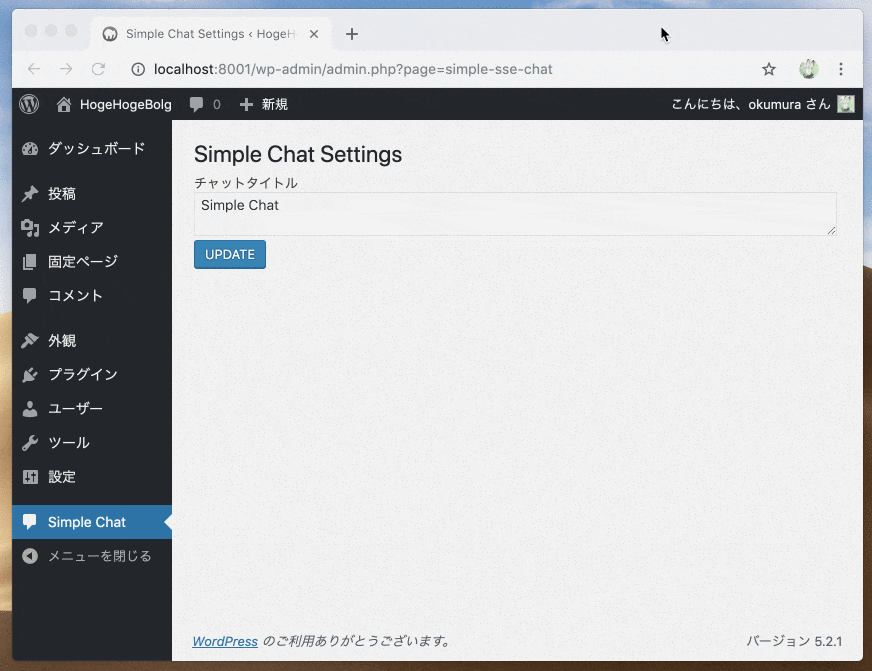
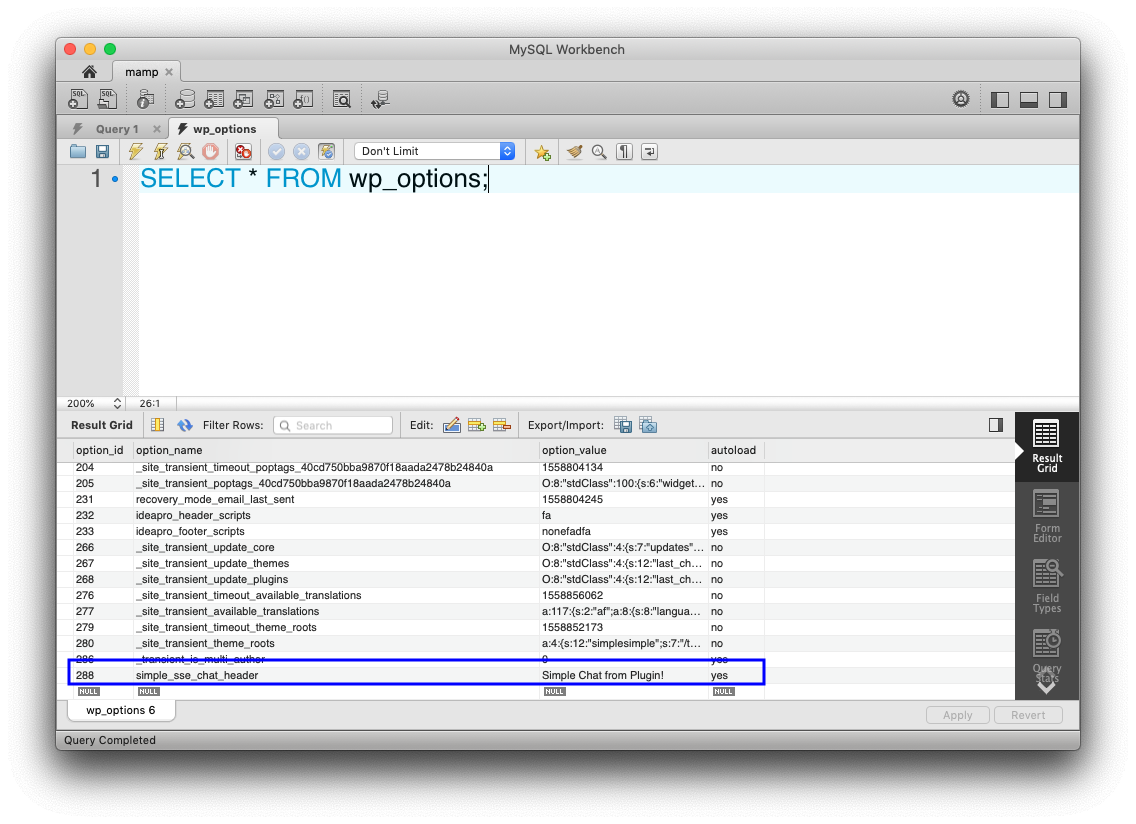
wp_optionsテーブルに入力値が保存されていることが確認できました。
3 ショートコードでチャットのHTMLを表示する
3-1 まず、簡単なHTMLだけを表示
<?php

// ...

add_shortcode('simple_sse_chat', function () {
    return '<span style="color:blue;">ショートコードのテスト</span>';
});
※wordpress 5からの投稿エディタのGutenberg(グーテンベルグ)でのショートコード設定方法↓
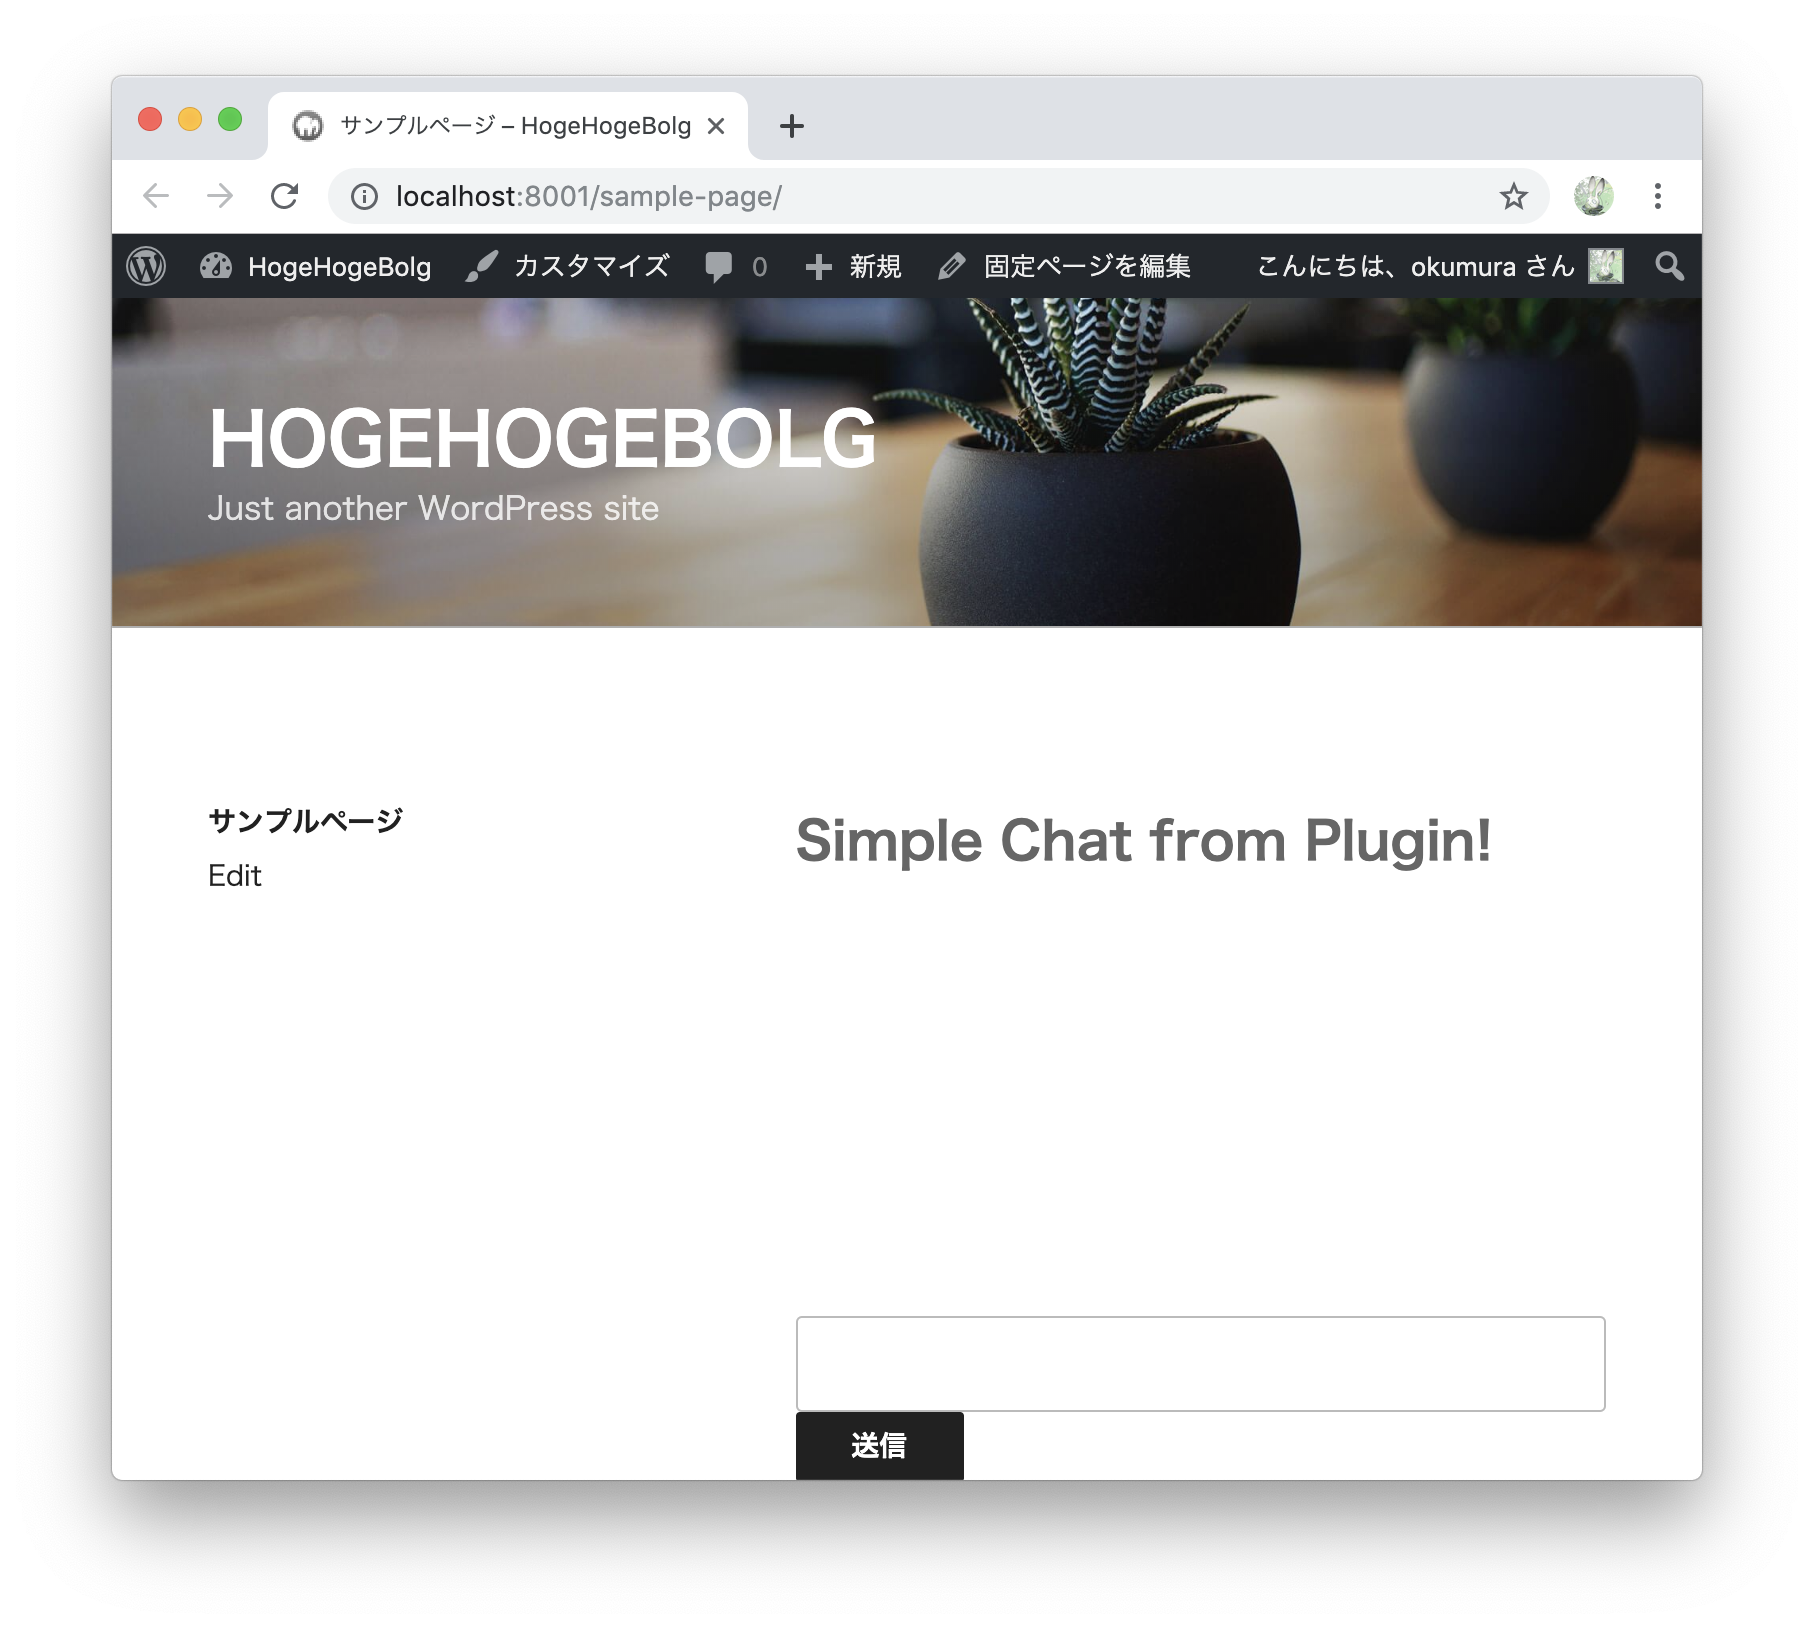
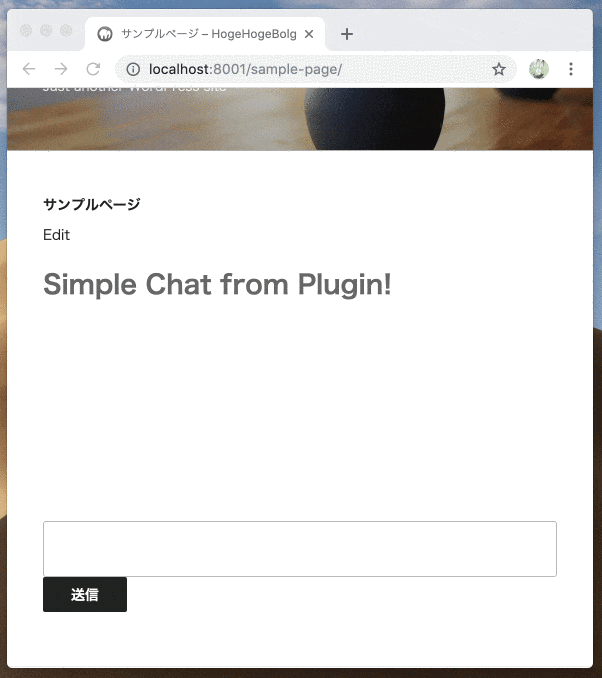
ショートコードがページに表示できたのを確認できました。
3-2 チャット用のHTMLを表示
HTMLを見やすくするためにバッファリングしてHTMLを表示するようにしてみました。
get_option('simple_sse_chat_header', 'Simple Chat');として管理画面から登録した値を出力します。
<?php

// ...

add_shortcode('simple_sse_chat', function () {
    $header = get_option('simple_sse_chat_header', 'Simple Chat');
    ob_start(); // バッファリング開始
    ?>
    <form id="js-simple-sse-chat-form">
        <h2><?= esc_html($header) ?></h2>
        <div class="simple-sse-chat-container">
            <table id="js-simple-sse-chat-body">
                <tbody></tbody>
            </table>
        </div>
        <input type="text" name="chat-content" id="js-simple-sse-chat-input">
        <input type="submit" value="送信">
    </form>
    <style>
        .simple-sse-chat-container {
            height: 200px;
            overflow: scroll;
        }
    </style>
    <?php
    return ob_get_clean(); // バッファからデータを取得してクリア
});
4 チャットデータ登録用のテーブルをDBに作成する
4-1 register_activation_hook()でプラグインがアクティブ化されたときに実行される関数を定義
<?php

// ...

register_activation_hook(__FILE__, function () {
    // プラグインがアクティブ化されたときに実行される
});
4-2 $wpdbを使用してDBを操作する
<?php

// ...

register_activation_hook(__FILE__, function () {
    global $wpdb;
    $sql = sprintf('CREATE TABLE %ssimple_sse_chat (
        `id` INT NOT NULL AUTO_INCREMENT,
        `user_id` INT NOT NULL,
        `content` TEXT NOT NULL,
        PRIMARY KEY (`id`)
    ) %s;', $wpdb->prefix, $wpdb->get_charset_collate());
    require_once(ABSPATH . 'wp-admin/includes/upgrade.php');
    dbDelta($sql);
});
一度停止して、最有効化しても実行してくれます
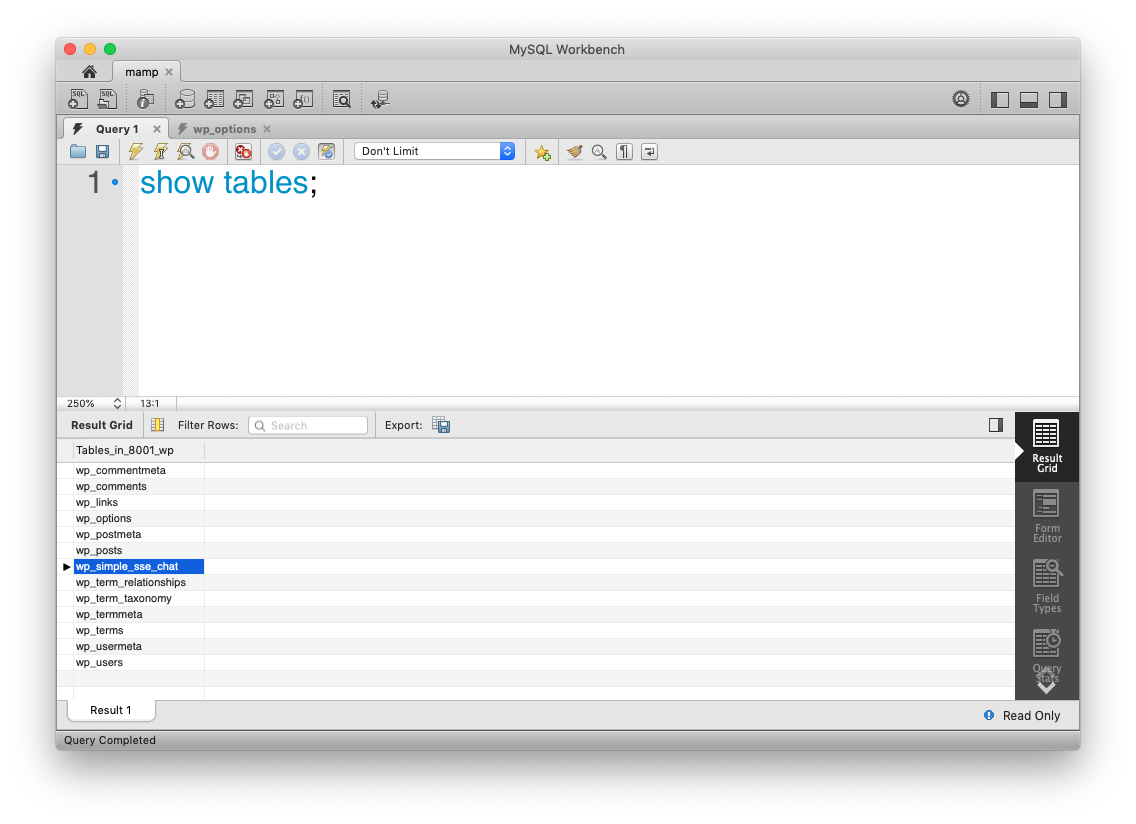
プラグイン有効化時にテーブルを作成してくれました。
5 チャットの入力値を登録する
5-1 javascriptを読み込む
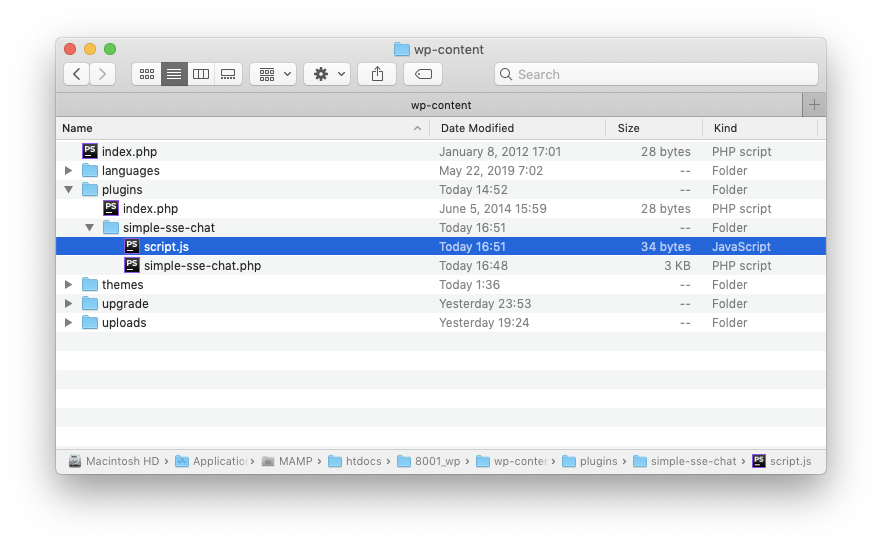
jsファイルを作成します。
console.log(simple_sse_chat_data) // <- PHPから渡される変数
今回はショートコードのHTMLをjavascriptで操作したいので、
-
add_action('the_content', $callback)で、投稿や固定ページの内容が表示されたときに、 -
has_shortcode($content, 'simple_sse_chat')で指定のショートコードが使われていた場合のみ、jsファイルを読み込みます。
<?php

// ...

add_action('the_content', function ($content) {
    // ショートコードが使われているページのみjsを読み込む
    if (has_shortcode($content, 'simple_sse_chat')) {
        // script.jsにsimple_sse_chat_dataという名前のオブジュエクトを定義し、home_urlというプロパティを定義
        wp_enqueue_script('simple_sse_chat', plugin_dir_url(__FILE__) . 'script.js');
        wp_localize_script('simple_sse_chat', 'simple_sse_chat_data', [
            'home_url' => home_url(),
            'nonce' => wp_create_nonce('hoge-fuga-piyo'), // CSRF対策
        ]);
    }
    return $content;
});
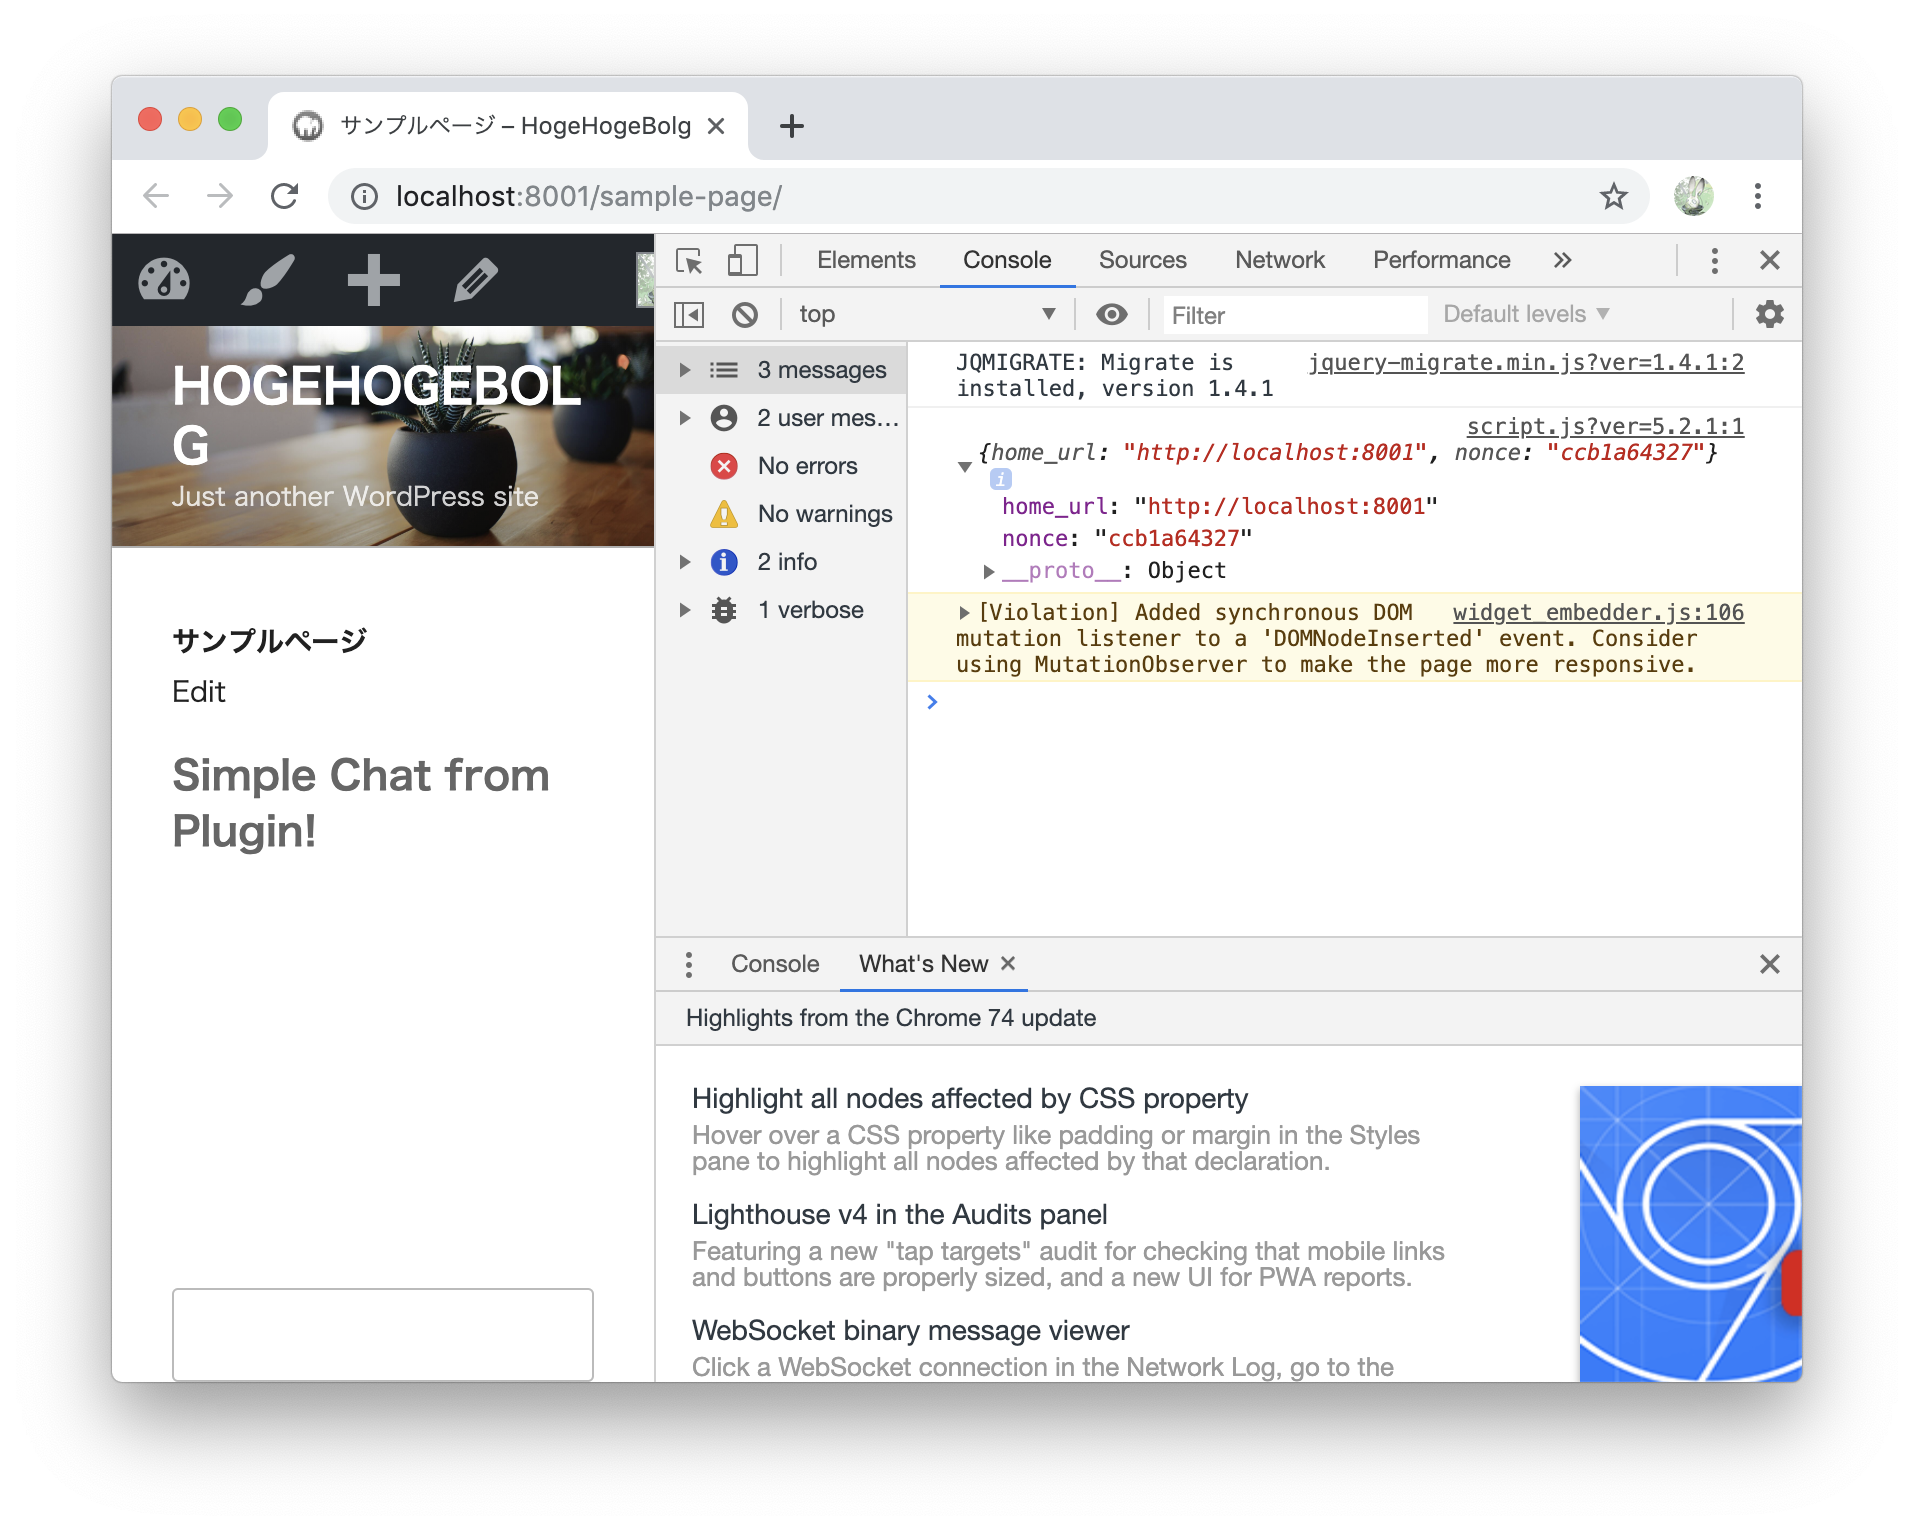
指定のjavascriptが読み込まれ、PHPからjavascriptにsimple_sse_chat_dataという変数名で値を渡せていることが確認できました。
5-2 wp_ajax_{action_name}でチャットの内容を登録する用のurlを設定
<?php

// ...

add_action('wp_ajax_chat_post', function () {
    check_ajax_referer('hoge-fuga-piyo', 'security'); // CSRF対策

    global $wpdb;
    $wpdb->insert($wpdb->prefix.'simple_sse_chat', [
        'user_id' => get_current_user_id(),
        'content' => $_POST['chat-content'],
    ]);
});
↑のような書き方ですと/wp-admin/admin-ajax.php?action=chat_postでリクエストすると、コールバック関数を実行してくれます。
5-3 ajaxで登録処理をする
const { home_url, nonce } = simple_sse_chat_data;

// 登録
document.getElementById("js-simple-sse-chat-form").addEventListener("submit", async e => {
    e.preventDefault();
    formData = new FormData(e.target)

    // 入力値が空の場合は何もしない
    if (formData.get("chat-content") === "") return;

    formData.append('security', nonce);

    // 登録のリクエスト
    const res = await fetch(`${home_url}/wp-admin/admin-ajax.php?action=chat_post`, {
        method: "POST",
        body: formData,
    })

    // 入力欄を空にしからにしておく
    document.getElementById("js-simple-sse-chat-input").value = ""
});
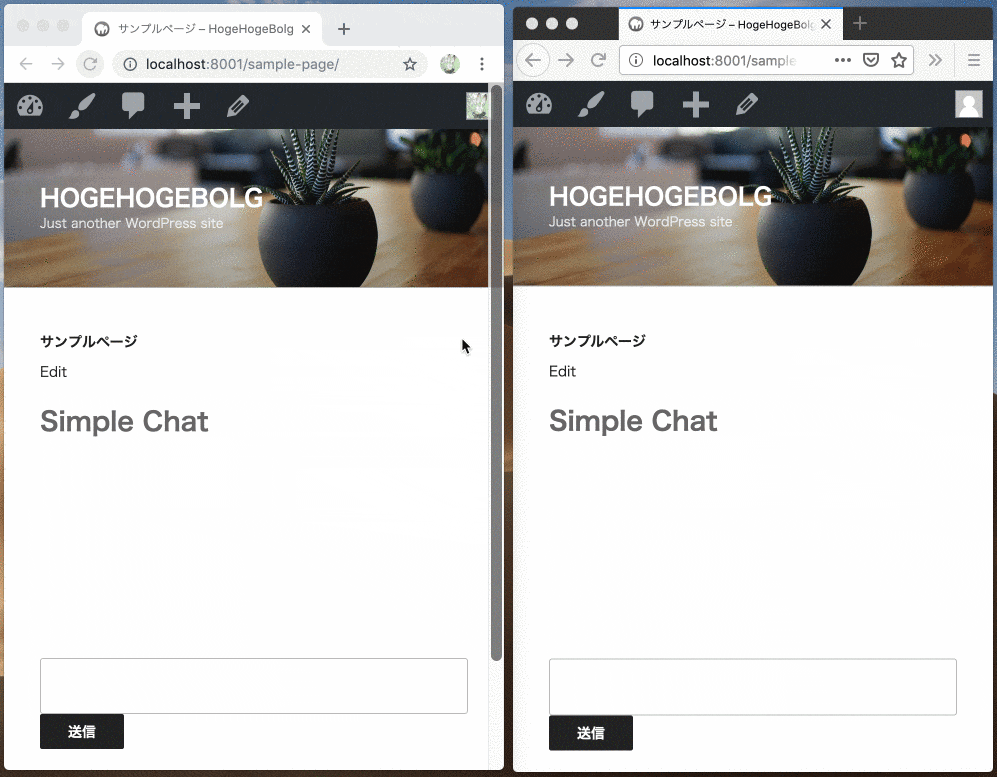
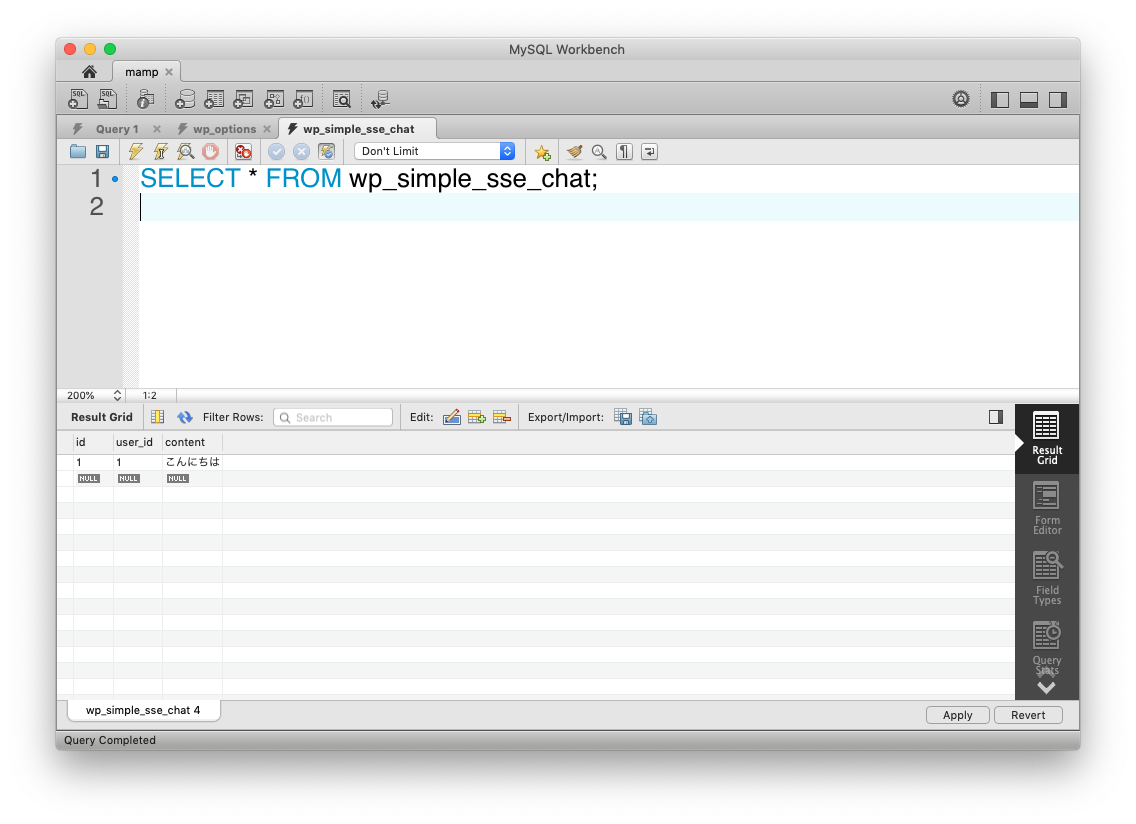
チャットからの入力値をDBに保存することができました。
6 Server-Sent Eventsでチャットの内容を表示する
6-1 Server-Sent Eventsを実行するurlを定義する
<?php

// ...

// ajaxのhookだが、SSEも問題なかったのでwp_ajax_{action_name}を使用しました
add_action('wp_ajax_event_streame', function () {
    if (!wp_verify_nonce($_GET['_wpnonce'], 'hoge-fuga-piyo')) {
      exit; // CSRF対策
    }

    global $wpdb;
    header('Content-Type: text/event-stream');
    header('Cache-Control: no-store');
    while(true) {
        printf("data: %s\n\n", json_encode([
            'chat_data' => $wpdb->get_results(
                "SELECT s.id, s.content, u.user_login
                 FROM {$wpdb->prefix}simple_sse_chat s
                 LEFT JOIN {$wpdb->prefix}users u ON s.user_id = u.id
                 ORDER BY id DESC
                 LIMIT 10"
            ),
        ]));
        ob_end_flush();
        flush();
        sleep(1);
    }
});
6-2 javascriptで表示処理をする
const { home_url, nonce } = simple_sse_chat_data;

// ...

const es = new EventSource(`${home_url}/wp-admin/admin-ajax.php?action=event_streame&_wpnonce=${nonce}`);

// 表示
let lastId = 0;
es.addEventListener("message", e => {
    const { chat_data } = JSON.parse(e.data);

    // 更新がなければ何もしない
    if (lastId === (chat_data[0] ? chat_data[0].id : 0)) return;

    // jsonを受け取ってHTMLにして表示
    targetElement = document.getElementById("js-simple-sse-chat-body").querySelector("tbody");
    targetElement.innerHTML = ""
    chat_data.forEach(data => {
        const { user_login, content } = data
        targetElement.insertAdjacentHTML("afterbegin", `
            <tr>
                <td>
                    <small>${user_login}</small>
                    <br>
                    <strong>${content}</strong>
                </td>
            </tr>
        `)
    })

    // 新着があったら下にスクロール
    const scrollElement = document.querySelector(".simple-sse-chat-container")
    scrollElement.scrollTop = scrollElement.scrollHeight

    lastId = (chat_data[0] ? chat_data[0].id : 0);
});
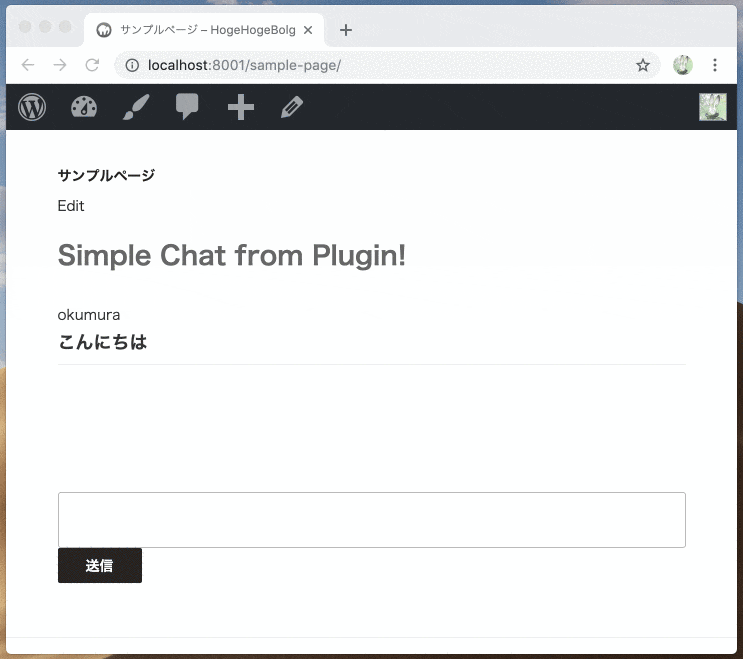
Server-Sent Eventsでチャットの内容を表示することができました。
7 プラグイン削除時に不要なデータを削除する
7-1 register_uninstall_hook()でプラグインが削除された場合に実行される関数を定義
今回の場合だと、wp_simple_sse_chatテーブルの削除、wp_optionsテーブルのoption_name:simple_sse_chat_headerの削除が必要です。
<?php

// ...

// プラグインが削除されたときに実行される
function simple_sse_chat_uninstall () {
    // TODO マルチサイトの考慮をするとより良いものとなる
    //  see also https://github.com/okumurakengo/simple-sse-chat/pull/7

    global $wpdb;
    $wpdb->query("DROP TABLE IF EXISTS {$wpdb->prefix}simple_sse_chat"); // テーブル削除
    delete_option('simple_sse_chat_header'); // wp_optionsテーブルの値を削除
}
register_uninstall_hook(__FILE__, 'simple_sse_chat_uninstall');
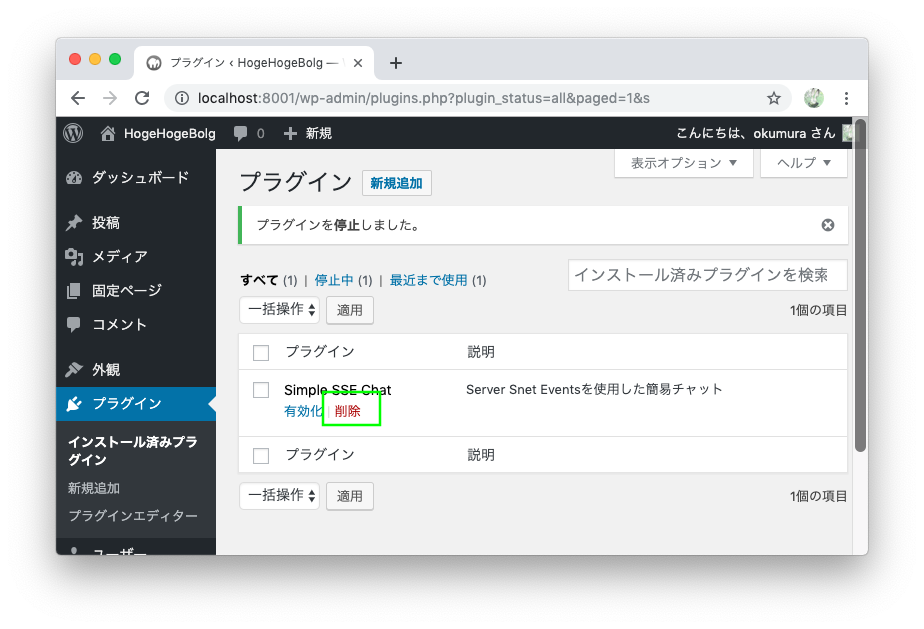
管理画面から削除ボタンを押すと、こちらの関数が実行してくれます
最後まで読んでいただいてありがとうございました。m(_ _)m