環境構築を頑張りたくなかったので、
Reactはcreate-react-appで環境を作成、
PHPはMAMPで動かしてみました。
その際に自分が設定したことをせっかくなので投稿させていただきました。m(_ _)m
また私は、React、PHPの初心者です。間違っていたら教えていただけるとありがたいです。
私が最終的に作成したコードはこちらです
create-react-appでプロジェクト作成
# mampルートへ移動
cd /Applications/MAMP/htdocs

# mampルートでreactのプロジェクトを作成する
npx create-react-app .

# 今回は簡単に見た目をかっこよくできる material-ui も使いました
yarn add @material-ui/core @material-ui/icons
Reactのプロジェクトを起動
yarn start
PHPで簡単にapiを作成
mampのルートにcreate-react-appでプロジェクトを作成しました。
そこにapiフォルダを作成して、phpでapiを動かすことにしました。
/api/以下のアクセスは必ず、./api/index.phpが読み込まれるように設定
RewriteEngine On
RewriteCond %{REQUEST_FILENAME} !-f
RewriteCond %{REQUEST_FILENAME} !-d
RewriteRule ^ index.php [QSA,L]
$ composer require vlucas/phpdotenv
<?php

require __DIR__ . '/../vendor/autoload.php';

$dotenv = Dotenv\Dotenv::create(dirname(__DIR__));
$dotenv->load();
$dotenv->required('DB_CONNECTION')->notEmpty();
$dotenv->required('DB_HOST')->notEmpty();
$dotenv->required('DB_DATABASE')->notEmpty();
$dotenv->required('DB_USERNAME')->notEmpty();
$dotenv->required('DB_PASSWORD')->notEmpty();

try{
    $pdo = new PDO(
        sprintf('%s:dbname=%s;host=%s;charset=utf8', getenv('DB_CONNECTION'), getenv('DB_DATABASE'), getenv('DB_HOST')),
        getenv('DB_USERNAME'),
        getenv('DB_PASSWORD'),
        [
            PDO::ATTR_ERRMODE => PDO::ERRMODE_EXCEPTION,
            PDO::ATTR_DEFAULT_FETCH_MODE => PDO::FETCH_ASSOC,
        ]
    );
    $pdo->exec(
        'CREATE TABLE IF NOT EXISTS todos (
            id   INT NOT NULL PRIMARY KEY AUTO_INCREMENT,
            text VARCHAR(255) NOT NULL
        );'
    );

    header('Content-Type: application/json; charset=utf-8');

    [, , $target] = $uri = explode('/', $_SERVER["REQUEST_URI"]);
    switch($target) {
        case 'list':
            echo json_encode($pdo->query('SELECT * FROM todos')->fetchAll());
            exit;
        case 'add':
            $stmt = $pdo->prepare('INSERT INTO todos(text) VALUES(?)');
            $stmt->execute([$_POST['text']]);
            json_encode(['res' => 'ok']);
            exit;
        case 'delete':
            $stmt = $pdo->prepare('DELETE FROM todos WHERE id = ?');
            $stmt->execute([end($uri)]);
            exit;
        default:
            http_response_code(404);
            echo '404 Not Found';
            exit;
    }
} catch (PDOException $e) {
    http_response_code(500);
}
APP_URL=http://localhost:3000
REACT_APP_API_URL=$APP_URL/api

DB_CONNECTION=mysql
DB_HOST=localhost
DB_DATABASE=testdb
DB_USERNAME=root
DB_PASSWORD=root
MAMPへproxyの設定をする
- create-react-appを使うとポート3000で起動
- mampはデフォルトでポート8888でサーバーが起動
なので、package.jsonで以下のように設定すると、
fetch(http://localhost:3000/api) のリクエストが、fetch(http://localhost:8888/api)へとproxyでうまくリクエストできました。
"proxy": "http://localhost:8888"
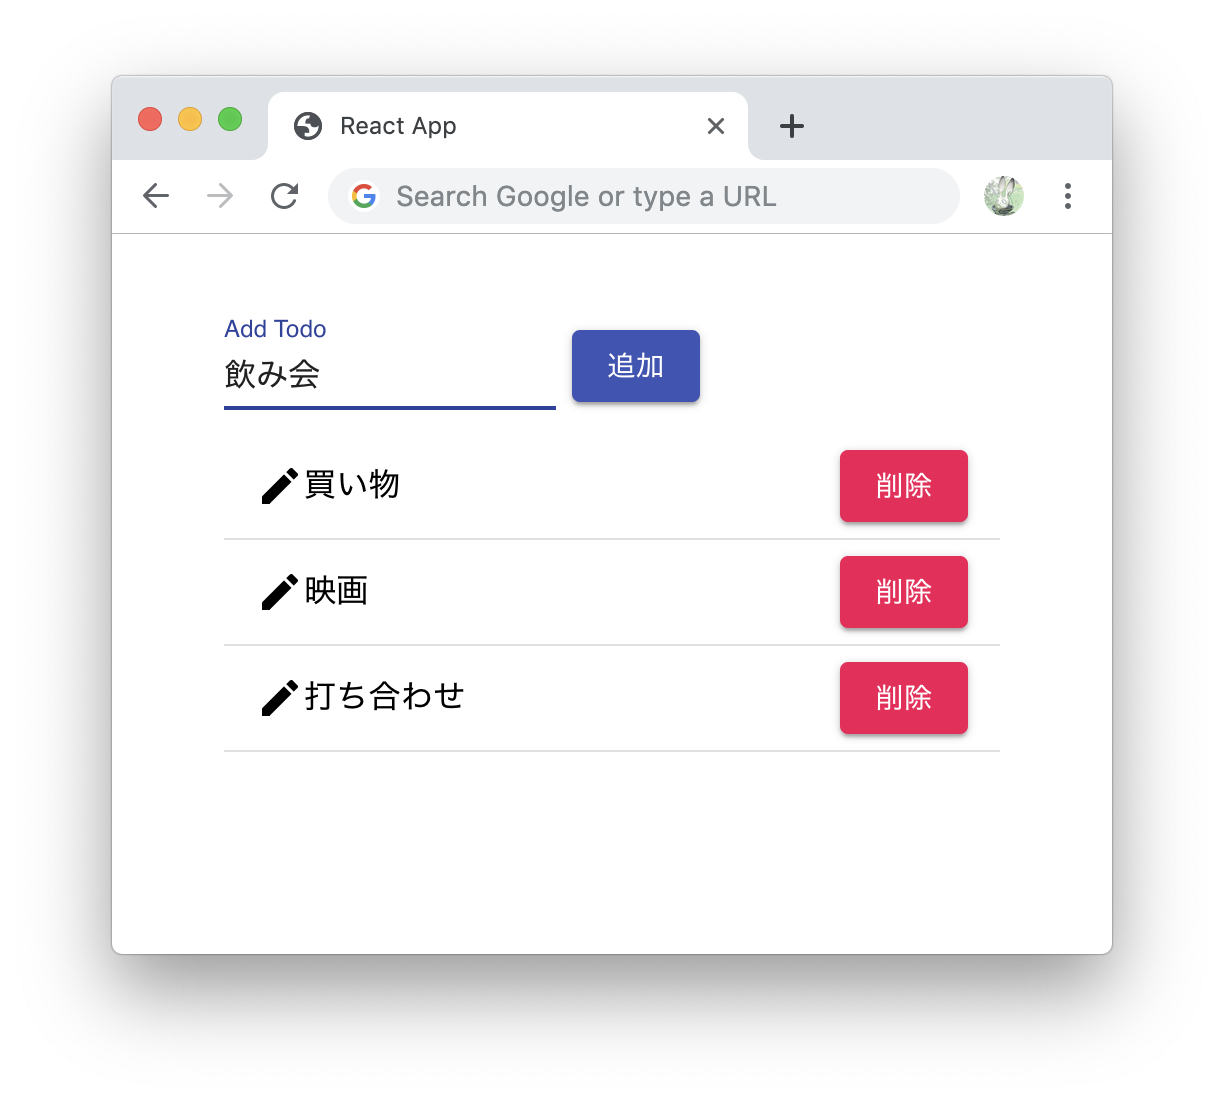
簡単にTodoリストを作成
Reactとphpのapiで簡単に動くものを作りました
import React, { useState, useEffect } from 'react';
import Container from '@material-ui/core/Container';
import Box from '@material-ui/core/Box';
import TodoHeader from './components/TodoHeader'
import TodoList from './components/TodoList'

function App() {
  const [text, setText] = useState('');
  const [todos, setTodos] = useState([]);
  const [isLoading, setIsLoading] = useState(true);

  useEffect(() => {
    getTodos()
  }, []);

  async function getTodos() {
    const res = await fetch(`${process.env.REACT_APP_API_URL}/list`)
    setIsLoading(false)
    setTodos(await res.json())
  }

  async function addTodo(e) {
    e.preventDefault()
    setIsLoading(true)
    await fetch(`${process.env.REACT_APP_API_URL}/add`, { method: 'POST', body: new FormData(e.target) })
    setText('')
    getTodos()
  }

  async function deleteTodo(id) {
    if (!window.confirm('削除しますか?')) {
      return;
    }
    setIsLoading(true)
    await fetch(`${process.env.REACT_APP_API_URL}/delete/${id}`, { method: 'POST' })
    getTodos()
  }

  return (
    <Container maxWidth="sm">
      <Box m={5}>
        <TodoHeader {...{ text, setText, addTodo }} />
        {isLoading ? <>Loading...</> : <TodoList {...{ todos, deleteTodo }} />}
      </Box>
    </Container>
  );
}

export default App;
import React from 'react';
import { makeStyles } from '@material-ui/core/styles';
import TextField from '@material-ui/core/TextField';
import Button from '@material-ui/core/Button';

const useStyles = makeStyles(theme => ({
    button: {
        margin: theme.spacing(1),
    },
}));

export default function TodoHeader({ text, setText, addTodo }) {
    const classes = useStyles();

    return (
        <form onSubmit={addTodo}>
            <TextField
                name="text"
                label="Add Todo"
                value={text}
                onChange={({ target : { value } }) => setText(value)}
            />
            <Button
                type="submit"
                variant="contained"
                color="primary"
                className={classes.button}
                disabled={!text.trim().length}
            >
                追加
            </Button>
        </form>
    )
}
import React,{ Fragment } from 'react';
import List from '@material-ui/core/List';
import ListItem from '@material-ui/core/ListItem';
import ListItemText from '@material-ui/core/ListItemText';
import Divider from '@material-ui/core/Divider';
import Button from '@material-ui/core/Button';
import CreateIcon from '@material-ui/icons/Create';

export default function TodoList({ todos, deleteTodo }) {
  return (
    <List>
      {todos.map(({ id, text }) => (
        <Fragment key={id}>
          <ListItem button>
            <CreateIcon />
            <ListItemText>{text}</ListItemText>
            <Button
              variant="contained"
              color="secondary"
              onClick={() => deleteTodo(id)}
            >
              削除
            </Button>
          </ListItem>
          <Divider />
        </Fragment>
      ))}
    </List>
  );
}
本番環境用に設定してみた
.env.productionを用意
APP_URL=http://localhost:3000
REACT_APP_API_URL=$APP_URL/api

DB_CONNECTION=mysql
DB_HOST=localhost
DB_DATABASE=testdb
DB_USERNAME=root
DB_PASSWORD=root
APP_URL=http://xxxxx.ne.jp
REACT_APP_API_URL=$APP_URL/api

DB_CONNECTION=mysql
DB_HOST=localhost
DB_DATABASE=testdb
DB_USERNAME=xxxxx
DB_PASSWORD=xxxxx
create-react-app
create-react-appだと、yarn startで.env が読み込まれ、 yarn build で .env.production が読み込まれますので、
特に考えずにそのままの設定で行いました
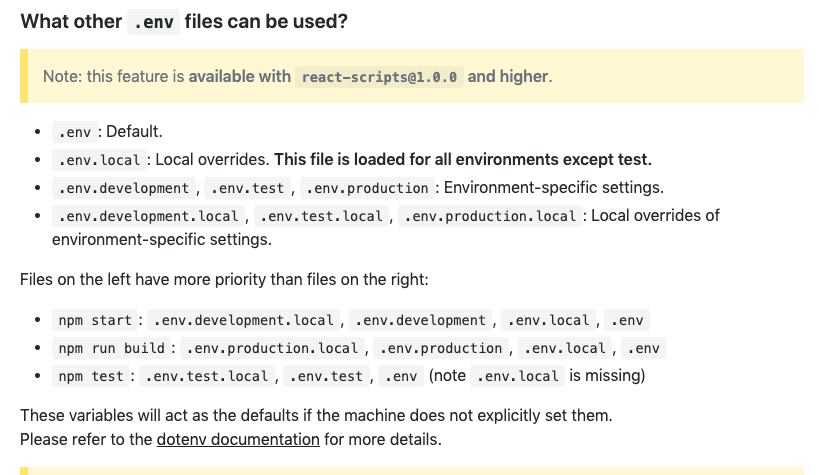
※.envの命名規則で読み込まれる順番なども決まるようです。
参考:https://create-react-app.dev/docs/adding-custom-environment-variables
php
開発環境では、.envを読み込み、本番環境では、.env.productionを.envにリネームして、それを読み込むという設定にしてみました。
設定はwebpackで行いました。
webpackの設定を追加
yarn buildするときに、作成されるbuildフォルダにphp関連のファイルもコピーされるようにします。
以下のPHP関連のファイルをコピー。
-
.env- 本番環境用に、
.env.productionを.envにリネームして、それをbuildフォルダにコピーされるようにする
- 本番環境用に、
api/index.phpvendor/
webpackでコピーするために、copy-webpack-pluginを使用します。
create-react-appにちょっと設定を追加するだけですので、ejectせずにreact-app-rewiredを使って設定を追加します。
yarn add -D react-app-rewired copy-webpack-plugin
package.jsonを変更
公式の内容に従って変更します
  "scripts": {
-    "start": "react-scripts start",
-    "build": "react-scripts build",
-    "test": "react-scripts test",
-    "eject": "react-scripts eject"
+    "start": "react-app-rewired start",
+    "build": "react-app-rewired build",
+    "test": "react-app-rewired test",
+    "eject": "react-app-rewired eject"
  },
config-overrides.jsを作成
const CopyWebpackPlugin = require('copy-webpack-plugin');

module.exports = function override(config, env) {
    if (!config.plugins) {
        config.plugins = [];
    }

    if (process.env.NODE_ENV === 'production') {
        config.plugins.push(new CopyWebpackPlugin([
            {from: 'api', to: 'api'},
            {from: 'vendor', to: 'vendor'},
            {from: '.env.production', to: '.env', toType: 'file'},
        ]));
    }

    return config;
}
この状態でyarn buildととするとうまくいきました
yarn build実行前
.
├── api # yarn buildするときに一緒にビルドのフォルダに送るようにする
│   ├── .htaccess
│   └── index.php
├── node_modules
├── .env # 開発環境の設定
├── .env.production # 本番環境の設定、yarn buildするときに.envにリネームして、一緒にビルドのフォルダに送るようにする
├── composer.json
├── composer.lock
├── README.md
├── package.json
├── public
├── src
├── vendor # yarn buildするときに一緒にビルドのフォルダに送るようにする
└── yarn.lock
↓↓↓↓↓yarn build実行↓↓↓↓↓
.
├── api
│   ├── .htaccess
│   └── index.php
├── build # yarn buildで作成されるフォルダ、本番環境へは、このフォルダの中をそのままアップロードするだけで動くようにする
│   ├── api
│   │   ├── .htaccess
│   │   └── index.php
│   ├── vendor
│   ├── .env # .env.productinをリネームして設置
│   └── index.html
│   ... # その他自動で作られるファイル
├── node_modules
├── .env
├── .env.production
├── composer.json
├── composer.lock
├── README.md
├── package.json
├── public
├── src
├── vendor
└── yarn.lock
buildフォルダ内をそのままレンタルサーバーにFTPでアップロードするだけで、動かすことができました。
最後まで見ていただいてありがとうございました。m(_ _)m