はじめに
クロスアカウトのCodePipeline の構築で、各サービスのロールのIAMポリシーやリソースベースポリシーを最小権限で実装しようとした場合、アカウント間のアクセス制御を、公式のユーザーガイドだけで理解して実装するのは少し難しいのかなと思います。(自分は、詰まりました。)
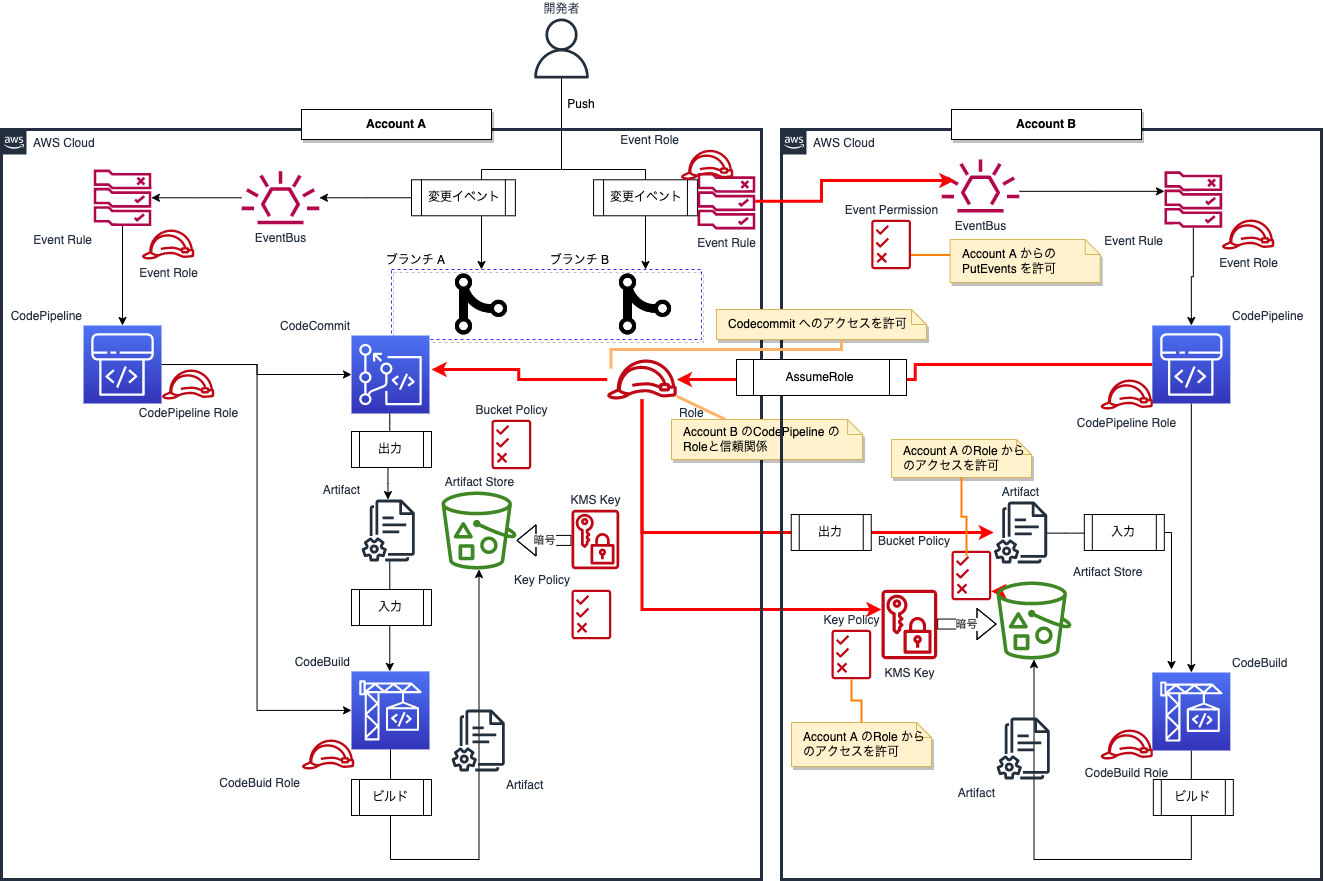
本記事では、クロスアカウントのCodePipeline を最小権限で構築するTerraform のコードとそのパイプライン(ビルドまで。)を図示してみましたので、参考までに、サンプルとして共有しますので、理解する手助けになればと思います。
また、補足として、アカウント間のアクセスを制御している各サービスのロールのIAM ポリシーやリソースベースポリシーについて、簡単に説明をしています。
Terraform で構築する全体構成図
Terraform のコードと構成
$ tree aws-tf-cross-account-codepipeline
aws-tf-cross-account-codepipeline
├── README.md
├── main.tf
└── modules
    └── codepipeline
        ├── Account_A-cloudwatch_event.tf
        ├── Account_A-codebuild.tf
        ├── Account_A-codecommit.tf
        ├── Account_A-codepipeline.tf
        ├── Account_A-iam.tf
        ├── Account_A-kms.tf
        ├── Account_A-s3.tf
        ├── Account_B-cloudwatch_event.tf
        ├── Account_B-codebuild.tf
        ├── Account_B-codepipeline.tf
        ├── Account_B-iam.tf
        ├── Account_B-kms.tf
        ├── Account_B-s3.tf
        ├── buildspec.yml
        ├── provider.tf
        ├── terraform.tf
        └── variables.tf
使い方
Terraform の動作確認環境
$ terraform --version
Terraform v1.1.9
on darwin_amd64
+ provider registry.terraform.io/hashicorp/aws v4.13.0
変数の設定
main.tf に下記の変数を設定します。
| 変数名 | 説明 |
|---|---|
| prefix | 各AWSのリソースに付与するプレフィックス |
| repository_name | CodeCommitのリポジトリ名(Account Aに作成されます) |
| profile | 各AWSのプロファイル名 |
| region | リージョン |
| env | 環境を識別するプレフィックス |
| branch_name | ブランチ名 |
module "codepipeline" {
  source = "./modules/codepipeline"

  # Project Prefix
  prefix = "prefix"
  # Codecommit Repository Name
  repository_name = "prefix-repository"

  # For example, a development account
  Account_A = {
    profile = "YOUR AWS ACCOUNT PROFILE NAME"
    region  = "ap-northeast-1"

    # Environment Prefix
    env = "dev"
    # Branch Name
    branch_name = "develop"
  }

  # For example, a production account
  Account_B = {
    profile = "YOUR AWS ACCOUNT PROFILE NAME"
    region  = "ap-northeast-1"

    # Environment Prefix
    env = "prd"
    # Branch Name
    branch_name = "master"
  }
}
Terraform の実行
$ terraform init
Initializing modules...
- codepipeline in modules/codepipeline

Initializing the backend...

Initializing provider plugins...
- Finding hashicorp/aws versions matching ">= 4.13.0"...
- Installing hashicorp/aws v4.13.0...
- Installed hashicorp/aws v4.13.0 (signed by HashiCorp)

Terraform has created a lock file .terraform.lock.hcl to record the provider
selections it made above. Include this file in your version control repository
so that Terraform can guarantee to make the same selections by default when
you run "terraform init" in the future.

Terraform has been successfully initialized!
$ terraform plan
.....省略
Plan: 46 to add, 0 to change, 0 to destroy.
$ terraform apply
....省略
Apply complete! Resources: 46 added, 0 changed, 0 destroyed.
補足:アカウント間のアクセス制御について
上記の全体構成図の中では、アカウント間のアクセスを赤矢印で示しているのですが、この部分を制御している各サービスのロールのIAM ポリシーやリソースベースポリシーについて説明します。
アカウント間のCodeCommit イベントに対するアクセス制御
アカウントAのCloudWatch EventのIAM ロールにCodeCommit イベントをアカウントBのEventBus にPutEvents できるIAM ポリシーを設定しています。
resource "aws_iam_role_policy" "Account_A_to_B" {
  provider = aws.Account_A
  name     = "${var.prefix}-${var.Account_B["env"]}-eventbus"
  role     = aws_iam_role.Account_A_to_B.id
  policy = jsonencode({
    Version : "2012-10-17",
    Statement : [
      {
        Effect : "Allow",
        Action : [
          "events:PutEvents"
        ],
        Resource : [
          "arn:aws:events:${var.Account_B["region"]}:${data.aws_caller_identity.Account_B.account_id}:event-bus/default"
        ]
      }
    ]
  })
}
アカウントBのEventBusに、アカウントAからアカウントBにPutEvents できる権限を設定しています。
resource "aws_cloudwatch_event_permission" "Account_A_to_B" {
  provider       = aws.Account_B
  principal      = data.aws_caller_identity.Account_A.account_id
  statement_id   = "CrossAccountAccess"
  action         = "events:PutEvents"
  event_bus_name = "default"
}
アカウント間のIAM ロールの信頼関係
アカウントAのIAM ロールとアカウントBのCodePipeline のIAM ロールとで信頼関係を設定しています。
アカウントA側
resource "aws_iam_role" "Account_B_codepipeline_codecommit" {
  provider = aws.Account_A
  name     = "${var.prefix}-${var.Account_B["env"]}-pipeline-commit"
  assume_role_policy = jsonencode({
    Version : "2012-10-17",
    Statement : [
      {
        Action : "sts:AssumeRole",
        Principal : {
          AWS : aws_iam_role.Account_B_codepipeline.arn
        },
        Effect : "Allow",
        Sid : ""
      }
    ]
  })
}
アカウントB側
resource "aws_iam_role_policy" "Account_B_codepipeline" {
  provider = aws.Account_B
  name     = "${var.prefix}-${var.Account_B["env"]}-pipeline"
  role     = aws_iam_role.Account_B_codepipeline.id

  policy = jsonencode({
    Version : "2012-10-17",
    Statement : [
      {
        Action : "sts:AssumeRole",
        Resource : aws_iam_role.Account_B_codepipeline_codecommit.arn,
        Effect : "Allow"
      },
      {
        Action : "sts:AssumeRole",
        Resource : aws_iam_role.Account_B_codepipeline_codebuild.arn,
        Effect : "Allow"
      }
    ]
  })
}
アカウント間のCodeCommit のリポジトリに対するアクセス制御
アカウントAのIAM ロールにアカウントAのCodeCommit のリポジトリへのアクセスを許可するIAM ポリシーを設定しています。
resource "aws_iam_role_policy" "Account_B_repository" {
  provider = aws.Account_A
  name     = "${var.prefix}-${var.Account_B["env"]}-codecommit-repository"
  role     = aws_iam_role.Account_B_codepipeline_codecommit.id

  policy = jsonencode({
    Version : "2012-10-17",
    Statement : [
      {
        Action : [
          "codecommit:GetBranch",
          "codecommit:GetCommit",
          "codecommit:UploadArchive",
          "codecommit:GetUploadArchiveStatus",
          "codecommit:CancelUploadArchive"
        ],
        Resource : aws_codecommit_repository.this.arn,
        Effect : "Allow"
      }
    ]
  })
}
アカウント間のアーティファクトストアに対するアクセス制御
アカウントAのIAM ロールにアカウントBのアーティファクトストアへのアクセスを許可するIAM ポリシーを設定しています。
resource "aws_iam_role_policy" "Account_B_artifact_store" {
  provider = aws.Account_A
  name     = "${var.prefix}-${var.Account_B["env"]}-artifact-store"
  role     = aws_iam_role.Account_B_codepipeline_codecommit.id

  policy = jsonencode({
    Version : "2012-10-17",
    Statement : [
      {
        Action : [
          "s3:Get*",
          "s3:Put*",
        ],
        Resource : "${aws_s3_bucket.Account_B.arn}/*",
        Effect : "Allow"
      },
      {
        Action : [
          "s3:ListBucket",
        ],
        Resource : aws_s3_bucket.Account_B.arn,
        Effect : "Allow"
      },
      {
        Action : [
          "kms:Decrypt",
          "kms:DescribeKey",
          "kms:Encrypt",
          "kms:ReEncrypt*",
          "kms:GenerateDataKey*"
        ],
        Resource : aws_kms_key.Account_B.arn,
        Effect : "Allow"
      }
    ]
  })
}
アカウント間のKMS キーに対するアクセス制御
アカウントAのIAM ロールからアカウントBのKMS キーへのアクセスを許可するキーポリシーを設定しています。
resource "aws_kms_key" "Account_B" {
  provider = aws.Account_B
  policy = jsonencode({
    Version : "2012-10-17",
    Statement : [
      {
        Effect : "Allow",
        Principal : {
          AWS : "arn:aws:iam::${data.aws_caller_identity.Account_B.account_id}:root"
        },
        Action : [
          "kms:Create*",
          "kms:Describe*",
          "kms:Enable*",
          "kms:List*",
          "kms:Put*",
          "kms:Update*",
          "kms:Revoke*",
          "kms:Disable*",
          "kms:Get*",
          "kms:Delete*",
          "kms:ScheduleKeyDeletion",
          "kms:CancelKeyDeletion",
          "kms:GenerateDataKey",
          "kms:TagResource",
          "kms:UntagResource"
        ],
        Resource : "*"
      },
      {
        Effect : "Allow",
        Principal : {
          AWS : [
            aws_iam_role.Account_B_codepipeline_codecommit.arn,
            aws_iam_role.Account_B_codebuild.arn,
        ] },
        Action : [
          "kms:Decrypt",
          "kms:DescribeKey",
          "kms:Encrypt",
          "kms:ReEncrypt*",
          "kms:GenerateDataKey*"
        ],
        Resource : "*"
      },
    ]
  })
}
アカウント間のアーティファクトストアに対するアクセス制御
アカウントAのIAM ロールからアカウントBのアーティファクトストアへのアクセスを許可するバケットポリシーを設定しています。
参考:CodePipeline 用に Amazon S3 に保存したアーティファクトのサーバー側の暗号化を設定する
resource "aws_s3_bucket_policy" "Account_B" {
  provider = aws.Account_B
  bucket   = aws_s3_bucket.Account_B.id
  policy = jsonencode({
    Version : "2012-10-17",
    Id : "SSEAndSSLPolicy",
    Statement : [
      {
        Sid : "DenyUnEncryptedObjectUploads",
        Effect : "Deny",
        Principal : "*",
        Action : "s3:PutObject",
        Resource : "${aws_s3_bucket.Account_B.arn}/*",
        Condition : {
          StringNotEquals : {
            "s3:x-amz-server-side-encryption" : "aws:kms"
          }
        }
      },
      {
        Sid : "DenyInsecureConnections",
        Effect : "Deny",
        Principal : "*",
        Action : "s3:*",
        Resource : "${aws_s3_bucket.Account_B.arn}/*",
        Condition : {
          Bool : {
            "aws:SecureTransport" : "false"
          }
        }
      },
      {
        Sid : "CodePipelineBucketPolicy",
        Effect : "Allow",
        Principal : {
          AWS : [
            aws_iam_role.Account_B_codepipeline_codecommit.arn,
            aws_iam_role.Account_B_codebuild.arn,
        ] },
        Action : [
          "s3:Get*",
          "s3:Put*"
        ],
        Resource : "${aws_s3_bucket.Account_B.arn}/*",
      },
      {
        Sid : "CodePipelineBucketListPolicy",
        Effect : "Allow",
        Principal : {
          AWS : [
            aws_iam_role.Account_B_codepipeline_codecommit.arn,
            aws_iam_role.Account_B_codebuild.arn,
        ] },
        Action : "s3:ListBucket",
        Resource : aws_s3_bucket.Account_B.arn,
      }
    ]
  })
}
さいごに
少しでも理解する手助けになれば幸いです。
参考サイト
下記の記事が大変参考になりました。
Terraform もこちらの記事を参考にカスタマイズさせていただきました。
