はじめに
本記事では、TerraformでElastiCache for Redisの検証環境を構築する手順について記載しています。
全体構成図
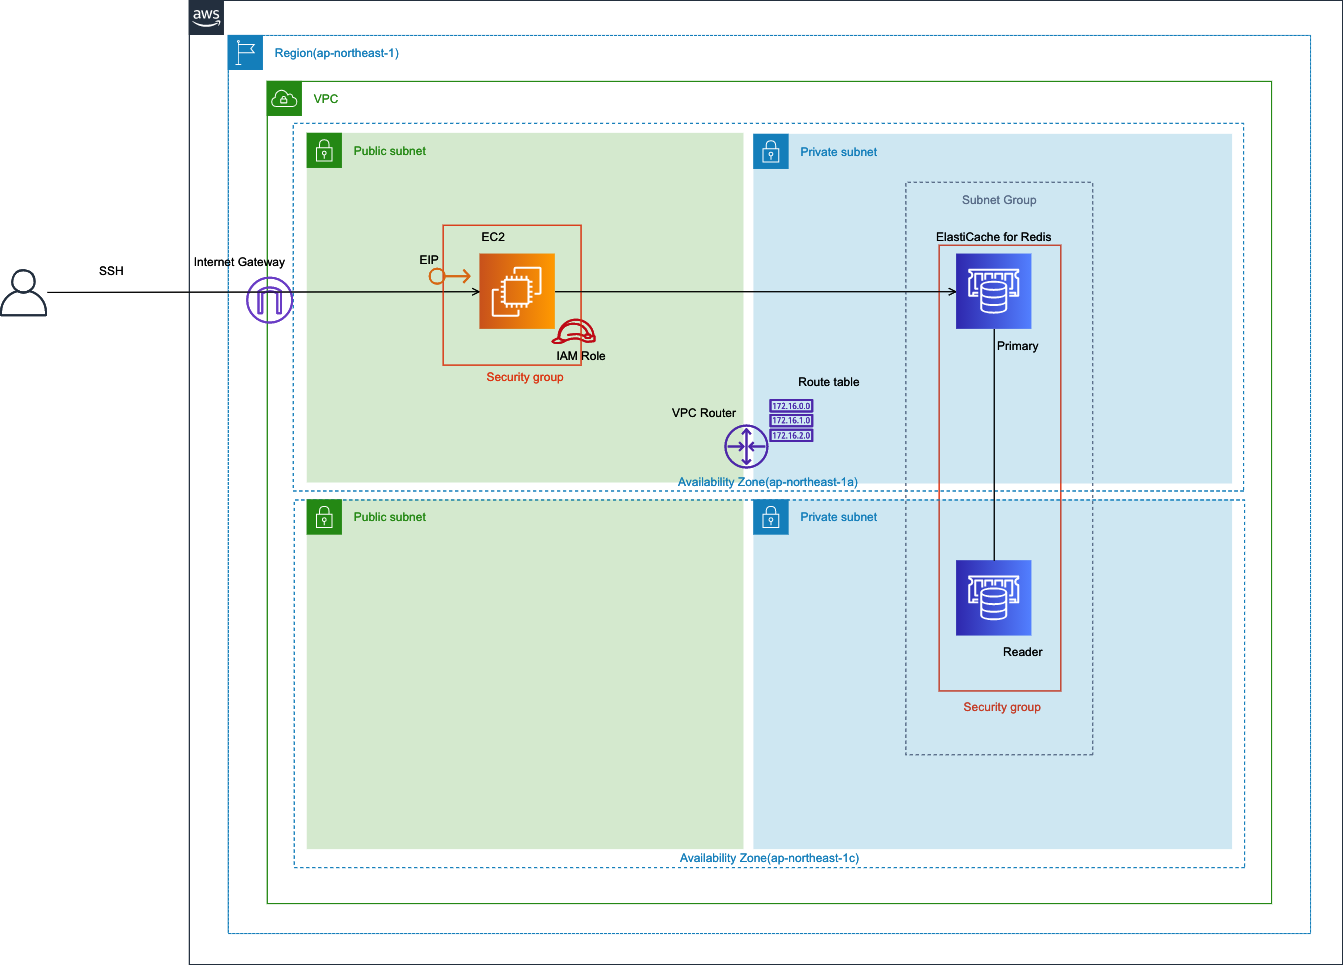
本環境での ElastiCache for Redisのクラスターモードは無効の構成になります。
事前に読んでおくと良い資料
ElastiCache のBlackBeltの資料
Amazon ElastiCache のリソース
Redis クライアントのインストール手順
Terraform のコードと構成
$ tree aws-tf-elasticahe-test-infra
aws-tf-elasticahe-test-infra
├── modules
│   ├── network
│   │   ├── vpc.tf
│   │   ├── internet_gateway.tf
│   │   ├── subnet.tf
│   │   ├── route_table.tf
│   │   ├── variables.tf
│   │   ├── outputs.tf
│   ├── ec2
│   │   ├── instance.tf
│   │   ├── user_data.sh
│   │   ├── eip.tf
│   │   ├── security_group.tf
│   │   ├── iam_role.tf
│   │   ├── ec2_trust_policy.json
│   │   ├── variables.tf
│   │   └── outputs.tf
│   └── elasticahe
│       ├── replication_group.tf
│       ├── subnet_group.tf
│       ├── security_group.tf
│       ├── variables.tf
│       └── outputs.tf
├── main.tf
├── provider.tf
├── terraform.tfvars.org
├── variables.tf
└── outputs.tf
Terraform で構築する各リソース名
| リソース | 名前(デフォルト) |
|---|---|
| VPC 名 | elasticache-test-vpc |
| インターネットゲートウェイ名 | elasticahe-test-igw |
| パブリック サブネット名 | elasticahe-test-public-a elasticahe-test-public-c |
| プライベート サブネット名 | elasticahe-test-private-a elasticahe-test-private-c |
| EC2 インスタンス名 | elasticache-test-ec2 |
| EC2 EIP名 | elasticache-test-eip |
| EC2 セキュリティグループ名 | elasticache-test-ec2-sg |
| EC2 IAM ロール名 | elasticache-test-ec2-role |
| elasticahe クラスター名 | elasticahe-test-redis |
| elasticahe サブネットグループ名 | elasticahe-test-redis-subnet |
| elasticahe セキュリティグループ名 | elasticahe-test-redis-sg |
事前準備
・Terraform のインストール
・tfenv のインストール
・Terraform を実行するための IAM のアクセスキーとシークレットキー
Terraform の動作確認環境
$ terraform -version
Terraform v1.0.0
on darwin_amd64
+ provider registry.terraform.io/hashicorp/aws v3.52.0
Terrraform で環境を構築する手順
本手順は、Mac環境で実施することを想定しています。
Terraformのコードをダウンロードします。
git clone https://github.com/okubo-t/aws-tf-elasticahe-test-infra.git
Terraform のコードがあるディレクトへ移動します。
$ cd aws-tf-elasticahe-test-infra/
terraform.tfvars ファイルを作成します。
$ cp -p terraform.tfvars.org terraform.tfvars
作成した terraform.tfvars 内の各パラメータを環境に応じて、任意で変更します。(下記のキーはサンプルです。)
# アクセスキー
aws_access_key = "AKIAIOSFODNN7EXAMPLE"

# シークレットキー
aws_secret_key = "wJalrXUtnFEMI/K7MDENG/bPxRfiCYEXAMPLEKEY"

# リージョン
aws_region = "ap-northeast-1"

# リソース名のプレフィックス
prefix = "elasticahe"

# リソースの環境
env = "test"

# EC2に SSHアクセスする時の送信元 IPアドレス
remote_ip = "0.0.0.0/0"

# SSH キー名
key_name = "key name"
下記コマンドで、Terraform の初期設定をします。
$ terraform init
各リソースのパラメーターを調整したい場合は、下記のファイルのパラメータを修正してください。
module "network" {
  source = "./modules/network"

  vpc = {
    name = "${var.prefix}-${var.env}-vpc"
    cidr = "10.0.0.0/16"
  }

  igw_name = "${var.prefix}-${var.env}-igw"

  public_subnet_a = {
    name = "${var.prefix}-${var.env}-public-a"
    cidr = "10.0.1.0/24"
  }

  public_subnet_c = {
    name = "${var.prefix}-${var.env}-public-c"
    cidr = "10.0.2.0/24"
  }

  private_subnet_a = {
    name = "${var.prefix}-${var.env}-private-a"
    cidr = "10.0.10.0/24"
  }

  private_subnet_c = {
    name = "${var.prefix}-${var.env}-private-c"
    cidr = "10.0.20.0/24"
  }
}

# get latest ami Id for amazonlinux2
data "aws_ssm_parameter" "amzn2_ami_latest" {
  name = "/aws/service/ami-amazon-linux-latest/amzn2-ami-hvm-x86_64-gp2"
}
module "ec2" {
  source = "./modules/ec2"

  ## network
  vpc_id    = module.network.vpc_id
  subnet_id = module.network.public_subnet_a_id
  remote_ip = var.remote_ip

  ## base
  ec2_name      = "${var.prefix}-${var.env}-ec2"
  ami_id        = data.aws_ssm_parameter.amzn2_ami_latest.value
  instance_type = "t3.micro"
  volume_size   = 30
  key_name      = var.key_name

}

module "elasticahe" {
  source = "./modules/elasticahe"

  ## network
  vpc_id         = module.network.vpc_id
  vpc_cidr_block = module.network.vpc_cidr_block
  subnet_ids = [
    module.network.private_subnet_a_id,
    module.network.private_subnet_c_id,
  ]

  ## base for redis(cluster mode disabled)
  cluster_name          = "${var.prefix}-${var.env}-redis"
  node_type             = "cache.t3.micro"
  engine_version        = "5.0.6"
  family                = "redis5.0"
  number_cache_clusters = 2

  ## not available for t1/t2 instances
  automatic_failover_enabled = true

  ## automatic Failover must also be enabled
  multi_az_enabled = true

}
下記コマンドで、環境のデプロイを実行します。
$ terraform apply
デプロイ後に出力される Outputsの内容をメモします。(下記の値は例です。)
Apply complete! Resources: 23 added, 0 changed, 0 destroyed.

Outputs:

instance_eip = "xxx.xxx.xxx.xxx"
primary_endpoint_address = "elasticahe-test-redis.xxxxx.ng.0001.apne1.cache.amazonaws.com"
reader_endpoint_address = "elasticahe-test-redis-ro.xxxxxx.ng.0001.apne1.cache.amazonaws.com"
これで、Terraformによる環境の構築は完了です。
下記コマンドで、構築されたAWS環境のコンポーネントを確認できます。
$ terraform state list
簡単な ElastiCache for Redis の検証例
構築したEC2に SSHアクセスします。(instance_eip は、メモしたOutputsの内容です。)
$ ssh -i {SSH キー名} ec2-user@{instance_eip}
下記コマンドで、ElastiCahe に接続します。(primary_endpoint_address は、メモしたOutputsの内容です。)
redis-cli はインストール済みです。(module/ec2/user_data.sh 参照)
$ ./redis-stable/src/redis-cli -h {primary_endpoint_address} -p 6379
elasticahe-test-redis.xxxxx.ng.0001.apne1.cache.amazonaws.com:6379>
値をsetします。
elasticahe-test-redis.xxxxxx.ng.0001.apne1.cache.amazonaws.com:6379> set key1 "value1"
OK
elasticahe-test-redis.xxxxxx.ng.0001.apne1.cache.amazonaws.com:6379> get key1
"value1"
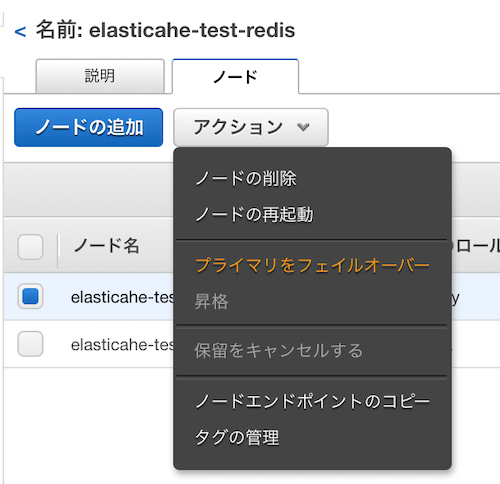
管理コンソールから、プライマリノードを選択して、[アクション] > [プライマリをフェイルオーバー]を実行します。
フェイルオーバー中に、 ElastiCaheに接続を試みます。> 接続できない。
$ ./redis-stable/src/redis-cli -h elasticahe-test-redis.xxxxxx.ng.0001.apne1.cache.amazonaws.com -p 6379
フェイルオーバー完了後、 ElastiCaheに再接続して、値が維持されているか確認します。 > 維持されている。
$ ./redis-stable/src/redis-cli -h elasticahe-test-redis.xxxxxx.ng.0001.apne1.cache.amazonaws.com -p 6379
elasticahe-test-redis.xxxxxx.ng.0001.apne1.cache.amazonaws.com:6379> get key1
"value1"
後片付け
下記コマンドで、Terraform で作成したAWS環境を削除します。
$ terraform destroy
さいごに
少しでも ElastiCache for Redisの検証に役立てれば幸いです。
参考記事