はじめに
未だに報告資料、表計算、何かしらの一覧を作る時によくエクセル使ってます。
その中でも、テキストファイルを加工して一覧にしたりします。
区切り位置指定したりVBAでも良いですが操作が煩雑であったり、exe化したいです。
ツール作りに時間かかってしまっては本末転倒しそうなので、
ざっくりですがpythonで作る事にしました。
また同じようなもの作るかもしれないので、後学のために作り方残しておきます。
自分用に作った記事なので、分かりにくい点や情報、技術が古いかもしれませんがご了承ください![]()
簡易ツールは以下のGIFのようになります。
※そのまま載せれないので、一般化してます![]()

テキストファイルを2つ読み込んで、加工してエクセルに出力します。
参考文献
この記事を作るにあたって参考にさせて頂きました![]()
環境
Windows 10
Python 3.7.7
簡易ツールについて
できること
テキストファイル読み込んで、加工してフォーマットに合わせてエクセルに出力。それだけ![]()

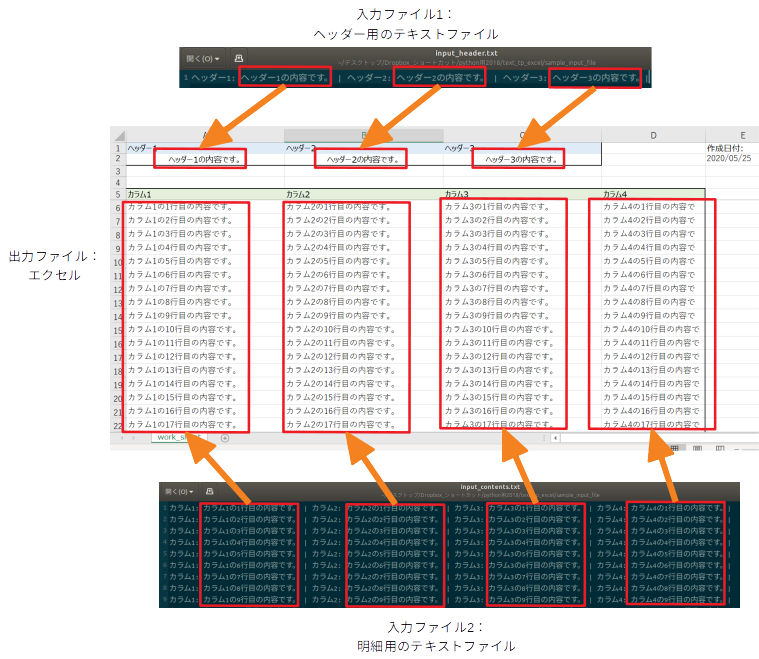
(入力)テキストファイル
入力ファイルは「|」で区切られていて、さらにその中を「:」でラベルと内容に分けています。
ヘッダー1: ヘッダー1の内容です。 | ヘッダー2: ヘッダー2の内容です。 | ヘッダー3: ヘッダー3の内容です。|
カラム1: カラム1の1行目の内容です。 | カラム2: カラム2の1行目の内容です。 | カラム3: カラム3の1行目の内容です。 | カラム4: カラム4の1行目の内容です。|
カラム1: カラム1の2行目の内容です。 | カラム2: カラム2の2行目の内容です。 | カラム3: カラム3の2行目の内容です。 | カラム4: カラム4の2行目の内容です。|
カラム1: カラム1の3行目の内容です。 | カラム2: カラム2の3行目の内容です。 | カラム3: カラム3の3行目の内容です。 | カラム4: カラム4の3行目の内容です。|
カラム1: カラム1の4行目の内容です。 | カラム2: カラム2の4行目の内容です。 | カラム3: カラム3の4行目の内容です。 | カラム4: カラム4の4行目の内容です。|
カラム1: カラム1の5行目の内容です。 | カラム2: カラム2の5行目の内容です。 | カラム3: カラム3の5行目の内容です。 | カラム4: カラム4の5行目の内容です。|
カラム1: カラム1の6行目の内容です。 | カラム2: カラム2の6行目の内容です。 | カラム3: カラム3の6行目の内容です。 | カラム4: カラム4の6行目の内容です。|
カラム1: カラム1の7行目の内容です。 | カラム2: カラム2の7行目の内容です。 | カラム3: カラム3の7行目の内容です。 | カラム4: カラム4の7行目の内容です。|
カラム1: カラム1の8行目の内容です。 | カラム2: カラム2の8行目の内容です。 | カラム3: カラム3の8行目の内容です。 | カラム4: カラム4の8行目の内容です。|
カラム1: カラム1の9行目の内容です。 | カラム2: カラム2の9行目の内容です。 | カラム3: カラム3の9行目の内容です。 | カラム4: カラム4の9行目の内容です。|
カラム1: カラム1の10行目の内容です。 | カラム2: カラム2の10行目の内容です。 | カラム3: カラム3の10行目の内容です。 | カラム4: カラム4の10行目の内容です。|
(出力)エクセルの中身
以下のように入力ファイル1と入力ファイル2を組み合わせて、
エクセルのセルにデータを加工してセットします。
入力ファイルの各内容は「:」と「|」で区切られているので正規表現を使って抽出します。
また、エクセルの罫線等の書式はフォーマットとして別エクセルを読み込んでいます。
プログラムの中身
以下、プログラムです。
$\tiny{※凝視したらダメです}$![]()
GUIにしたかったので、一番簡単そうなTkinterを使ってみました。
また、エクセルファイルを操作するライブラリ「openpyxl」を使っています。
事前に"pip install openpyxl"等でインストール必要があります。
テキストファイルを読み込みますが、文字コードがutf-8の場合は、
encoding引数にutf-8を指定しない正常に読み取れないと思います。
それ以外は、テキストファイルから所定の項目を取得する時に正規表現使っています。
パターン網羅できていないので抜けあると思いますが、ご了承ください![]()
import openpyxl, pprint
import re
from datetime import datetime

import os,sys
from tkinter import *
from tkinter import ttk
from tkinter import filedialog
from tkinter import messagebox
from datetime import datetime

def get_item_value(key_word, sentence, suffix=":", item_delimiter="\\|"):
    if key_word is None or len(key_word) == 0:
        return ""
    else:
        m = re.match(r'(.*)(' + key_word + suffix + ')(.*?)(' + item_delimiter + ')', sentence)
        if m:
            return m.group(3).strip()
        else:
            return ""

def write_to_execel(start_row_pos,sentence, ws_app, key_word_list, start_col_pos=1):
    for x_add, cell_key_word in enumerate(key_word_list[0]):
        item_val = get_item_value(cell_key_word.value, sentence)

        if 0 == len(item_val): continue
        ws_app.cell(row=start_row_pos, column=start_col_pos + x_add, value=item_val)

# 参照ボタン1 クリック時の処理
def ref1_button_clicked():
    fTyp = [("","*")]
    iDir = os.path.abspath(os.path.dirname(__file__))
    filepath = filedialog.askopenfilename(filetypes = fTyp,initialdir = iDir)
    file1.set(filepath)

# 参照ボタン2のクリック時の処理
def ref2_button_clicked():
    fTyp = [("","*")]
    iDir = os.path.abspath(os.path.dirname(__file__))
    filepath = filedialog.askopenfilename(filetypes = fTyp,initialdir = iDir)
    file2.set(filepath)

# button2クリック時の処理
def make_excel():
    ref1_input_path = file1.get()
    ref2_input_path = file2.get()

    file_input = "format/fmt_sample_form1.xlsx" # フォーマット
    file_output= "output/sample_form1_out.xlsx"  # 出力するエクセル

    wb_app = openpyxl.load_workbook(file_input)
    ws_app = wb_app["work_sheet"] # シートを選ぶ

    key_word_list_header = ws_app["A1:C1"] # 任意の範囲を取得
    key_word_list_contents = ws_app["A5:D5"] # 任意の範囲を取得

    # サンプルファイル(input_contents.txt) テキストファイル読み込み
    # utf-8を読み込む場合 → with open(ref1_input_path, 'r',encoding='utf-8') as f_ref1:
    with open(ref1_input_path, 'r') as f_ref1:
        header_info_list_file = f_ref1.readlines()

    # サンプルファイル(input_header.txt) テキストファイル読み込み
    # utf-8を読み込む場合 → with open(ref2_input_path, 'r',encoding='utf-8') as f_ref1:
    with open(ref2_input_path, 'r') as f_ref2:
        contents_info_list_file = f_ref2.readlines()

    cdate = datetime.now().strftime("%Y/%m/%d")
    ws_app["E2"].value = cdate

    # エクセルファイル書き込み(header部分)
    start_row_pos = 2
    for header_info in header_info_list_file:
        if header_info is not None and 0 < len(header_info) and '\n' != header_info:
            write_to_execel(start_row_pos, header_info, ws_app, key_word_list_header)
            start_row_pos += 1

    # エクセルファイル書き込み(contents部分)
    start_row_pos = 6
    for contents_info in contents_info_list_file:
        if contents_info is not None and 0 < len(contents_info) and '\n' != contents_info:
            write_to_execel(start_row_pos, contents_info, ws_app, key_word_list_contents)
            start_row_pos += 1

    # エクセルファイル保存
    wb_app.save(file_output)
    messagebox.showinfo('便利ツール', u'エクセル作成 完了しました。')

# main関数呼び出し
if __name__ == "__main__":
    # rootの作成
    root = Tk()
    root.title('エクセルの作成')
    root.resizable(False, False)

    # Frame1の作成
    frame1 = ttk.Frame(root, padding=10)
    frame1.grid()

    # 参照ボタン1の作成
    button1 = ttk.Button(frame1, text=u'参照', command=ref1_button_clicked)
    button1.grid(row=0, column=3)

    # ラベルの作成
    # 「ファイル」ラベルの作成
    s1 = StringVar()
    s1.set('header情報のファイル : ')
    label1 = ttk.Label(frame1, textvariable=s1)
    label1.grid(row=0, column=0)

    # 参照ファイルパス表示ラベルの作成
    file1 = StringVar()
    file1_entry = ttk.Entry(frame1, textvariable=file1, width=50)
    file1_entry.grid(row=0, column=2)

    # 参照ボタン2の作成
    button2 = ttk.Button(frame1, text=u'参照', command=ref2_button_clicked)
    button2.grid(row=1, column=3)

    # ラベルの作成
    # 「ファイル」ラベルの作成
    s2 = StringVar()
    s2.set('content情報のファイル : ')
    label1 = ttk.Label(frame1, textvariable=s2, padding=5)
    label1.grid(row=1, column=0)

    # 参照ファイルパス表示ラベルの作成
    file2 = StringVar()
    file2_entry = ttk.Entry(frame1, textvariable=file2, width=50)
    file2_entry.grid(row=1, column=2)

    # Frame2の作成
    frame2 = ttk.Frame(root, padding=(0,5))
    frame2.grid(row=1)

    # Startボタンの作成
    button2 = ttk.Button(frame2, text='エクセル作成', command=make_excel)
    button2.pack(side=LEFT)

    # Cancelボタンの作成
    button3 = ttk.Button(frame2, text='閉じる', command=sys.exit)
    button3.pack(side=LEFT)

    root.mainloop()
実行方法
以下のコマンドを実行すれば、GUIが立ち上がるはずです。
python text_to_excel_tool.py
exeファイルの作り方
配布する時などexeファイルが良いと思うのでexe化します。
exe化するためにPyInstaller使います。
インストールします。
pip install pyinstaller
インストールできたら、以下コマンドでexe化します。
pyinstaller text_to_excel_tool.py --onefile --noconsole