
ボクセル崩し的なゲームをUnityで作ってみたくて画像データから3Dのボクセルに変換する方法をChat GPT-4に質問したのがきっかけでした。
Chat GPT-4が提案する画像データからボクセル生成
何度か質問して以下のやり方がChat GPTから提案されました。
・MagicaVoxelやQubicle Contructorのツールの提案
・Blenderの機能でDisplaceやRemeshを使っての提案
・Blenderのスクリプトやプラグインでの提案
提案されたツールの検証
MagicaVoxelを試したところ画像から直接ボクセルの生成は出来ず、画像を下絵としてキューブを配置する形で作るやり方になるためボクセル作成に時間がかかりそうだったので却下しました。
Qubicle Contructorは以下のような形で画像から直接ボクセル生成ができましたが、FBXなどの出力が有料だったので保留としました。

BlenderのDisplaceとRemeshの検証
Chat GPTは詳細な手順を提案してくれます。
Blenderでドット絵をボクセル風の3Dモデルに変換するには、以下の手順を参照してください。これは「Remesh」モディファイアを使用し、ドット絵の画像を一連の3Dキューブ(ボクセル)に変換します。

**1. 新しい平面を作成する**
まずBlenderを開き、新しいシーンを作成します。その後、「Shift + A」を押して、オブジェクトメニューを開き、「Mesh」から「Plane」を選択して、新しい平面を作成します。

**2. マテリアルの作成とテクスチャの設定**
新しい平面を選択し、「Material Properties」から新しいマテリアルを作成します。次に、「Base Color」の右にあるドットをクリックして、「Image Texture」を選択します。そして「Open」をクリックして、ドット絵のイメージを選択します。

**3. 平面をサブディビジョンサーフェスで分割する**
プロパティパネルのモディファイアタブで、「Subdivision Surface」モディファイアを追加します。その後、「Simple」モードを選択し、サブディビジョンのレベルを調整します。レベルはドット絵の解像度に基づいて設定します。

**4. 「Displace」モディファイアを追加する**
次に「Displace」モディファイアを追加します。そして、「Texture Coordinate」を「UV」に、そして「Texture」で先ほど作成したイメージテクスチャを選択します。「Strength」設定を調整して、モデルの高さを制御します。

**5. 「Remesh」モディファイアを追加する**
次に、「Remesh」モディファイアを追加します。そして、「Mode」を「Blocks」に設定します。「Octree Depth」を調整して、モデルの詳細度を制御します。

**6. モデルの確認**
最後に、3Dビューポートでモデルを確認します。

以上の手順で、Blenderを使ってドット絵からボクセル風の3Dモデルを作成することができます。
これらの手順の中でやり方がわからない箇所があればChat GPTに詳細を質問することでネットで検索することなく問題を解決できます。
このやり方でできたものが以下になります。Displaceの機能で色によって深度を決定されて凸凹のメッシュになりますが、イメージしていたボクセルにはできなそうだったので却下しました。

Blenderのスクリプトの検証(メイン)
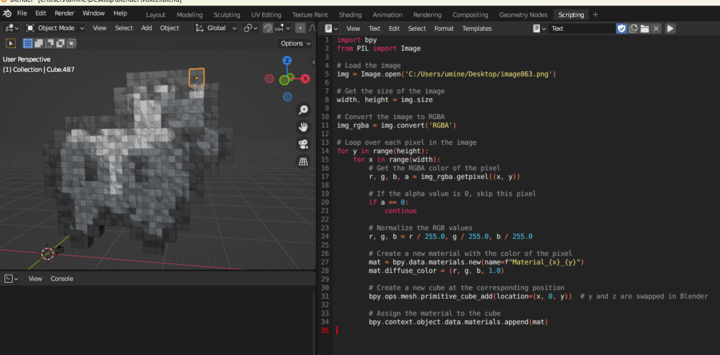
最初に提案されたスクリプトでかなり精度の高いボクセルが作れました。
import bpy
from PIL import Image

# Load the image
img = Image.open('dot_art.png')

# Get the size of the image
width, height = img.size

# Convert the image to RGB
img_rgb = img.convert('RGB')

# Loop over each pixel in the image
for y in range(height):
    for x in range(width):
        # Get the RGB color of the pixel
        r, g, b = img_rgb.getpixel((x, y))

        # Normalize the RGB values
        r, g, b = r / 255.0, g / 255.0, b / 255.0

        # Create a new material with the color of the pixel
        mat = bpy.data.materials.new(name=f"Material_{x}_{y}")
        mat.diffuse_color = (r, g, b, 1.0)

        # Create a new cube at the corresponding position
        bpy.ops.mesh.primitive_cube_add(location=(x, 0, y))  # y and z are swapped in Blender

        # Assign the material to the cube
        bpy.context.object.data.materials.append(mat)

図のように画像データに合わせてキューブがピクセル単位で整列して色まで付けてくれています。
ここから自分のイメージしていたボクセルを作るため、Chat GPTにスクリプトの修正依頼を行い改善させていきます。
リクエスト1:アルファ0のピクセルにはキューブを生成しない
スクリプトは正しく動作しました。ありがとう。ドット絵のアルファチャンネルが0だったらキューブを生成したくないので、そのスクリプトを改造してアルファチャンネルが0だったらキューブを生成しないようにできますか?。
すぐにコメント付きでコードを出力してくれました
リクエスト2:180度回転して出力させる
正しく動作しました。キューブの生成が画像の180度回転した位置に生成されました。キューブの生成を画像と同じ向きにするため、180度回転した位置に生成できるようにコードを直してもらえますか?
import bpy
from PIL import Image

# Load the image
img = Image.open('dot_art.png')

# Get the size of the image
width, height = img.size

# Convert the image to RGBA
img_rgba = img.convert('RGBA')

# Loop over each pixel in the image
for y in range(height):
    for x in range(width):
        # Get the RGBA color of the pixel
        r, g, b, a = img_rgba.getpixel((x, y))

        # If the alpha value is 0, skip this pixel
        if a == 0:
            continue

        # Normalize the RGB values
        r, g, b = r / 255.0, g / 255.0, b / 255.0

        # Create a new material with the color of the pixel
        mat = bpy.data.materials.new(name=f"Material_{x}_{y}")
        mat.diffuse_color = (r, g, b, 1.0)

        # Create a new cube at the corresponding position
        # Subtract y from the height of the image to rotate the image 180 degrees
        bpy.ops.mesh.primitive_cube_add(location=(x, 0, height - y))  # y and z are swapped in Blender

        # Assign the material to the cube
        bpy.context.object.data.materials.append(mat)
上記のコードでは、キューブを生成する際のY座標(BlenderでのZ座標)を height - y としています。これにより、キューブの生成位置が画像の180度回転した位置になるように調整しています。
リクエスト3:キューブが重ならないように配置
スクリプトで生成されたキューブを確認したところ、隣り合うキューブが干渉しあっていました。干渉しないように配置できるようにスクリプトを直せますか?
import bpy
from PIL import Image

# Load the image
img = Image.open('dot_art.png')

# Get the size of the image
width, height = img.size

# Convert the image to RGBA
img_rgba = img.convert('RGBA')

# Loop over each pixel in the image
for y in range(height):
    for x in range(width):
        # Get the RGBA color of the pixel
        r, g, b, a = img_rgba.getpixel((x, y))

        # If the alpha value is 0, skip this pixel
        if a == 0:
            continue

        # Normalize the RGB values
        r, g, b = r / 255.0, g / 255.0, b / 255.0

        # Create a new material with the color of the pixel
        mat = bpy.data.materials.new(name=f"Material_{x}_{y}")
        mat.diffuse_color = (r, g, b, 1.0)

        # Create a new cube at the corresponding position
        # Subtract y from the height of the image to rotate the image 180 degrees
        bpy.ops.mesh.primitive_cube_add(location=(x, 0, height - y), size=1.0)  # y and z are swapped in Blender, size is set to 1.0

        # Assign the material to the cube
        bpy.context.object.data.materials.append(mat)
Blenderのデフォルトのキューブサイズは辺が2ユニットなので、位置を1ユニットずつずらすとキューブが重なってしまいます。
このコードでは bpy.ops.mesh.primitive_cube_add 関数に size=1.0 を追加して、新たに生成するキューブの大きさを1ユニットに設定しています。これにより、キューブ同士が重ならないようになります。

FBX出力したデータをUnity上で取り込み、きれいにボクセルデータが並んでいることが確認できます。
リクエスト4:凸凹の配置にしてボクセル感を際立たせる
ボクセルがたくさんのキューブで作られていることを目立たせたいのでキューブの生成時に少しだけY座標をランダムでずらすようにスクリプトを修正してもらえますか?
import bpy
from PIL import Image
import random

# Load the image
img = Image.open('dot_art.png')

# Get the size of the image
width, height = img.size

# Convert the image to RGBA
img_rgba = img.convert('RGBA')

# Loop over each pixel in the image
for y in range(height):
    for x in range(width):
        # Get the RGBA color of the pixel
        r, g, b, a = img_rgba.getpixel((x, y))

        # If the alpha value is 0, skip this pixel
        if a == 0:
            continue

        # Normalize the RGB values
        r, g, b = r / 255.0, g / 255.0, b / 255.0

        # Create a new material with the color of the pixel
        mat = bpy.data.materials.new(name=f"Material_{x}_{y}")
        mat.diffuse_color = (r, g, b, 1.0)

        # Generate a random Y offset
        y_offset = random.uniform(-0.1, 0.1)  # change this range as needed

        # Create a new cube at the corresponding position with the random Y offset
        bpy.ops.mesh.primitive_cube_add(location=(x, y_offset, height - y), size=1.0)  # y and z are swapped in Blender, size is set to 1.0

        # Assign the material to the cube
        bpy.context.object.data.materials.append(mat)
このコードでは、random.uniform(-0.1, 0.1) を使用して、キューブのY座標をランダムにずらす量(y_offset)を生成しています。この範囲はお好みに応じて調整してください。範囲を広くすると、キューブのずれが大きくなりますし、範囲を狭くすると、ずれが小さくなります。
ランダムで配置することでボクセル感が増します。
最後にChat GPTへフィードバック
私は正しい結果、間違った結果のフィードバックをすることでChat GPTもより正確なデータを出してくれることを期待してなるべく結果を答えるようにしています。
