対象読者
- ディープラーニングを触ったことがある方
- 姿勢推定に興味がある方
- mmposeを使ったことない方
- 様々な姿勢推定モデルを使ってみたい方
- 論文執筆等で他の姿勢推定モデルと比較したい方
mmposeってなに?
皆さんはmmposeをご存知でしょうか?もっと有名な、mmdetection、mmsegmentationなどはご存知かもしれません。mmシリーズのフレームワーク中で姿勢推定を扱っているのがmmposeです。mmposeがあれば、様々な姿勢推定を試すことができます。学習済のモデルを推論に使うだけでなく、カスタムデータセットを作って訓練してみたり、新しいバックボーンを開発してみたり、実務や論文執筆にも有用と言えます。私自身もmmdetectionやmmsegmentationは研究で使ったこともあり、mmposeも使ってみようということで、その動機にこの記事を書くことにしました。日本語の解説記事が見当たらなかったのでその点も丁度いいなあ、といったところです。
mmposeのオフィシャルなど
オフィシャルのリポジトリは以下です。
https://github.com/open-mmlab/mmpose
ご覧いただければわかるように、HRNetを始め、様々なモデルが使えます。チュートリアルがありますので、まずはそれベースにやっていけたらと思います。ただし、細かいところで、より扱いやすいように変更を加えていますので、ご了承ください。
姿勢推定のチュートリアル(微修正)をやってみる
まずは、pytorchやcudaのバージョンに合わせたライブラリをインストールするために、これらのバージョンを取得します。
import torch
TORCH_VERSION = torch.__version__.split("+")[0]
CUDA_VERSION = torch.__version__.split("+")[-1]
print("torch: ", TORCH_VERSION, "; cuda: ", CUDA_VERSION)
ビルド済のmmcv-fullと、mmdet、mmposeダウンロードします。mmcv-fullはmmシリーズの中核となるライブラリです。mmdetは人間を抽出するために使用します。
!pip install mmcv-full mmdet mmpose -f https://download.openmmlab.com/mmcv/dist/$CUDA_VERSION/torch$TORCH_VERSION/index.html
インストールすると以下の通り怒られます。
WARNING: The following packages were previously imported in this runtime:
  [numpy]
You must restart the runtime in order to use newly installed versions.
指示通り、カーネルの再起動を行ってください。
さて、再起動後、改めてバージョンを確認してみましょう。
# PyTorch, TorchVisionのバージョン確認
import torch, torchvision
print('torch version:', torch.__version__, torch.cuda.is_available())
print('torchvision version:', torchvision.__version__)

# mmposeのバージョン確認
import mmpose
print('mmpose version:', mmpose.__version__)

# cuda, gccのバージョン確認
from mmcv.ops import get_compiling_cuda_version, get_compiler_version
print('cuda version:', get_compiling_cuda_version())
print('compiler information:', get_compiler_version())
私の場合、以下のような結果となっています(2021/11/14現在)。
torch version: 1.10.0+cu111 True
torchvision version: 0.11.1+cu111
mmpose version: 0.20.0
cuda version: 11.1
compiler information: GCC 7.3
設定やテスト画像のダウンロードのため、mmposeのリポジトリをクローンします。
!git clone https://github.com/open-mmlab/mmpose.git
%cd mmpose
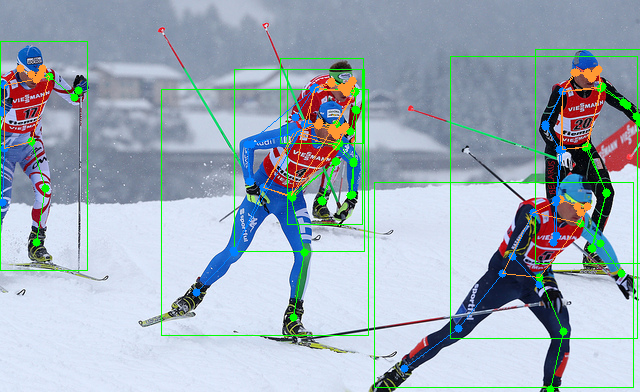
物体検出モデル(Faster R-CNN)と姿勢推定モデル(HRNet)の学習済モデルをロードし、物体検出モデルで人間を検出し、人間に対して姿勢推定を行います。
import cv2
from mmpose.apis import (inference_top_down_pose_model, init_pose_model,
                         vis_pose_result, process_mmdet_results)
from mmdet.apis import inference_detector, init_detector
from google.colab.patches import cv2_imshow

# 使用する姿勢推定モデルの設定
pose_config = 'configs/body/2d_kpt_sview_rgb_img/topdown_heatmap/coco/hrnet_w48_coco_256x192.py'
# 使用する姿勢推定モデルの学習済のチェックポイント
pose_checkpoint = 'https://download.openmmlab.com/mmpose/top_down/hrnet/hrnet_w48_coco_256x192-b9e0b3ab_20200708.pth'
# 使用する物体検出モデルの設定
det_config = 'demo/mmdetection_cfg/faster_rcnn_r50_fpn_coco.py'
# 使用する物体検出モデルの学習済のチェックポイント
det_checkpoint = 'https://download.openmmlab.com/mmdetection/v2.0/faster_rcnn/faster_rcnn_r50_fpn_1x_coco/faster_rcnn_r50_fpn_1x_coco_20200130-047c8118.pth'

#  姿勢推定モデルの作成
pose_model = init_pose_model(pose_config, pose_checkpoint)
# 物体検出モデルの作成
det_model = init_detector(det_config, det_checkpoint)

# お試しに使う画像のパス
img = 'tests/data/coco/000000197388.jpg'

# 物体検出モデルの推論
mmdet_results = inference_detector(det_model, img)

# extract person (COCO_ID=1) bounding boxes from the detection results
# COCOのカテゴリIDが1の物体(人間)の情報だけ切り出す。
person_results = process_mmdet_results(mmdet_results, cat_id=1)

# 人間に対して姿勢推定する
pose_results, returned_outputs = inference_top_down_pose_model(pose_model,
                                                               img,
                                                               person_results,
                                                               bbox_thr=0.3,
                                                               format='xyxy',
                                                               dataset=pose_model.cfg.data.test.type)

# 推論結果画像を作る(out_fileオプションの指定を追加し、画像に保存しています。)
vis_result = vis_pose_result(pose_model,
                             img,
                             pose_results,
                             dataset=pose_model.cfg.data.test.type,
                             show=False,
                             out_file="posed_000000197388.png")

# 結果画像を表示する
cv2_imshow(vis_result)
そうすると、以下のような画像が出力されると思います!
mmpose記事の続き