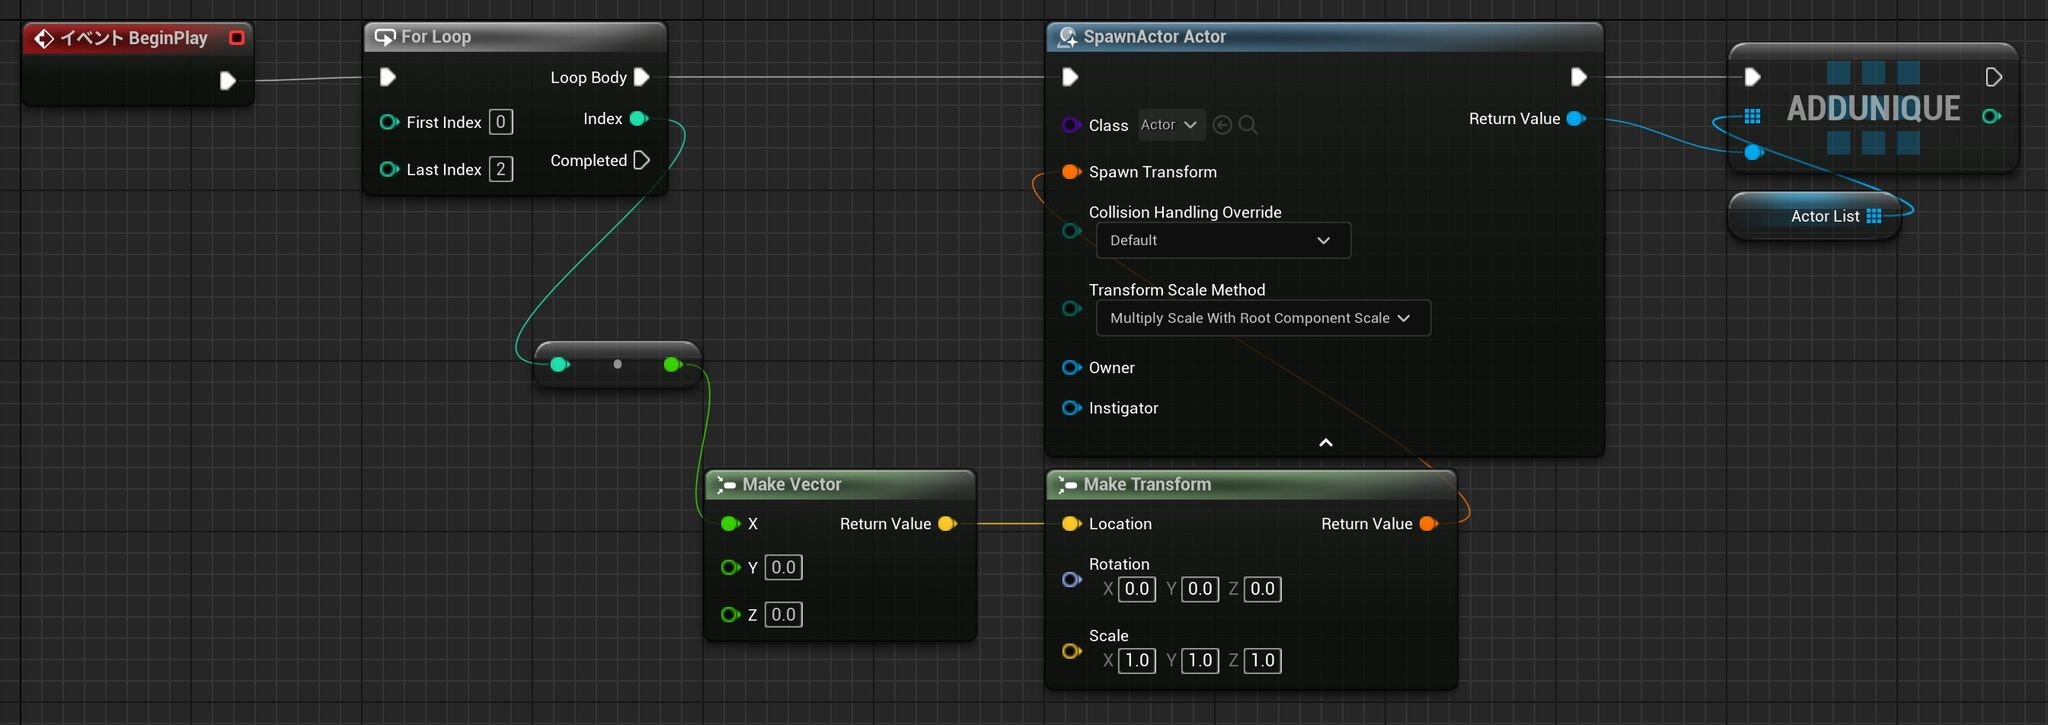
Daedalic Test Automation Plugin とは
Unreal Engine の Gauntlet Automation Framework との統合テストの作成と実行を容易に行える
MIT ライセンスのサードパーティー製プラグインです。
対応環境
公式では UE4.23 ~ UE4.27 をサポートしています。
ここでは UE5 に対応する方法も記載しています。
※ UE5 対応のブランチが存在していることに後から気づきました...
導入利点
- 導入が容易です。
- 提供機能が豊富です。
- エディタと実機でテスト実装を分ける必要がなくなります。
環境構築
プラグインのダウンロード
下記の URL よりダウンロードが可能です。
https://github.com/DaedalicEntertainment/ue4-test-automation
プラグインの修正 ※ 警告を無視する場合はスキップOK
ビルド時に警告が発生するので、回避するために下記ファイルを修正します。
ue4-test-automation-develop\DaedalicTestAutomationPlugin\DaedalicTestAutomationPlugin.uplugin
下記に修正後の内容を記載します。
{
  "FileVersion": 3,
  "Version": 1,
  "VersionName": "1.1.0",
  "FriendlyName": "Daedalic Test Automation Plugin",
  "Description": "Facilitates setting up integration test suites with Gauntlet.",
  "Category": "Daedalic Entertainment",
  "CreatedBy": "Daedalic Entertainment GmbH",
  "CreatedByURL": "https://www.daedalic.com/",
  "DocsURL": "https://github.com/DaedalicEntertainment/ue4-test-automation",
  "MarketplaceURL": "",
  "SupportURL": "https://github.com/DaedalicEntertainment/ue4-test-automation/issues",
  "EnabledByDefault": false,
  "CanContainContent": true,
  "IsBetaVersion": false,
  "Installed": false,
  "Modules": [
    {
      "Name": "DaedalicTestAutomationPlugin",
      "Type": "DeveloperTool",
      "LoadingPhase": "Default"
    },
    {
      "Name": "DaedalicTestAutomationPluginEditor",
      "Type": "Editor",
      "LoadingPhase": "PreDefault"
    }
  ],
  "Plugins": [
    {
      "Name": "Gauntlet",
      "Enabled": true
    }
  ]
}
プラグインの追加
下記のフォルダを該当のディレクトリに追加してプロジェクトプラグイン or エンジンプラグインとして認識させます。
ue4-test-automation-develop\DaedalicTestAutomationPlugin
Daedalic Test Automation プロジェクトの追加
UE4
プロジェクトの参照が無くなっているので、参照されるように下記のファイルを修正します。
ue4-test-automation-develop\DaedalicTestAutomationPlugin.Automation\DaedalicTestAutomationPlugin.Automation.csproj
下記に修正後の内容を記載します。
<?xml version="1.0" encoding="utf-8"?>
<Project ToolsVersion="15.0" xmlns="http://schemas.microsoft.com/developer/msbuild/2003">
  <Import Project="$(MSBuildExtensionsPath)\$(MSBuildToolsVersion)\Microsoft.Common.props" Condition="Exists('$(MSBuildExtensionsPath)\$(MSBuildToolsVersion)\Microsoft.Common.props')" />
  <PropertyGroup>
    <Configuration Condition=" '$(Configuration)' == '' ">Debug</Configuration>
    <Platform Condition=" '$(Platform)' == '' ">AnyCPU</Platform>
    <ProjectGuid>{C008207C-E5DF-41F3-B0ED-6A1A80F7234B}</ProjectGuid>
    <OutputType>Library</OutputType>
    <AppDesignerFolder>Properties</AppDesignerFolder>
    <RootNamespace>DaedalicTestAutomationPlugin.Automation</RootNamespace>
    <AssemblyName>DaedalicTestAutomationPlugin.Automation</AssemblyName>
    <TargetFrameworkVersion>v4.6.2</TargetFrameworkVersion>
    <FileAlignment>512</FileAlignment>
    <Deterministic>true</Deterministic>
  </PropertyGroup>
  <PropertyGroup Condition=" '$(Configuration)|$(Platform)' == 'Debug|AnyCPU' ">
    <DebugSymbols>true</DebugSymbols>
    <DebugType>full</DebugType>
    <Optimize>false</Optimize>
    <OutputPath>..\..\..\..\Binaries\DotNET\AutomationScripts</OutputPath>
    <DefineConstants>DEBUG;TRACE</DefineConstants>
    <ErrorReport>prompt</ErrorReport>
    <WarningLevel>4</WarningLevel>
  </PropertyGroup>
  <PropertyGroup Condition=" '$(Configuration)|$(Platform)' == 'Development|AnyCPU' ">
    <DebugType>pdbonly</DebugType>
    <Optimize>false</Optimize>
    <OutputPath>..\..\..\..\Binaries\DotNET\AutomationScripts</OutputPath>
    <DefineConstants>TRACE</DefineConstants>
    <ErrorReport>prompt</ErrorReport>
    <WarningLevel>4</WarningLevel>
  </PropertyGroup>
  <ItemGroup>
    <Reference Include="System" />
    <Reference Include="System.Core" />
    <Reference Include="System.Xml.Linq" />
    <Reference Include="System.Data.DataSetExtensions" />
    <Reference Include="Microsoft.CSharp" />
    <Reference Include="System.Data" />
    <Reference Include="System.Net.Http" />
    <Reference Include="System.Xml" />
  </ItemGroup>
  <ItemGroup>
    <Compile Include="DaeGauntletTest.cs" />
    <Compile Include="DaeTestConfig.cs" />
    <Compile Include="Properties\AssemblyInfo.cs" />
  </ItemGroup>
  <ItemGroup>
    <ProjectReference Include="..\Gauntlet\Gauntlet.Automation.csproj">
      <Project>{767B4F85-AB56-4B00-A033-04C7600ACC3D}</Project>
      <Name>Gauntlet.Automation</Name>
    </ProjectReference>
    <ProjectReference Include="..\..\UnrealBuildTool\UnrealBuildTool.csproj">
      <Project>{c8f6226e-ce34-3ad3-b4e5-28c746200ace}</Project>
      <Name>UnrealBuildTool</Name>
    </ProjectReference>
    <ProjectReference Include="..\AutomationUtils\AutomationUtils.Automation.csproj">
      <Project>{73210ea2-c98c-3d64-b673-5a4ff3161fc9}</Project>
      <Name>AutomationUtils.Automation</Name>
    </ProjectReference>
  </ItemGroup>
  <Import Project="$(MSBuildToolsPath)\Microsoft.CSharp.targets" />
</Project>
UE5
C# プロジェクトは .Net Core による開発に移行されています。
そのため UE4 時に必要な対応 と合わせて、プロジェクトを .Net Framwork → .Net Core へ変換する必要があります。
変更するファイルは下記になります。
ue4-test-automation-develop\DaedalicTestAutomationPlugin.Automation\DaedalicTestAutomationPlugin.Automation.csproj
下記に変換後の内容を記載します。
<Project Sdk="Microsoft.NET.Sdk">
  <PropertyGroup>
    <TargetFramework>netcoreapp6.0</TargetFramework>
    <Configuration Condition=" '$(Configuration)' == '' ">Development</Configuration>
    <Platform Condition=" '$(Platform)' == '' ">AnyCPU</Platform>
    <OutputType>Library</OutputType>
    <AppendTargetFrameworkToOutputPath>false</AppendTargetFrameworkToOutputPath>
    <GenerateAssemblyInfo>false</GenerateAssemblyInfo>
    <GenerateTargetFrameworkAttribute>false</GenerateTargetFrameworkAttribute>
    <Configurations>Debug;Release;Development</Configurations>
    <RootNamespace>DaedalicTestAutomationPlugin.Automation</RootNamespace>
    <AssemblyName>DaedalicTestAutomationPlugin.Automation</AssemblyName>
    <WarningsNotAsErrors>612,618</WarningsNotAsErrors>
    <TreatWarningsAsErrors>true</TreatWarningsAsErrors>
    <DebugType>pdbonly</DebugType>
  </PropertyGroup>
  <PropertyGroup Condition=" '$(Configuration)|$(Platform)' == 'Debug|AnyCPU' ">
    <DebugSymbols>true</DebugSymbols>
    <DebugType>full</DebugType>
    <Optimize>false</Optimize>
    <OutputPath>..\..\..\..\Binaries\DotNET\AutomationTool\AutomationScripts</OutputPath>
    <DefineConstants>DEBUG;TRACE</DefineConstants>
    <ErrorReport>prompt</ErrorReport>
    <WarningLevel>4</WarningLevel>
  </PropertyGroup>
  <PropertyGroup Condition=" '$(Configuration)|$(Platform)' == 'Development|AnyCPU' ">
    <DebugType>pdbonly</DebugType>
    <Optimize>false</Optimize>
    <OutputPath>..\..\..\..\Binaries\DotNET\AutomationTool\AutomationScripts</OutputPath>
    <DefineConstants>TRACE</DefineConstants>
    <ErrorReport>prompt</ErrorReport>
    <WarningLevel>4</WarningLevel>
  </PropertyGroup>
  <ItemGroup>
    <ProjectReference Include="..\..\UnrealBuildTool\UnrealBuildTool.csproj" />
    <ProjectReference Include="..\AutomationUtils\AutomationUtils.Automation.csproj" />
    <ProjectReference Include="..\Gauntlet\Gauntlet.Automation.csproj" />
  </ItemGroup>
</Project>
対応するにあたり注意する点
使用する UE バージョンによってプラグイン内部で呼ばれている一部 API が非推奨 or 置換されています。
↑ については記載していないので適宜ご対応ください。
UE 共通
下記のフォルダを Unreal Engine の UE#{バージョン}\Engine\Source\Programs\AutomationTool フォルダ内にコピーします。
ue4-test-automation-develop\DaedalicTestAutomationPlugin.Automation
例外) 一部のモバイルプラットフォームへの対応
Gauntlet Automation Framework を一部のモバイルプラットフォーム向けに実行しようとすると、
.uprojectdirs ファイルに記載されているディレクトリ以下にプロジェクトが配置されていない場合は見つけられずに失敗します。
この問題を回避するために、Unreal Engine の下記ファイルに手を加える必要があります。
UE#{バージョン}\Engine\Source\Programs\AutomationTool\AutomationUtils\ProjectUtils.cs
下記に変更後の内容を記載します。
/// <summary>
/// Takes a game name (e.g "ShooterGame") and tries to find the path to the project file
/// </summary>
/// <param name="GameName"></param>
/// <returns></returns>
public static FileReference FindProjectFileFromName(string GameName)
{
    // if they passed in a path then easy.
    if (File.Exists(GameName))
    {
        return new FileReference(GameName);
    }

    // Start with the gamename regardless of what they passed in
    GameName = Path.GetFileNameWithoutExtension(GameName);

    // Turn Foo into Foo.uproject
    string ProjectFile = GameName;

    if (string.IsNullOrEmpty(Path.GetExtension(ProjectFile)))
    {
        // if project was specified but had no extension then just add it.
        ProjectFile = Path.ChangeExtension(GameName, ".uproject");
    }

    // Turn Foo.uproject into Foo/Foo.uproject
    ProjectFile = Path.Combine(GameName, ProjectFile);

    GameName = Path.GetFileNameWithoutExtension(GameName);

    // check for sibling to engine
    if (File.Exists(ProjectFile))
    {
        return new FileReference(ProjectFile);
    }

    // Search NativeProjects (sibling folders).
    IEnumerable<FileReference> Projects = NativeProjects.EnumerateProjectFiles();

    FileReference ProjectPath = Projects.Where(R => string.Equals(R.GetFileName(), ProjectFile, StringComparison.OrdinalIgnoreCase)).FirstOrDefault();

    if (ProjectPath == null)
    {
        // read .uprojectdirs
        List<string> SearchPaths = new List<string>();
        SearchPaths.Add("");
        string ProjectDirsFile = Directory.EnumerateFiles(Environment.CurrentDirectory, "*.uprojectdirs").FirstOrDefault();
        if (ProjectDirsFile != null)
        {
            foreach (string FilePath in File.ReadAllLines(ProjectDirsFile))
            {
                string Trimmed = FilePath.Trim();
                if (!Trimmed.StartsWith("./", StringComparison.OrdinalIgnoreCase) &&
                    !Trimmed.StartsWith(";", StringComparison.OrdinalIgnoreCase) &&
                    Trimmed.IndexOfAny(Path.GetInvalidPathChars()) < 0)
                {
                    SearchPaths.Add(Trimmed);
                }
            }

            string ResolvedFile = SearchPaths.Select(P => Path.Combine(P, ProjectFile))
                                    .Where(P => File.Exists(P))
                                    .FirstOrDefault();

            if (ResolvedFile != null)
            {
                ProjectPath = new FileReference(ResolvedFile);
            }
        }
    }

// ========== 変更箇所 ==========//
    if(ProjectPath == null)
    {
        string[] LocalFileDirectory =
        {
            // ココにプロジェクト検索対象のルートフォルダパスを指定する
            "C:/Users/okamonn/Projects"
        };

        List<string> SearchPaths = new List<string>();
        SearchPaths.Add("");
        foreach (string FilePath in LocalFileDirectory)
        {
            string Trimmed = FilePath.Trim();
            if (!Trimmed.StartsWith("./", StringComparison.OrdinalIgnoreCase) &&
                !Trimmed.StartsWith(";", StringComparison.OrdinalIgnoreCase) &&
                Trimmed.IndexOfAny(Path.GetInvalidPathChars()) < 0)
            {
                SearchPaths.Add(Trimmed);
            }
        }

        string ResolvedFile = SearchPaths.Select(P => Path.Combine(P, ProjectFile))
                                .Where(P => File.Exists(P))
                                .FirstOrDefault();

        if (ResolvedFile != null)
        {
            ProjectPath = new FileReference(ResolvedFile);
        }
    }
// ====================//

    // either valid or we're out of ideas...
    return ProjectPath;
}
テストの登録
- プラグインを有効にします。
- テスト用のレベルを用意します。
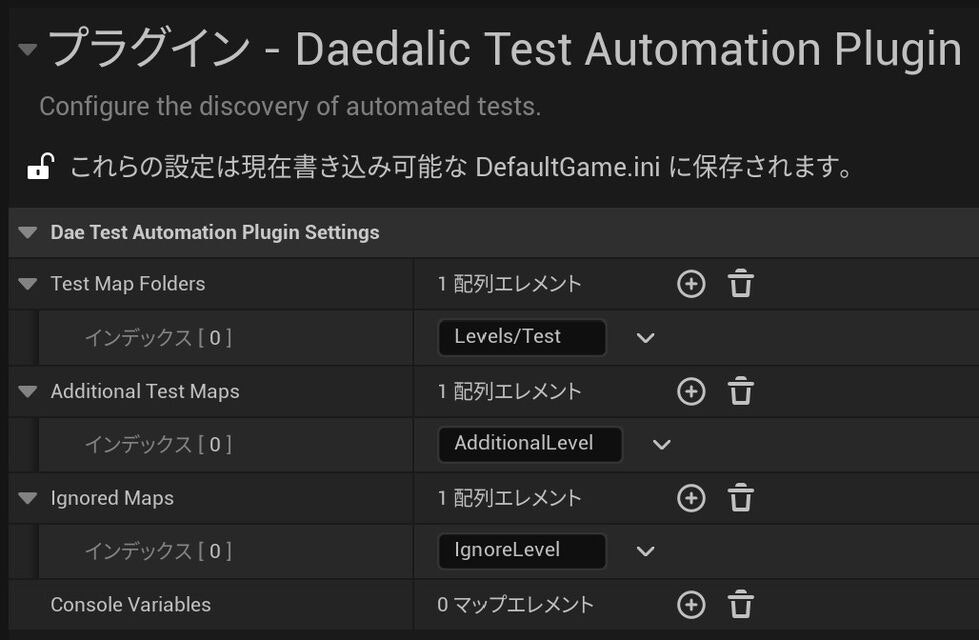
- [プロジェクト設定 -> Plugins -> Daedalic Test Automation Plugins] から登録できます。
- Test Map Folders - プロジェクトのコンテンツフォルダをルートとした、テストを実行するレベルアセットが存在するフォルダパスを設定します。
- Additional Test Maps - Test Map Folders に設定していないフォルダパスに存在する、テストを行いたいレベル名を設定できます。
- Ignored Maps - Test Map Folders に設定したフォルダパスに存在する、テストを行いたくないレベル名を設定できます。
- Console Variables - テスト実行前に更新する、コンソール変数値を設定できます。
テストの実装
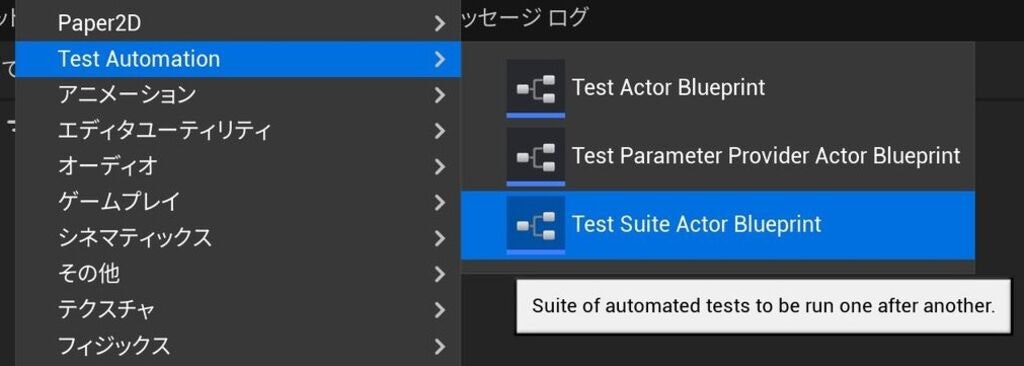
Daedalic Test Suite Actor
同レベル上に存在する Daedalic Test Actor を管理するクラスです。
カスタマイズしない場合はデフォルトのアクターを使用できます。
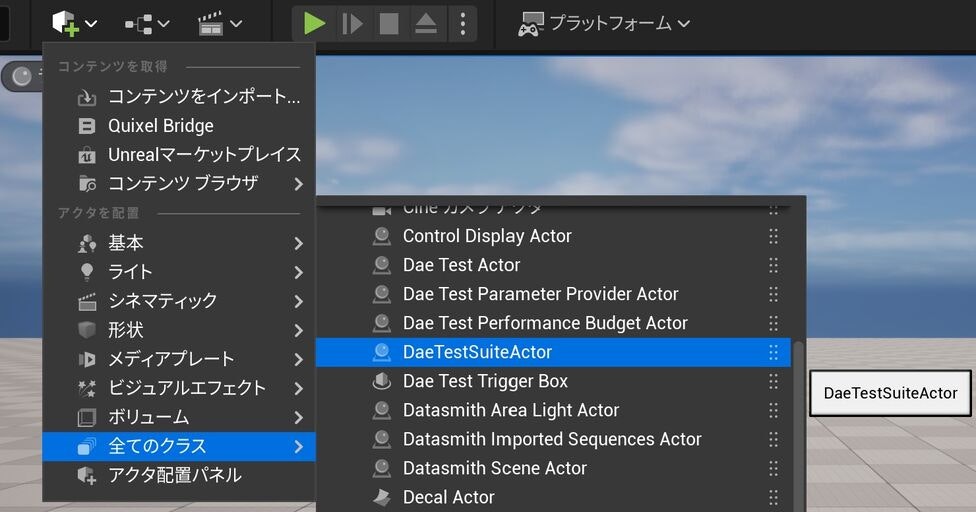
アセットとして用意することで下記の実装をカスタマイズできます。
- Befor All - テスト開始時に呼ばれるイベントです。
- After All - テスト終了時に呼ばれるイベントです。
- Befor Each - 各テストの実行前に呼ばれるイベントです。
- After Each - 各テストの実行後に呼ばれるイベントです。
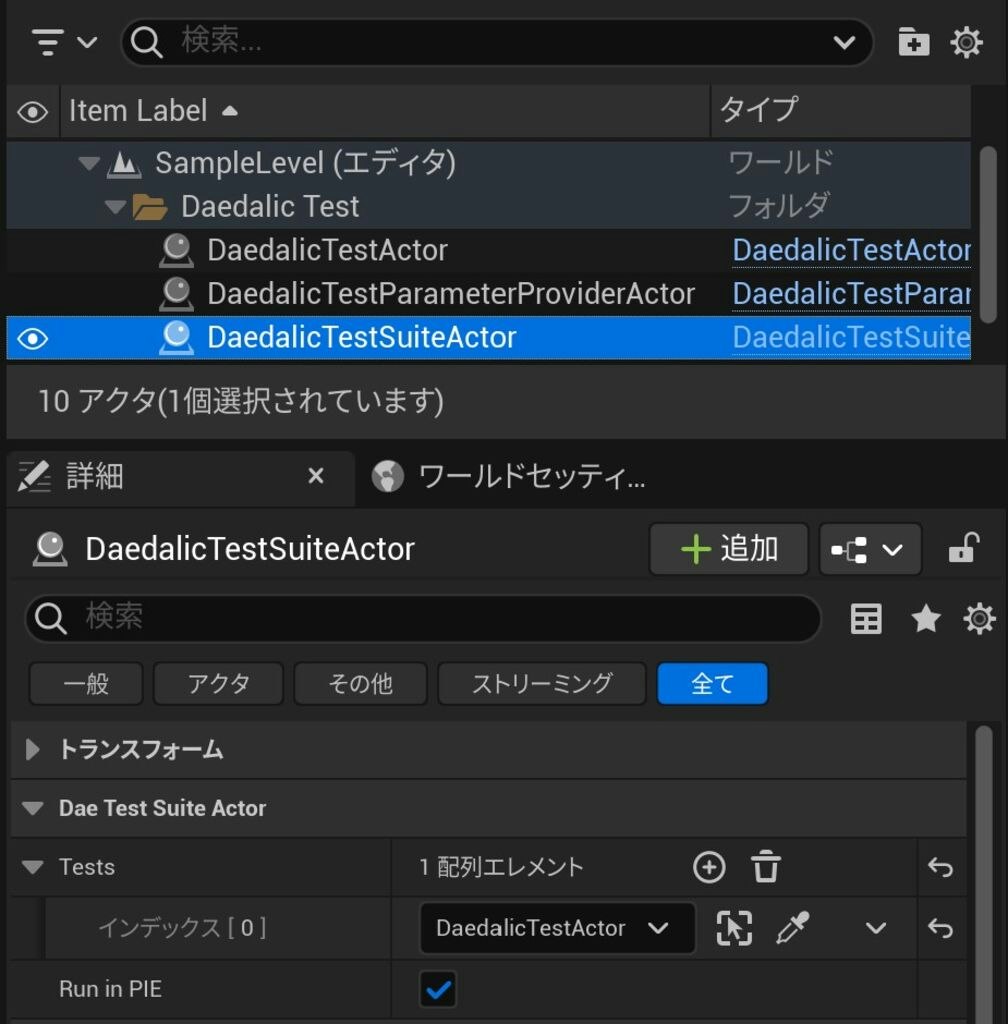
- Tests - 同レベル上に存在する、テストを開始したい Daedalic Test Actor を設定できます。
- Run in PIE - PIE 時にテスト実行するフラグです。
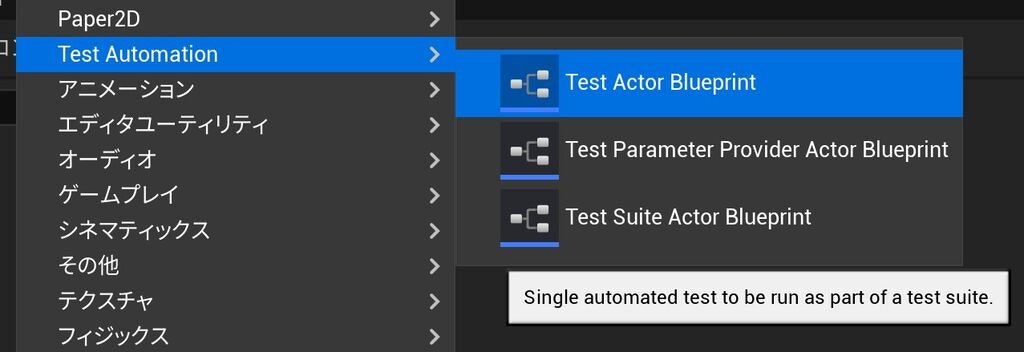
Daedalic Test Actor
テスト内容を実装するクラスです。
アセットとして用意することで下記の実装をカスタマイズできます。
- Assume - テスト実行検証用の、テスト実行前に呼ばれるイベントです。動的にテストの スキップ を実装できます。
- Arrange - 初期セットアップ用の、テスト実行時に呼ばれるイベントです。
- Act - テスト処理用の、テスト実行時に呼ばれるイベントです。Finish Act の呼び出しで次のイベントを呼び出します。
- Assert - テスト結果検証用の、テスト実行後に呼ばれるイベントです。
レベル上に 複数 配置できます。
同レベル上に存在する Daedalic Test Suite Actor のパラメータに追加することでテスト実行対象となります。
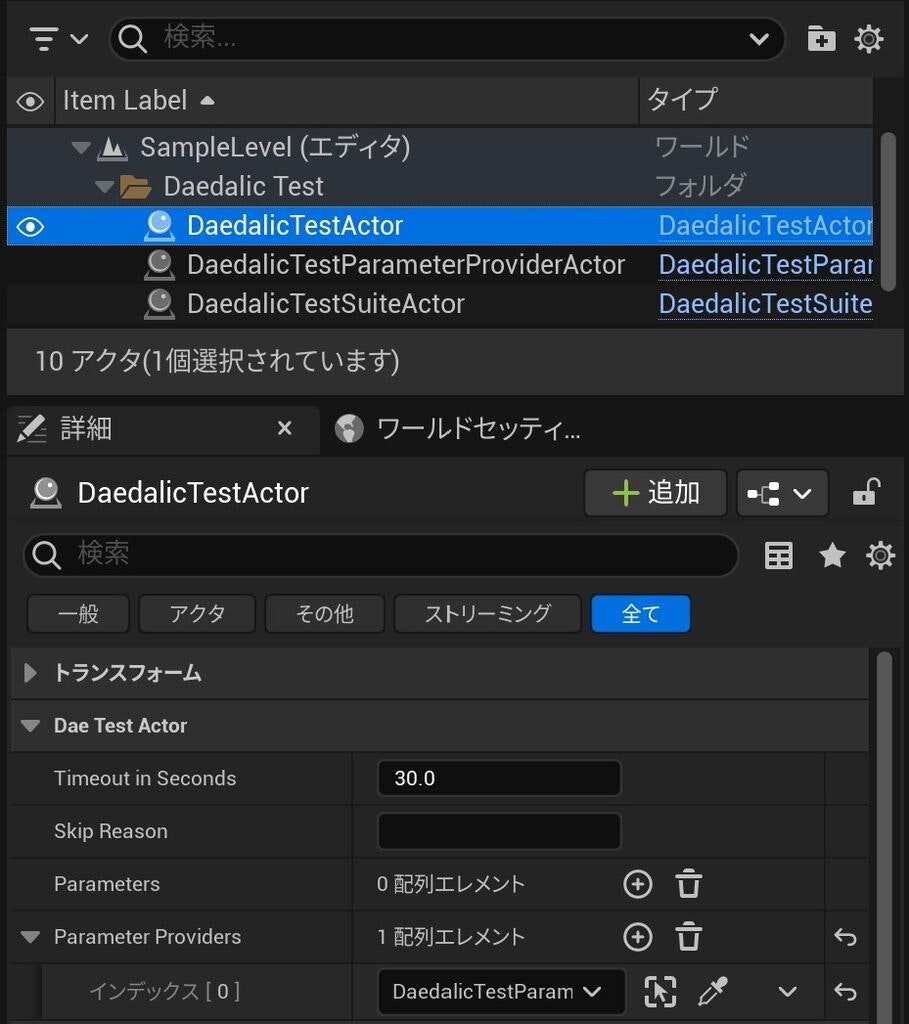
- Timeout in Seconds - テスト実行のタイムアウト時間を設定します。
- Skip Reason - 設定するとテストが スキップ されます。
- Parameters - テストで参照する UObject なオブジェクトを設定できます。複数設定されている場合は 各パラメータごとに同一のテストが実行されます。
- Parameter Providers - 同レベル上に存在するテストで参照したい Daedalic Test Parameter Provider Actor を設定できます。複数設定されている場合は、それぞれが行う Get Parameter 関数によって取得できるパラメータ数だけ同一のテストが実行されます。
実装サンプル
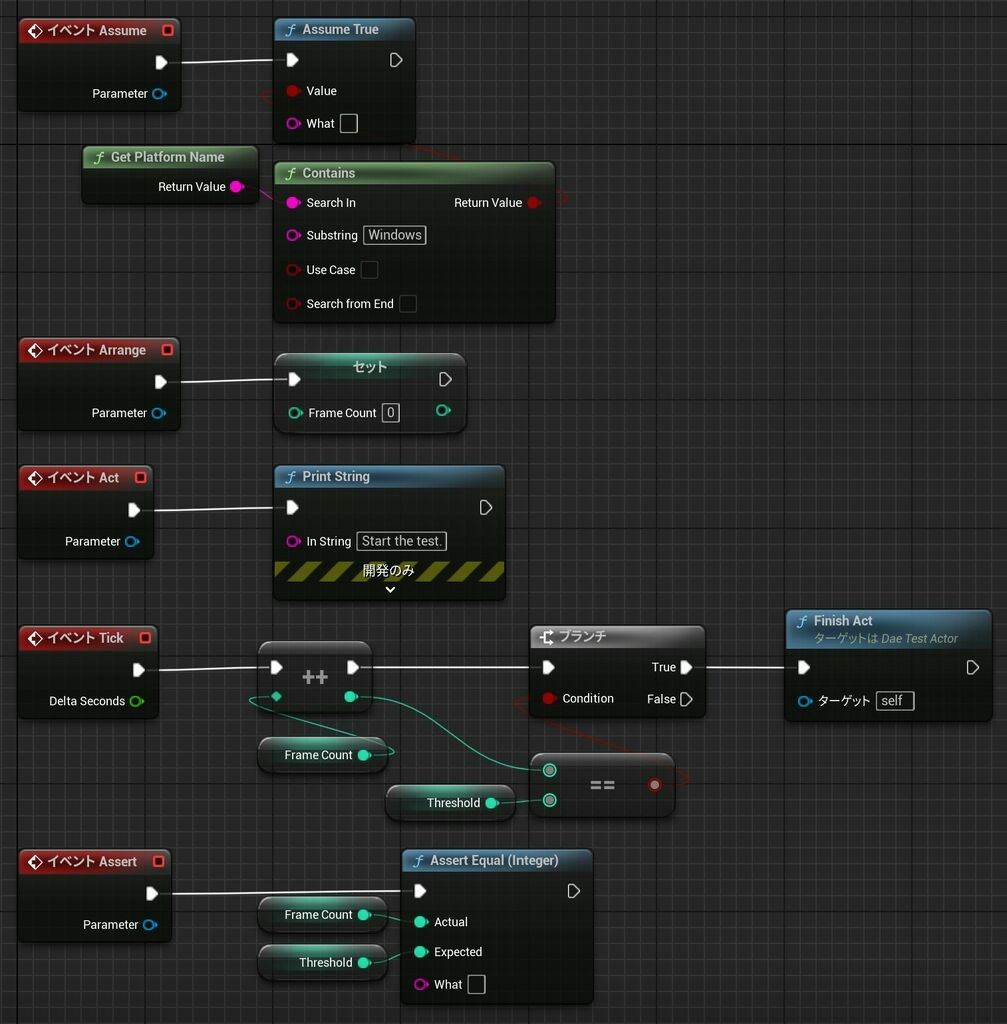
※ Finish Act の呼び出しを Tick 内で呼び出すことで フレームをまたぐテストにも対応 できます。
Daedalic Test Parameter Provider Actor
テスト実行前に動的なパラメータを提供するクラスです。
アセットとして用意することで下記の実装をカスタマイズできます。
- Get Parameters - 動的に確保したパラメータを提供します。
レベル上に 複数 配置できます。
同レベル上に存在する Daedalic Test Actor のパラメータに追加することでパラメータ提供者となります。
実装サンプル
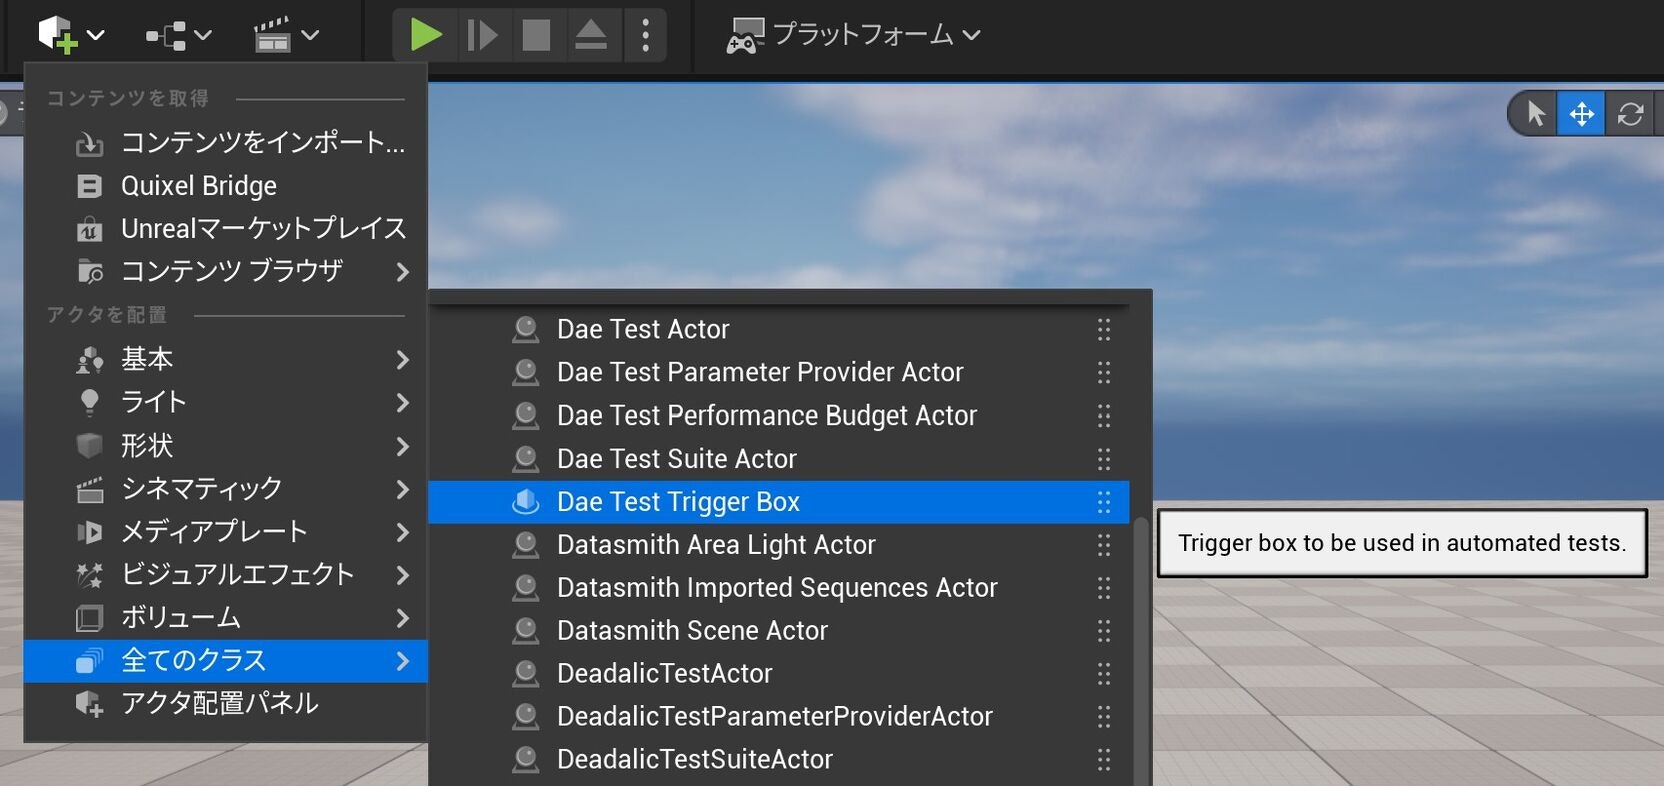
Daedalic Test Trigger Box
ボックス内に 他オブジェクトが侵入するとフラグを立てる クラスです。
フラグを監視した待機や、そのままフラグをテスト結果とすることができます。
実装サンプル
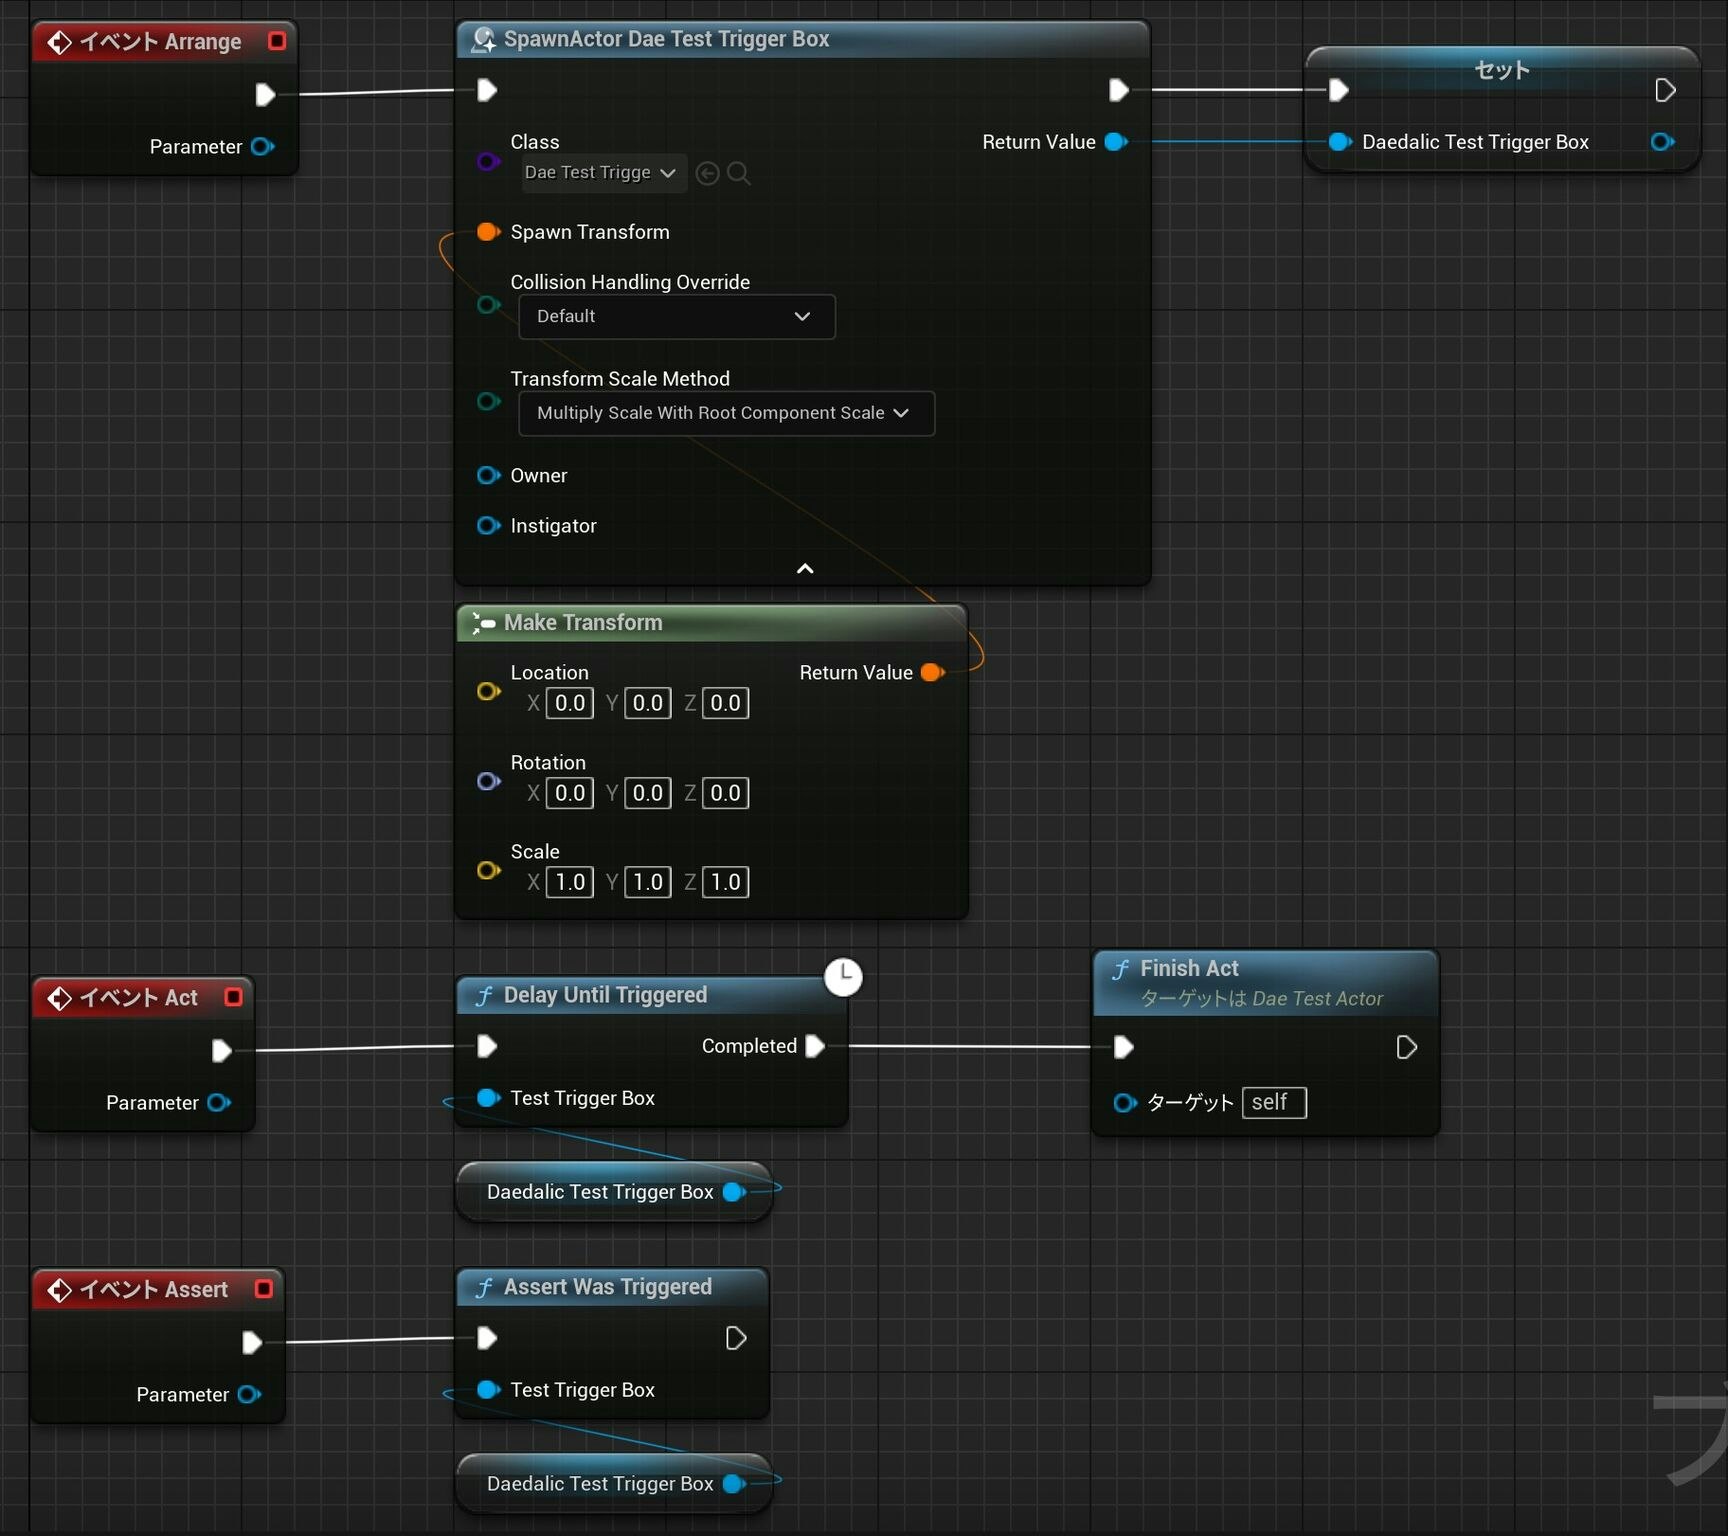
※ Daedalic Test Actor の実装内です。
Daedalic Test Performance Budget Actor
パフォーマンス測定テストを行うためのクラスです。
任意位置を順番に移動する際のパフォーマンスを監視します。
想定値よりもパフォーマンスが悪くなったタイミングでスクリーンショットと情報を保存します。
保存された情報は、コンソール変数「ReportPath」で指定したフォルダに .html 形式で出力されます。
※ Gauntlet 実行時のみ

レベル上に 複数 配置できます。
同レベル上に存在する Daedalic Test Suite Actor のパラメータに追加することでテスト実行対象となります。
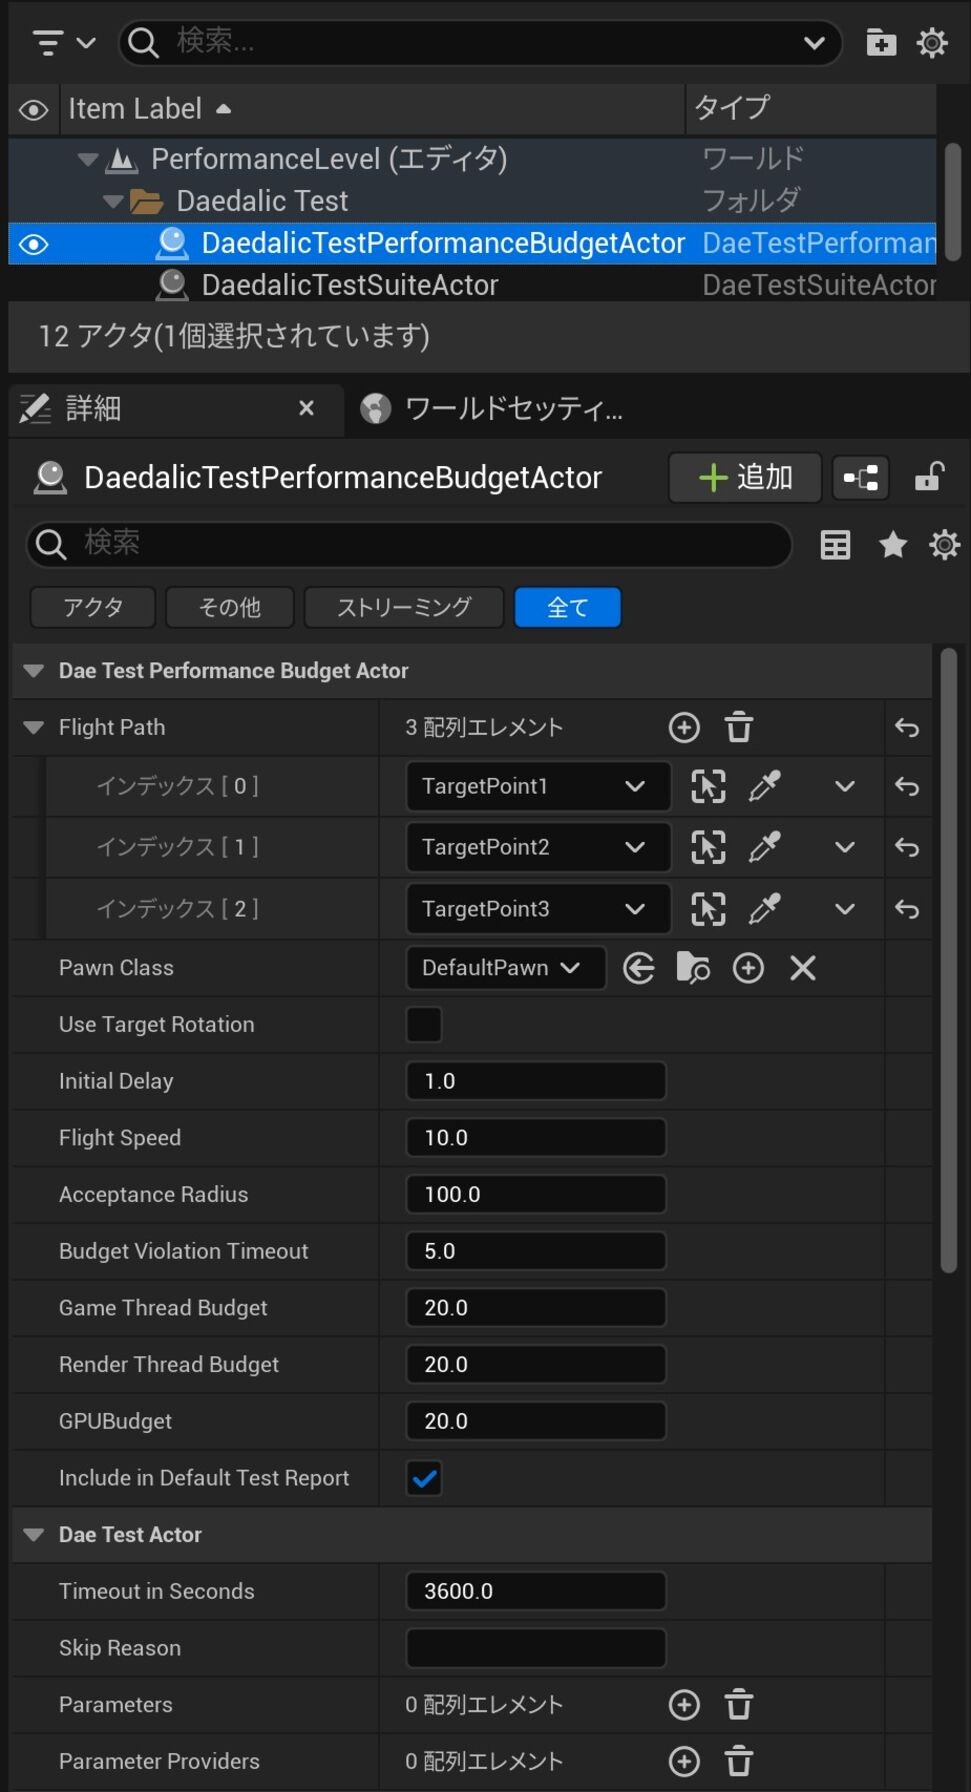
- Flight Path - 同レベル上に存在する Target Point アクターを通過する順番で追加します。
- Pawn Class - スポーンする Pawn クラスを設定します。
- Use Target Rotation - 次のターゲットポイント移動時に Pawn の回転を補完するフラグです。
- Initial Delay - 移動の開始までの待機時間を設定できます。
- Fight Speed - 移動速度(cm/s)を設定します。
- Acceptance Radius - ターゲットポイントの到達判定の半径を設定します。
- Budget Violation Timeout - 再測定開始までの待機時間を設定します。
- Game Thread Budget - ゲームスレッドが1フレームの処理にかかる想定時間(ms)を設定します。
- Render Thread Budget - レンダースレッドが1フレームの描画にかかる想定時間(ms)を設定します。
- GPU Budget - GPU が1フレームの処理にかかる想定時間(ms)を設定します。
- Include in Default Test Report - パフォーマンス計測テストが失敗した際にデフォルトレポートの失敗項目に記載するフラグです。
- Daedalic Test Actor のパラメータ説明をご参考ください。
テストの実行
- UE エディタから「ツール -> セッションフロントエンド」を開きます。
- オートメーション一覧に テストの登録 で設定したディレクトリに含まれるレベル名と Additional Test Maps で設定したレベル名が表示されます。
- 「テストを開始する」を実行することで選択したレベルのテストが実行されます。
Gauntlet Automation Framework による実行
基本的にコンソールコマンドによる実行になります。
そのため「[UE4] Gauntlet Automation Framework」で紹介されている .bat ファイルに手を加えて対応しました。
下記に実装内容を記載します。
rem ****************************************************************************************************
rem
rem Unreal Engine-related definitions
rem
rem ****************************************************************************************************

rem // Unreal Engine directory.
set UE_DIR=D:\UE#{エンジンバージョン}

rem // RunUAT.bat file path.
set UAT_PATH=%UE_DIR%\Engine\Build\BatchFiles\RunUAT.bat

rem // Platform name.
set PLATFORM=Win64

rem // Build configuration.
set CONFIG=Development

rem // Directory where UAT extensions are loaded.
set SCRIPT_DIR=%UE_DIR%\Engine\Source\Programs\AutomationTool\DaedalicTestAutomationPlugin.Automation

rem ****************************************************************************************************
rem
rem Project-related definitions
rem
rem ****************************************************************************************************

rem // Project directory.
set PROJECT_DIR=#{プロジェクトが存在するディレクトリ}

rem // File path of the project to test.
set PROJECT_PATH=%PROJECT_DIR%\#{プロジェクト名}.uproject

rem // Staging build file path.
rem set STG_BUILD_PATH=editor
set STG_BUILD_PATH=%PROJECT_DIR%\Saved\StagedBuilds

rem // Startup level.
set MAP_NAME=#{特定のマップ名}

rem ****************************************************************************************************
rem
rem Gauntlet-related definitions
rem
rem ****************************************************************************************************

rem // Gauntlet test node to use.
set TEST_NODE=DaedalicTestAutomationPlugin.Automation.DaeGauntletTest

rem // Time to time out.
set TIME_OUT=30

rem ****************************************************************************************************
rem
rem Daedalic Test Automation-related definitions
rem
rem ****************************************************************************************************

rem // Single level to run.
set TEST_NAME=%MAP_NAME%

rem // Custom report output directory.
set REPORT_PATH=#{レポートの出力先ディレクトリ}

rem // JUnit XML report output directory.
set JUNIT_REPORT_PATH=%REPORT_PATH%

rem ****************************************************************************************************
rem
rem memo
rem
rem ****************************************************************************************************

rem // Specify level at startup. (Gauntlet)
rem -map=%MAP_NAME%

rem // Disable timeout period. (Gauntlet)
rem -notimeouts

rem // Specifying a single level to run. (Deadalic Test)
rem -TestName=%TEST_NAME%

rem ****************************************************************************************************
rem
rem Creating a staging build & Run a gauntlet test
rem
rem ****************************************************************************************************

%UAT_PATH% BuildCookRun -project=%PROJECT_PATH% -platform=%PLATFORM% -configuration=%CONFIG% -build -cook -pak -stage & %UAT_PATH% RunUnreal -scriptdir=%SCRIPT_DIR% -project=%PROJECT_PATH% -platform=%PLATFORM% -configuration=%CONFIG% -build=%STG_BUILD_PATH% -test=%TEST_NODE% -maxduration=%TIME_OUT% -ReportPath=%REPORT_PATH% -JUnitReportPath=%JUNIT_REPORT_PATH&%
.bat ファイルを コマンドプロンプト or PowerShell で実行すると Gauntlet が起動してテストが開始されます。
下記にテストレポートの出力結果を記載します。
<testsuite name="JUnit Test Report" tests="5" skipped="0" failures="1" errors="0" time="9.470415" timestamp="2023-11-21T09:22:16.265Z">
  <testcase name="DeadalicTestActor_C_1 - Actor_0" classname="SampleLevel.DeadalicTestSuiteActor_C_2" time="0.132811"> </testcase>
  <testcase name="DeadalicTestActor_C_1 - Actor_1" classname="SampleLevel.DeadalicTestSuiteActor_C_2" time="0.123850"> </testcase>
  <testcase name="DeadalicTestActor_C_1 - Actor_2" classname="SampleLevel.DeadalicTestSuiteActor_C_2" time="0.125962"> </testcase>
  <testcase name="DaeTestPerformanceBudgetActor_0" classname="PerformanceLevel.DaeTestSuiteActor_0" time="9.064131">
    <failure type="Assertion failed">Assertion failed - Budget Violations - Expected: 0, but was: 2</failure>
  </testcase>
  <testcase name="DaedalicTestActor2_C_1" classname="AdditionalLevel.DaeTestSuiteActor_0" time="0.023662"> </testcase>
</testsuite>
- DeadalicTestActor_C_1 を動的なパラメータによって複数回実行(3回):成功
- パフォーマンステストの実行:失敗
- DaedalicTestActor2_C_1 をパラメータなしで実行:成功
また、パフォーマンステストが失敗した際に出力される .html ファイルの結果も記載します。
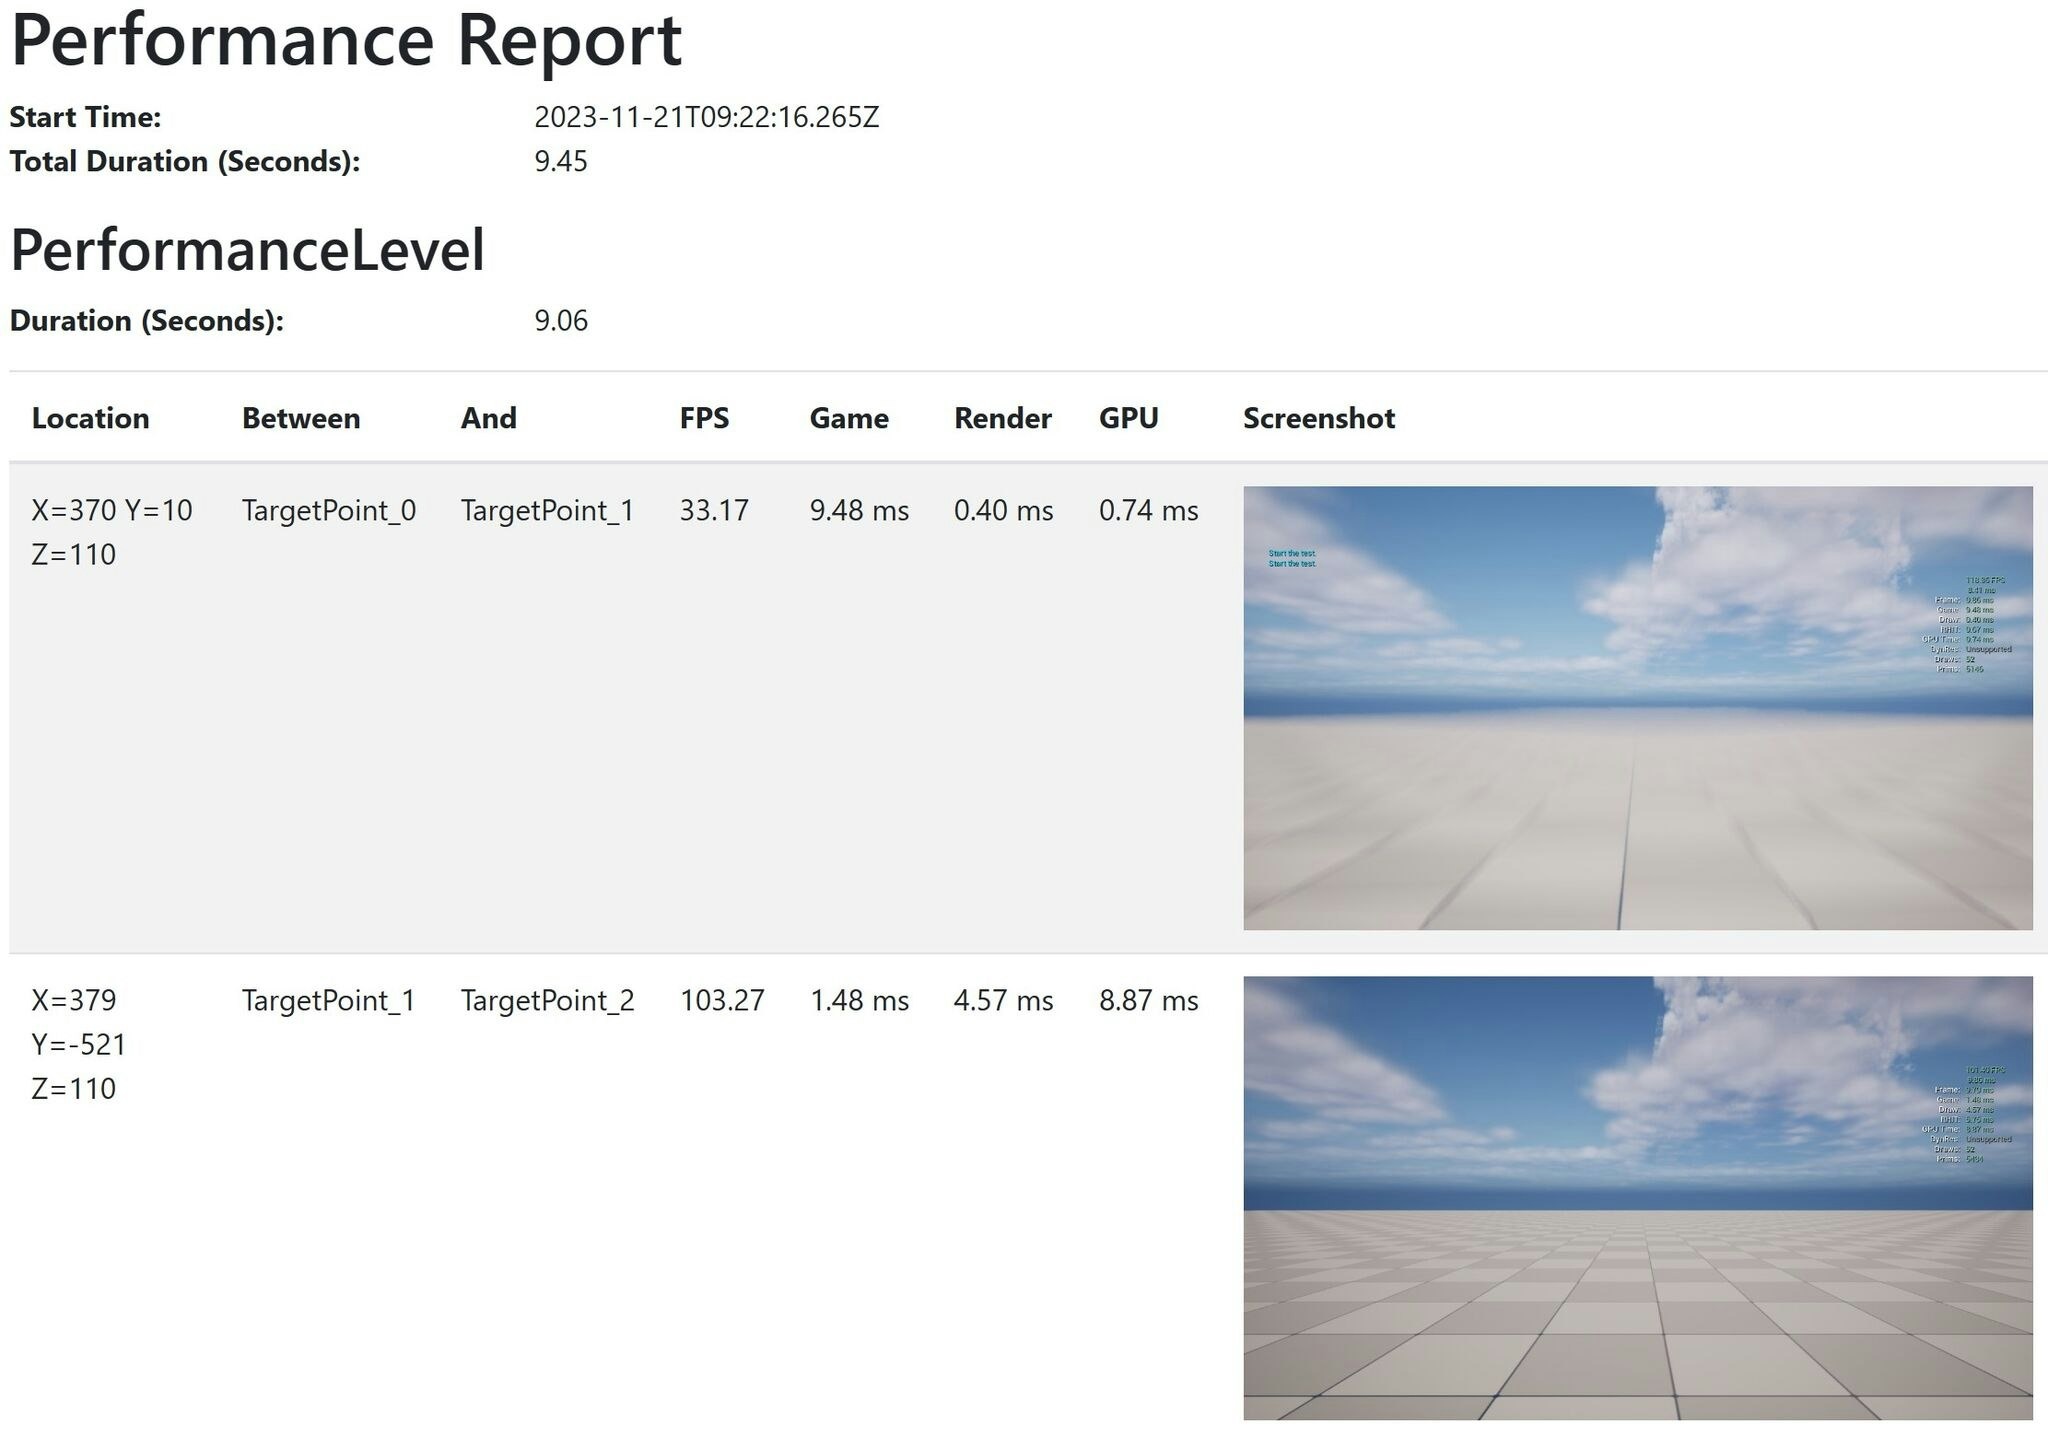
- Location - 操作 Pawn の位置を表します。
- Between - どのポイント間の移動なのかを表します。
- FPS - アプリケーションのフレームレートを表します。
- Game - ゲームスレッドの処理時間を表します。
- Render - レンダースレッドの処理時間を表します。
- GPU - GPU の処理時間を表します。
- Screenshot - パフォーマンスが悪くなった時のスクリーンショットです。
カスタムテストクラスの作成
既存のテストクラスでは不十分な場合や、出力されるレポート内容を変えたい場合などに独自のテストクラスを作成してカスタマイズすることができます。
独自のテストクラスの作成とオリジナルレポートへの出力処理を行う最小構成な実装例を下記に記載します。
PublicDependencyModuleNames.Add("DaedalicTestAutomationPlugin");
/* 必要なインクルードファイル */

#include "Misc/FileHelper.h"

#include "DaeTestActor.h"
#include "DaeTestResultData.h"
#include "DaeTestSuiteResult.h"
#include "DaeTestReportWriter.h"
class FSampleTestResultData : public FDaeTestResultData
{
public:
	/* テストの結果データのタイプ名を取得する */
	virtual FName GetDataType() const override
	{
		return TEXT("FSampleTestResultData");
	}
};
class FSampleTestReportWriter : public FDaeTestReportWriter
{
public:
    /* テストレポートのタイプ名を取得する */
    virtual FName GetReportType() const override
    {
        return TEXT("FSampleTestReportWriter");
    }

    /* 指定された結果のテストレポートを作成する */
    virtual void WriteReport(const TArray<FDaeTestSuiteResult>& TestSuites, const FString& ReportPath) const override
    {
        IPlatformFile& PlatformFile = FPlatformFileManager::Get().GetPlatformFile();
        if (!PlatformFile.DirectoryExists(*ReportPath))
        {
            PlatformFile.CreateDirectoryTree(*ReportPath);
        }

        FString TestName;
        for (const auto& TestSuiteResult : TestSuites)
        {
            for (const auto& TestResult : TestSuiteResult.TestResults)
            {
                if (TestResult.Data != nullptr && TestResult.Data->GetDataType() == TEXT("FSampleTestResultData"))
                {
                    /* レポート内容を記載する */
                    TestName += TestResult.TestName;
                    TestName += "\n";
                }
            }
        }

        FString ReportFilePath = FPaths::Combine(ReportPath, TEXT("#{ファイル名.拡張子}"));
        FFileHelper::SaveStringToFile(TestName, *ReportFilePath);
    }
};
UCLASS()
class DEADALICTEST_API ASampleTestActor : public ADaeTestActor
{
    GENERATED_BODY()

public:
    /* テストの結果データクラスを取得する */
    virtual TSharedPtr<FDaeTestResultData> CollectResults() const override
    {
        TSharedPtr<FSampleTestResultData> Results = MakeShareable(new FSampleTestResultData());
        return Results;
    }

    /* テストレポートを作成するライタークラスを取得する */
    virtual FDaeTestReportWriterSet GetReportWriters() const override
    {
        FDaeTestReportWriterSet ReportWriters;

        /* デフォルトのレポートへテスト結果を書き込む */
        FDaeTestReportWriterSet DefaultReportWriters = Super::GetReportWriters();
        ReportWriters.Add(DefaultReportWriters);

        /* オリジナルのレポートへテスト結果を書き込む */
        ReportWriters.Add(MakeShareable(new FSampleTestReportWriter()));
        return ReportWriters;
    }
};
まとめ
テストの仕組みを構築するにも一苦労するかと思われます。
また、実機でのテストについても考えるとなると...大変です。
そんな苦労を少しでも緩和してくれる Deadalic Test Automation によるテストの実装について紹介しました。
皆さんの開発ライフに貢献できたなら幸いです。
