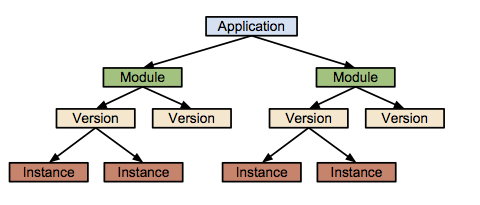
ライブラリの構成
- RestAPI: Jersey
- Data Binding: MOXy
- DataStoreAPI: Objectify
DataStore Service
オブジェクトデータベース。BigTableがベースとなったもの。
- カインド(kind)
- RDBのtableに相当
- エンティティ(entity)
- RDBのレコードに相当
- プロパティ(property)
- RDBのフィールドに相当
データのCRUDの操作は、Javaであればgoogle謹製のObjectifyというライブラリがあり、それを利用するとだいぶ楽
エンティティの定義
import com.googlecode.objectify.annotation.Entity;
import com.googlecode.objectify.annotation.Id;
import com.googlecode.objectify.annotation.Index;

@Entity
public class Car {
    @Id Long id;
    @Index String license;
    int color;
}
PUT(保存)
    public Car create() {
        Car car = new Car("toyoya", 1234);
        ofy().save().entity(car).now();
    }
GET
Result<Car> result = ofy().load().key(Key.create(Car.class, id));
LIST
Result<Car> result = ofy().load().key(Key.create(Car.class, id));
Query
// Operators are >, >=, <, <=, in, !=, <>, =, ==
List<Car> cars = ofy().load().type(Car.class).filter("year >", 1999).list();
List<Car> cars = ofy().load().type(Car.class).filter("year >=", 1999).list();
List<Car> cars = ofy().load().type(Car.class).filter("year !=", 1999).list();
List<Car> cars = ofy().load().type(Car.class).filter("year in", yearList).list();

// The Query itself is Iterable
Query<Car> q = ofy().load().type(Car.class).filter("vin >", "123456789");
for (Car car: q) {
    System.out.println(car.toString());
}
インデックス
基本@Indexで設定しておけばIndexは設定される。
ただし、カスタムインデックス(複数条件を指定する場合)は、datastore-indexes.xml を作成する必要あり。
例)
<?xml version="1.0" encoding="utf-8"?>
<datastore-indexes
  autoGenerate="true">
    <datastore-index kind="Employee" ancestor="false">
        <property name="lastName" direction="asc" />
        <property name="hireDate" direction="desc" />
    </datastore-index>
    <datastore-index kind="Project" ancestor="false">
        <property name="dueDate" direction="asc" />
        <property name="cost" direction="desc" />
    </datastore-index>
</datastore-indexes>
トランザクション
ちょっと癖があって制限はあるが可能。使えないわけではない。
import static com.googlecode.objectify.ObjectifyService.ofy;
import com.googlecode.objectify.Work;

// If you don't need to return a value, you can use VoidWork
Thing th = ofy().transact(new Work<Thing>() {
    public Thing run() {
        Thing thing = ofy().load().key(thingKey).now();
        thing.modify();
        ofy().save().entity(thing);
        return thing;
    }
});
Users Service
Googleアカウントでユーザ認証する仕組みなどを簡単に使えるようにするサービス。
例えばとあるURLのみGoogle認証にするとか、特定のユーザのみ認証許可与えるとか。
オペレータ向けの画面だったり、リリース前に特定のユーザのみ閲覧できるようにGoogle認証いれたりとか。
WebXMLのみで設定可能。
Memcache Service
Google Cloud Datastore や、Cloud SQLのような永続的なデータ保存の仕組みではなく、インメモリで高速に、かつ一時的にデータを保存したい場合などに利用できる。Objectifyでは、永続化と同時にMemcacheに保存する仕組みなども用意されている。
Task Queue Service
いわゆるキュー。2種類のキューが存在する。
- Push Queue
- enqueueしたら即座にdequeue処理される。
- Pull Queue
- 特定のタイミングでdequeueしたい場合に利用できる。
enqueue
public class Enqueue extends HttpServlet {
    protected void doPost(HttpServletRequest request, HttpServletResponse response)
            throws ServletException, IOException {
        String key = request.getParameter("key");

        // Add the task to the default queue.
        Queue queue = QueueFactory.getDefaultQueue();
        queue.add(TaskOptions.Builder.withUrl("/worker").param("key", key));

        response.sendRedirect("/");
    }
}
dequeue
// The Worker servlet should be mapped to the "/worker" URL.
public class Worker extends HttpServlet {
    protected void doPost(HttpServletRequest request, HttpServletResponse response)
            throws ServletException, IOException {
        String key = request.getParameter("key");
        // Do something with key.
    }
}
dequeueは、enqueue時に指定したパスに対してhttpで処理要求が飛んで来るような仕組みになっている。
Scheduled Tasks Serivice (Cron)
いわゆるcron。cron.xml 設定する。
各cronに対応するエンドポイント(Servlet)を用意し、処理はServletで書く。
<?xml version="1.0" encoding="UTF-8"?>
<cronentries>
  <cron>
    <url>/recache</url>
    <description>Repopulate the cache every 2 minutes</description>
    <schedule>every 2 minutes</schedule>
  </cron>
  <cron>
    <url>/weeklyreport</url>
    <description>Mail out a weekly report</description>
    <schedule>every monday 08:30</schedule>
    <timezone>America/New_York</timezone>
  </cron>
  <cron>
    <url>/weeklyreport</url>
    <description>Mail out a weekly report</description>
    <schedule>every monday 08:30</schedule>
    <timezone>America/New_York</timezone>
    <target>version-2</target>
  </cron>
</cronentries>
Channel Service
いわゆるPubSubみたいなことができるサービス。チャットみたいなことができると思われる。詳細はおって調べる。
Images Service
画像をリサイズしたりcropしたりローテートしたりを簡単にできるようにしたサービス。
import com.google.appengine.api.images.Image;
import com.google.appengine.api.images.ImagesService;
import com.google.appengine.api.images.ImagesServiceFactory;
import com.google.appengine.api.images.Transform;

// ...
        byte[] oldImageData;  // ...

        ImagesService imagesService = ImagesServiceFactory.getImagesService();

        Image oldImage = ImagesServiceFactory.makeImage(oldImageData);
        Transform resize = ImagesServiceFactory.makeResize(200, 300);

        Image newImage = imagesService.applyTransform(resize, oldImage);

        byte[] newImageData = newImage.getImageData();
Blobstore(バイナリを保存する仕組み)に保存されている画像などは、以下のようにURLにクエリを付与してアクセスすると、自動的にスケールやcropをしてくれる。
# Resize the image to 32 pixels (aspect-ratio preserved)
http://lhx.ggpht.com/randomStringImageId=s32

# Crop the image to 32 pixels
http://lhx.ggpht.com/randomStringImageId=s32-c
Module
アプリケーションに紐づくサブアプリケーションみたいな概念。
<?xml version="1.0" encoding="UTF-8"?>
<dispatch-entries>
  <dispatch>
      <!-- Default module serves the typical web resources and all static resources. -->
      <url>*/favicon.ico</url>
      <module>default</module>
  </dispatch>
  <dispatch>
      <!-- Default module serves simple hostname request. -->
      <url>simple-sample.appspot.com/</url>
      <module>default</module>
  </dispatch>
  <dispatch>
      <!-- Send all mobile traffic to the mobile frontend. -->
      <url>*/mobile/*</url>
      <module>mobile-frontend</module>
  </dispatch>
  <dispatch>
      <!-- Send all work to the one static backend. -->
      <url>*/work/*</url>
      <module>static-backend</module>
  </dispatch>
</dispatch-entries>
MicroServicesのような仕組みに使える。また、dispatch.xml を書くことで、URLのパスごとに指定したモジュールに処理を委譲することができる。
Cloud Debugging
超すごい。本番環境で動いているサービスのソースコードにデバッカおいてデバッグできる。現在はJavaのみ利用可能。
デバッガを設置すると、20msぐらい停止し、その間にsnapshotをとってくれる。変数の値やメモリなどの情報をダンプしてくれる。
