はじめに
前回の記事ではOSSのIoTプラットフォームであるFIWAREを紹介しました。
この記事ではFIWAREの構築方法から実際に使ってみるまでを説明します。
FIWAREの構築
以下のような環境を構築していきます。
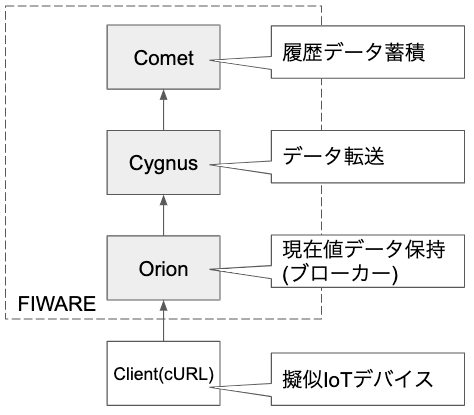
全て同一ホストの中で構築します。IoTデバイスを用意する代わりにcURLコマンドを使ってデータの登録・取得を行います。
今回はもっともシンプルな構成とするため、認証・認可のコンポーネント等は含んでいません。
準備
FIWAREの構築はDocker利用するのがもっとも簡単です。
事前に、DockerとDocker Composeを以下の公式ドキュメントの手順を参考にインストールしてください。
FIWAREの構築
Dockerを用いて、以下のコンテナを構築していきます。
- Orion
- MongoDB
- Comet
- Cygnus
まずはじめにOrionを起動します。
docker-compose.yaml を作成し、以下のコードを貼り付けてください。
version: "3"

services:
  orion:
    container_name: orion
    image: fiware/orion
    links:
      - mongo
    ports:
      - "1026:1026"
    command: -dbhost mongo

  cygnus:
    container_name: cygnus
    image: fiware/cygnus-ngsi:1.14.0
    ports:
      - "5050:5050"
      - "8081:8081"
    environment:
      - CYGNUS_MONGO_HOSTS=mongo:27017

  sth-comet:
    container_name: comet
    image: telefonicaiot/fiware-sth-comet
    links:
      - mongo
    ports:
      - "8666:8666"
    environment:
      - STH_HOST=0.0.0.0
      - DB_URI=mongo:27017

  mongo:
    container_name: mongo
    image: mongo:3.6
    command: --nojournal
docker-compose.yaml にはOrion、Cygnus、Cometとそれらで使用するMongoDBを起動するための設定が記述されています。
以下のコマンドを実行し、FIWAREを起動します。
$ docker-compose up -d
以下のようなログが出ればOKです。これでOrionが起動できました。
Creating cygnus ... done
Creating mongo  ... done
Creating comet  ... done
Creating orion  ... done
OrionのAPIを叩いて動作を確認します。
$ curl http://localhost:1026/version
Orionのバージョン情報が返ってくれば正常です。
$ curl http://localhost:1026/version
{
"orion" : {
  "version" : "2.2.0-next",
  "uptime" : "0 d, 0 h, 5 m, 34 s",
  "git_hash" : "549cd2b1a6b4e9a88eb42018d0a83eb574636d28",
  "compile_time" : "Tue Jun 4 09:14:09 UTC 2019",
  "compiled_by" : "root",
  "compiled_in" : "aab35014a2d5",
  "release_date" : "Tue Jun 4 09:14:09 UTC 2019",
  "doc" : "https://fiware-orion.rtfd.io/"
}
}
FIWAREを使う
FIWAREが構築できたので、実際に使っていきます。
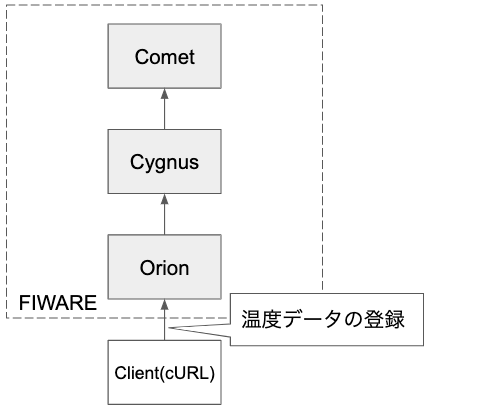
現在値データをアップロードする (Orion)
Orionに温度の擬似データをアップロードします。
Clientから以下のようなイメージでデータを登録します。
$ curl -sS http://localhost:1026/v2/entities \
     -H 'Content-Type: application/json' \
     -d @- <<EOF
{
  "id": "living",
  "type": "Room",
  "temperature": {"value": 23, "type": "Float"}
}
EOF
これでエンティティが作成されました。
次はエンティティを呼び出してみます。
$ curl -sS http://localhost:1026/v2/entities/living?type=Room \
       -H 'Accept: application/json' | jq .
以下のようなレスポンスが得られます。
{
  "id": "living",
  "type": "Room",
  "temperature": {
    "type": "Float",
    "value": 23,
    "metadata": {}
  }
}
現在値データを更新する
アップロードした温度のデータを更新してみます。
$ curl -sS http://localhost:1026/v2/entities/living/attrs \
     -H 'Content-Type: application/json' \
     -X PATCH \
     -d @- <<EOF
{
  "temperature": {
    "value": 26.5,
    "type": "Float"
  }
}
EOF
データを取得してみます。
$ curl -sS http://localhost:1026/v2/entities/living?type=Room \
       -H 'Accept: application/json' | jq .
temperature が26.5に更新されていれば正常です。
{
  "id": "living",
  "type": "Room",
  "temperature": {
    "type": "Float",
    "value": 26.5,
    "metadata": {}
  }
}
アトリビュートを指定して更新することもできます。
$ curl -sS http://localhost:1026/v2/entities/living/attrs/temperature/value \
       -H 'Content-Type: text/plain' \
       -X PUT \
       -d 28.5
値が更新されていることがわかります。
{
  "id": "living",
  "type": "Room",
  "temperature": {
    "type": "Float",
    "value": 28.5,
    "metadata": {}
  }
}
履歴データを参照する (Comet)
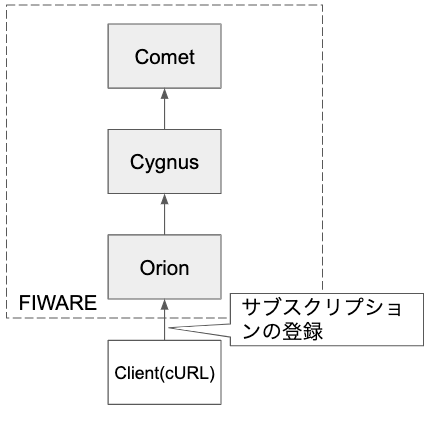
これまでは現在値データのみを扱ってきましたが、時間毎のデータの推移を取得したり分析したりするためには、過去のデータを履歴データとして蓄積する必要があります。
履歴データを蓄積するためには、現在値データの更新時にOrionからデータ転送コンポーネントであるCygnusに通知し、Cometにデータを渡す必要があります。
この通知の設定はサブスクリプションと呼ばれます。サブスクリプションの設定は以下のイメージでOrionに対して行います。
サブスクリプションは以下のように設定します。
$ curl -v -sS http://localhost:1026/v2/subscriptions \
     -H 'Content-Type: application/json' \
     -d @- <<EOF
{
  "description": "A subscription to notify info about living",
  "subject": {
    "entities": [
      {
        "id": "living",
        "type": "Room"
      }
    ],
    "condition": {
      "attrs": [
        "temperature"
      ]
    }
  },
  "notification": {
    "http": {
      "url": "http://cygnus:5050/notify"
    },
    "attrs": [
      "temperature"
    ],
    "attrsFormat": "legacy"
  },
  "expires": "2040-01-01T14:00:00.00Z",
  "throttling": 5
}
EOF
これで、履歴データを蓄積する準備ができました。
データを更新してみます。
$ curl -sS http://localhost:1026/v2/entities/living/attrs/temperature/value \
       -H 'Content-Type: text/plain' \
       -X PUT \
       -d 29
$ curl -sS http://localhost:1026/v2/entities/living/attrs/temperature/value \
       -H 'Content-Type: text/plain' \
       -X PUT \
       -d 29.5
データを更新したのでCometにデータが蓄積されているはずです。
履歴データはCometのAPIを利用します。
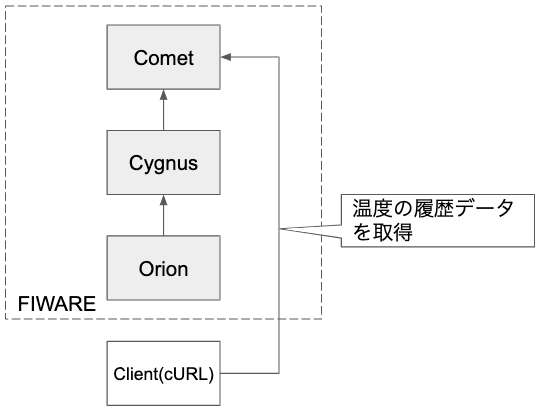
以下のコマンドを実行して履歴データを参照してみます。
$ curl -sS "http://localhost:8666/STH/v1/contextEntities/type/Room/id/living/attributes/temperature?lastN=3" \
        -H 'fiware-service: default' \
        -H 'fiware-servicepath: /' | jq
履歴データを取ることができました。
{
  "contextResponses": [
    {
      "contextElement": {
        "attributes": [
          {
            "name": "temperature",
            "values": [
              {
                "recvTime": "2019-06-06T07:43:43.498Z",
                "attrType": "Float",
                "attrValue": "28.5"
              },
              {
                "recvTime": "2019-06-06T07:43:50.676Z",
                "attrType": "Float",
                "attrValue": "29"
              },
              {
                "recvTime": "2019-06-06T07:43:50.682Z",
                "attrType": "Float",
                "attrValue": "29"
              }
            ]
          }
        ],
        "id": "living",
        "isPattern": false,
        "type": "Room"
      },
      "statusCode": {
        "code": "200",
        "reasonPhrase": "OK"
      }
    }
  ]
}
次に温度の最大値を取得してみます。
$ curl -sS "http://localhost:8666/STH/v1/contextEntities/type/Room/id/living/attributes/temperature?aggrMethod=max&aggrPeriod=minute" \
        -H 'fiware-service: default' \
        -H 'fiware-servicepath: /' | jq
最大値の29.5が取得できました。
{
  "contextResponses": [
    {
      "contextElement": {
        "attributes": [
          {
            "name": "temperature",
            "values": [
              {
                "_id": {
                  "attrName": "temperature",
                  "origin": "2019-06-06T07:00:00.000Z",
                  "resolution": "minute"
                },
                "points": [
                  {
                    "offset": 55,
                    "samples": 3,
                    "max": 29.5
                  }
                ]
              }
            ]
          }
        ],
        "id": "living",
        "isPattern": false,
        "type": "Room"
      },
      "statusCode": {
        "code": "200",
        "reasonPhrase": "OK"
      }
    }
  ]
}
おわりに
2回に渡ってFIWAREを紹介してきました。実際にFIWAREに触れることによって基本的な機能を理解していただけたと思います。
この記事をきっかけに、IoTやFIWAREに興味を持っていただければ幸いです。