業務でSSLや証明書が絡む開発してると、SSL通信できる環境がほしくなるケースに出くわすことがあります。
通常だと、シマンテックやサイバートラストなどの証明書サービスを利用しますが、なにかと面倒だったりします。
そんな時、MacのApache+mod_sslでサクッとSSL環境を構築してみるのがおすすめです。
前提条件
- MacOS X Lion (10.7.5)
- Apache 2.2.22
$ apachectl -v
Server version: Apache/2.2.22 (Unix)
Server built:   Jul 12 2015 15:11:26
- OpenSSL 0.9.8r
$ openssl version
OpenSSL 0.9.8r 8 Feb 2011
手順
- プライベート認証局(CA)の秘密鍵と公開鍵のペアの作成
- サーバ証明書の発行
- クライアント証明書の発行
- Apacheの設定と起動
- MacのWeb共有を有効にする
- Webサイトにアクセスする
プライベート認証局(CA)の秘密鍵と公開鍵のペアの作成
CA.shを使ってCAを構築し、CAの秘密鍵と公開鍵を作成します。
後にSSL証明書を発行するのと、クライアント認証環境で必要になります。
$ sudo su
$ cd /System/Library/OpenSSL/
$ ls
certs		misc		openssl.cnf	private
$ cp misc/CA.sh .
$ ./CA.sh -newca
CA certificate filename (or enter to create)
→リターン
Making CA certificate ...
Generating a 1024 bit RSA private key
.......++++++
......................................++++++
writing new private key to './demoCA/private/./cakey.pem'
Enter PEM pass phrase: →CA秘密鍵のパスフレーズ
Verifying - Enter PEM pass phrase: →パスフレーズ再入力
-----
You are about to be asked to enter information that will be incorporated
into your certificate request.
What you are about to enter is what is called a Distinguished Name or a DN.
There are quite a few fields but you can leave some blank
For some fields there will be a default value,
If you enter '.', the field will be left blank.
-----
Country Name (2 letter code) [AU]:JP
State or Province Name (full name) [Some-State]:Fukuoka
Locality Name (eg, city) []:Fukuoka
Organization Name (eg, company) [Internet Widgits Pty Ltd]:company
Organizational Unit Name (eg, section) []: →リターン
Common Name (eg, YOUR name) []:hogehoge.com ※1
Email Address []: →リターン

Please enter the following 'extra' attributes
to be sent with your certificate request
A challenge password []: →リターン
An optional company name []: →リターン
Using configuration from /System/Library/OpenSSL/openssl.cnf
Enter pass phrase for ./demoCA/private/./cakey.pem: →パスフレーズ再入力
Check that the request matches the signature
Signature ok
Certificate Details:
        Serial Number:
            b4:4b:d5:02:07:8f:43:49
        Validity
            Not Before: May 12 06:21:14 2015 GMT
            Not After : May 11 06:21:14 2018 GMT
        Subject:
            countryName               = JP
            stateOrProvinceName       = Fukuoka
            organizationName          = company
            commonName                = hogehoge.com
        X509v3 extensions:
            X509v3 Subject Key Identifier:
                D5:77:F6:E2:36:ED:EB:2D:C0:A1:1A:0B:E6:9F:3D:1F:A8:39:BB:3B
            X509v3 Authority Key Identifier:
                keyid:D5:77:F6:E2:36:ED:EB:2D:C0:A1:1A:0B:E6:9F:3D:1F:A8:39:BB:3B
                DirName:/C=JP/ST=Fukuoka/O=company/CN=hogehoge.com
                serial:B4:4B:D5:02:07:8F:43:49

            X509v3 Basic Constraints:
                CA:TRUE
Certificate is to be certified until May 11 06:21:14 2018 GMT (1095 days)

Write out database with 1 new entries
Data Base Updated
※1・・実在しないサーバ名を設定するとブラウザでアクセス時に警告が出ます。それでも良い場合は適当に。困る場合(やDNSがない環境の場合は)IP指定すれば回避できます。
以下のファイルが作成されてると思います。
-
CAの秘密鍵
demoCA/private/cakey.pem -
CAの公開鍵証明書
demoCA/cacert.pem
サーバ証明書の発行
まず、サーバ証明書を発行するための証明書署名要求(CSR)を作ります。
(サーバ証明書が第三者期間(ここでいうCA)によって審査されていることを保証するためにやります)
作ったCSRに、CAが秘密鍵で署名し証明書(crt)を発行します。
(この時、1で作ったCAの秘密鍵(cakey.pem)が使われます)
Note:
通常は、シマンテックやサイバートラストなどの申請サイトで、CSRをテキストエディタで開き内容をコピペして申請する手順を踏みます。
公開鍵長は1024bitとしてますが、プライベート認証局じゃない場合は2048bitじゃないとダメだったりするので、正式運用ではご注意を。
サーバ秘密鍵(key)の作成
$ openssl genrsa -out server.key 1024
Generating RSA private key, 1024 bit long modulus
....++++++
.++++++
e is 65537 (0x10001)
署名要求書(CSR)を作成
$ openssl req -new -key server.key -out server.csr
You are about to be asked to enter information that will be incorporated
into your certificate request.
What you are about to enter is what is called a Distinguished Name or a DN.
There are quite a few fields but you can leave some blank
For some fields there will be a default value,
If you enter '.', the field will be left blank.
-----
Country Name (2 letter code) [AU]:JP
State or Province Name (full name) [Some-State]:Fukuoka
Locality Name (eg, city) []:Fukuoka
Organization Name (eg, company) [Internet Widgits Pty Ltd]:company
Organizational Unit Name (eg, section) []: →リターン
Common Name (eg, YOUR name) []:hogehoge.com
Email Address []: →リターン

Please enter the following 'extra' attributes
to be sent with your certificate request
A challenge password []: →リターン
An optional company name []: →リターン
CAによる署名と証明書作成
$ openssl ca -out serverca.crt -infiles server.csr
Using configuration from /System/Library/OpenSSL/openssl.cnf
Enter pass phrase for ./demoCA/private/cakey.pem: →CA秘密鍵のパスフレーズ
Check that the request matches the signature
Signature ok
Certificate Details:
        Serial Number:
            b4:4b:d5:02:07:8f:43:4a
        Validity
            Not Before: May 12 06:31:56 2015 GMT
            Not After : May 11 06:31:56 2016 GMT
        Subject:
            countryName               = JP
            stateOrProvinceName       = Fukuoka
            organizationName          = company
            commonName                = hogehoge.com
        X509v3 extensions:
            X509v3 Basic Constraints:
                CA:FALSE
            Netscape Comment:
                OpenSSL Generated Certificate
            X509v3 Subject Key Identifier:
                6A:78:7C:45:C3:02:8F:E1:4D:E5:E9:83:19:3A:05:82:15:60:C8:0D
            X509v3 Authority Key Identifier:
                keyid:D5:77:F6:E2:36:ED:EB:2D:C0:A1:1A:0B:E6:9F:3D:1F:A8:39:BB:3B

Certificate is to be certified until May 11 06:31:56 2016 GMT (365 days)
Sign the certificate? [y/n]:y


1 out of 1 certificate requests certified, commit? [y/n]y
Write out database with 1 new entries
Data Base Updated
クライアント証明書の発行
手順はサーバ証明書の発行の流れと同じで説明は割愛します。
クライアント認証が必要なければ、この章を飛ばせばOK。
クライアント秘密鍵(client.key)作成
$ openssl genrsa -out client.key 1024
署名要求書(CSR)を作成
openssl req -new -key client.key -out client.csr
You are about to be asked to enter information that will be incorporated
into your certificate request.
What you are about to enter is what is called a Distinguished Name or a DN.
There are quite a few fields but you can leave some blank
For some fields there will be a default value,
If you enter '.', the field will be left blank.
-----
Country Name (2 letter code) [AU]:JP
State or Province Name (full name) [Some-State]:Fukuoka
Locality Name (eg, city) []:Fukuoka
Organization Name (eg, company) [Internet Widgits Pty Ltd]:company
Organizational Unit Name (eg, section) []: →リターン
Common Name (eg, YOUR name) []:hogehoge.com
Email Address []: →リターン

Please enter the following 'extra' attributes
to be sent with your certificate request
A challenge password []: →リターン
An optional company name []: →リターン
CAによる署名と証明書作成
$ openssl ca -out client-ca.crt -infiles client.csr
Using configuration from /System/Library/OpenSSL/openssl.cnf
Enter pass phrase for ./demoCA/private/cakey.pem: →CA秘密鍵のパスフレーズ
Check that the request matches the signature
Signature ok
Certificate Details:
        Serial Number:
            b4:4b:d5:02:07:8f:43:4b
        Validity
            Not Before: May 12 06:37:30 2015 GMT
            Not After : May 11 06:37:30 2016 GMT
        Subject:
            countryName               = JP
            stateOrProvinceName       = Fukuoka
            organizationName          = company
            commonName                = hogehoge.com
        X509v3 extensions:
            X509v3 Basic Constraints:
                CA:FALSE
            Netscape Comment:
                OpenSSL Generated Certificate
            X509v3 Subject Key Identifier:
                09:64:C3:16:B5:0B:63:AA:EC:8A:85:7B:DE:97:F2:A1:4E:7D:B1:45
            X509v3 Authority Key Identifier:
                keyid:D5:77:F6:E2:36:ED:EB:2D:C0:A1:1A:0B:E6:9F:3D:1F:A8:39:BB:3B

Certificate is to be certified until May 11 06:37:30 2016 GMT (365 days)
Sign the certificate? [y/n]:y


1 out of 1 certificate requests certified, commit? [y/n]y
Write out database with 1 new entries
Data Base Updated
p12形式にエクスポート
$ openssl pkcs12 -export -inkey client.key -in client-ca.crt -out client.p12 -name "private ca test"
Enter Export Password: →クライアント証明書のパスフレーズ
Verifying - Enter Export Password: →パスフレーズ再入力
Apacheの設定
各ファイルの配置
これまで作成した各ファイルをApache側で読み込みできるようにコピーしておく。
$ cp /System/Library/OpenSSL/serverca.crt /private/etc/apache2/.
$ cp /System/Library/OpenSSL/server.key /private/etc/apache2/.
$ cp /System/Library/OpenSSL/demoCA/cacert.pem /private/etc/apache2/.
各種設定ファイルの編集
変更しなくてもいい記述もあるが、ポイントだけ抜粋してます。
以下のような設定で各キーが有効になっているようにしておくこと。
 94行付近 : LoadModule ssl_module libexec/apache2/mod_ssl.so

186行付近 : ServerName admin-no-Mac-mini.local:80

238行付近 : DocumentRoot "/Library/WebServer/Documents"

624行付近 : Include /private/etc/apache2/extra/httpd-vhosts.conf

636行付近 : Include /private/etc/apache2/extra/httpd-ssl.conf
※ もし、クライアント認証が必要ない場合は
httpd-ssl.confのSSLVerifyClientの記述をコメントアウトすればOK
SSLCertificateFile "/private/etc/apache2/serverca.crt"

SSLCertificateKeyFile "/private/etc/apache2/server.key"

SSLCACertificateFile "/private/etc/apache2/cacert.pem"

SSLVerifyClient require
SSLVerifyDepth  1
httpd-vhosts.confに既に記述されているVirtualHostタグのものは、サンプルなので削除して以下のものだけとなるように記述する。
<VirtualHost *:80>
ServerName localhost
DocumentRoot /Library/WebServer/Documents/
</VirtualHost>
Apacheの再起動
httpd.confの構文テストで問題ないことが確認できたら、Apacheを再起動する。
$ apachectl configtest
Syntax OK
$ apachectl restart
MacのWeb共有を有効にする
システム環境設定>共有>Web 共有 をオンにする
Webサイトにアクセスする
クライアント証明書(client.p12)をSSL通信したいPCに入れておく。
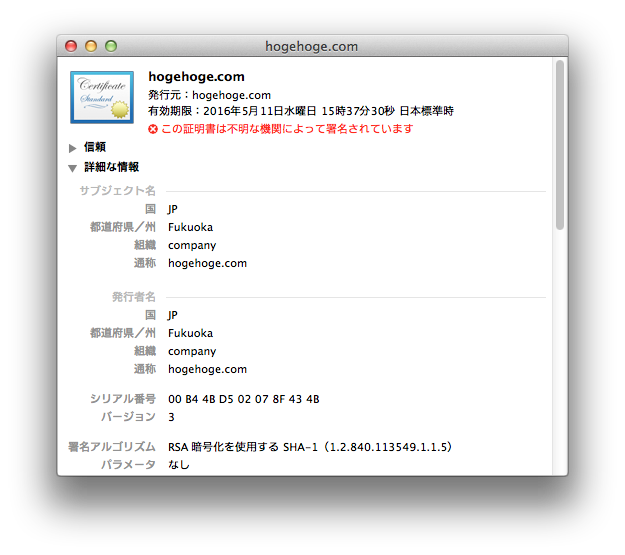
Macのキーチェーンに入れて詳細表示するとこうなる。

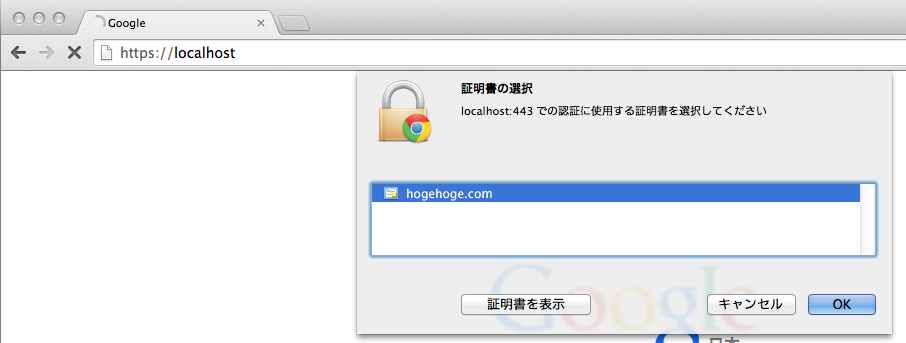
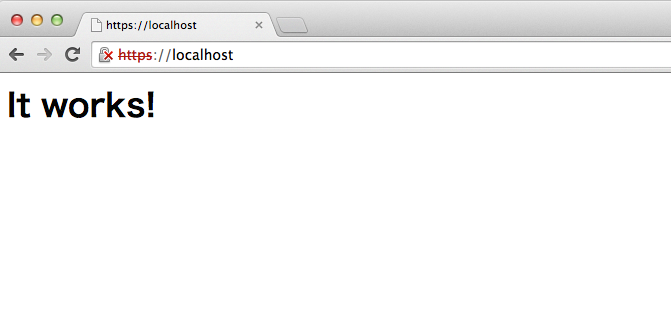
ブラウザから https://{IPアドレス} にアクセスする(例ではlocalhost)と、証明書選択画面が表示されるので選択すると(別のCAが発行した証明書は表示されません)

トラブルシューティング
証明書発行する際に
failed to update database
TXT_DB error number 2
のようなエラーが出た場合は、以下のコマンドを実行すればOKです。
$ rm -fr demoCA/index.txt
$ touch demoCA/index.txt
Tips
- 秘密鍵が正しいかどうか確認する
$ openssl rsa -in server.key -check -noout
RSA key ok
- 証明書の有効期限を確認
$ openssl x509 -in serverca.crt -noout -dates
- 証明書の確認
$ openssl x509 -in demoCA/cacert.pem -text
- 証明書の失効
$ openssl ca -gencrl -revoke client-ca.crt
- CAの再構築
certs, misc, openssl.cnf, private以外を削除
/private/etc/apache2/にコピーしたファイル(serverca.crt, server.key, cacert.pem)を削除
