筆者は自宅にGit/SSHサーバを置いている.最近,Wifiルータに付属してきたDDNSiobb.netサービスが使用できなくなったので,ドメイン取得からやり直す必要が出た.備忘録として残しておく.
前提条件
- 固定IPなし
- DDNSサービスを使用してもよいが,セキュリティが手早いという意味も含めcloudflare tunnel (cloudflared) サービスを使う.
- 接続先のサーバ(SSH先.クライアント専用機は他にもある)は以下3台.
- MacOS Sequoia(計算用)
- Windows 11(自宅デスクトップ)
- Linux Fedora Workstation 42(Gitサーバ)
- 全台とも
sshdはインストール済み.(適当なパスワード・鍵設定のもとでssh localhostが通る) -
cloudflaredをインストール済み.(後述)
- 接続元のクライアントはMac, Windows, Linuxのいずれか(上記3台も含め,複数台).
- 全台とも
sshをインストール済み. -
cloudflaredをインストール済み.(後述) - (オプション)各サーバに公開鍵を登録済みであるものとする.
- 全台とも
手順
ドメインを購入する
ここからはじまる.無料のものは避けておくとして,購入先には様々な選択肢がある.筆者が使用したことのあるサービスとしては,Squarespace(旧Google Domains)などがある.Google Domains当時は若干安価であったが,最近では値上がりしているので,あまりメリットもないだろう.
今回はcloudflareサービスで使用するので,結局Cloudflare Registerで購入した.
なお一般論として,ドル建て購入の場合はpaypalよりクレジットカードのほうが為替手数料が安い傾向にあるようだ.ちなみに執筆時点では.comドメインが$11.48であった.
また,Cloudflare Registerは,DNSをCloudflareのものにする必要がある,等の制約がある.
またデフォルトでwhoisの個人情報はData Redactedとなるが,住所が都道府県までは表示される.
Cloudflare Zero Trustの登録
ドメインの支払い・登録が完了したら,Cloudflare Tunnelのセットアップを行う.SSH(・Git)だけを行うのなら,明示的にDNSテーブルを設定する必要はない.Tunnelを設定すれば,勝手にCNAMEドメインを登録してくれる.
Cloudflareのダッシュボードから,左の「Access」を選択し,Zero Trustのトップページに移行する.
初回はプランを選択するように言われるので,対応する.無料(Free)プランでよい.クレジットカード情報のみ入力する必要があった.
左のメニューのNetwork(昔はAccess欄にあったのが移動した)から,Tunnelsを選択する.

Cloudflare Tunnelのセットアップ(サーバ側)
Tunnelは,サーバの数だけ用意する.クライアントの数だけ用意するのではない.
「Create Tunnel」から,Cloudflaredを選択する.

適当なトンネル名(サブドメイン等には関係がない(後から設定する)が,サーバ名が管理上良いだろう)を記入する.


サーバのCloudflaredを設定する.インストールが未完了であれば,各OSごとの手順に従ってcloudflaredをインストールすればよい.
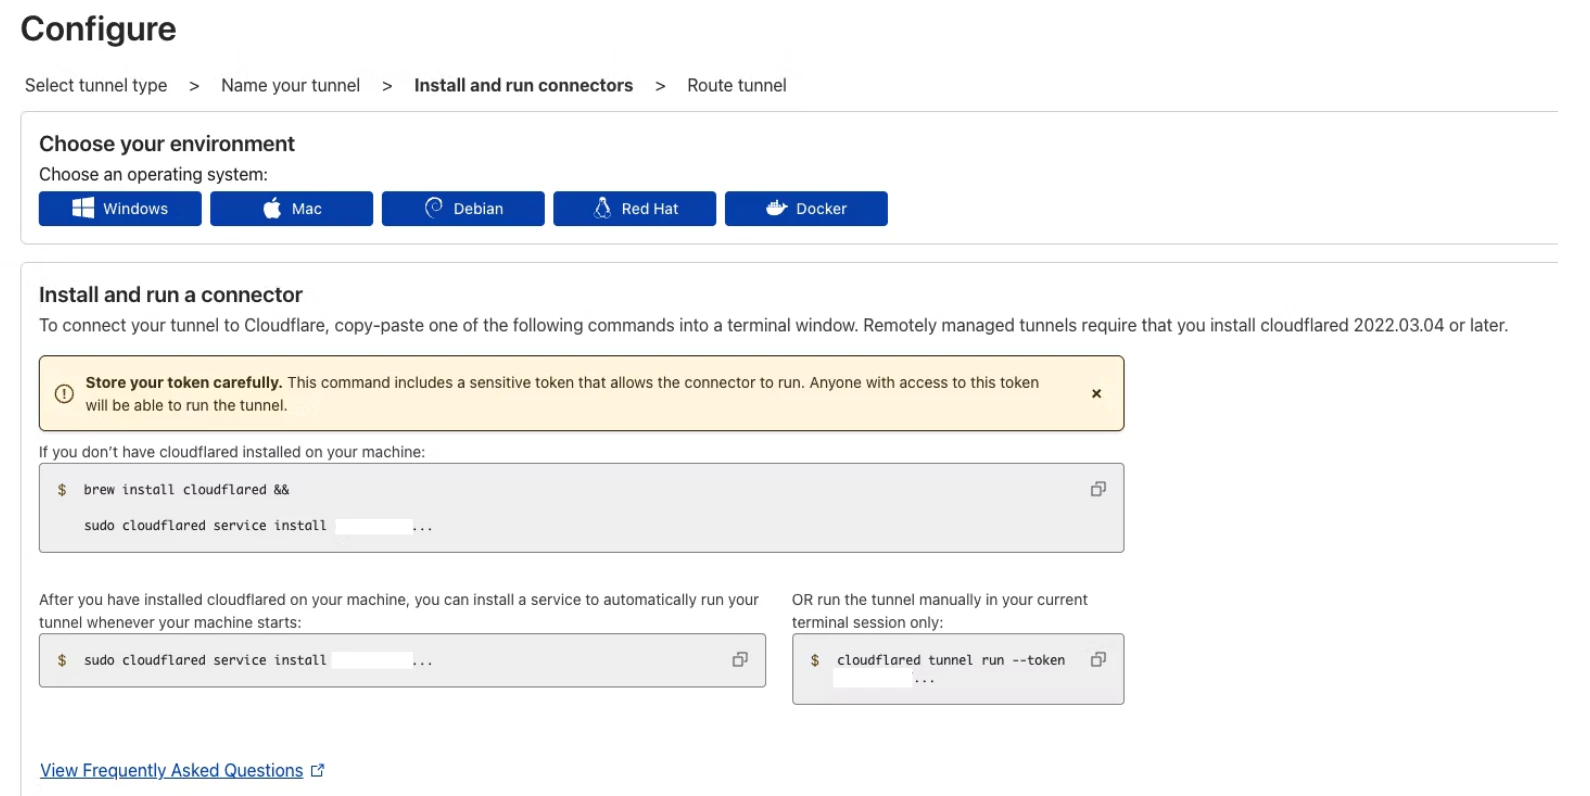
(補足)cloudflaredを既にインストール済みなら,画面に表示されているコマンド(ここではcloudflared service install xxxxxx....(横のコピーマークを押すことでトークンの全文が得られる))を実行すればよい.なお,既に別のトンネルが稼働している場合はエラーが出る.今回は古いトンネル(別のドメインで使っていたもの)を削除して良い状況だったので,削除した.
(base) Mac-Studio:~ user$ sudo cloudflared service install xxxxxxxx

2025-07-01T10:55:19Z INF Installing cloudflared client as a system launch daemon. cloudflared client will run at boot
2025-07-01T10:55:19Z ERR error generating launchd template error="cloudflared service is already installed at /Library/LaunchDaemons/com.cloudflare.cloudflared.plist; if you are running a cloudflared tunnel, you can point it to multiple origins, avoiding the need to run more than one cloudflared service in the same machine; otherwise if you are really sure, you can do `cloudflared service uninstall` to clean up the existing service and then try again this command"
cloudflared service is already installed at /Library/LaunchDaemons/com.cloudflare.cloudflared.plist; if you are running a cloudflared tunnel, you can point it to multiple origins, avoiding the need to run more than one cloudflared service in the same machine; otherwise if you are really sure, you can do `cloudflared service uninstall` to clean up the existing service and then try again this command

(base) Mac-Studio:~ user$ sudo cloudflared service uninstall

2025-07-01T10:56:47Z INF Uninstalling cloudflared as a system launch daemon
2025-07-01T10:56:47Z INF Launchd for cloudflared was uninstalled successfully

(base) Mac-Studio:1025tex miffy$ sudo cloudflared service install xxxxxxxx

2025-07-01T10:56:52Z INF Installing cloudflared client as a system launch daemon. cloudflared client will run at boot
2025-07-01T10:56:52Z INF Outputs are logged to /Library/Logs/com.cloudflare.cloudflared.err.log and /Library/Logs/com.cloudflare.cloudflared.out.log
2025-07-01T10:56:52Z INF MacOS service for cloudflared installed successfully
サブドメイン(サーバ名がよいだろう),ドメイン(パスは空欄で良い)を入力する.また,下の「service」は,「SSH://localhost」またはポートを変えているなら「SSH://localhost:8022」などでよい.

サーバの設定は以上である.サーバについても以下クライアント側マシンと同様の設定をしておくと,各作業において手早い.
クライアント側マシンの設定
cloudflaredをインストールする.(トンネル(サーバ用トンネルコネクタ)のセットアップは不要である.)以下のサイトの通りだ.
次に,以下のコマンドでcloudflareにログインする.
$ cloudflared tunnel login
~/.ssh/configに以下のように追記する.サーバ側のドメインをsubdomain.example.comにしたとする.
Host subdomain.example.com
	ProxyCommand cloudflared access ssh --hostname %h
	User (ユーザ名;都度指定するならこの行不要)
テスト
以上の設定を行えば,クライアントマシンから
ssh subdomain.example.com
で接続できる.その後,必要に応じて鍵認証等を設定して完了.