この記事は 2020 年の ReactiveProperty のオーバービューの全 3 編からなる記事の 2 つ目の記事です。
他の記事はこちらです。
- MVVM をリアクティブプログラミングで快適に ReactiveProperty オーバービュー 2020 年版 前編
- MVVM をリアクティブプログラミングで快適に ReactiveProperty オーバービュー 2020 年版 中編 (この記事)
- MVVM をリアクティブプログラミングで快適に ReactiveProperty オーバービュー 2020 年版 後編
コマンド
ReactiveProperty には MVVM アプリケーションを開発するときには必須のコマンドを提供しています。型引数の有無はありますが、大きくわけて非同期処理対応じゃないものと非同期処理対応のものの 2 種類のコマンドを提供しています。
- ReactiveCommand : 非同期処理対応じゃないもの
- AsyncReactiveCommand : 非同期処理対応のもの
ReactiveCommand
普通のコマンドです。特徴としては ICommand の実行可否を表す CanExecute と CanExecuteChanged イベントを IObservable<bool> から発行された値をもとに指定できるというものがあります。
ReactiveCommand を作成するには IObservable<bool> に対して ToReactiveCommand() か 型引数ありの ToReactiveCommand<T>() を呼び出すことでコマンドの生成が出来ます。型引数がないものはコマンドパラメーターを受け取らないコマンドで、型引数を指定するとコマンドパラメーターを受けるコマンドになります。また、IObservable<T> を実装していて、コマンドの Execute が呼ばれると OnNext が実行されます。そのため Subscribe でコマンドの実行処理を書けたり、Where などの LINQ のメソッドで加工や合成が可能になります。
Subscribe メソッド
ReactiveCommand の特徴についてまとめます。
-
IObservable<bool>からToReactiveCommandメソッドで作成可能 -
IObservable<bool>から true が発行されると実行可能になりIObservable<bool>から false が発行されると実行不可能になる -
IObservable<T>を実装していて Command の Execute が呼ばれるとコマンドパラメーターの値を発行する - Subscribe でコマンド実行処理がかけたり Where/Select/Zip/Concat/etc... で合成ができる
動きは以下のようになります。
using Reactive.Bindings;
using System;
using System.Reactive.Subjects;

namespace RxPropLab
{
    class Program
    {
        static void Main(string[] args)
        {
            var commandSource = new Subject<bool>();

            // 初期状態
            var command = commandSource.ToReactiveCommand(true);
            command.Subscribe(() => Console.WriteLine("Execute が呼ばれたよ。"));
            command.CanExecuteChanged += (_, __) => Console.WriteLine("CanExecuteChanged が呼ばれたよ!");

            // CanExecute の値は最後に発行された値
            Console.WriteLine($"CanExecute: {command.CanExecute()}");

            // ソースから値が発行されると CanExecuteChanged が呼ばれる
            commandSource.OnNext(false);
            commandSource.OnNext(true);

            command.Execute(); // Subscribe が呼ばれる
        }
    }
}
実行結果は以下のようになります。
CanExecute: True
CanExecuteChanged が呼ばれたよ!
CanExecuteChanged が呼ばれたよ!
Execute が呼ばれたよ。
ToReactiveProperty の型引数を指定するとコマンドパラメーターありになります。
動作確認のコードは以下のようになります。
using Reactive.Bindings;
using System;
using System.Reactive.Subjects;

namespace RxPropLab
{
    class Program
    {
        static void Main(string[] args)
        {
            var commandSource = new Subject<bool>();

            // 初期状態
            var command = commandSource.ToReactiveCommand<string>(true);
            command.Subscribe(x => Console.WriteLine($"Execute が呼ばれたよ。: {x}"));
            command.CanExecuteChanged += (_, __) => Console.WriteLine("CanExecuteChanged が呼ばれたよ!");

            // CanExecute の値は最後に発行された値
            Console.WriteLine($"CanExecute: {command.CanExecute()}");

            // ソースから値が発行されると CanExecuteChanged が呼ばれる
            commandSource.OnNext(false);
            commandSource.OnNext(true);

            command.Execute("ぱらめーたー"); // Subscribe が呼ばれる。パラメーターも渡せる
        }
    }
}
実行すると以下のようになります。
CanExecute: True
CanExecuteChanged が呼ばれたよ!
CanExecuteChanged が呼ばれたよ!
Execute が呼ばれたよ。: ぱらめーたー
XAML プラットフォームでは、この ReactiveCommand を Button などの Command プロパティとバインドして使用します。
実際に ViewModel クラスで定義した例を以下に示します。
using Reactive.Bindings;
using System;
using System.ComponentModel;
using System.Reactive.Linq;

namespace RxPropLabWpf
{
    // WPF のメモリリーク対策で INotifyPropertyChanged は実装しておく
    public class MainWindowViewModel : INotifyPropertyChanged
    {
        public event PropertyChangedEventHandler PropertyChanged;

        // コマンドのソース用
        public ReactivePropertySlim<bool> IsChecked { get; }
        // コマンドを押したときに更新するメッセージ
        public ReadOnlyReactivePropertySlim<string> Message { get; }
        // コマンド
        public ReactiveCommand SampleCommand { get; }

        public MainWindowViewModel()
        {
            // デフォルト値が true の設定
            IsChecked = new ReactivePropertySlim<bool>(true);
            // ReactiveProperty は IObservable なので ReactiveCommand にできる
            SampleCommand = IsChecked.ToReactiveCommand();
            // ReactiveCommand は IObservable なので Select で加工して ReactiveProperty に出来る
            Message = SampleCommand.Select(_ => DateTime.Now.ToString())
                .ToReadOnlyReactivePropertySlim();
        }
    }
}
XAML で使ってみましょう。
<Window x:Class="RxPropLabWpf.MainWindow"
        xmlns="http://schemas.microsoft.com/winfx/2006/xaml/presentation"
        xmlns:x="http://schemas.microsoft.com/winfx/2006/xaml"
        xmlns:d="http://schemas.microsoft.com/expression/blend/2008"
        xmlns:mc="http://schemas.openxmlformats.org/markup-compatibility/2006"
        xmlns:local="clr-namespace:RxPropLabWpf"
        mc:Ignorable="d"
        Title="MainWindow" Height="450" Width="800">
    <Window.DataContext>
        <!-- ViewModel を設定して -->
        <local:MainWindowViewModel />
    </Window.DataContext>
    <StackPanel Margin="10">
        <!-- ReactivePropertySlim とバインド -->
        <CheckBox IsChecked="{Binding IsChecked.Value, Mode=TwoWay}"
                  Content="CanExecute"
                  Margin="5"/>
        <!-- コマンドとバインド -->
        <Button Content="Command"
                Command="{Binding SampleCommand}"
                Margin="5"/>
        <!-- ReadOnlyReactivePropertySlim とバインド -->
        <TextBlock Text="{Binding Message.Value}"
                   Margin="5"/>
    </StackPanel>
</Window>
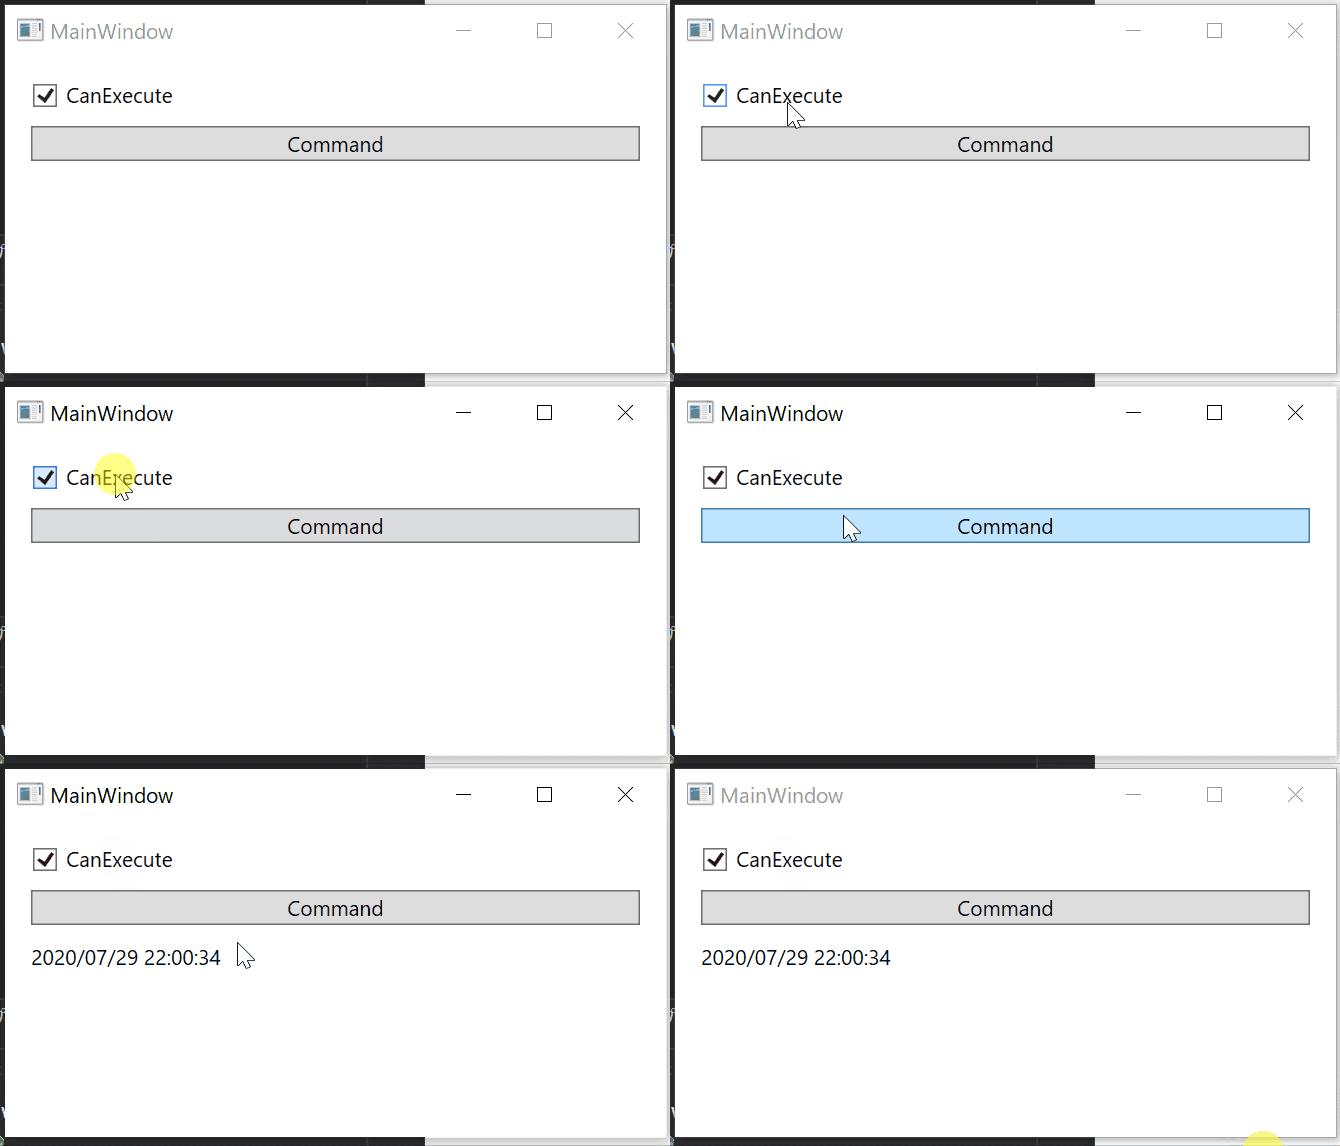
実行してみると以下のように動きます。チェックボックスとボタンの活性非活性が ReactivePropertySlim<bool> から作られた ReactiveCommand の CanExecute 軽油で同期されます。そしてボタンのクリックを IObservable<string> に Select で変換して ToReadOnlyReactivePropertySlim で ReactivePropertySlim にしたものとバインドすることでコマンド実行と同時に一番下の TextBlock にメッセージが表示されます。
この他に ReactiveCommand には WithSubscribe メソッドがが定義されています。これはコマンドのインスタンス生成から Subscribe までをメソッドチェーンで定義できる便利メソッドです。以下のように利用します。
// コマンドのソース
var source = new Subject<bool>();
// WithSubscribe を使わない方法
var command1 = source.ToReactiveCommand();
command.Subscribe(() => 何か処理);

// WithSubscribe を使う方法
var command2 = source.ToReactiveCommand()
  .WithSubscribe(() => 何か処理);
便利。
最後に常に実行されていればいいコマンドは普通に new ReactiveCommand() で作成できます。
AsyncReactiveCommand
次に非同期対応のコマンドです。このコマンドは、Subscribe に非同期メソッドが指定できます。そして非同期メソッドが実行している間は CanExecute が false を返してボタンなどが自動的に非活性になります。便利。
以下にコード例を示します。
using Reactive.Bindings;
using System;
using System.ComponentModel;
using System.Reactive.Linq;
using System.Threading.Tasks;

namespace RxPropLabWpf
{
    // WPF のメモリリーク対策で INotifyPropertyChanged は実装しておく
    public class MainWindowViewModel : INotifyPropertyChanged
    {
        public event PropertyChangedEventHandler PropertyChanged;

        public AsyncReactiveCommand SampleCommand { get; }
        public ReactivePropertySlim<string> Message { get; }

        public MainWindowViewModel()
        {
            SampleCommand = new AsyncReactiveCommand()
                // 非同期処理を Subscribe 可能
                .WithSubscribe(async () =>
                {
                    Message.Value = "開始";
                    await Task.Delay(3000);
                    Message.Value = "終了";
                });
        }
    }
}
DataContext に設定して適当にバインドします。
<Window x:Class="RxPropLabWpf.MainWindow"
        xmlns="http://schemas.microsoft.com/winfx/2006/xaml/presentation"
        xmlns:x="http://schemas.microsoft.com/winfx/2006/xaml"
        xmlns:d="http://schemas.microsoft.com/expression/blend/2008"
        xmlns:mc="http://schemas.openxmlformats.org/markup-compatibility/2006"
        xmlns:local="clr-namespace:RxPropLabWpf"
        mc:Ignorable="d"
        Title="MainWindow" Height="450" Width="800">
    <Window.DataContext>
        <!-- ViewModel を設定して -->
        <local:MainWindowViewModel />
    </Window.DataContext>
    <StackPanel Margin="10">
        <!-- コマンドとバインド -->
        <Button Content="Command"
                Command="{Binding SampleCommand}"
                Margin="5"/>
        <!-- ReadOnlyReactivePropertySlim とバインド -->
        <TextBlock Text="{Binding Message.Value}"
                   Margin="5"/>
    </StackPanel>
</Window>
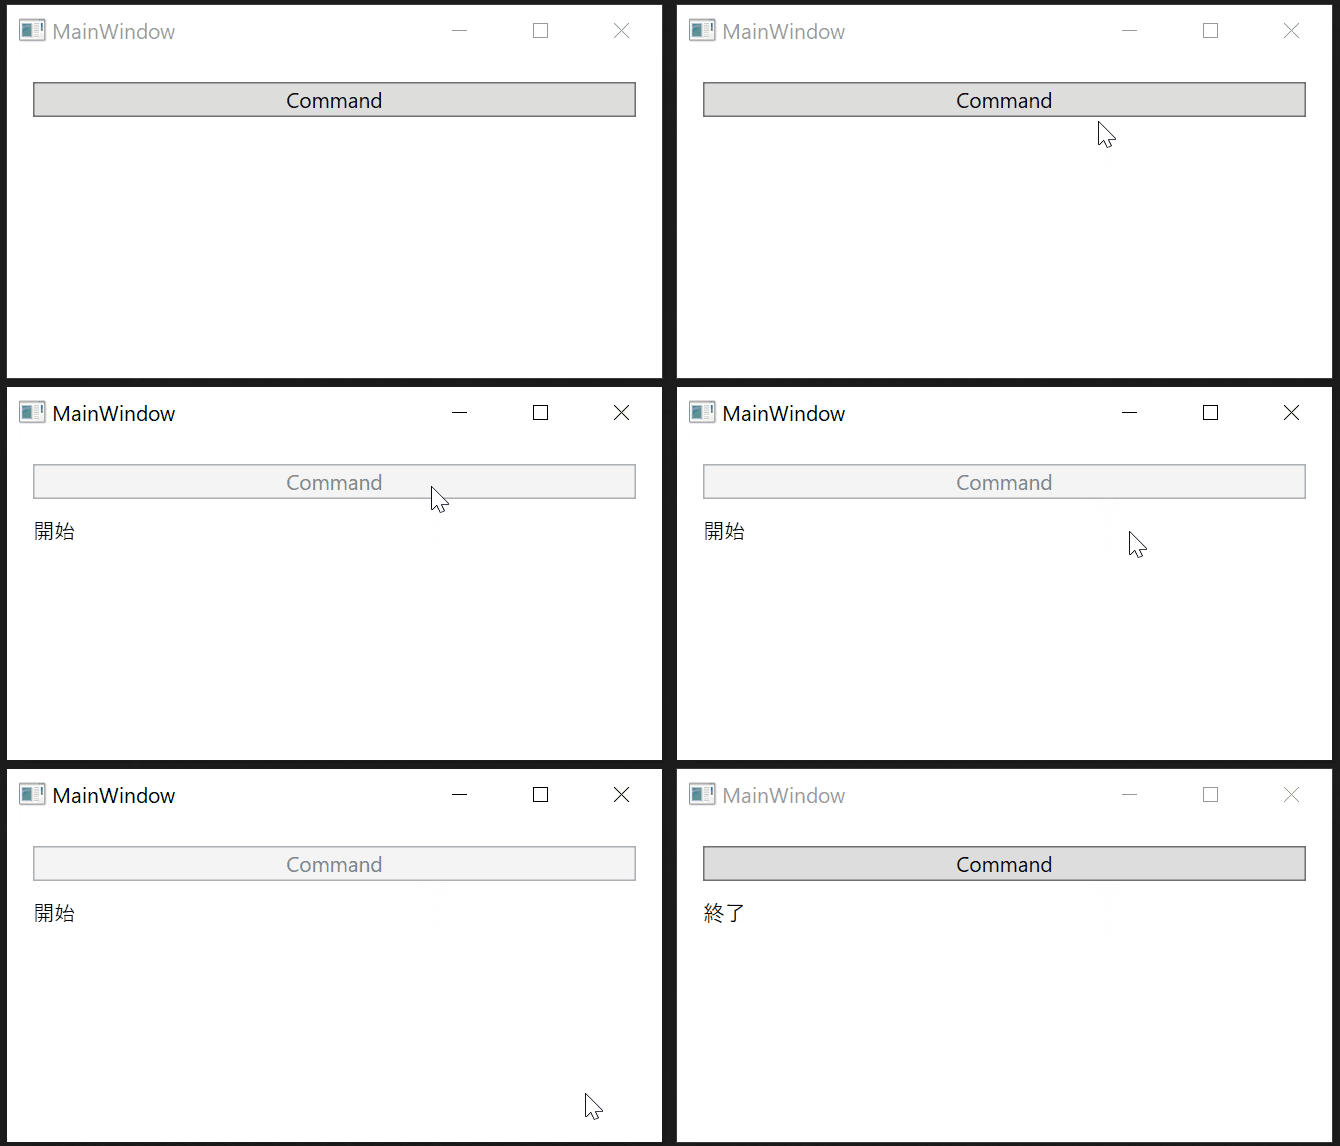
実行すると以下のようになります。ちゃんと非同期処理が実行中はボタンが非活性になっています。
注意点としては、AsyncReactiveCommand は IObservable<bool> ではないので ReactiveCommand のように Select などは出来ません。Subscribe か WithSubscribe をするだけになります。
実行可否状態の共有
非同期操作を行うコマンドが画面内に複数個あって、どれかが実行されている間は全部のボタンを押せないようにしないという要件は結構あると思います。
AsyncReactiveCommand は、その機能を組み込みでサポートしています。
AsyncReactiveCommand を生成するためのメソッドやコンストラクターには IReactiveProperty<bool> を受け取るオーバーロードや IReactiveProperty<bool> 専用の ToAsyncReactiveCommand 拡張メソッドがあります。IReactiveProperty<T> は ReactiveProperty<T> クラスと ReactivePropertySlim<T> が実装しているインターフェースです。つまり ReactiveProperty<bool> か ReactivePropertySlim<T> を渡せるということです。
IReactiveProperty<bool> を使って作った AsyncReactiveCommand は、実行可否の状態を、この IReactiveProperty<bool> を通して共有します。
例えば、コマンドの実行可否を共有する 2 つの AsyncReactiveCommand を作るようなコードは以下のようになります。
using Reactive.Bindings;
using System.ComponentModel;
using System.Threading.Tasks;

namespace RxPropLabWpf
{
    // WPF のメモリリーク対策で INotifyPropertyChanged は実装しておく
    public class MainWindowViewModel : INotifyPropertyChanged
    {
        public event PropertyChangedEventHandler PropertyChanged;

        public AsyncReactiveCommand LongTimeProcess1Command { get; }
        public AsyncReactiveCommand LongTimeProcess2Command { get; }

        public MainWindowViewModel()
        {
            // 同じ ReactiveProperty<bool> から非同期コマンドを作成
            var sharedCanExecuteReactiveProperty = new ReactivePropertySlim<bool>(true);
            LongTimeProcess1Command = sharedCanExecuteReactiveProperty.ToAsyncReactiveCommand()
                .WithSubscribe(async () => await Task.Delay(3000));
            LongTimeProcess2Command = sharedCanExecuteReactiveProperty.ToAsyncReactiveCommand()
                .WithSubscribe(async () => await Task.Delay(3000));
        }
    }
}
この 2 つのコマンドをボタンにバインドしてみましょう。
<Window x:Class="RxPropLabWpf.MainWindow"
        xmlns="http://schemas.microsoft.com/winfx/2006/xaml/presentation"
        xmlns:x="http://schemas.microsoft.com/winfx/2006/xaml"
        xmlns:d="http://schemas.microsoft.com/expression/blend/2008"
        xmlns:mc="http://schemas.openxmlformats.org/markup-compatibility/2006"
        xmlns:local="clr-namespace:RxPropLabWpf"
        mc:Ignorable="d"
        Title="MainWindow" Height="450" Width="800">
    <Window.DataContext>
        <!-- ViewModel を設定して -->
        <local:MainWindowViewModel />
    </Window.DataContext>
    <StackPanel>
        <Button Content="1" Command="{Binding LongTimeProcess1Command}" />
        <Button Content="2" Command="{Binding LongTimeProcess2Command}" />
    </StackPanel>
</Window>
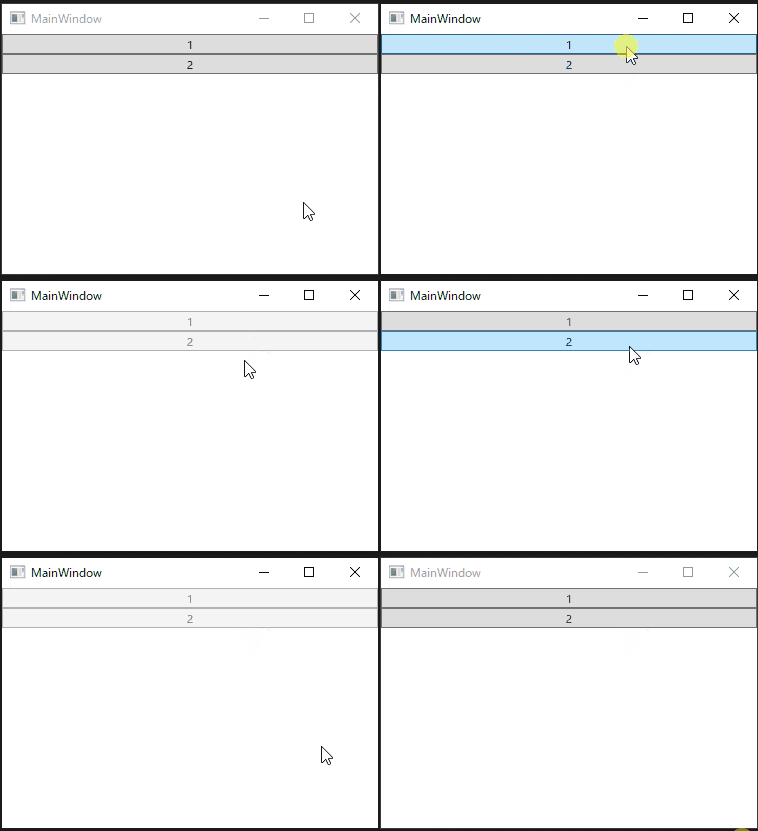
実行すると以下のようになります。コマンドの実行可否のステータスが共有化されていることがわかります。
もう少し複雑な例を紹介したいと思います。例えば 2 つの入力項目があって、そこに入力エラーが無かったら押せる AsyncReactiveCommand に紐づいたボタンが複数個あって、それの実行可否を共有するようにしてみましょう。
以下のようなコードになります。
using Reactive.Bindings;
using System.ComponentModel;
using System.ComponentModel.DataAnnotations;
using System.Reactive.Linq;
using System.Threading.Tasks;

namespace RxPropLabWpf
{
    // WPF のメモリリーク対策で INotifyPropertyChanged は実装しておく
    public class MainWindowViewModel : INotifyPropertyChanged
    {
        public event PropertyChangedEventHandler PropertyChanged;

        [Required]
        public ReactiveProperty<string> Input1 { get; }
        [Required]
        public ReactiveProperty<string> Input2 { get; }
        public AsyncReactiveCommand LongTimeProcess1Command { get; }
        public AsyncReactiveCommand LongTimeProcess2Command { get; }

        public MainWindowViewModel()
        {
            // 必須入力チェックつき ReactiveProperty
            Input1 = new ReactiveProperty<string>()
                .SetValidateAttribute(() => Input1);
            Input2 = new ReactiveProperty<string>()
                .SetValidateAttribute(() => Input2);

            // ObservehasErrors は ReactiveProperty の入力エラーに変化があるたびに値が発行される IObservable<bool>
            // それをもとに、入力エラーがない状態を表す IObservable<bool> を作成
            var allInputsAreValid = Input1
                .ObserveHasErrors.CombineLatest(Input2.ObserveHasErrors, (x, y) => !x && !y);

            // 入力エラーがないときに実行できるコマンドを作りつつ、IReactiveProperty<bool> を使って状態を共有するようにする
            var sharedCanExecuteReactiveProperty = new ReactivePropertySlim<bool>(true);
            LongTimeProcess1Command = allInputsAreValid.ToAsyncReactiveCommand(sharedCanExecuteReactiveProperty)
                .WithSubscribe(async () => await Task.Delay(3000));
            LongTimeProcess2Command = allInputsAreValid.ToAsyncReactiveCommand(sharedCanExecuteReactiveProperty)
                .WithSubscribe(async () => await Task.Delay(3000));
        }
    }
}
XAML で適当にバインドします。
<Window x:Class="RxPropLabWpf.MainWindow"
        xmlns="http://schemas.microsoft.com/winfx/2006/xaml/presentation"
        xmlns:x="http://schemas.microsoft.com/winfx/2006/xaml"
        xmlns:d="http://schemas.microsoft.com/expression/blend/2008"
        xmlns:mc="http://schemas.openxmlformats.org/markup-compatibility/2006"
        xmlns:local="clr-namespace:RxPropLabWpf"
        mc:Ignorable="d"
        Title="MainWindow" Height="450" Width="800">
    <Window.DataContext>
        <!-- ViewModel を設定して -->
        <local:MainWindowViewModel />
    </Window.DataContext>
    <StackPanel>
        <TextBox Text="{Binding Input1.Value, UpdateSourceTrigger=PropertyChanged}"
                 Margin="5" />
        <TextBox Text="{Binding Input2.Value, UpdateSourceTrigger=PropertyChanged}"
                 Margin="5" />
        <Button Content="1" Command="{Binding LongTimeProcess1Command}"
                Margin="5" />
        <Button Content="2" Command="{Binding LongTimeProcess2Command}"
                Margin="5" />
    </StackPanel>
</Window>
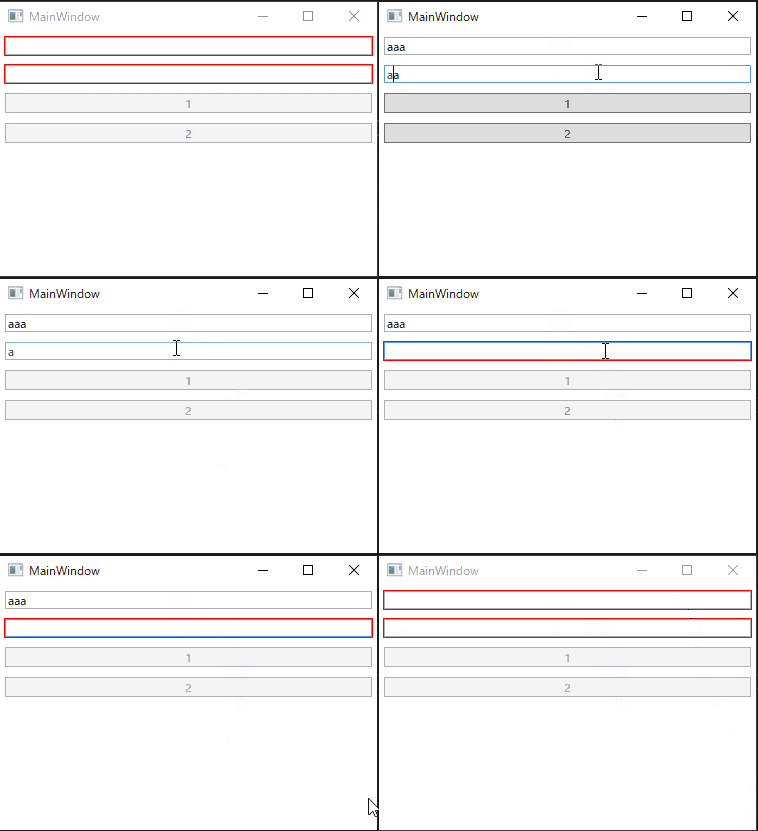
実行すると以下のようになります。エラーのないときだけ押せて、なおかつどちらかしか押せないボタンが出来ました。
コレクション
ReactiveProperty では、いくつかの便利なコレクションクラスを適用しています。以下の 3 つをよく使うことになると思います。
- ReactiveCollection: UI スレッド上でコレクションの追加・削除などを行う機能をもつコレクション
- ReadOnlyReactiveCollection: 別のコレクションから型変換を行い読み取り専用コレクションとして動くコレクション。コレクションの変更通知は UI スレッド上で行う。
- IFilteredReadOnlyObservableCollection: 別のコレクションを指定した条件でフィルタリングした内容を表示するコレクション
ReactiveCollection
ObservableCollection に UI スレッド上でのコレクション操作を行うメソッドを追加したものになります。
AddOnScheduler や RemoveOnScheduler などのように、普通のコレクション操作を行うメソッドに対して OnScheduler がついたメソッドが定義されています。このメソッドを呼び出すことで自動的に UI スレッド上でコレクション操作が行われます。
通常はバックグラウンドのスレッドからコレクション操作を行うと、そのコレクションが UI 要素にバインドされているとアプリが落ちますが、ReactiveCollection の OnScheduler のついているメソッドを使うことでバックグラウンドスレッドからも割と気軽にコレクションが操作できます。例を以下に示します。
using Reactive.Bindings;
using System;
using System.ComponentModel;
using System.Threading.Tasks;

namespace RxPropLabWpf
{
    // WPF のメモリリーク対策で INotifyPropertyChanged は実装しておく
    public class MainWindowViewModel : INotifyPropertyChanged
    {
        public event PropertyChangedEventHandler PropertyChanged;

        public ReactiveCommand SampleCommand { get; }
        public ReactiveCollection<DateTime> Timestamps { get; }

        public MainWindowViewModel()
        {
            Timestamps = new ReactiveCollection<DateTime>();
            SampleCommand = new ReactiveCommand()
                .WithSubscribe(() =>
                {
                    Task.Run(() =>
                        // UI スレッド以外でコレクション操作
                        // XxxOnScheduler メソッドで UI スレッド上でコレクション操作を行う
                        Timestamps.AddOnScheduler(DateTime.Now));
                });
        }
    }
}
これを適当に画面にバインドします。
<Window x:Class="RxPropLabWpf.MainWindow"
        xmlns="http://schemas.microsoft.com/winfx/2006/xaml/presentation"
        xmlns:x="http://schemas.microsoft.com/winfx/2006/xaml"
        xmlns:d="http://schemas.microsoft.com/expression/blend/2008"
        xmlns:mc="http://schemas.openxmlformats.org/markup-compatibility/2006"
        xmlns:local="clr-namespace:RxPropLabWpf"
        mc:Ignorable="d"
        Title="MainWindow" Height="450" Width="800">
    <Window.DataContext>
        <!-- ViewModel を設定して -->
        <local:MainWindowViewModel />
    </Window.DataContext>
    <DockPanel Margin="10">
        <!-- コマンドとバインド -->
        <Button Content="Command"
                Command="{Binding SampleCommand}"
                Margin="5"
                DockPanel.Dock="Top" />
        <ListBox ItemsSource="{Binding Timestamps}"
                 Margin="5" />
    </DockPanel>
</Window>
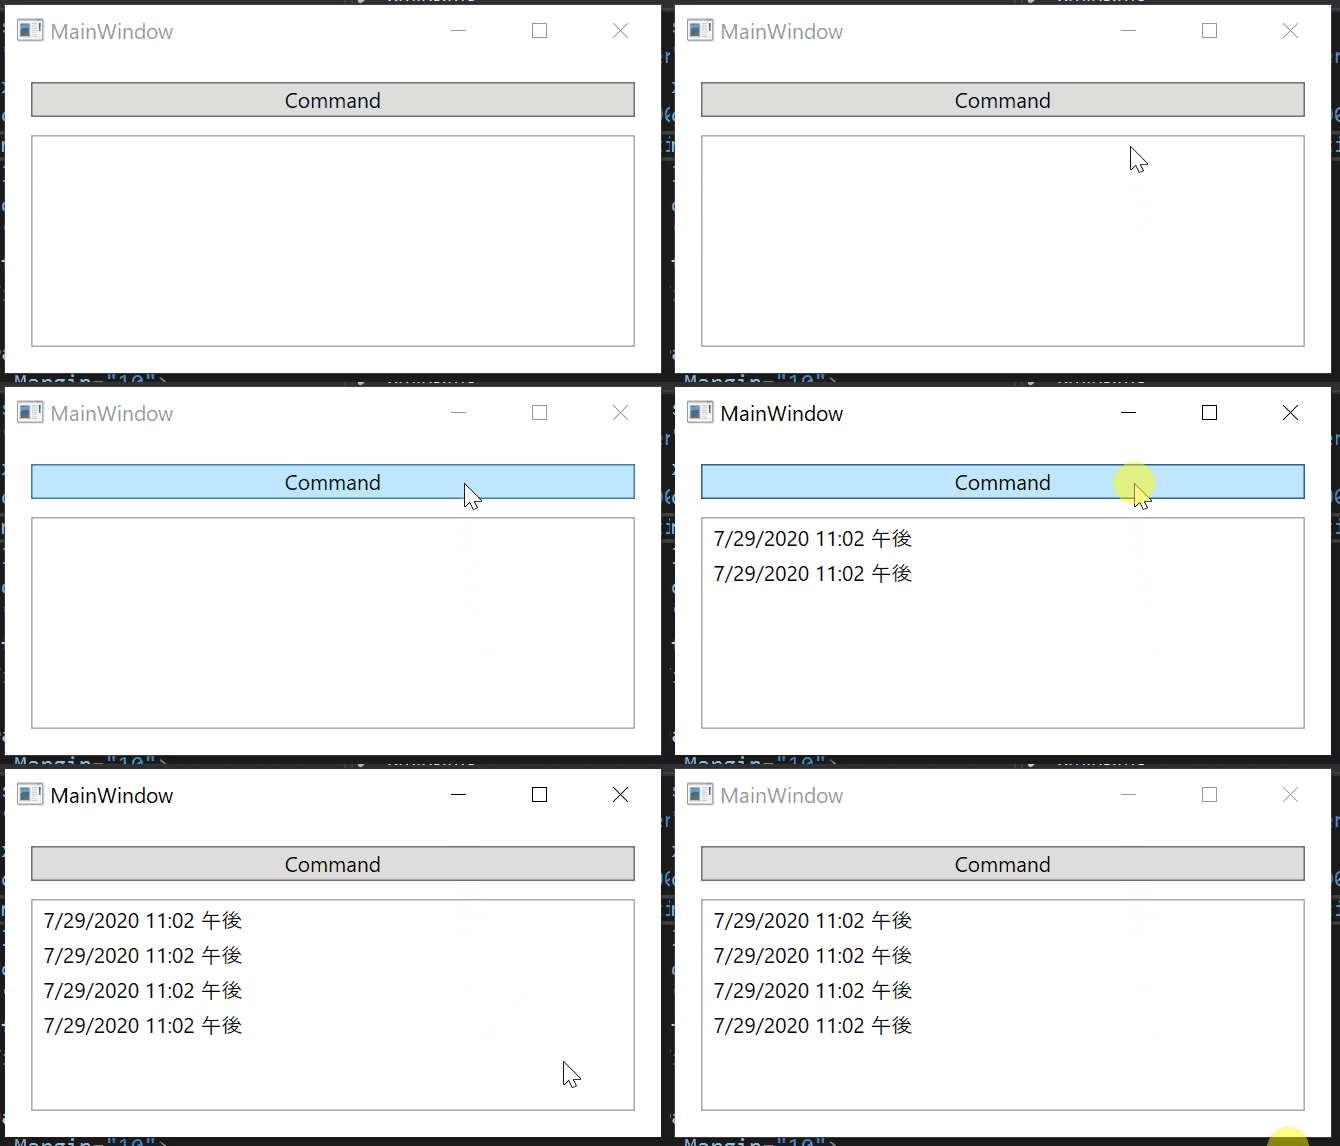
ボタンを押すと UI スレッド以外からコレクション操作が行われますが例外が起きることはありません。
この他に IObservable<T> から ReactiveCollection<T> を生成する ToReactiveCollection メソッドも提供しています。このメソッドを呼ぶと IObservable<T> から値が発行されたらコレクションに要素が追加されます。
例えば先ほどの MainWindowViewModel を以下のように書き換えても同じ動作になります。
using Reactive.Bindings;
using System;
using System.ComponentModel;
using System.Reactive.Linq;
using System.Threading.Tasks;

namespace RxPropLabWpf
{
    // WPF のメモリリーク対策で INotifyPropertyChanged は実装しておく
    public class MainWindowViewModel : INotifyPropertyChanged
    {
        public event PropertyChangedEventHandler PropertyChanged;

        public ReactiveCommand SampleCommand { get; }
        public ReactiveCollection<DateTime> Timestamps { get; }

        public MainWindowViewModel()
        {
            SampleCommand = new ReactiveCommand();

            Timestamps = SampleCommand.Select(_ => DateTime.Now)
                .ToReactiveCollection();
        }
    }
}
ReactiveCollection のスレッドを自動で切り替える機能は便利ですが、スレッドを切り替えるということは追加や削除などのコレクション操作はメソッドを呼び出しても即座には行われないという点に注意が必要です。
例えば AddOnScheduler で 10 個の要素を追加して、そのままコレクションの Count を参照しても要素は増えていません。
例えば、先ほどの ViewModel を以下のように書き換えてみます。
using Reactive.Bindings;
using System;
using System.ComponentModel;
using System.Linq;
using System.Reactive.Linq;
using System.Threading.Tasks;
using System.Windows;

namespace RxPropLabWpf
{
    // WPF のメモリリーク対策で INotifyPropertyChanged は実装しておく
    public class MainWindowViewModel : INotifyPropertyChanged
    {
        public event PropertyChangedEventHandler PropertyChanged;

        public ReactiveCommand SampleCommand { get; }
        public ReactiveCollection<DateTime> Timestamps { get; }

        public MainWindowViewModel()
        {
            Timestamps = new ReactiveCollection<DateTime>();
            SampleCommand = new ReactiveCommand()
                .WithSubscribe(() =>
                {
                    foreach (var i in Enumerable.Range(1, 10))
                    {
                        Timestamps.AddOnScheduler(DateTime.Now);
                    }

                    MessageBox.Show($"{Timestamps.Count}");
                });
        }
    }
}
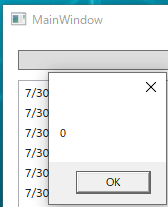
コマンドでコレクションに 10 個の要素を AddOnScheduler で追加して Count プロパティを MessageBox で表示しています。素直に考えると 10 と表示されてほしいところですが、先ほど言った理由から 0 と表示されます。
現状では、コレクションの操作の完了を待つ方法はありません。
ReadOnlyReactiveCollection
ObservableCollection のような変更通知の機能を持ったコレクションと同期する読み取り専用のコレクションが作成できます。また、ReadOnlyReactiveCollection では自動的にコレクションの変更通知イベントを UI スレッド上で実行します。ReadOnlyReactiveCollection を生成するには、元になるコレクションに対して ToReadOnlyReactiveCollection 拡張メソッドを呼び出します。ToReadOnlyReactiveCollection メソッドの引数にはラムダ式が指定できて、ここで元になるコレクションの要素に対する変換処理が指定できます。
例えば Guid を保持する ObservableCollection を元にして Guid を表示用に加工した文字列を保持する同期した ReadOnlyReactiveCollection を作るコードは以下のようになります。
using Reactive.Bindings;
using System;
using System.Collections.ObjectModel;
using System.ComponentModel;
using System.Threading.Tasks;

namespace RxPropLabWpf
{
    // WPF のメモリリーク対策で INotifyPropertyChanged は実装しておく
    public class MainWindowViewModel : INotifyPropertyChanged
    {
        public event PropertyChangedEventHandler PropertyChanged;

        public ReactiveCommand SampleCommand { get; }
        public ObservableCollection<Guid> Guids { get; }
        public ReadOnlyReactiveCollection<string> Views { get; }

        public MainWindowViewModel()
        {
            // 元になる ObservableCollection
            Guids = new ObservableCollection<Guid>();
            // 同期する読み取り専用コレクションを作成
            // ToReadOnlyReactiveCollection の引数で変換処理も指定可能
            Views = Guids.ToReadOnlyReactiveCollection(x => $"Guid: {x}");
            SampleCommand = new ReactiveCommand()
                .WithSubscribe(() => Task.Run(() =>
                {
                    // 別スレッドから元になるコレクションを操作
                    Guids.Add(Guid.NewGuid());
                }));
        }
    }
}
XAML は以下のようになります。
<Window x:Class="RxPropLabWpf.MainWindow"
        xmlns="http://schemas.microsoft.com/winfx/2006/xaml/presentation"
        xmlns:x="http://schemas.microsoft.com/winfx/2006/xaml"
        xmlns:d="http://schemas.microsoft.com/expression/blend/2008"
        xmlns:mc="http://schemas.openxmlformats.org/markup-compatibility/2006"
        xmlns:local="clr-namespace:RxPropLabWpf"
        mc:Ignorable="d"
        Title="MainWindow" Height="450" Width="800">
    <Window.DataContext>
        <!-- ViewModel を設定して -->
        <local:MainWindowViewModel />
    </Window.DataContext>
    <DockPanel Margin="10">
        <!-- コマンドとバインド -->
        <Button Content="Command"
                Command="{Binding SampleCommand}"
                Margin="5"
                DockPanel.Dock="Top" />
        <ListBox ItemsSource="{Binding Views}"
                 Margin="5" />
    </DockPanel>
</Window>
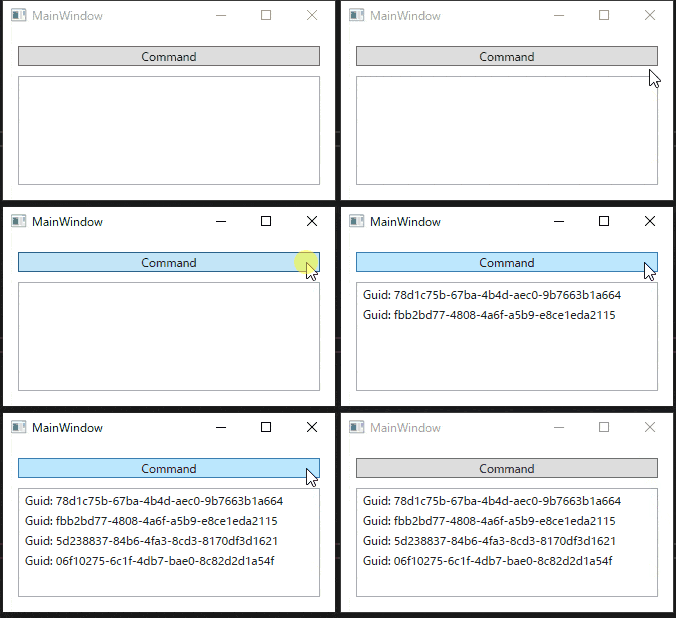
実行すると以下のようになります。元になるコレクションを UI スレッド以外から操作してもエラーにならないことが確認できます。
ReadOnlyReactiveCollection から要素が削除されるタイミングで、ReadOnlyReactiveCollection は削除される要素が IDisposable を実装している場合に Dispose メソッドを呼び出します。何か要素の後始末が必要な場合は IDisposable を実装してください。
注意!!
今回は例のために ObservableCollection を UI スレッド外から更新しましたが、ObservableCollection はスレッドセーフなコレクションではないので複数スレッドから要素の追加や削除などを行うと中身が壊れる可能性があります。(というか壊れます)
気を付けましょう。
複数スレッドからデータを追加する場合はロックをかけるなどの対策が必要です。
IFilteredReadOnlyObservableCollection
IFilteredReadOnlyObservableCollection は INotifyPropertyChanged を実装したクラスの ObservableCollection に対してリアルタイムでフィルタリングを行うコレクションです。使い方は簡単で INotifyPropertyChanged を実装したクラスの ObservableCollection に対して ToFilteredReadOnlyObservableCollection をフィルタリングの条件のラムダ式と共に呼び出すだけです。
例えば以下のように一定間隔で Value プロパティが変わる Sensor クラスがあるとします。
using System;
using System.Collections.Generic;
using System.ComponentModel;
using System.Text;
using System.Threading;
using System.Threading.Tasks;

namespace RxPropLabWpf
{
    public class Sensor : INotifyPropertyChanged, IDisposable
    {
        private CancellationTokenSource _cancellationTokenSource;
        public string Name { get; }

        private int _value;
        public int Value
        {
            get => _value;
            private set
            {
                _value = value;
                PropertyChanged?.Invoke(this, new PropertyChangedEventArgs(nameof(Value)));
            }
        }

        public event PropertyChangedEventHandler PropertyChanged;
        public Sensor(string name)
        {
            Name = name;

            // Dispose されるまで3秒間隔でランダムに Value を更新する
            _cancellationTokenSource = new CancellationTokenSource();
            Start(_cancellationTokenSource.Token);
        }

        private async void Start(CancellationToken token)
        {
            var random = new Random();
            while (!token.IsCancellationRequested)
            {
                Value = random.Next(100);
                await Task.Delay(3000);
            }
        }

        public void Dispose() => _cancellationTokenSource.Cancel();
    }
}
このクラスの ObservableCollection と Value が 50 以上のみを表示する IFilteredReadOnlyObservableCollection を作成するコードは以下のようになります。
using Reactive.Bindings;
using Reactive.Bindings.Helpers;
using Reactive.Bindings.Extensions;
using System;
using System.Collections.ObjectModel;
using System.ComponentModel;
using System.Threading.Tasks;

namespace RxPropLabWpf
{
    // WPF のメモリリーク対策で INotifyPropertyChanged は実装しておく
    public class MainWindowViewModel : INotifyPropertyChanged
    {
        public event PropertyChangedEventHandler PropertyChanged;

        public ObservableCollection<Sensor> Sensors { get; }
        public IFilteredReadOnlyObservableCollection<Sensor> AlertTargets { get; }
        public ReactiveCommand SampleCommand { get; }
        public MainWindowViewModel()
        {
            Sensors = new ObservableCollection<Sensor>();
            AlertTargets = Sensors.ToFilteredReadOnlyObservableCollection(x => x.Value >= 50);
            SampleCommand = new ReactiveCommand()
                .WithSubscribe(() =>
                {
                    Sensors.Add(new Sensor(Guid.NewGuid().ToString()));
                });
        }
    }
}
これを XAML にバインドします。
<Window x:Class="RxPropLabWpf.MainWindow"
        xmlns="http://schemas.microsoft.com/winfx/2006/xaml/presentation"
        xmlns:x="http://schemas.microsoft.com/winfx/2006/xaml"
        xmlns:d="http://schemas.microsoft.com/expression/blend/2008"
        xmlns:mc="http://schemas.openxmlformats.org/markup-compatibility/2006"
        xmlns:local="clr-namespace:RxPropLabWpf"
        mc:Ignorable="d"
        Title="MainWindow" Height="450" Width="800">
    <Window.DataContext>
        <!-- ViewModel を設定して -->
        <local:MainWindowViewModel />
    </Window.DataContext>
    <Window.Resources>
        <DataTemplate x:Key="sensorTemplate" DataType="local:Sensor">
            <StackPanel>
                <TextBlock Text="{Binding Name}" />
                <TextBlock Text="{Binding Value}" />
            </StackPanel>
        </DataTemplate>
    </Window.Resources>
    <DockPanel Margin="10">
        <!-- コマンドとバインド -->
        <Button Content="Command"
                Command="{Binding SampleCommand}"
                Margin="5"
                DockPanel.Dock="Top" />
        <Grid>
            <Grid.ColumnDefinitions>
                <ColumnDefinition />
                <ColumnDefinition />
            </Grid.ColumnDefinitions>
            <ListBox ItemsSource="{Binding Sensors}"
                     ItemTemplate="{StaticResource sensorTemplate}"
                     Margin="5" />
            <ListBox ItemsSource="{Binding AlertTargets}"
                     ItemTemplate="{StaticResource sensorTemplate}"
                     Grid.Column="1"
                     Margin="5" />
        </Grid>
    </DockPanel>
</Window>
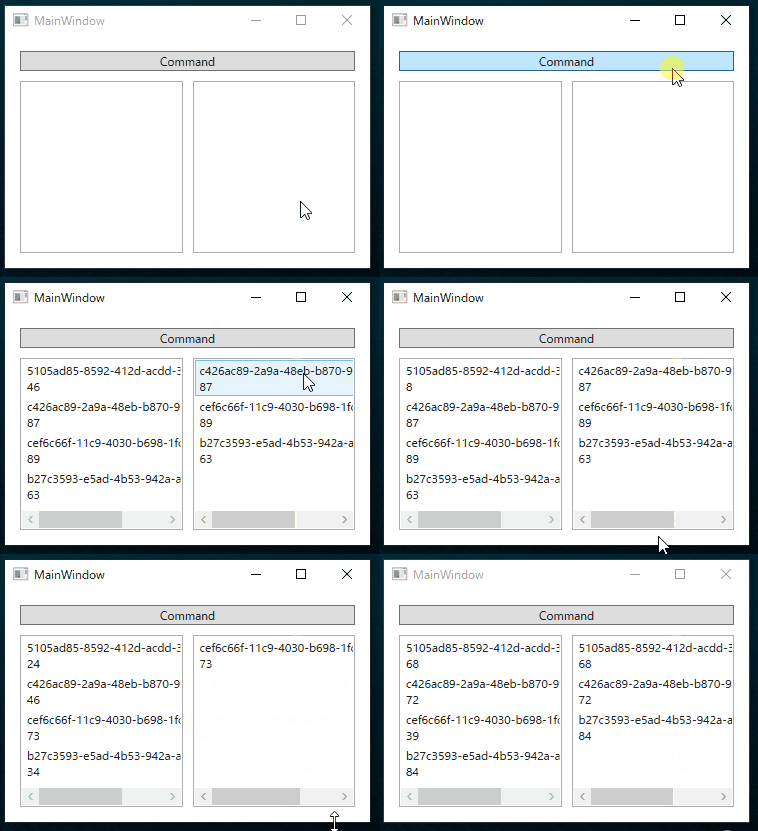
実行すると以下のように左側には全部の要素が表示されますが、右側には Value が 50 以上の要素しか表示されていないことが確認できます。
UI スレッドについて
ReactiveProperty の提供するクラスで以下のものは UI スレッドへの自動ディスパッチ機能があります。
- ReactiveProperty
- ReadOnlyReactiveProperty
- ReactiveCollection
- ReadOnlyReactiveCollection
- ReactiveCommand
前編でも書きましたが、これは ReactivePropertyScheduler.SetDefault(IScheduler defaultScheduler) メソッドで任意のスケジューラーに置き換えることが出来ます。デフォルトが UI スレッドになっています。
各クラスのインスタンスが作られた時点の ReactivePropertyScheduler.Default が使用されます。
アプリケーションのエントリーポイントで ReactivePropertyScheduler.SetDefault(ImmediateScheduler.Instance); のようなコードを指定することで UI スレッドへのディスパッチを辞めて即座に実行するように変更することが出来ます。また ReactivePropertyScheduler.SetDefaultSchedulerFactory メソッドを指定するとスケジューラーを取得する任意のロジックを指定できます。例えば WPF の App.xaml.cs の Startup イベントで以下のように設定しておくことで、ReactiveProperty などのインスタンスが生成されたスレッドに紐づく Dispatcher でイベントを発生させるようなスケジューラーを返すようにできます。
private void Application_Startup(object sender, StartupEventArgs e)
{
    ReactivePropertyScheduler.SetDefaultSchedulerFactory(() =>
        new DispatcherScheduler(Dispatcher.CurrentDispatcher));
}
グローバルに一括で設定するほかに各クラスのインスタンスを生成する際に IScheduler 型の引数を受け取るオーバーロードがあるので、それを使ってディスパッチ先を変えることが出来ます。
例えば ViewModel で以下のようにすることで、指定されたスケジューラーか現在のスレッドのスケジューラーを紐づいたスケジューラーを使用するといったことも出来ます。
public class MainPageViewModel
{
    private readonly IScheduler _uiThreadScheduler;

    public ReadOnlyObservableCollection<string> Items { get; }

    public MainPageViewModel(IScheduler uiThreadScheduler = null)
    {
        // null の場合は現在の SynchronizationContext に紐づいたスケジューラーを使う
        _uiThreadScheduler = uiThreadScheduler ?? new SynchronizationContextScheduler(SynchronizationContext.Current);
        // ReactiveProperty 系のクラスを作るときは、このスケジューラーを指定して作る
        Items = Model.Items.ToReadOnlyReactiveCollection(scheduler: _uiThreadScheduler);
    }
}

public static class Model
{
    // 今回は手抜きでグローバルな位置にあるコレクション
    public static ObservableCollection<string> Items { get; } = new ObservableCollection<string>();
}
ReactiveProperty の後始末
ReactiveProperty や ReactiveCommand や ReactiveCollection などの殆どのクラスは IDisposable インターフェースを実装しています。これらのクラスで Dispose を呼ぶと例えば ReactiveProperty が IObservable から作られている場合は、IObservable と切り離されます。また、ReactiveProperty を Subscribe している人たちへ OnCompleted を発行して切り離します。
なので、不要になったタイミングで Dispose を呼び出しましょう。
Dispose をまとめて呼ぶ方法
Reactive Extensions には IDisposable を一括で Dispose してくれる CompositeDisposable があります。この CompositeDisposable に対して ReactiveProperty や ReactivePropertySlim や ReactiveCommand などを Add することで、任意のタイミングで一括で Dispose 出来ます。
また ReactiveProperty では IDisposable の拡張メソッドとして CompositeDisposable に簡単に登録できる AddTo 拡張メソッドを提供しています。これを使うことで ReactiveProperty や ReactiveCommand の生成のメソッドチェーンに CompositeDisposable への追加処理を自然に書くことが出来ます。
コード例を以下に示します。
// ReadOnlyReactivePropertySlim のソース
var rpSource = new Subject<string>();

// 一括 Dispose 用
var disposables = new CompsisteDisposable();

// 大文字の ReactiveProperty を生成
var upperProp = rpSource.Select(x => x?.ToUpper())
    .ToReadOnlyReactivePropertySlim()
    .AddTo(disposables); // AddTo で CompositeDisposables へ追加
// 小文字の ReactiveProperty を生成
var lowerProp = rpSource.Select(x => x?.ToLower())
    .ToReadOnlyReactivePropertySlim()
    .AddTo(disposables);  // AddTo で CompositeDisposables へ追加

// 一括で Dispose 可能
disposables.Dispose();
一般的には ViewModel クラスのフィールドやプロパティで CompositeDisposable を保持して、不要になったタイミングで Dispose を呼んで一括で購読などを解除します。以下のようなコードになります。
public class MainWindowViewModel : INotifyPropertyChanged, IDisposable
{
  ... 省略 ...

  private CompositeDisposable Disposables { get; } = new CompositeDisposable();
  public ReactiveCommand SampleCommand { get; }
  public ReactivePropertySlim<string> Input { get; }
  public ReadOnlyReactivePropertySlim<string> Output { get; }

  public MainWindowViewModel()
  {
    // メソッドチェーンの最後で AddTo をして CompositeDisposable に登録
    Input = new ReactivePropertySlim<string>()
      .AddTo(Disposables);
    Output = Input.Select(x => x?.ToUpper())
      .Delay(TimeSpan.FromSeconds(3))
      .ObserveOnUIDispatcher()
      .ToReadOnlyReactivePropertySlim()
      .AddTo(Disposables);
    // Command 自体を Dispose すれば普通は問題ないが WithSubscribe を個別に開放する方法もあります
    SampleCommand = Input.Select(x => string.IsNullOrEmpty(x))
      .ToReactiveCommand()
      .WithSubscribe(() => { ...省略... }, Disposables.Add) // WithSubscribe は第二引数で Disposable を追加するメソッドを受け取れる
      .AddTo(Disposables); // コマンド自身を追加する場合は AddTo
  }

  // 今回の ViewModel は不要になったタイミングで Dispose が呼ばれる想定
  public void Dispose() => Disposables.Dispose();
}
Dispose を呼び出さないことによる弊害
単純にずっと IObservable の処理がつながっていると、何かの値が発行されるたびに動く処理が多くなるので性能は悪くなるでしょう。
もっと深刻な例では寿命の長いオブジェクトの発行する値を購読して ReactiveProperty や ReactiveCommand を作っているとメモリリークの原因になります。例えば寿命の長いオブジェクトに ObserveProperty をして ReactiveProperty への変換したとします。この時 ObserveProperty は寿命の長いオブジェクトの PropertyChanged イベントを購読しています。
PropertyChanged イベントを購読しているということは、PropertyChanged イベントの発行先として寿命の長いオブジェクトに発行先として登録されるということです。これは ToReadOnlyReactivePropertySlim で作られた ReadOnlyReactivePropertySlim を Dispose するまで開放されません。
なので、ライフサイクルの長いオブジェクトから作った ReactiveProperty などは必ず不要になったタイミングで Dispose しましょう。
まとめ
中編では主にコレクションや、コマンドについて説明しました。スレッドや後始末など意外と重要なことも入っているのでもしかしたらシリーズの中で一番重要なところかもしれません。
残るはプラットフォーム固有機能と、便利クラスたちの紹介になります。
