海外旅行や海外出張はどちらもあまり好きではないのですが、たま~~~~に行くくらいならいいものです。
最近はコロナのせいで絶対いけない感じになってしまいましたが…。
海外でご飯を食べるときに困ることとして、レストランのメニューが英語という問題があります。
英語なのは、まぁ当たり前なのでいいのですが海外のメニューはテキストのみのケースが多く、名前から料理がわからないと詰むという問題があります。どんな料理ですか?と聞くだけのコミュ力も英語力もない。
つまり、円滑にレストランでご飯をするには、こういうアプリが必要になります。
- レストランのメニューを写真撮影
- OCR でテキストを認識
- 認識した料理名で画像検索
- どんな料理かイメージがわく
Windows デスクトップ アプリで作るよ
こういうのはモバイルでも使えるアプリ(Web かネイティブアプリ) として作ると使い勝手がいいのですが、今回は先日紹介した UWP 版の Prism を使うためにでっちあげたネタなので、Windows デスクトップ アプリとして作ります。
ただ、クライアント側は画像開いて後述する Azure Cognitive Services に分析や検索をお願いしているだけなので、Android/iOS/Web のどれでも、そんなに苦労せずに作れると思います。
画像から文字を読み取る処理や文字列から画像を検索する処理には Microsoft Azure の Cognitive Services もつかいます。
作ったアプリ
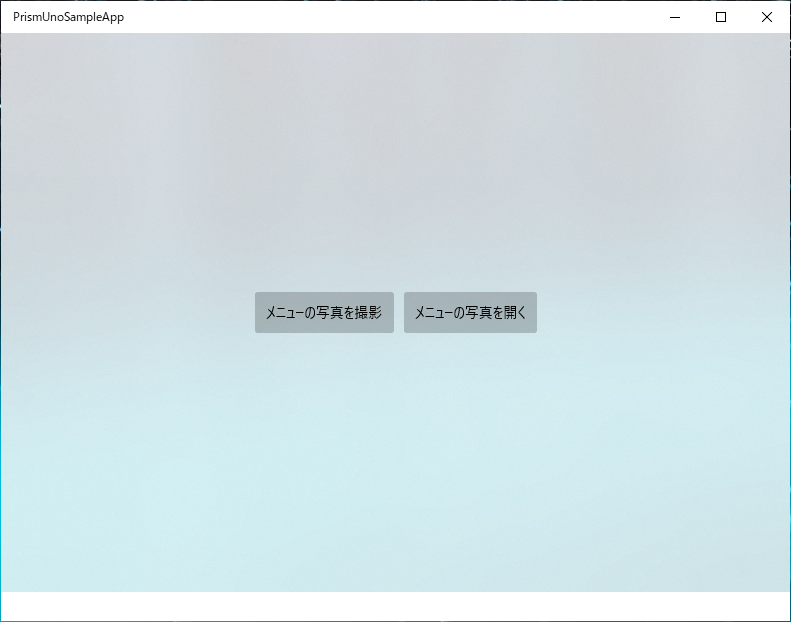
以下のような動きになります。起動直後。
文字しかない英語のレストランのメニューの画像を開いて認識した文字列がリストに表示されます。
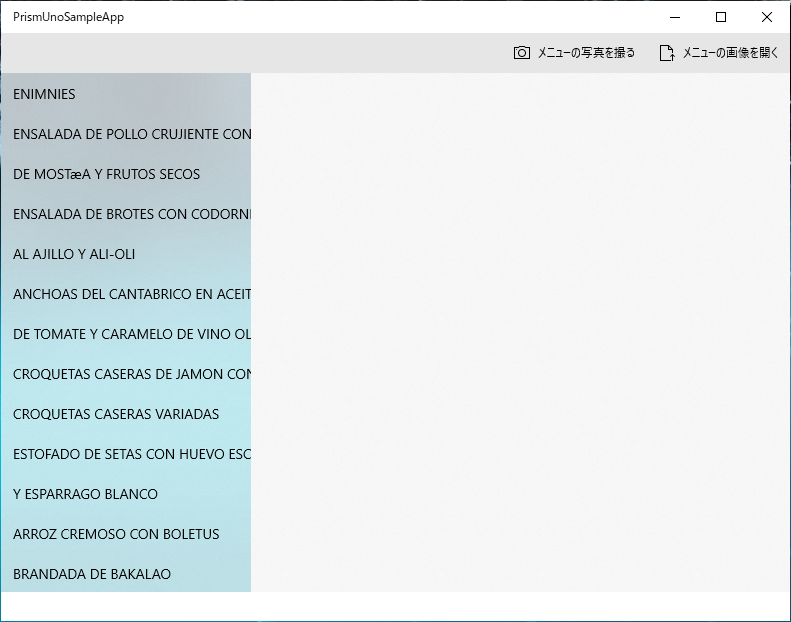
因みに読ませた画像は、こちらのサイトにあるレストランのメニューの画像です。
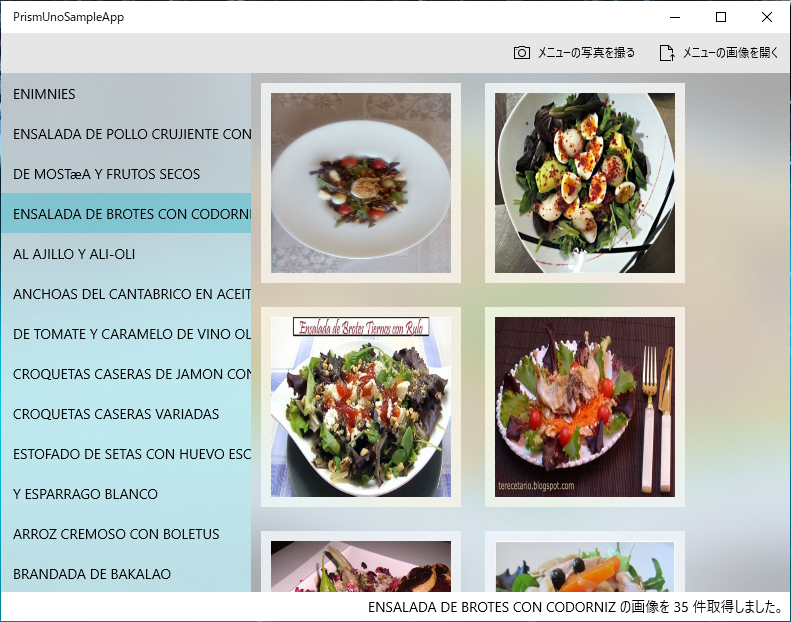
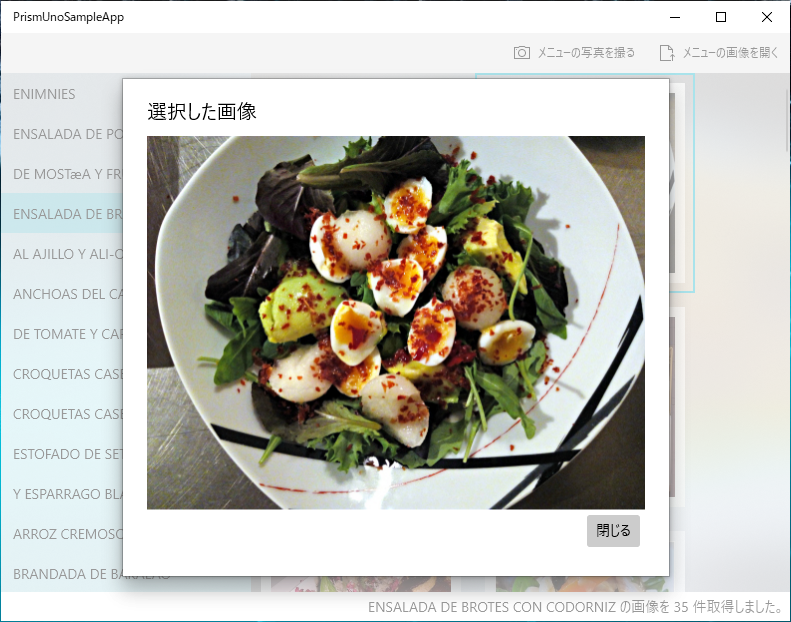
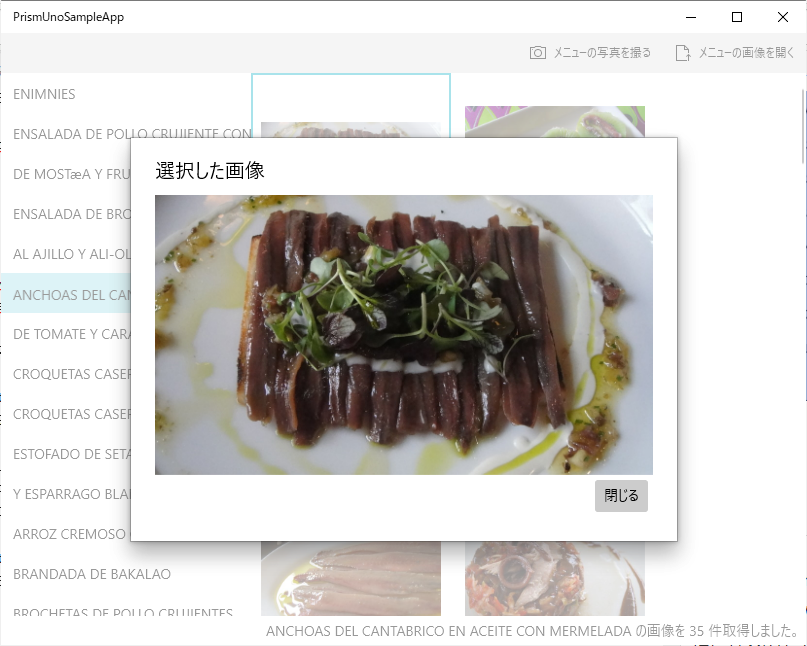
そしてリストの文字列を選択すると、その内容で画像検索した結果が表示されます。検索結果の画像は選択すると大きな画像が表示されます。
ソースコードは GitHub に上げておきました。
使ってるもの
- Prism.Uno
- UWP (厳密には Uno Platform)向けの MVVM アプリケーション開発用のライブラリ
- Uno Platform についてはこちらを見てみてください
Uno Platform 入門
- Azure Cognitive Services Computer Vision
- Azure の AI 系の API が使えるサービスの Cognitive Services の Computer Vision の中に OCR の機能があるので、ファイルやカメラの画像を食わせて文字列を抽出するのに使っています。
- ドキュメント:光学式文字認識 (OCR)
- Bing Search API
- Bing の検索を API として使える Bing Search API の中にある画像検索機能を使ってテキストから画像を検索して表示するのに使っています。
- ドキュメント:Bing Image Search API とは
実行方法
Azure で Cognitive Services の Computer Vision と、Bing Search のリソースを作ります。どちらも無料枠があります。
そして、そのキーとエンドポイントを PrismUnoSampleApp\appsettings.json の中に設定します。
{
  "ocr": {
    "subscriptionKey": "your computer vision key",
    "endpoint": "your computer vision endpoint"
  },
  "imageSearch": {
    "subscriptionKey": "your bing image search key"
  }
}
あとはビルドして実行すれば動くと思います。
アプリの構造
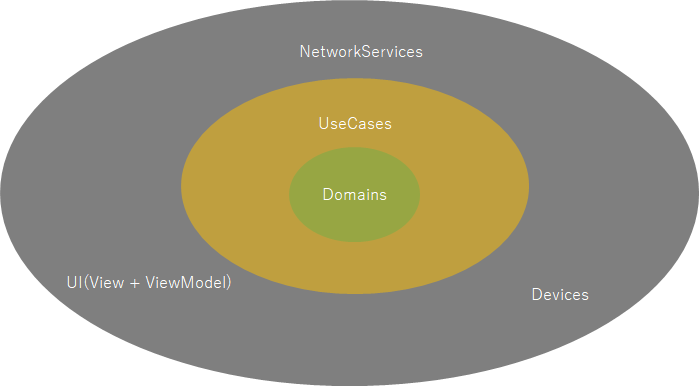
オニオンアーキテクチャあたりを意識しつつ、なるべく外部リソースに依存するところはインターフェースを切っておいて、最悪あとで単体テスト出来たりするようにしてあります。
ただ、途中でこんな小さなアプリでこんなにしてもあんまりメリットはないなぁと思いちょっと妥協してるところもあります。
こんな雰囲気を目指しています。
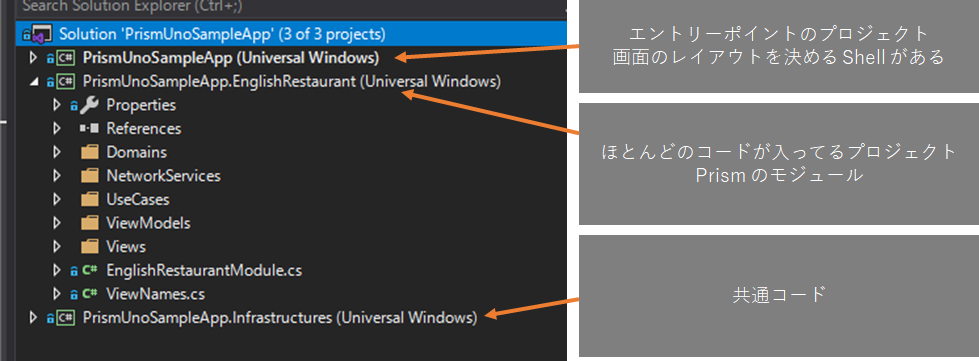
プロジェクトは 3 つで、Prism の Shell があるメインのプロジェクトと、モジュールのプロジェクトがあります。Prism では、複数のモジュールを組み合わせて、モジュールから Shell に定義された Region に View を登録していくように作れるのですが、今回はシンプルにモジュール 1 つだけです。
写真撮って AI にかけて表示するだけだしね。
画面
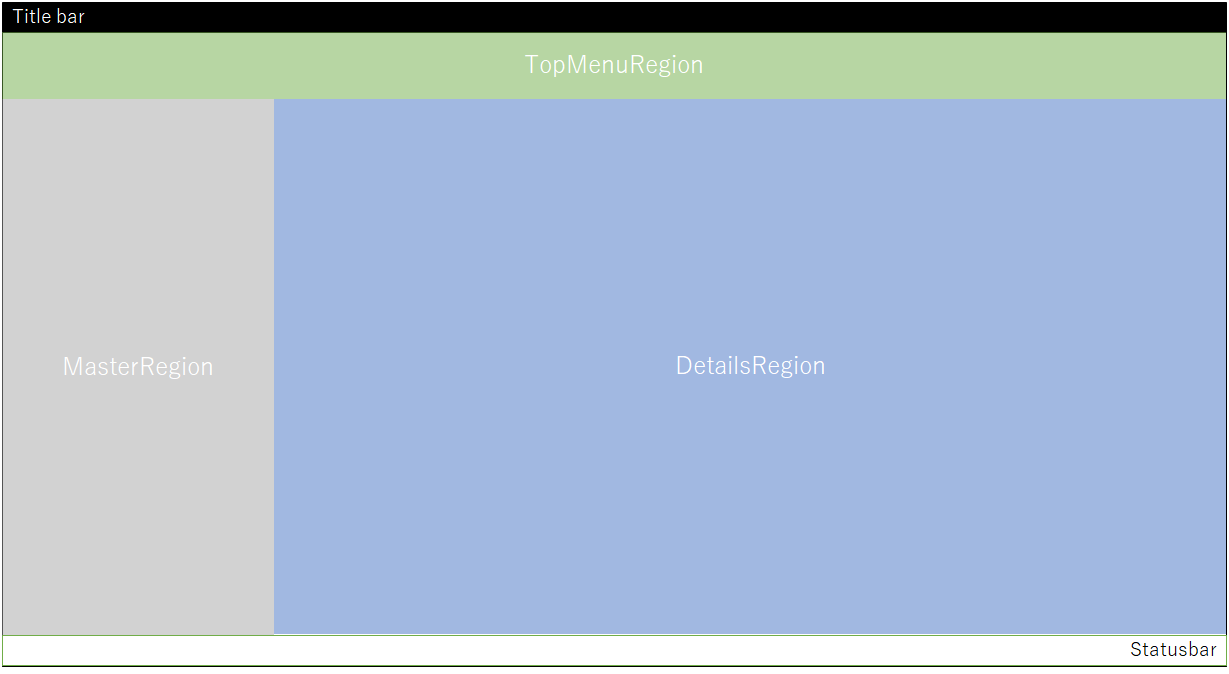
Shell は以下のような XAML で定義しています。
<Page
    x:Class="PrismUnoSampleApp.Views.Shell"
    xmlns="http://schemas.microsoft.com/winfx/2006/xaml/presentation"
    xmlns:x="http://schemas.microsoft.com/winfx/2006/xaml"
    xmlns:local="using:PrismUnoSampleApp.Views"
    xmlns:d="http://schemas.microsoft.com/expression/blend/2008"
    xmlns:mc="http://schemas.openxmlformats.org/markup-compatibility/2006"
    xmlns:regions="using:Prism.Regions"
    xmlns:infra="using:PrismUnoSampleApp.Infrastructures"
    xmlns:mvvm="using:Prism.Mvvm"
    mvvm:ViewModelLocator.AutoWireViewModel="True"
    mc:Ignorable="d"
    d:DesignHeight="300"
    d:DesignWidth="400">
    <Page.Resources>
        <infra:RegionNamesForXAML x:Key="regionNames" x:Name="regionNames" />
    </Page.Resources>
    <RelativePanel>
        <ContentControl regions:RegionManager.RegionName="{x:Bind regionNames.TopMenuRegion}"
                        x:Name="topMenuRegion"
                        RelativePanel.AlignLeftWithPanel="True"
                        RelativePanel.AlignRightWithPanel="True"
                        RelativePanel.AlignTopWithPanel="True"
                        HorizontalAlignment="Stretch"
                        HorizontalContentAlignment="Stretch"
                        VerticalContentAlignment="Stretch"/>
        <ContentControl regions:RegionManager.RegionName="{x:Bind regionNames.MasterRegion}"
                        x:Name="masterRegion"
                        RelativePanel.Below="topMenuRegion"
                        RelativePanel.AlignLeftWithPanel="True"
                        RelativePanel.Above="statusBar"
                        MaxWidth="250" />
        <ContentControl regions:RegionManager.RegionName="{x:Bind regionNames.DetailsRegion}"
                        x:Name="detailsRegion"
                        RelativePanel.Below="topMenuRegion"
                        RelativePanel.RightOf="masterRegion"
                        RelativePanel.AlignRightWithPanel="True"
                        RelativePanel.AlignBottomWith="masterRegion"
                        RelativePanel.Above="statusBar"
                        HorizontalContentAlignment="Stretch"
                        VerticalContentAlignment="Stretch" />
        <Grid x:Name="statusBar"
              RelativePanel.AlignRightWithPanel="True"
              RelativePanel.AlignLeftWithPanel="True"
              RelativePanel.AlignBottomWithPanel="True"
              VerticalAlignment="Bottom"
              Padding="5">
            <TextBlock Text="{x:Bind ViewModel.StatusbarMessage.Value, Mode=OneWay}"
                       HorizontalAlignment="Right" />
        </Grid>
    </RelativePanel>
</Page>
大体以下のような区画が区切られていて、モジュールからこの区画に View を表示していく感じです。
PrismUnoSampleApp.EnglishRestaurant プロジェクトの Views 名前空間では以下のような View を定義しています。
- TopView
- MenuListView
- ImageListView
- CommandBarView
- ImageDialogView
初期状態で表示されている画面が TopView です。
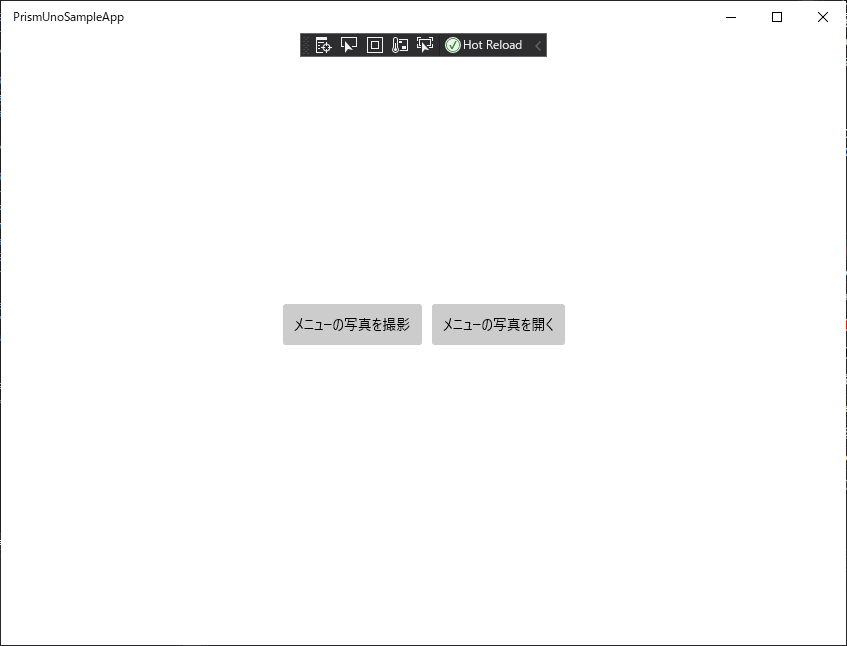
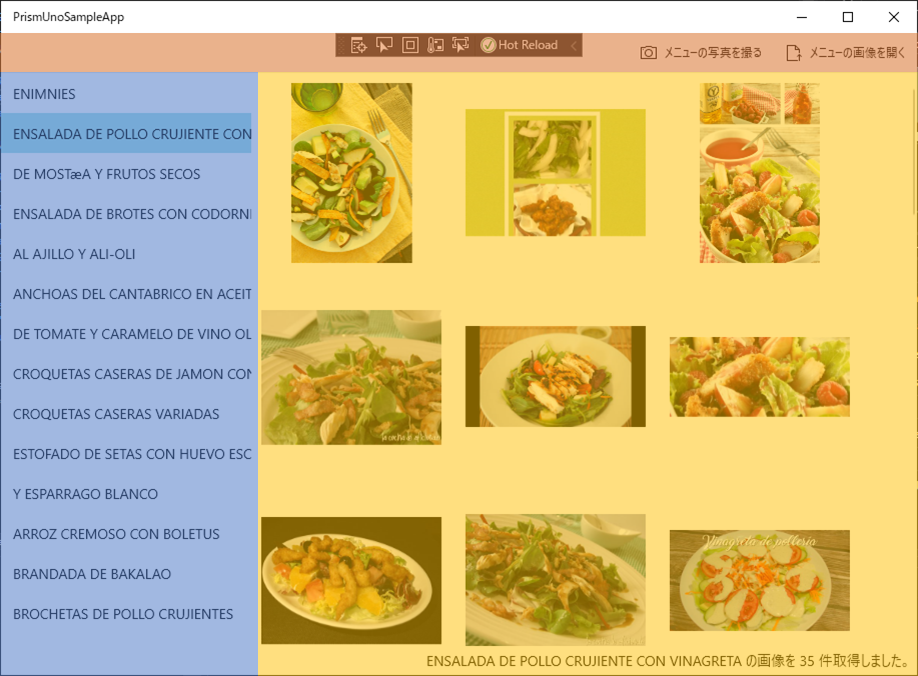
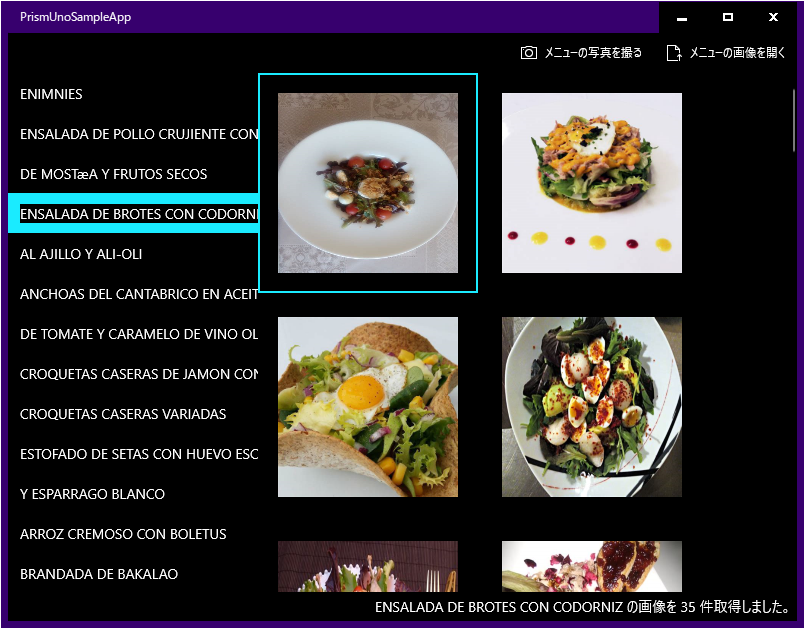
画像を選択すると、TopViewModel から裏の処理を呼び出し、成功すると各 Region に View を追加していっています。以下の画像のオレンジが CommandBarView で、青色が MenuListView で、黄色が ImageListView になります。
画像を選択したときに出てくるのが ImageDialogView です。Prism の IDialogService を使って出しています。
ViewModel では ReactiveProperty を使って Rx を使ってさくっとモデルとつないでいます。
大体以下のような感じになっています。
public class ImageListViewModel : ViewModelBase
{
    private readonly IDetectMenuTextUseCase _detectMenuTextUseCase;
    private readonly IDialogService _dialogService;

    public ReadOnlyReactivePropertySlim<ReadOnlyObservableCollection<ImageInfo>> Images { get; }

    public ReactivePropertySlim<ImageInfo> SelectedImage { get; } = new ReactivePropertySlim<ImageInfo>();

    public ImageListViewModel(IDetectMenuTextUseCase detectMenuTextUseCase, IDialogService dialogService)
    {
        _detectMenuTextUseCase = detectMenuTextUseCase ?? throw new ArgumentNullException(nameof(detectMenuTextUseCase));
        _dialogService = dialogService ?? throw new ArgumentNullException(nameof(dialogService));
        Images = _detectMenuTextUseCase
            .RestaurantMenu
            .CurrentText
            .Select(x => x?.Images)
            .ToReadOnlyReactivePropertySlim()
            .AddTo(Disposables);

        SelectedImage.Where(x => x != null)
            .Subscribe(x =>
            {
                _dialogService.ShowDialog(ViewNames.ImageDialogView,
                    new DialogParameters { { "image", x } },
                    _ => { });
            });
    }
}
アプリ上では 1 画面に見えるものも Region で分割して作れるので、割と一つ一つはシンプルな感じになっています。
ReactiveProperty を使うときのコツというか、やっておくと便利なことの一つとして、複数のイベントが飛んでくるようなものは、IObservable に変換するような拡張メソッドを作っておくとスムーズに ReactiveProperty とつなげることが出来ます。
Prism だと IEventAggregator と PubSubEvent がモジュール間でのイベントのやりとりに使えるのですが、PubSubEvent の拡張メソッドを定義して以下のように IObservable にしておくといいです。
using Prism.Events;
using System;
using System.Collections.Generic;
using System.Linq;
using System.Reactive;
using System.Reactive.Linq;
using System.Text;
using System.Threading.Tasks;

namespace PrismUnoSampleApp.Infrastructures.Events
{
    public static class PubSubEventExtensions
    {
        public static IObservable<TPayload> ToObservable<TPayload>(this PubSubEvent<TPayload> self) =>
            Observable.Create<TPayload>(ox =>
            {
                var token = self.Subscribe(x => ox.OnNext(x));
                return () => token.Dispose();
            });
        public static IObservable<Unit> ToObservable(this PubSubEvent self) =>
            Observable.Create<Unit>(ox =>
            {
                var token = self.Subscribe(() => ox.OnNext(Unit.Default));
                return () => token.Dispose();
            });
    }
}
このサンプルでは UpdateGlobalMessageEvent というイベントを定義していて、このイベントを投げるとステータスバーのメッセージを書き換えるようにしています。
using Prism.Events;

namespace PrismUnoSampleApp.Infrastructures.Events
{
    public class UpdateGlobalMessageEvent : PubSubEvent<string>
    {
    }
}
Shell の ViewModel では、以下のように IEventAggregator からシームレスに ReadOnlyReactivePropertySlim にしています。
using Prism.Events;
using Prism.Mvvm;
using PrismUnoSampleApp.Infrastructures.Events;
using Reactive.Bindings;
using Reactive.Bindings.Extensions;
using System;

namespace PrismUnoSampleApp.ViewModels
{
    public class ShellViewModel : BindableBase
    {
        private readonly IEventAggregator _eventAggregator;

        public ReadOnlyReactivePropertySlim<string> StatusbarMessage { get; }

        public ShellViewModel(IEventAggregator eventAggregator)
        {
            _eventAggregator = eventAggregator ?? throw new ArgumentNullException(nameof(eventAggregator));
            StatusbarMessage = _eventAggregator.GetEvent<UpdateGlobalMessageEvent>()
                .ToObservable()
                .ObserveOnUIDispatcher()
                .ToReadOnlyReactivePropertySlim();
        }
    }
}
ReadOnlyReactivePropertySlim は Dispose しないの?と思うかもですが、Shell は 1 つしかなくて、アプリ終了まで居続けるので、アプリの死ぬ時が Shell の死ぬときなので、まぁいいかなと。
この ReadOnlyReactivePropertySlim の Value をバインドしておくと、誰かが UpdateGlobalMessageEvent を Publish うるとステータスバーのテキストが書き換わります。
UWP で作ると…
機能面では Win32 アプリと比べるとセキュリティの縛りが強いぶん出来ないこともありますが、UWP からじゃないと呼べない API も現段階ではいくつかあったりするので、何を使って Windows アプリを作るのか悩ましいところです。
アプリの直接的な機能に役立つものではないですが UWP で作っておくと、何も考えなくてもテーマに対応できたりします。また、アクリルブラシなどで半透明感のある見た目もサクッとできます。
白テーマ(アクセントカラー赤)
黒テーマ(アクセントカラー紫)
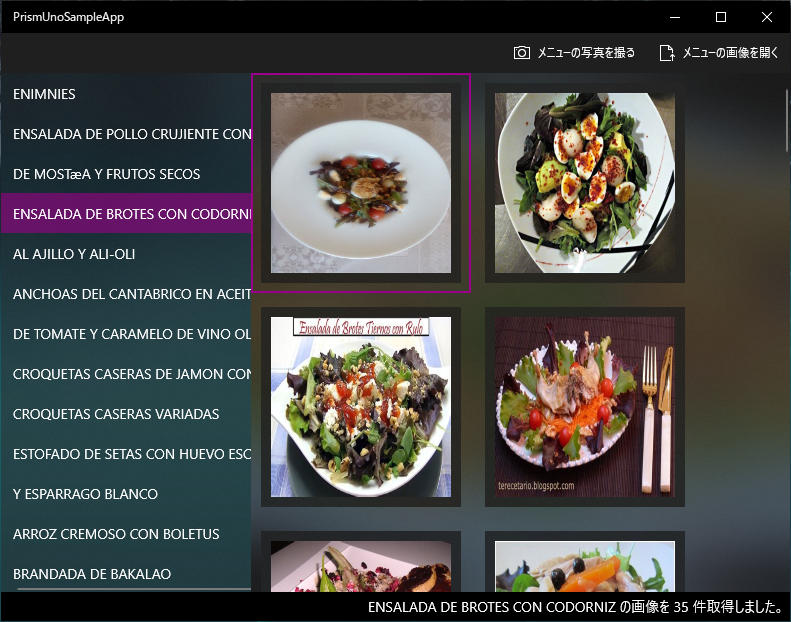
ハイコントラスト黒
ハイコントラストは UWP じゃなくても対応していますが一応念のため。(自分で色指定してたりするとハイコントラストでうまく表示されないこともある。UWP は、そこらへんをいい感じにしてくれる仕組みもある。)
今後 Windows UI Library 3.0 がリリースされると UWP でも Win32 でも、ここら辺も対応可能になるので個人的に楽しみにしています。
まとめ
UWP 版の Prism である Prism.Uno を試すためにやってみました。Uno Platform は UWP のコードを Android, iOS, WebAssembly などに対応可能なのですがファイルいたりカメラを使うところは絶対 OS ごとに固有処理になってコード量が増えるので今回は UWP に絞って使ってみました。
機能以外にも小さな画面を意識した UI も組まないといけなかったりしますしね…出来るけどコード量は増える…。
とりあえず試してみた感じ、現段階で動きが怪しいところは見つからなかったので Prism 8.0 のリリースが楽しみです。
あと Cognitive Services を組み合わせるとアイデア次第では面白いものも作れそうだなぁと思いました。