先日 Uno Platform を使って UWP と WebAssembly に対応した湯婆婆ですが、Android や iOS に対応できたにもかかわらず対応しなかったのは単にレスポンシブ対応がめんどくさかったからです。
でも、Android と iOS 対応をきっても WebAssembly だとスマホで見れるじゃん orz
ということで対応しないと表示が崩れる!というか iPhoneX で見たらがっかりな見た目だったので直していこうと思います。
前回の記事: C# で湯婆婆を Windows アプリと WebAssembly 対応してみた(無駄に MVVM)
湯婆婆を試す: 湯婆婆 on Azure
現状
ある程度の大きさがあるとこんな感じで表示されます。
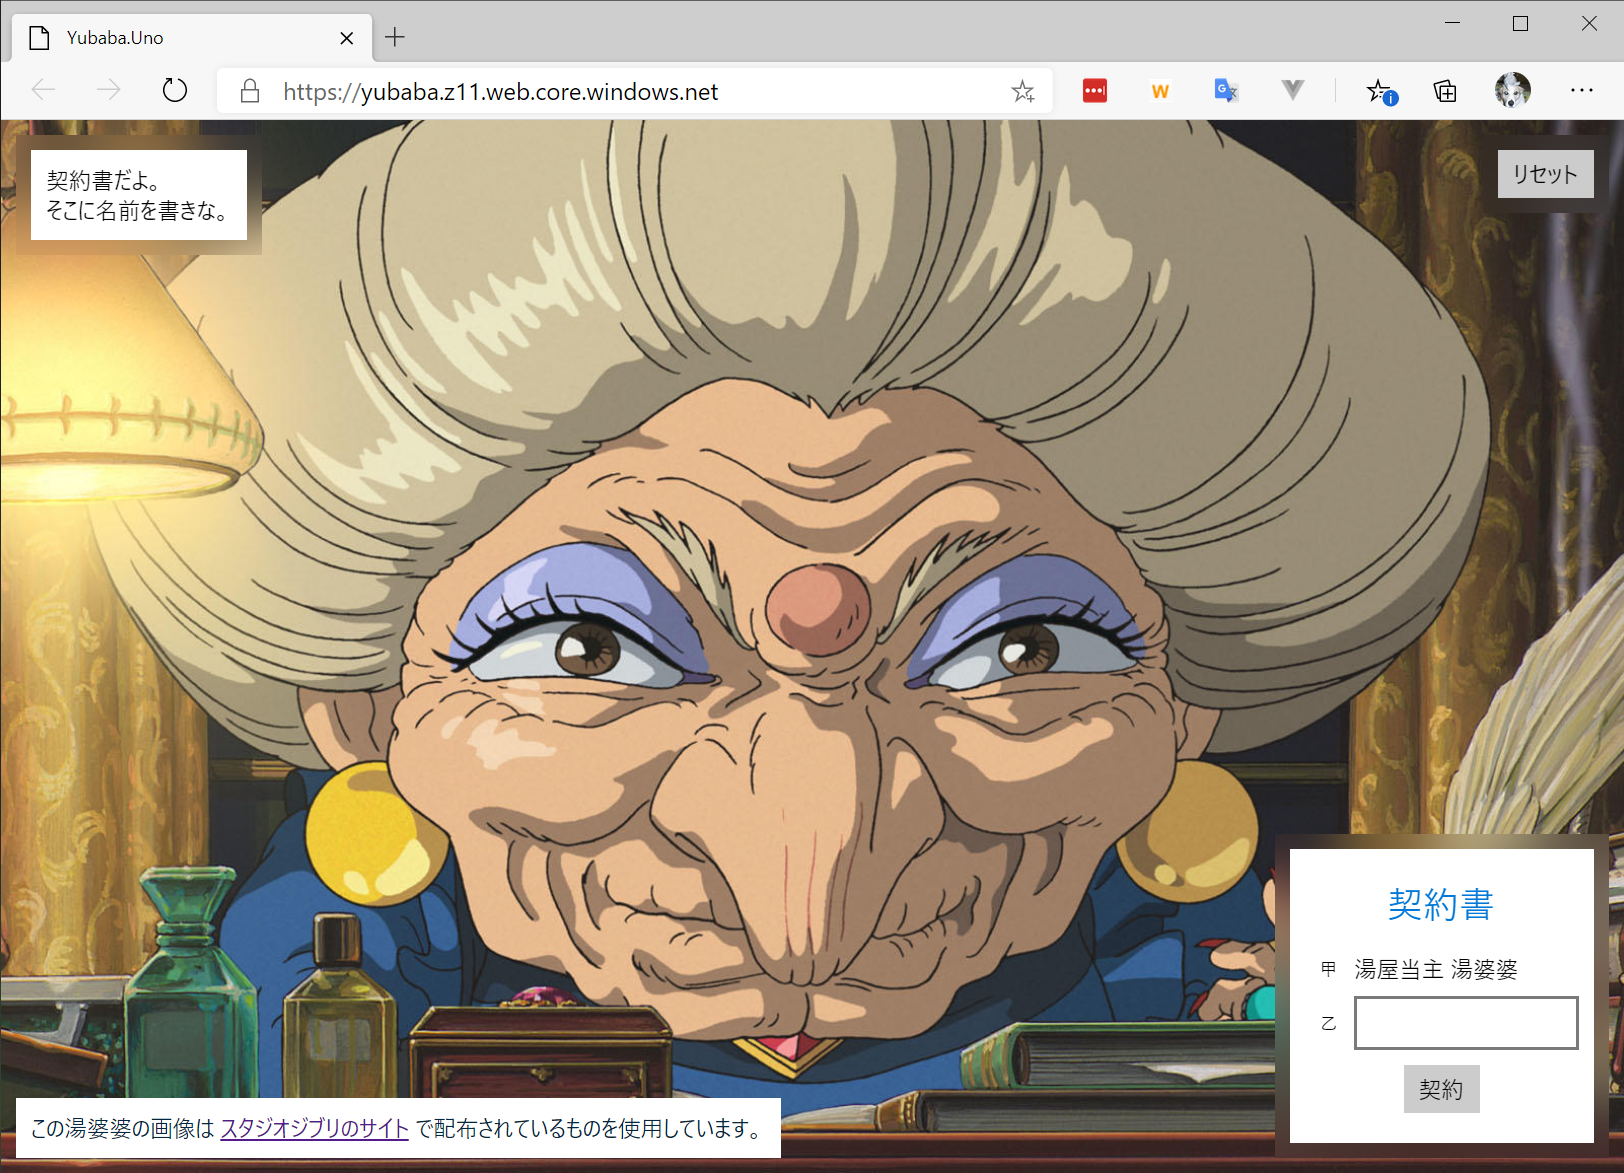
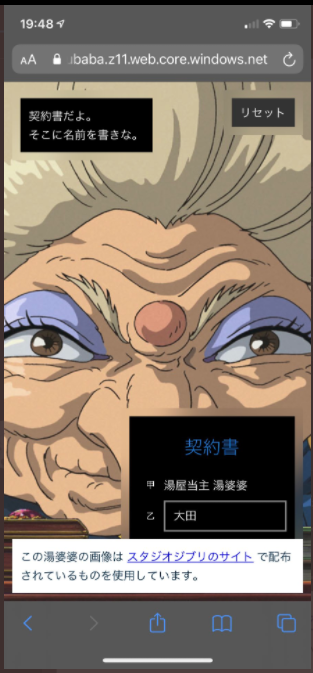
幅が小さくなると左下にある注意書きと右にある契約書がかぶってしまいボタンが押せなくなってしまうケースもあります。
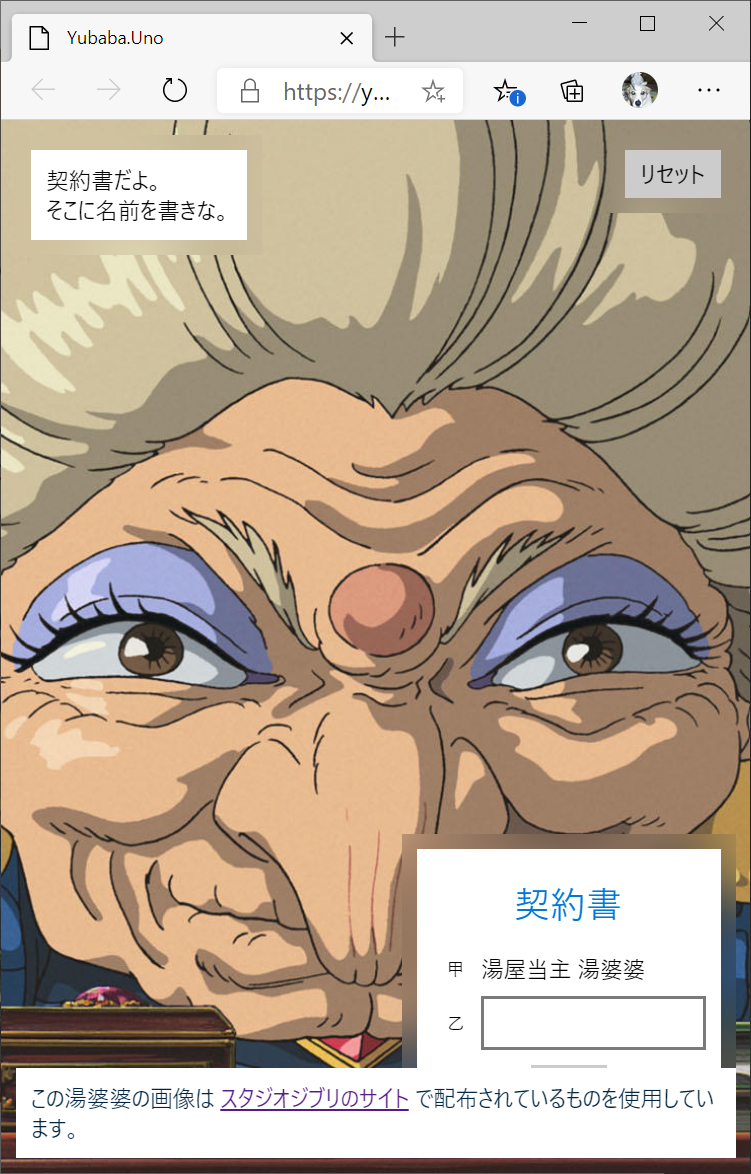
(湯婆婆の迫力満点…)
対応方針
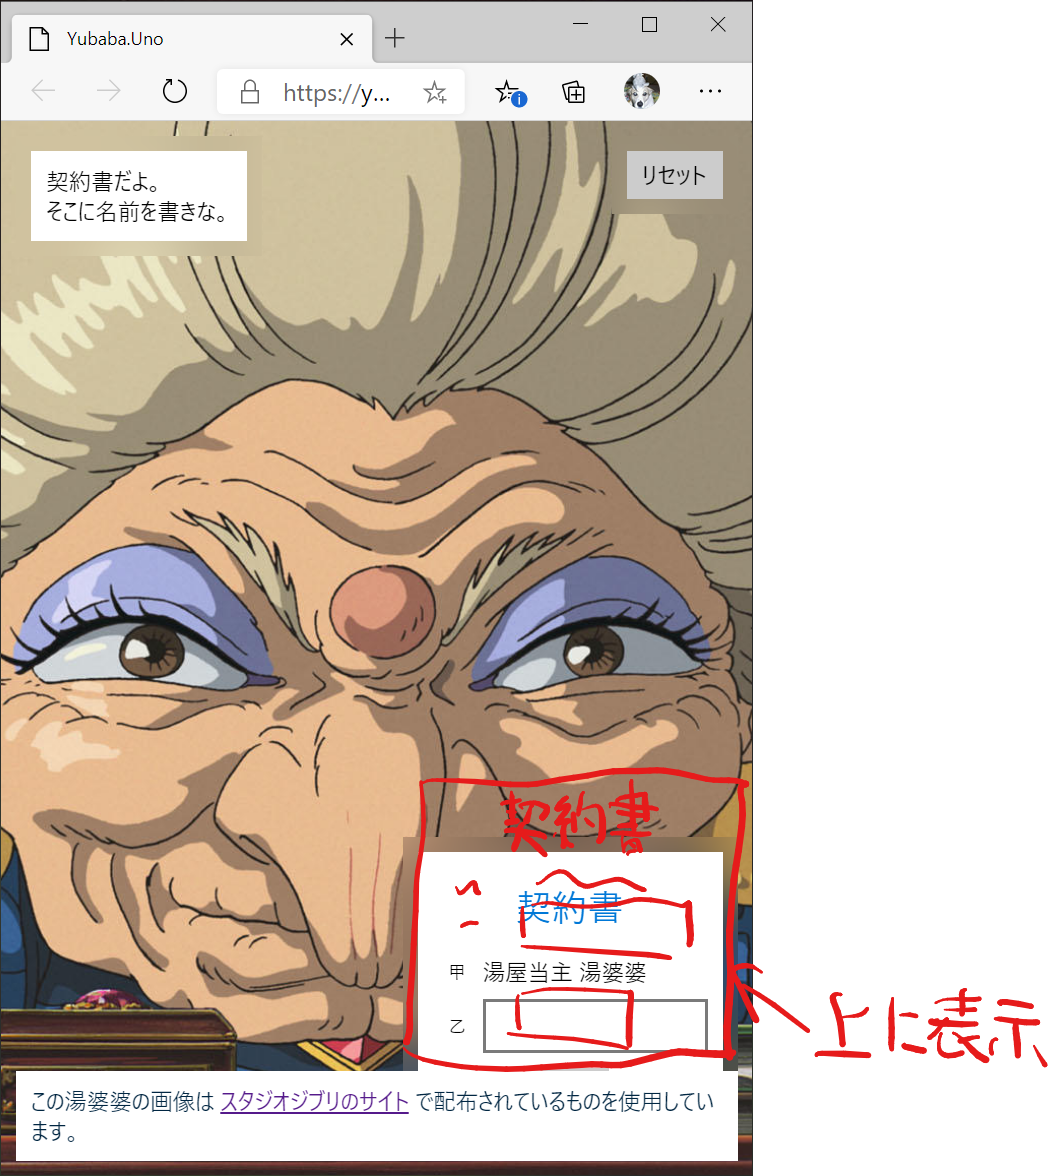
ということで左上のセリフ部分と右上のリセットボタンは問題なさそうなので下側の要素だけ対応すればよさそうです。今回は単純に幅が狭いときは注意書きを下側の横幅いっぱいに表示して、契約書はその上に表示するようにしたいと思います。
イメージとしては以下のような感じを目指します。
では、どれくらい横幅が狭くなったら表示を切り替えるかですが UWP のドキュメントの画面サイズとブレークポイントに小さい画面は横幅が 640 ピクセル以下と定義しているので、それより小さい場合にはレイアウトを変えようと思います。
参考: 画面のサイズとブレークポイント
現状は、Grid という列と行を定義して、そこにコントロールを配置するレイアウトパネルを使っているのですが、レスポンシブな感じにするときはコントロール同士の相対位置でレイアウトする RelativePanel を使うとやりやすいので、パネルを置き換えます。
そして AdaptiveTrigger を使うと画面サイズに応じて画面の要素のプロパティの書き換えが出来るので、それを使ってレイアウトの設定を書き換えようと思います。UWP でレスポンシブな感じの画面を作るときの定石です。
実装しよう
まずは、Grid だったものを RelativePanel にします。同じレイアウトを再現するとこんな感じの XAML になりました。
<UserControl
    x:Class="Yubaba.Uno.AppShell"
    xmlns="http://schemas.microsoft.com/winfx/2006/xaml/presentation"
    xmlns:x="http://schemas.microsoft.com/winfx/2006/xaml"
    xmlns:d="http://schemas.microsoft.com/expression/blend/2008"
    xmlns:infra="using:Yubaba.Uno.Infrastructures"
    xmlns:local="using:Yubaba.Uno"
    xmlns:mc="http://schemas.openxmlformats.org/markup-compatibility/2006"
    xmlns:prism="using:Prism.Regions"
    d:DesignHeight="300"
    d:DesignWidth="400"
    mc:Ignorable="d">

    <RelativePanel>
        <Image
            HorizontalAlignment="Center"
            VerticalAlignment="Center"
            Source="ms-appx:///Assets/Background.jpg"
            Stretch="UniformToFill" />
        <Border
            Margin="10"
            Padding="10"
            Background="{StaticResource RegionBackgroundBrush}"
            RelativePanel.AlignRightWithPanel="True"
            RelativePanel.AlignTopWithPanel="True">
            <ContentControl prism:RegionManager.RegionName="{x:Bind infra:RegionNames.CommandRegion}" />
        </Border>
        <Border
            Margin="10"
            Padding="10"
            Background="{StaticResource RegionBackgroundBrush}">
            <ContentControl prism:RegionManager.RegionName="{x:Bind infra:RegionNames.LogRegion}" />
        </Border>
        <Border
            Margin="10"
            Padding="10"
            Background="{StaticResource RegionBackgroundBrush}"
            RelativePanel.AlignBottomWithPanel="True"
            RelativePanel.AlignRightWithPanel="True">
            <ContentControl prism:RegionManager.RegionName="{x:Bind infra:RegionNames.ContractRegion}" />
        </Border>
        <Border
            Margin="10"
            Padding="10"
            Background="{ThemeResource SystemControlAcrylicElementBrush}"
            RelativePanel.AlignBottomWithPanel="True"
            RelativePanel.AlignLeftWithPanel="True">
            <TextBlock Foreground="{ThemeResource SystemAccentColorDark3}" Style="{StaticResource BodyTextBlockStyle}">
                <Run Text="この湯婆婆の画像は" />
                <Hyperlink NavigateUri="http://www.ghibli.jp/works/chihiro/">スタジオジブリのサイト</Hyperlink>
                <Run Text="で配布されているものを使用しています。" />
            </TextBlock>
        </Border>
    </RelativePanel>
</UserControl>
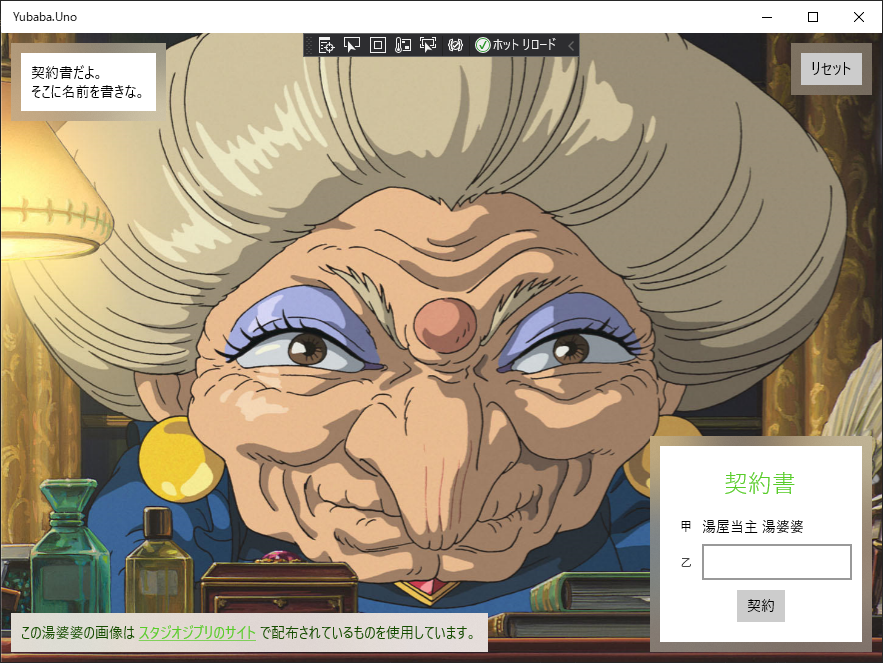
UWP で実行して見た目を確認します。Grid から RelativePanel に置き換えても見た目は同じです。ばっちり。
Uno Platform は開発中は Windows ネイティブアプリとして動作させて確認できるので便利です。とはいえクロスプラットフォームあるあるだと思いますが、プラットフォームが変わると見た目がちょっと変わったりすることもあるので最終確認は実際のプラットフォーム向けにビルドして確認が必要なのは変わりありません。
次に AdaptiveTrigger を使って画面サイズに応じてレイアウトを変える定義を入れます。今回はクレジット表記と契約書の部分はデフォルトではレイアウトを何も設定しないでおいて、AdaptiveTrigger で条件が合致したときにレイアウト系のプロパティをいじるような方針にしました。
<UserControl
    x:Class="Yubaba.Uno.AppShell"
    xmlns="http://schemas.microsoft.com/winfx/2006/xaml/presentation"
    xmlns:x="http://schemas.microsoft.com/winfx/2006/xaml"
    xmlns:d="http://schemas.microsoft.com/expression/blend/2008"
    xmlns:infra="using:Yubaba.Uno.Infrastructures"
    xmlns:local="using:Yubaba.Uno"
    xmlns:mc="http://schemas.openxmlformats.org/markup-compatibility/2006"
    xmlns:prism="using:Prism.Regions"
    d:DesignHeight="590"
    d:DesignWidth="1118"
    mc:Ignorable="d">

    <RelativePanel>
        <Image
            HorizontalAlignment="Center"
            VerticalAlignment="Center"
            Source="ms-appx:///Assets/Background.jpg"
            Stretch="UniformToFill" />
        <Border
            Margin="10"
            Padding="10"
            Background="{StaticResource RegionBackgroundBrush}"
            RelativePanel.AlignRightWithPanel="True"
            RelativePanel.AlignTopWithPanel="True">
            <ContentControl prism:RegionManager.RegionName="{x:Bind infra:RegionNames.CommandRegion}" />
        </Border>
        <Border
            Margin="10"
            Padding="10"
            Background="{StaticResource RegionBackgroundBrush}">
            <ContentControl prism:RegionManager.RegionName="{x:Bind infra:RegionNames.LogRegion}" />
        </Border>
        <Border
            x:Name="ContractRegion"
            Margin="10"
            Padding="10"
            Background="{StaticResource RegionBackgroundBrush}">
            <ContentControl prism:RegionManager.RegionName="{x:Bind infra:RegionNames.ContractRegion}" />
        </Border>
        <Border
            x:Name="CreditRegion"
            Margin="10"
            Padding="10"
            Background="{ThemeResource SystemControlAcrylicElementBrush}">
            <TextBlock Foreground="{ThemeResource SystemAccentColorDark3}" Style="{StaticResource BodyTextBlockStyle}">
                <Run Text="この湯婆婆の画像は" />
                <Hyperlink NavigateUri="http://www.ghibli.jp/works/chihiro/">スタジオジブリのサイト</Hyperlink>
                <Run Text="で配布されているものを使用しています。" />
            </TextBlock>
        </Border>
        <VisualStateManager.VisualStateGroups>
            <VisualStateGroup>
                <VisualState>
                    <VisualState.StateTriggers>
                        <!--  幅が 640 以上の時にこの Visual State になる  -->
                        <AdaptiveTrigger MinWindowWidth="640" />
                    </VisualState.StateTriggers>
                    <VisualState.Setters>
                        <!--  クレジットを左下に表示  -->
                        <Setter Target="CreditRegion.(RelativePanel.AlignLeftWithPanel)" Value="True" />
                        <Setter Target="CreditRegion.(RelativePanel.AlignRightWithPanel)" Value="False" />
                        <Setter Target="CreditRegion.(RelativePanel.AlignBottomWithPanel)" Value="True" />

                        <!--  契約書を右下に表示  -->
                        <Setter Target="ContractRegion.(RelativePanel.AlignBottomWithPanel)" Value="True" />
                        <Setter Target="ContractRegion.(RelativePanel.AlignRightWithPanel)" Value="True" />
                    </VisualState.Setters>
                </VisualState>
                <VisualState>
                    <VisualState.StateTriggers>
                        <!--  640 より小さいとき  -->
                        <AdaptiveTrigger MinWindowWidth="0" />
                    </VisualState.StateTriggers>
                    <VisualState.Setters>
                        <!--  クレジット表記を下に幅いっぱいに表示する  -->
                        <Setter Target="CreditRegion.(RelativePanel.AlignLeftWithPanel)" Value="True" />
                        <Setter Target="CreditRegion.(RelativePanel.AlignRightWithPanel)" Value="True" />
                        <Setter Target="CreditRegion.(RelativePanel.AlignBottomWithPanel)" Value="True" />

                        <!--  契約書をクレジット表記の上に右寄せで右寄せで表示する  -->
                        <Setter Target="ContractRegion.(RelativePanel.Above)" Value="CreditRegion" />
                        <Setter Target="ContractRegion.(RelativePanel.AlignRightWithPanel)" Value="True" />
                    </VisualState.Setters>
                </VisualState>
            </VisualStateGroup>
        </VisualStateManager.VisualStateGroups>
    </RelativePanel>
</UserControl>
実行すると以下のようにサイズに応じてレイアウトが変わります。
iPhoneX で確認
では手元で問題が起きていた iPhone で表示してみます。まずは対処前はこんな感じでした。
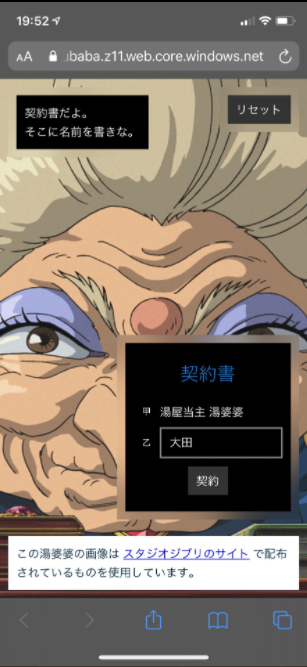
今回の対応を入れたものだとこうなります。ばっちり。
まとめ
UWP のレスポンシブ対応の機能を使って湯婆婆を狭い画面でも一応動くようにしました。RelativePanel と AdaptiveTrigger を使うことで割と楽にサイズに応じてレイアウトを変えることは実現できます。
ということで、レスポンシブ対応するなら Android と iOS 向けのプロジェクトを消すんじゃなかったと後悔する今日この頃でした。