とりまやってみましょう。
Azure Communication Services は Azure 上に必須なので作ります。
Token の払い出しを行うサーバーサイドの作成
これは Functions で行います。こちらにある通り。
Azure Functions を使用して、信頼できる認証サービスを構築する
今回は以下のような感じでいこうかなと思います。URL のクエリに id という名前のパラメーターがあるときは、それをユーザー ID としてトークンを取得。id 指定がない場合はユーザーを作成してトークンを取得といった感じにします。
id は、適当な値を設定しても Azure Communication Services ではじかれるので、初回は id 無しで呼び出して 2 回目以降は id 指定で行く感じです。戻ってくる JSON はこんな感じで
{
  "token": "xxxxx",
  "expiresOn": "2020-09-27T04:36:01.1941722+00:00",
  "userId": "xxxxxxxxxx"
}
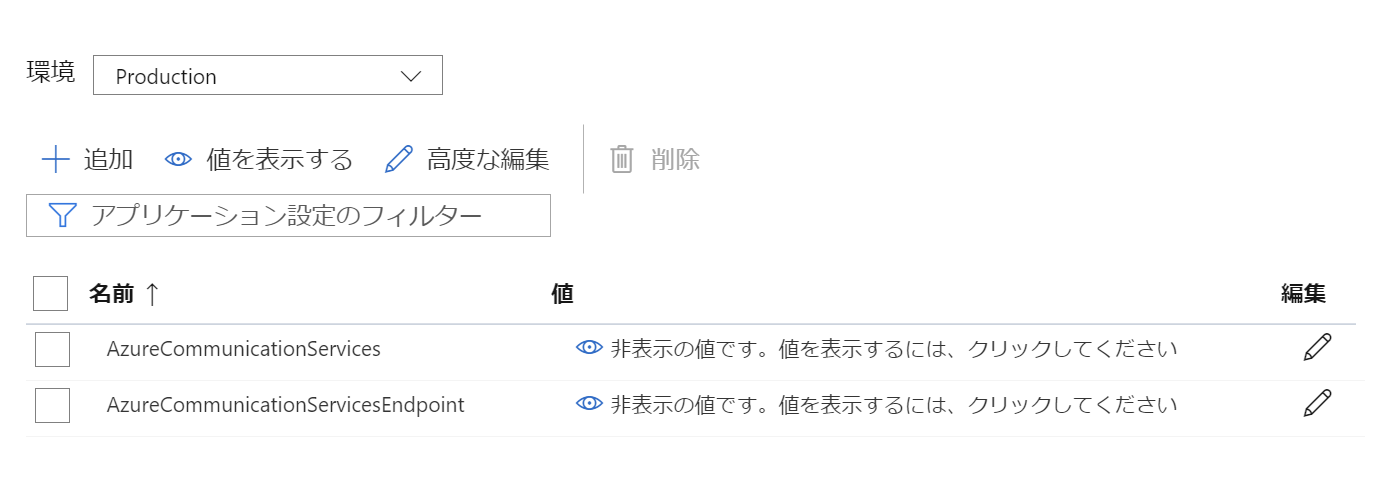
Azure Functions のプロジェクトを作って local.settings.json に Azure Communication Services の接続文字列を追加します。
{
  "IsEncrypted": false,
  "Values": {
    "AzureWebJobsStorage": "UseDevelopmentStorage=true",
    "FUNCTIONS_WORKER_RUNTIME": "dotnet",
    "AzureCommunicationServices": "endpoint=https://xxxx.communication.azure.com/;accesskey=xxxxxxxxx"
  }
}
Microsoft.Azure.Functions.Extensions と Azure.Communication.Administration (preview) パッケージを追加して以下のように Startup.cs を作ります。
using Azure.Communication.Administration;
using Microsoft.Azure.Functions.Extensions.DependencyInjection;
using Microsoft.Extensions.Configuration;
using Microsoft.Extensions.DependencyInjection;
using SimpleChat.Server;
using System;

[assembly: FunctionsStartup(typeof(Startup))]

namespace SimpleChat.Server
{
    public class Startup : FunctionsStartup
    {
        public override void Configure(IFunctionsHostBuilder builder)
        {
            builder.Services.AddTransient(provider =>
              {
                  var c = provider.GetRequiredService<IConfiguration>();
                  return new CommunicationIdentityClient(c.GetValue<string>("AzureCommunicationServices"));
              });
        }
    }
}
では、Token を作成する関数を作ります。HttpTrigger の関数で CommunicationIdentityClient を使ってトークンを生成して返します。まずは、戻り値のクラスを定義して…
using System;

namespace SimpleChat.Core
{
    public class GetTokenResponse
    {
        public string Token { get; set; }
        public DateTimeOffset ExpiresOn { get; set; }
        public string UserId { get; set; }
    }
}
関数本体を実装します。
using System;
using System.Threading.Tasks;
using Microsoft.AspNetCore.Mvc;
using Microsoft.Azure.WebJobs;
using Microsoft.Azure.WebJobs.Extensions.Http;
using Microsoft.AspNetCore.Http;
using Microsoft.Extensions.Logging;
using Azure.Communication.Administration;
using SimpleChat.Core;
using Azure.Communication;

namespace SimpleChat.Server
{
    public class GetToken
    {
        private readonly CommunicationIdentityClient _communicationIdentityClient;

        public GetToken(CommunicationIdentityClient communicationIdentityClient)
        {
            _communicationIdentityClient = communicationIdentityClient ?? throw new ArgumentNullException(nameof(communicationIdentityClient));
        }

        [FunctionName(nameof(GetToken))]
        public  async Task<IActionResult> Run(
            [HttpTrigger(AuthorizationLevel.Anonymous, "get")] HttpRequest req,
            ILogger log)
        {
            var id = req.Query["id"].ToString();

            var user = string.IsNullOrWhiteSpace(id) ?
                (await _communicationIdentityClient.CreateUserAsync()).Value :
                new CommunicationUser(id);

            try
            {
                var tokenResponse = await _communicationIdentityClient.IssueTokenAsync(user, new[] { CommunicationTokenScope.Chat });
                return new OkObjectResult(new GetTokenResponse
                {
                    UserId = tokenResponse.Value.User.Id,
                    Token = tokenResponse.Value.Token,
                    ExpiresOn = tokenResponse.Value.ExpiresOn,
                });
            }
            catch (Exception ex)
            {
                log.LogError(ex, "IssureTokenAsync");
                return new BadRequestResult();
            }
        }
    }
}
次に人が集まって会話するスレッドを作成する関数を追加します。このスレッド ID が一緒じゃないと一人チャットになるので、スレッド ID は皆で共有できないといけません。
実は先ほど作ったユーザーの ID も、システムで管理してる(もしくは外部の ID プロバイダーの)ユーザーとの紐づけの管理とかは自分で作りこまないといけません。
今回はユーザー管理は毎回ユーザーを作るという手抜き実装ですがスレッド ID は共有しないとみんなでチャット出来ないので頑張って作ります。ただ、 Cosmos DB とかに保存する処理とかを作るのはだるいのでメモリ上に保持するようにします。なので、Azure Functions がスケール アウトやスケール インすると不都合が起きますが、ちゃんと DB を使えばうまくいくはずです。
今回はグローバルで 1 つのスレッドという感じになるべくなるように実装していきます。
Server のプロジェクトに Azure.Communication.Chat パッケージを追加して GetToken メソッドでスレッドが無ければ作るように変更します。
local.settings.json にスレッド ID を作るために必要なエンドポイントの設定も追加します。
{
  "IsEncrypted": false,
  "Values": {
    "AzureWebJobsStorage": "UseDevelopmentStorage=true",
    "FUNCTIONS_WORKER_RUNTIME": "dotnet",
    "AzureCommunicationServices": "endpoint=https://xxxxxx.communication.azure.com/;accesskey=xxxxx...",
    "AzureCommunicationServicesEndpoint": "https://xxxxxx.communication.azure.com/"
  }
}
そして、GetToken.cs にスレッドも作る処理を追加しておきます。
using System;
using System.Threading.Tasks;
using Microsoft.AspNetCore.Mvc;
using Microsoft.Azure.WebJobs;
using Microsoft.Azure.WebJobs.Extensions.Http;
using Microsoft.AspNetCore.Http;
using Microsoft.Extensions.Logging;
using Azure.Communication.Administration;
using SimpleChat.Core;
using Azure.Communication;
using Azure.Communication.Chat;
using Microsoft.Extensions.Configuration;
using Azure.Communication.Identity;

namespace SimpleChat.Server
{
    public class GetToken
    {
        // 危険!こんなことは本番でやったらだめ!!絶対!!だけど、とりあえずのお試しなので static 変数にスレッドクライアントを保持します
        private static ChatThreadClient ChatThreadClient { get; set; }
        // ここにエンドポイントの値を構成情報から設定する
        private readonly string _endpoint;
        private readonly CommunicationIdentityClient _communicationIdentityClient;

        public GetToken(CommunicationIdentityClient communicationIdentityClient, IConfiguration configuration)
        {
            _communicationIdentityClient = communicationIdentityClient ?? throw new ArgumentNullException(nameof(communicationIdentityClient));
            _endpoint = configuration.GetValue<string>("AzureCommunicationServicesEndpoint");
        }

        [FunctionName(nameof(GetToken))]
        public  async Task<IActionResult> Run(
            [HttpTrigger(AuthorizationLevel.Anonymous, "get")] HttpRequest req,
            ILogger log)
        {
            var id = req.Query["id"].ToString();

            var user = string.IsNullOrWhiteSpace(id) ?
                (await _communicationIdentityClient.CreateUserAsync()).Value :
                new CommunicationUser(id);

            try
            {
                var tokenResponse = await _communicationIdentityClient.IssueTokenAsync(user, new[] { CommunicationTokenScope.Chat });

                // スレッド ID がなかったら作る。同時アクセスがあると死ぬロジックなので本番でマネしないでね!
                var chat = new ChatClient(
                    new Uri(_endpoint),
                    new CommunicationUserCredential(tokenResponse.Value.Token));
                if (ChatThreadClient == null)
                {
                    // Thread が無い場合
                    ChatThreadClient = await chat.CreateChatThreadAsync(
                        "talk",
                        new[] { new ChatThreadMember(user) });
                }
                else
                {
                    // Thread がある場合は参加しておく
                    await ChatThreadClient.AddMembersAsync(new[] { new ChatThreadMember(user) });
                }

                return new OkObjectResult(new GetTokenResponse
                {
                    UserId = tokenResponse.Value.User.Id,
                    Token = tokenResponse.Value.Token,
                    ExpiresOn = tokenResponse.Value.ExpiresOn,
                    ThreadId = ChatThreadClient.Id, // ThreadId も返す
                });
            }
            catch (Exception ex)
            {
                log.LogError(ex, "IssureTokenAsync");
                return new BadRequestResult();
            }
        }
    }
}
こうすると GetToken 関数の結果に threadId が追加されます。
{
  "token": "xxx.....",
  "expiresOn": "2020-09-27T06:04:49.1221965+00:00",
  "userId": "xxxxx...",
  "threadId": "xxxx...."
}
最後にローカルデバッグ時用の CORS の設定を追加します。local.settings.json に CORS の設定を以下のように追加しておきます。
{
  "IsEncrypted": false,
  "Values": {
    ... 省略 ...
  },
  "Host": {
    "CORS": "*"
  }
}
クライアント側の実装
次にクライアント側です。Blazor のプロジェクトを作りましょう。そして Azure.Communication.Chat (preview) パッケージを追加します。
とりあえずローカル実行時は、Azure Functions のローカルサーバーを見に行くようにします。Program.cs を以下のようにします。
using Microsoft.AspNetCore.Components.WebAssembly.Hosting;
using Microsoft.Extensions.DependencyInjection;
using System;
using System.Net.Http;
using System.Threading.Tasks;

namespace SimpleChat.Client
{
    public class Program
    {
        public static async Task Main(string[] args)
        {
            var builder = WebAssemblyHostBuilder.CreateDefault(args);
            builder.RootComponents.Add<App>("app");

            builder.Services.AddScoped(sp => new HttpClient
            {
                BaseAddress = new Uri(builder.Configuration["BaseAddress"] ?? builder.HostEnvironment.BaseAddress)
            });

            await builder.Build().RunAsync();
        }
    }
}
wwwroot フォルダーの下に appsettings.Development.json という名前で以下のファイルを置いたら構成は完了です。
{
  "BaseAddress": "http://localhost:7071/"
}
チャットにつなごう
ではつないでいきます。繋ぐためにはエンドポイントが必要なのでクライアントの構成ファイルに書いておくようにします。
appsettings.Development.json に以下のように設定を追加します。
{
  "BaseAddress": "http://localhost:7071/",
  "CommunicationServiceSettings": "https://xxxxxx.communication.azure.com/"
}
追加した設定を保持するためのクラスを定義します。
namespace SimpleChat.Client
{
    public class CommunicationServiceSettings
    {
        public string Endpoint { get; set; }
    }
}
そして Program.cs に、設定をクラスに読み込んでおく処理を追加します。
using Microsoft.AspNetCore.Components.WebAssembly.Hosting;
using Microsoft.Extensions.Configuration;
using Microsoft.Extensions.DependencyInjection;
using Microsoft.Extensions.Options;
using SimpleChat.Client.Services;
using System;
using System.Diagnostics;
using System.Net.Http;
using System.Threading.Tasks;

namespace SimpleChat.Client
{
    public class Program
    {
        public static async Task Main(string[] args)
        {
            var builder = WebAssemblyHostBuilder.CreateDefault(args);
            builder.RootComponents.Add<App>("app");

            builder.Services.AddScoped(sp => new HttpClient
            {
                BaseAddress = new Uri(builder.Configuration["BaseAddress"] ?? builder.HostEnvironment.BaseAddress)
            });

            // 設定を読み込み
            builder.Services.AddSingleton(sp =>
            {
                // Configure メソッド使いたかったけど何回試しても動かなかったので泣く泣く…
                var c = sp.GetRequiredService<IConfiguration>();
                return new CommunicationServiceSettings
                {
                    Endpoint = c[nameof(CommunicationServiceSettings)]
                };
            });
            builder.Services.AddScoped<CommunicationService>();

            await builder.Build().RunAsync();
        }
    }
}
そして、チャットのやり取りをするクラスを定義します。ここらへんは ChatClient や ChatThreadClient を使ってサクッと作れます。
using Azure.Communication.Chat;
using Azure.Communication.Identity;
using Microsoft.Extensions.Options;
using SimpleChat.Core;
using System;
using System.Collections.Generic;
using System.Net.Http;
using System.Text.Json;
using System.Threading.Tasks;

namespace SimpleChat.Client.Services
{
    public class CommunicationService
    {
        private static string ThreadId => "hello-world-sample";
        private readonly CommunicationServiceSettings _communicationServiceSettings;
        private readonly HttpClient _http;
        private GetTokenResponse _getTokenResponse;
        private ChatClient _chatClient;
        private ChatThreadClient _chatThreadClient;
        public CommunicationService(IOptions<CommunicationServiceSettings> settings, HttpClient http)
        {
            _communicationServiceSettings = settings.Value;
            _http = http;
        }

        public bool IsJoined => _chatThreadClient != null;

        // チャットに参加
        public async ValueTask JoinToChatAsync()
        {
            var res = await _http.GetStringAsync("/api/GetToken");
            _getTokenResponse = JsonSerializer.Deserialize<GetTokenResponse>(res);

            _chatClient = new ChatClient(
                new Uri(_communicationServiceSettings.Endpoint),
                new CommunicationUserCredential(_getTokenResponse.Token));
            _chatThreadClient =  _chatClient.GetChatThreadClient(_getTokenResponse.ThreadId);
        }

        // チャットにメッセージを送信
        public async ValueTask SendMessageAsync(string name, string message)
        {
            await _chatThreadClient.SendMessageAsync(message, senderDisplayName: name);
        }

        // チャットのメッセージを取得
        public IAsyncEnumerable<ChatMessage> GetMessagesAsync() => _chatThreadClient.GetMessagesAsync();
    }
}
Program.cs にコンテナに登録する処理も追加しておきましょう。
builder.Services.AddTransient<CommunicationService>();
仕上げに Index.razor です。async foreach で脳死で読み込めばいい感じにメッセージがくるたびに読み込んでくれるかと思ったら、ダメだったので泣く泣くメッセージの重複管理を自前でやってます。これチャットが長くなると毎回データとってくるのつらいのでは…。そのうち API がいい感じになるのかな??
@page "/"
@using SimpleChat.Client.Services
@using System.Diagnostics
@using Azure.Communication.Chat
@inject CommunicationService communicationService
@inject Microsoft.Extensions.Configuration.IConfiguration configuration;

<h1>Simple chat</h1>

@if (communicationService.IsJoined)
{
    <div>
        ユーザー名:@displayName
    </div>
    <div>
        <input type="text" @bind-value="message" />
        <button @onclick="SendButton_Click" disabled="@(string.IsNullOrEmpty(message))">Send</button>
        <hr />
        <ul>
            @foreach (var message in messages)
            {
                <li @key="message.Id">@message.SenderDisplayName : @message.Content</li>
            }
        </ul>
    </div>
}
else
{
    <button @onclick="JoinButton_Click" disabled="@(string.IsNullOrEmpty(displayName))">Join</button>
    <input type="text" @bind-value="displayName" />
}

@code {
    private readonly HashSet<string> messageIds = new HashSet<string>();
    private readonly List<ChatMessage> messages = new List<ChatMessage>();
    private string displayName;
    private string message;
    private async void JoinButton_Click()
    {
        await communicationService.JoinToChatAsync();
        StateHasChanged();
        _ = StartReadMessagesAsync();
    }

    private async ValueTask StartReadMessagesAsync()
    {
        while (true)
        {
            await foreach (var message in communicationService.GetMessagesAsync())
            {
                Debug.WriteLine($"{message.Type}: {message.SenderDisplayName} > {message.Content}");
                if (message.Type == "Text")
                {
                    Debug.WriteLine("Text!!");
                    if (!messageIds.Contains(message.Id))
                    {
                        messages.Add(message);
                        messageIds.Add(message.Id);
                    }
                }
            }

            StateHasChanged();
            await Task.Delay(3000);
        }
    }

    private async void SendButton_Click()
    {
        await communicationService.SendMessageAsync(displayName, message);
        message = "";
        StateHasChanged();
    }
}
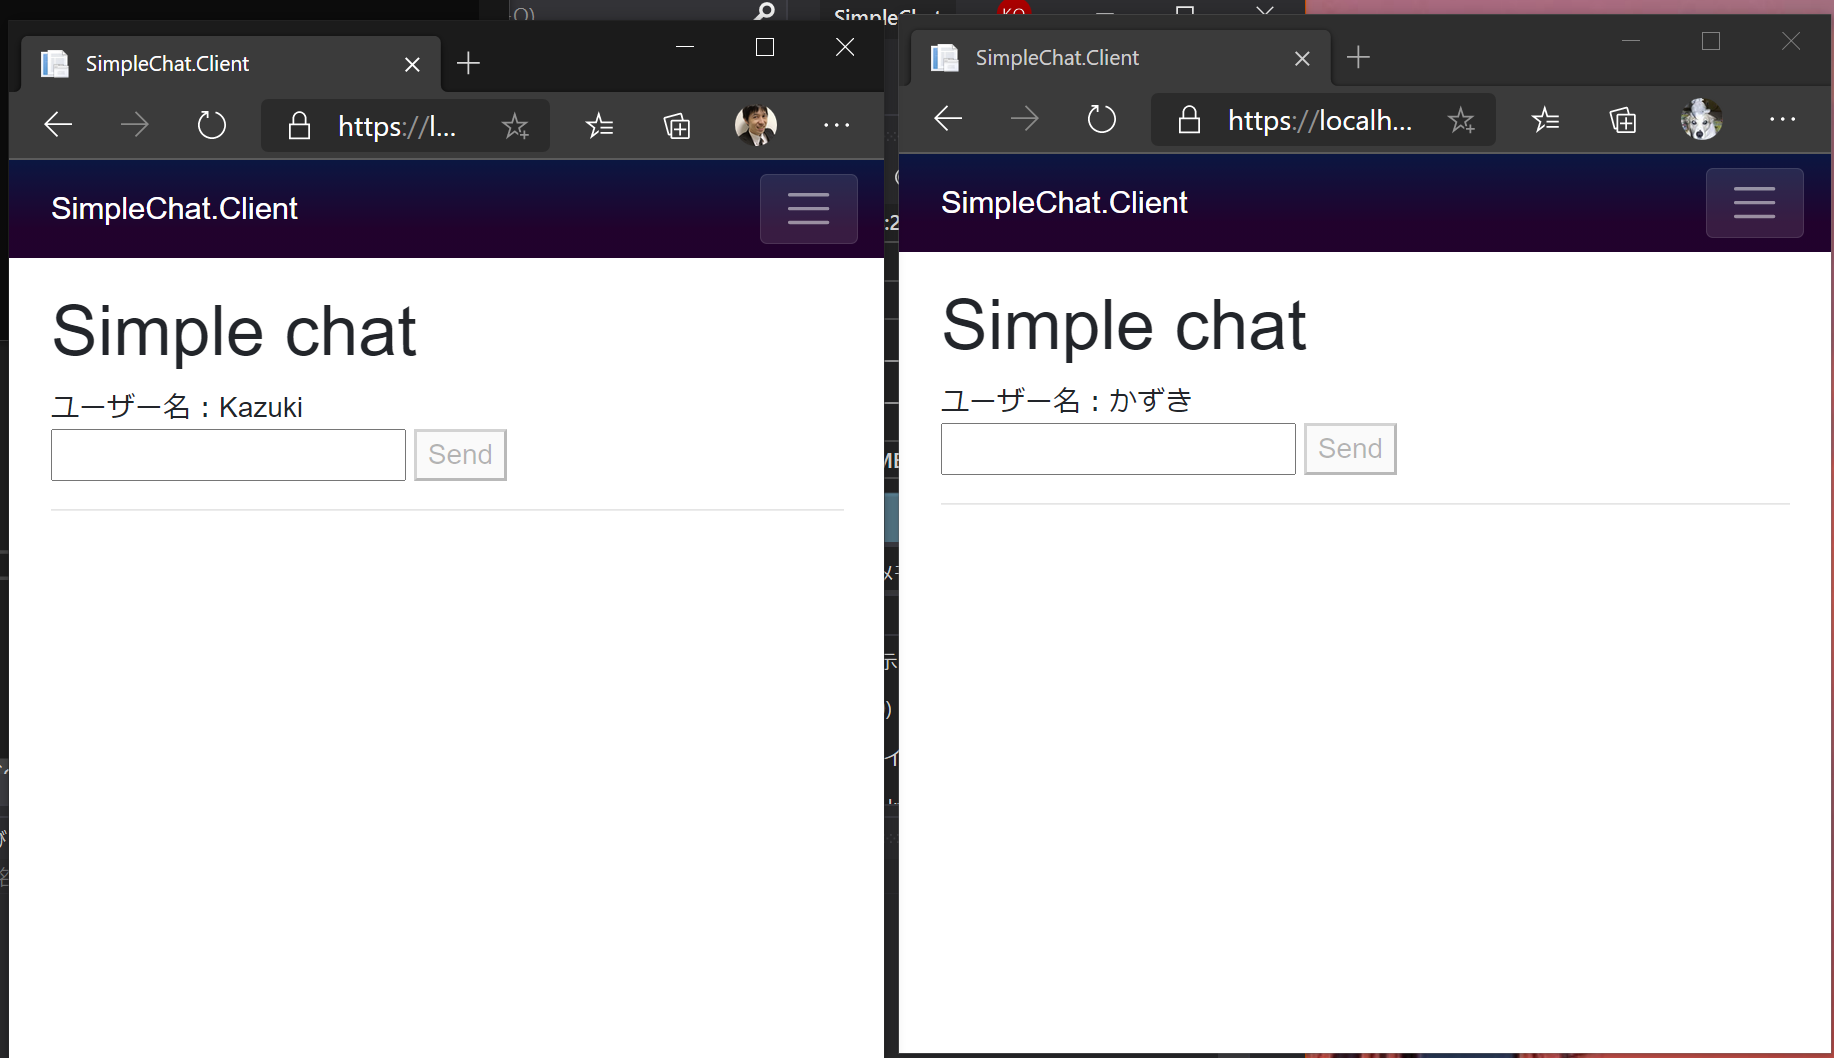
ローカルで動かしてみましょう。起動直後

名前を入力したところ(複数ブラウザで試してみてる)
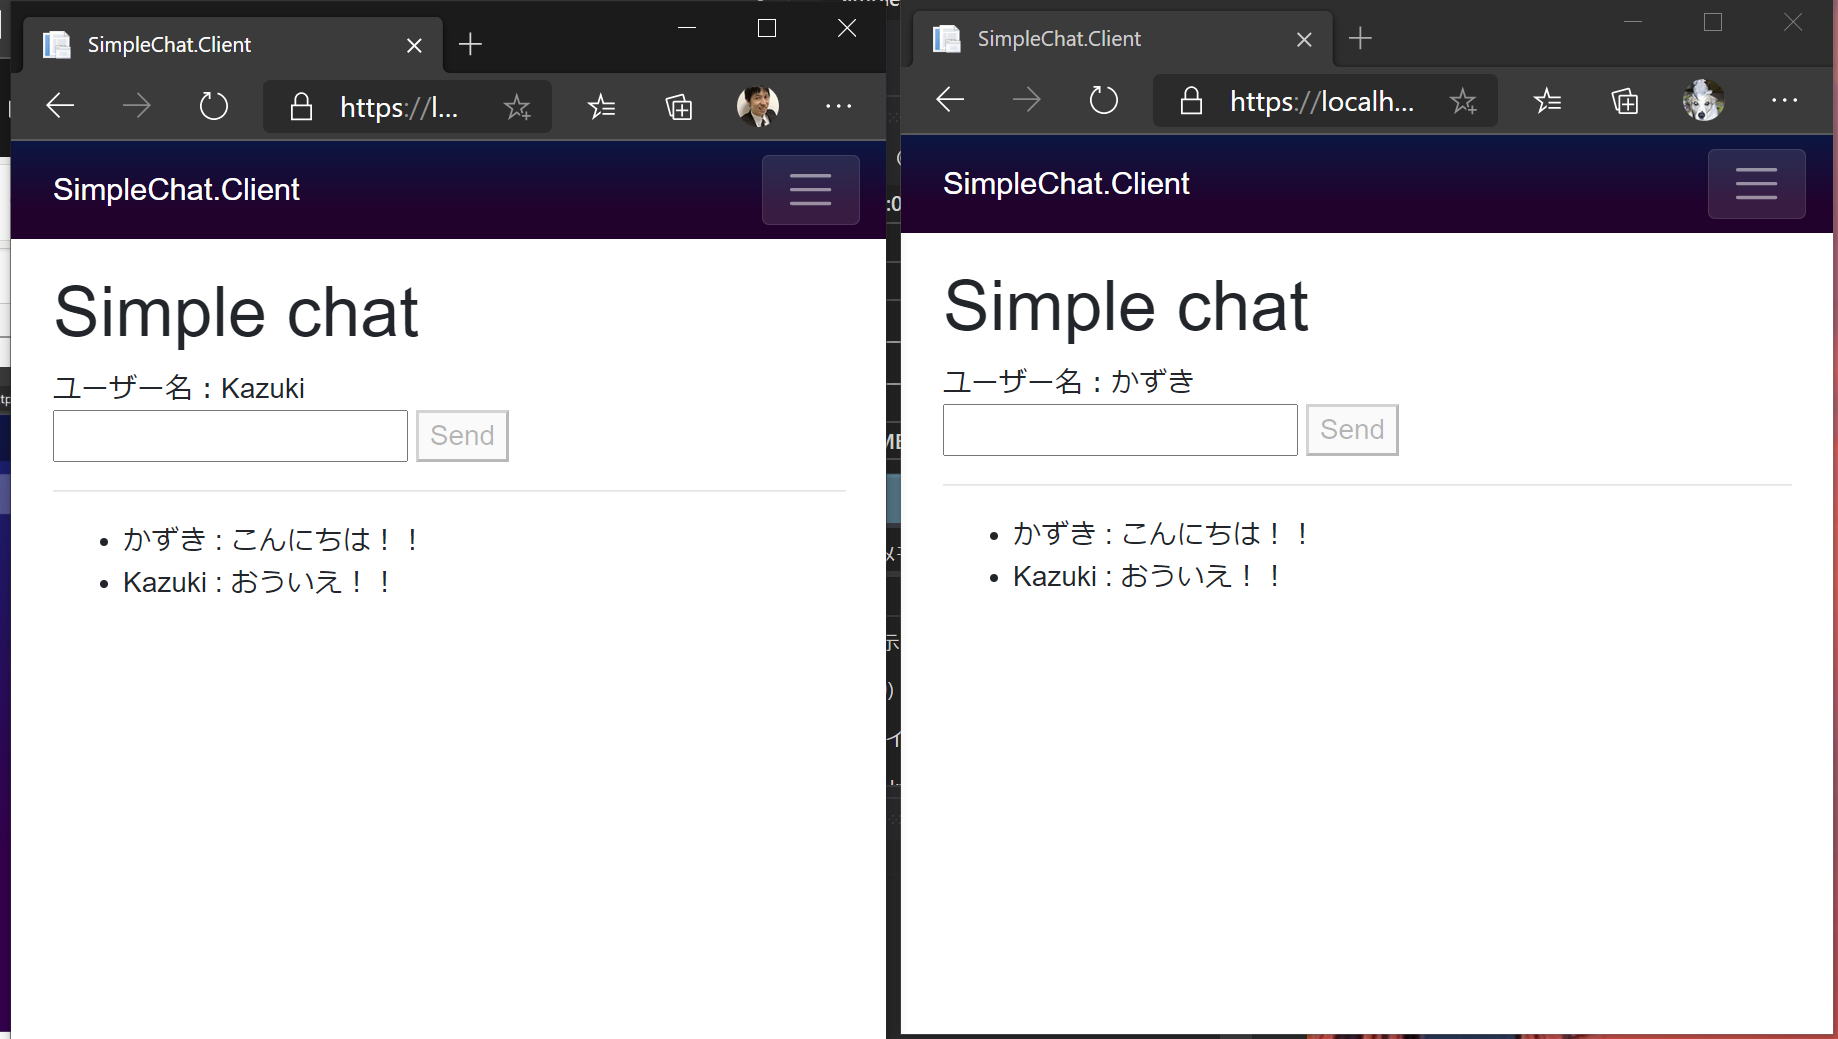
メッセージうってみた
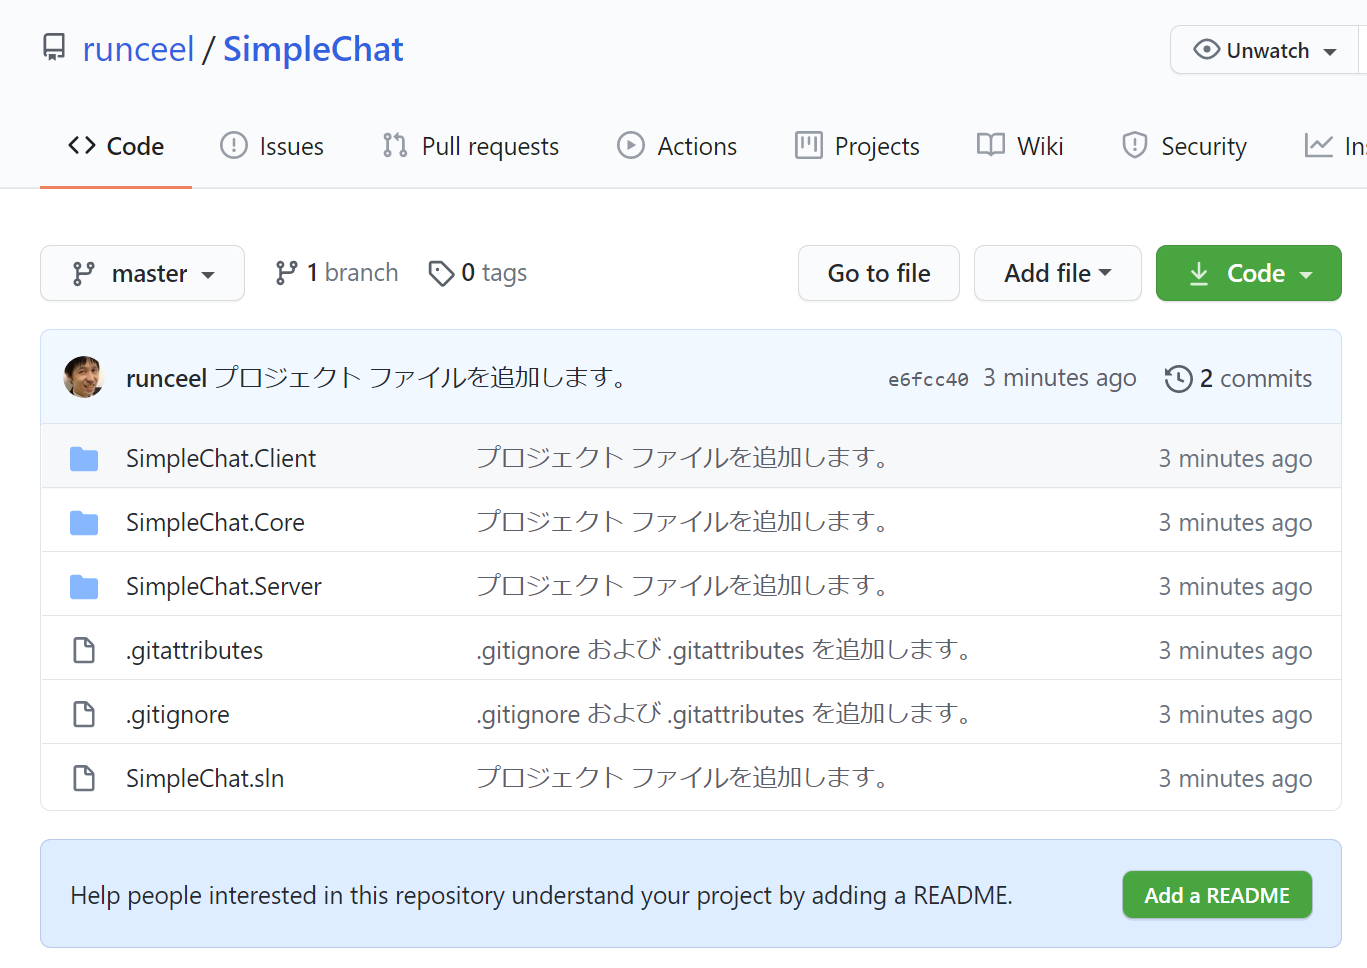
Static Web Apps へデプロイ
GitHub にリポジトリを作ってお約束の手順でデプロイしてみました。今回はこんな感じのレイアウトなので
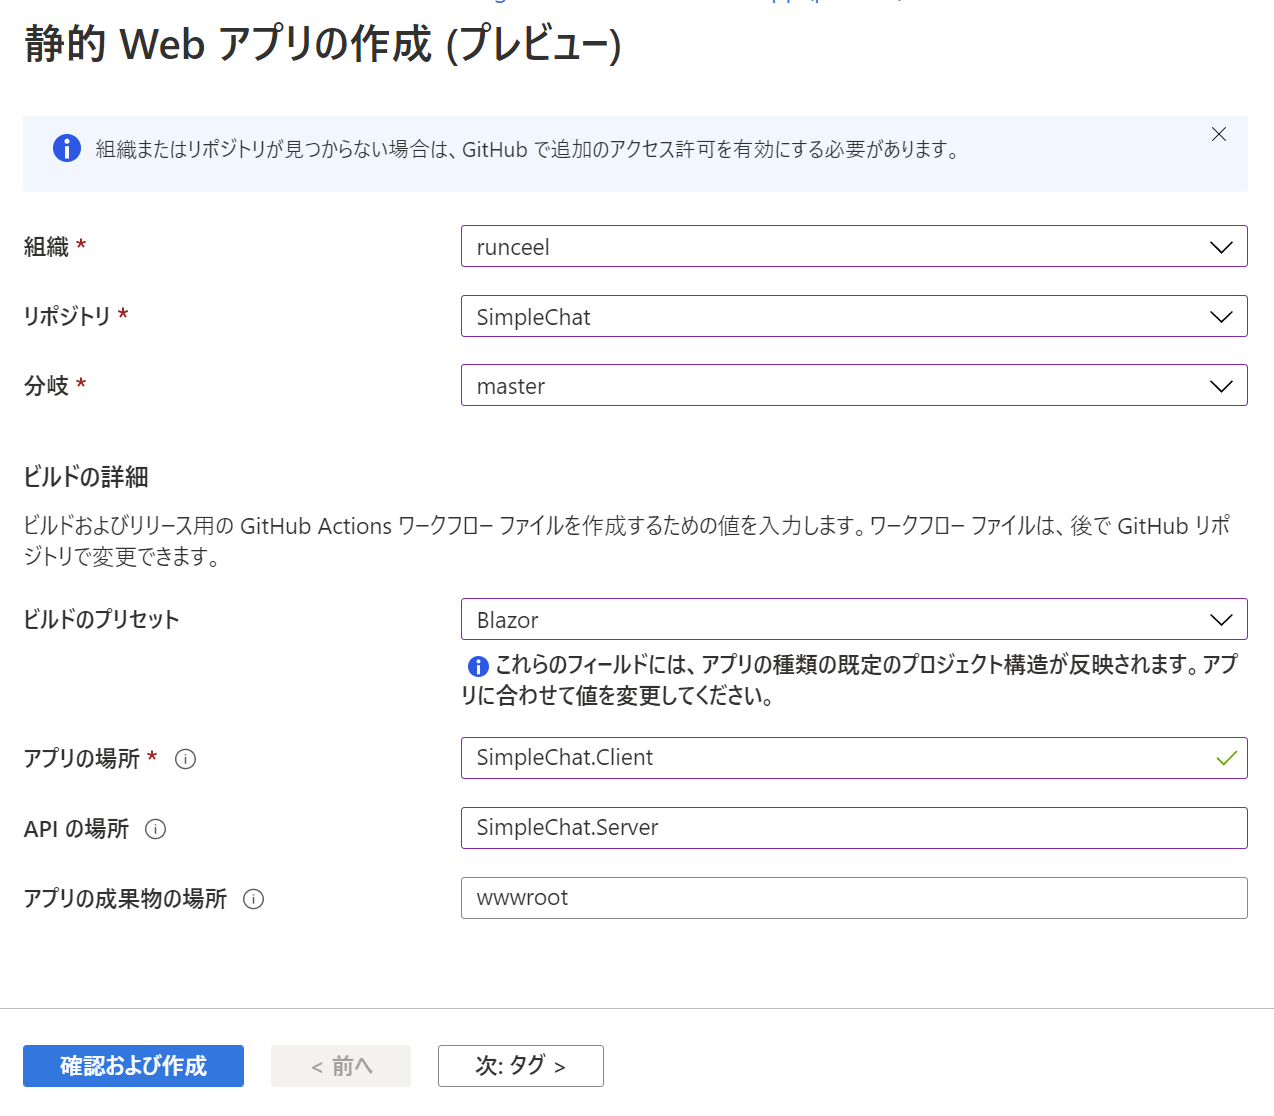
それにあわせて、こんな感じで作りました
デプロイが完了したら構成に Azure Communication Services 関連の設定を追加しておきます。
クライアント側にも appsettings.Development.json しかなかったので appsettings.json を足しておきます。Azure Communication Services 関連の設定だけ引っ越ししましょう。以下のように
{
  "CommunicationServiceSettings": "https://xxxxxxx.communication.azure.com/"
}
Static Web Apps にデプロイしてもとりあえずは動きました。

まとめ
ということで Azure Communication Services で一番とっつきやすいチャット機能を Blazor + Functions で試してみました。デプロイ先は Static Web Apps です。
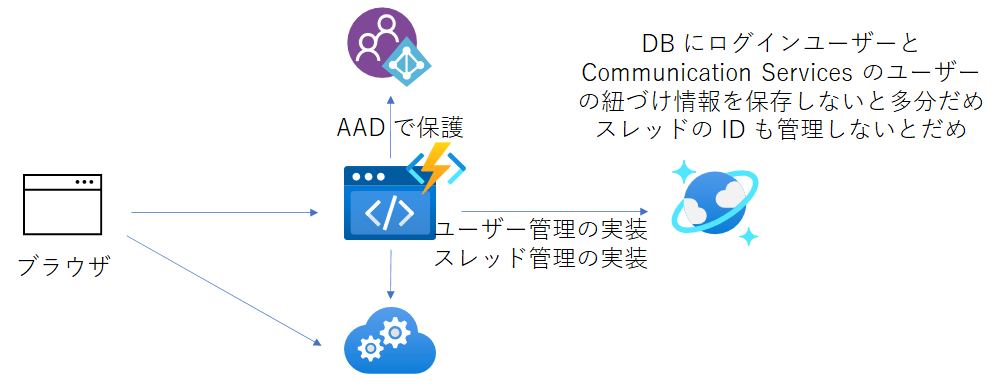
試してみた感じ、Azure Communication Services は ID は発行してくれるけど、それが実際に誰なのかということは自分で管理しないといけないなという感じでした。あと、ちゃんと作るときは Azure AD や Azure AD B2C か、それに準ずる何かしらでログイン機能も実装しておかないとフリーダムなチャットになりそうだなと思いました。
後は誰がどんなスレッドを持ってるのかとかも、おそらくアプリ側で管理することになる気がします。あくまで Communication Services が提供するのは作成と ID 指定での検索だけっぽいです。
なのでちゃんと作るとしたら最低でも以下のような雰囲気になる気がします。
仕様なのかバグなのかわかりませんが C# SDK は今のところポーリングしてメッセージとってくるのですが、毎回メッセージが全部返ってくるので、誰か差分だけいい感じにとってくる方法を教えてください。
startTime 引数と AsPages で continueousToken を指定しても、全部返ってきました orz
現状、C# SDK でメッセージのポーリングをするときは、受信したメッセージの最後のタイムスタンプの1秒後から取得するようにすると、一応続きからとれるみたいです。内部的にミリ秒まで持ってたらロストするメッセージもあるかもしれませんが…。
startTime 引数に前回取得したメッセージの一番大きなタイムスタンプ + 1 秒したものを渡すようにしましょう。
JavaScript の SDK には、チャットメッセージがきたらコールバックが呼ばれるというタイプのものがあるみたいなので、そのうち C# にも来るといいな。まぁまだプレビューですしね。
音声チャットも試してみたいな。