単体テストライブラリーっていっぱいありますね…
Most in-demand JavaScript testing tools in 2020 の翻訳
上の記事に上げられてるだけでも沢山あります。
- Jest
- Mocha
- Storybook
- Cypress
- Enzyme
- Ava
- Jasmine
- Puppeteer
とりあえず数の暴力に従って Jest をやってみて使い方をまとめてみました。
ひな型作成
以下のコマンドを叩いてプロジェクトのひな型を作ります。
$ npm init -y
$ tsc -init
tsconfig.json は以下のようにしました。
{
  "compilerOptions": {
    "target": "es5",
    "module": "commonjs",
    "outDir": "./dist",
    "rootDir": "./src",
    "strict": true,
    "esModuleInterop": true,
    "forceConsistentCasingInFileNames": true
  }
}
そして jest を入れて…
npm install --save-dev jest ts-jest @types/jest typescript
npm run test でテストを実行できるように jest コマンドを設定しておきます。npm run build で tsc を実行するようにもしておきましょう。package.json は以下のようになりました。
{
  "name": "jest-lab",
  "version": "1.0.0",
  "description": "",
  "main": "index.js",
  "scripts": {
    "test": "jest",
    "build": "tsc"
  },
  "keywords": [],
  "author": "Kazuki Ota",
  "license": "ISC",
  "devDependencies": {
    "@types/jest": "^25.2.3",
    "jest": "^26.0.1",
    "ts-jest": "^26.1.0",
    "typescript": "^3.9.3"
  }
}
npx jest -init で初期設定をします。こんな感じの設定にしました。
$ npx jest --init

The following questions will help Jest to create a suitable configuration for your project

√ Choose the test environment that will be used for testing » node
√ Do you want Jest to add coverage reports? ... yes
√ Automatically clear mock calls and instances between every test? ... no
.ts と .tsx に ts-jest を使ってもらうように生成された jest.config.js の roots と transform の設定を以下のようにします。
roots: [
  "<rootDir>/src"
],

transform: {
  "^.+\\.(ts|tsx)$": "ts-jest"
},
テスト対象の作成
とりあえず greeter.ts というファイルを作って以下のようなクラスを定義しました。
export class Greeter {
    constructor(private name: string) {}

    getMessage() {
        return `Hello ${this.name}`;
    }
}
テストコードの作成
greeter.test.ts を作って早速テストを書いていきましょう。
import { Greeter } from './greeter';

test('test', () => {
    expect(new Greeter('Taro').getMessage()).toBe('Hello Taro');
});
npm t でテストを実行します。
$ npm t

> jest-lab@1.0.0 test C:\Labs\jest-lab
> jest

 PASS  src/greeter.test.ts
  √ test (3 ms)

Test Suites: 1 passed, 1 total
Tests:       1 passed, 1 total
Snapshots:   0 total
Time:        1.532 s, estimated 4 s
Ran all test suites.
無事動きました。
モック
シンプルな単体テストはこれでいいとして、例えば REST API を叩くようなクラスがあるとします。今回は axios を使ってみましょう。
$ npm i axios
動かしても example.com へのリクエストなので、絶対動かないコードを書きます。
import axios from 'axios';

export interface ResponseData {
    id: number;
    text: string;
}

export async function getData(id: number): Promise<{ status: number, data: ResponseData[]}>  {
    const res = await axios.get<ResponseData[]>('https://example.com', { params: { id }});
    return { status: res.status, data: res.status == 404 ? [] : res.data };
}
REST API の仕様はあっても、まだ実装されてない段階では上のと同じように書いてみたけど動かないですよね。それでも単体テストしたい場合はモックを使えば出来ます。axios をモックしましょう。モックをするには jest.mock('axios'); のようにします。
そうすると import axios from 'axios'; の axios がモックになります。メソッドの戻り値とかをモックしたい場合は jest.Mocked<typeof axios> にキャストして使うと Jest の各種モック機能がコード補完に出てきてくれるようになります。
mockObj.mockTargetMethod.mockReturnValue(mockReturnValue) で mockTargetMethod を呼んだ時の戻り値を mockReturnValue に出来ます。Promise を返すような非同期メソッドの場合は mockResolvedValue で戻り値を指定できます。
モックの関数が実行されたかどうかのアサートは expect(mockFunction).toHaveBeenCalled() や expect(mockFunction).toHaveBeenCalledWith(引数1, 引数2) のようにして確認できます。
ここら辺の詳細は以下のドキュメントに書いてあるのでチェックしておきましょう。
ということで、これを使って axios をモックに差し替えたテストは以下のような感じになります。唯一 404 のときは空の配列を返すようなロジックを入れているので、そこをちゃんとテストしましょう。
import { getData, ResponseData } from './rest';

import axios, { AxiosResponse } from 'axios';
jest.mock('axios'); // axios を mock する

const mockAxios = axios as jest.Mocked<typeof axios>;

test('HTTP のステータスコードが 200 の時はデータを返す', async () => {
    mockAxios.get.mockResolvedValue({ status: 200, data: [ { id: 1, text: 'test result' } ] })
    const response = await getData(1);

    expect(mockAxios.get).toHaveBeenCalledWith('https://example.com', { params: { id: 1 }});
    expect(response).toStrictEqual({status: 200, data: [ {id: 1, text: 'test result' }]});
});

test('HTTP のステータスコードが 404 の時は空の配列を返す', async() => {
    mockAxios.get.mockResolvedValue({ status: 404 });
    const response = await getData(1);
    expect(mockAxios.get).toHaveBeenCalledWith('https://example.com', { params: { id: 1 }});
    expect(response).toStrictEqual({ status: 404, data: [] });
});
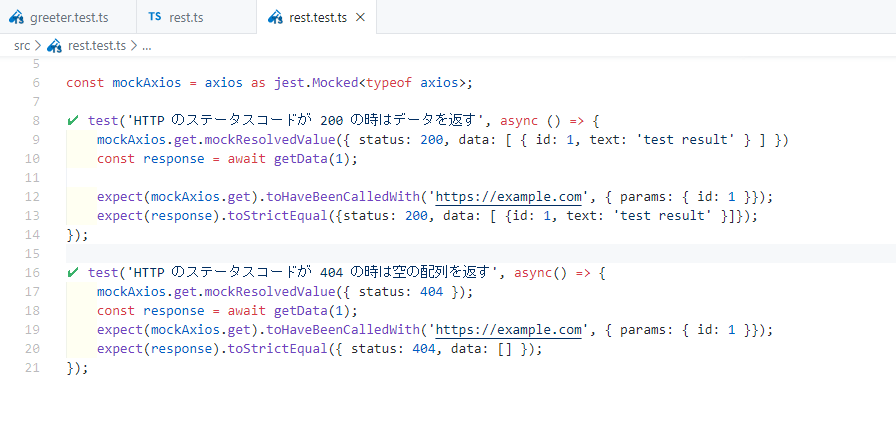
因みに、VS Code の Jest 拡張機能を入れてると、こんな感じに表示してくれるので捗ります。
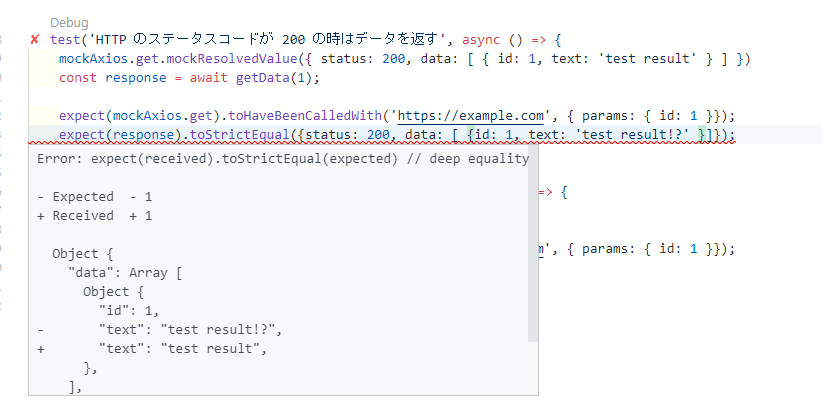
あえてテストコードを間違えてテスト失敗時の見た目も確認してみました。これは捗る。
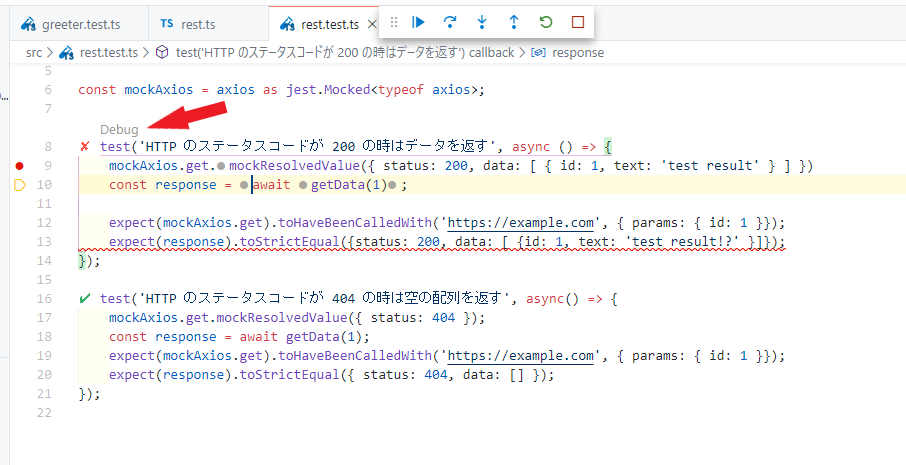
下の図の赤矢印部分の Debug を押すとデバッグも出来て至れり尽くせりですね。
その他覚えておくこと
describe, test, it??
describe はテストをグルーピングするために使う。ネストも出来る。test と it は同じ。
ということで、以下の例は過剰なグルーピングだとは思いますが、こんな感じに書ける。
import { getData, ResponseData } from './rest';

import axios, { AxiosResponse } from 'axios';
jest.mock('axios'); // axios を mock する

const mockAxios = axios as jest.Mocked<typeof axios>;

describe('getData のテスト', () => {
    describe('正常系', () => {
        test('HTTP のステータスコードが 200 の時はデータを返す', async () => {
            mockAxios.get.mockResolvedValue({ status: 200, data: [{ id: 1, text: 'test result' }] })
            const response = await getData(1);

            expect(mockAxios.get).toHaveBeenCalledWith('https://example.com', { params: { id: 1 } });
            expect(response).toStrictEqual({ status: 200, data: [{ id: 1, text: 'test result' }] });
        });
    });

    describe('異常系', () => {
        test('HTTP のステータスコードが 404 の時は空の配列を返す', async () => {
            mockAxios.get.mockResolvedValue({ status: 404 });
            const response = await getData(1);
            expect(mockAxios.get).toHaveBeenCalledWith('https://example.com', { params: { id: 1 } });
            expect(response).toStrictEqual({ status: 404, data: [] });
        });
    });
});
beforeEach, afterEach, beforeAll, afterAll
古き良き JUnit でいうところの setUp と tearDown に該当するようなもの。describe でくくるとその中で
- beforeAll: 全体で一回の前処理
- afterAll: 全体で一回の後処理
- beforeEach: テスト毎の前処理
- afterEach: テスト毎の後処理
なので以下のようなコードを書くと
describe('テスト!!', () => {
    beforeAll(() => {
        console.log('テスト!!の全体で一回の前処理');
    });
    afterAll(() => {
        console.log('テスト!!の全体で一回の後処理');
    });

    beforeEach(() => {
        console.log('テスト!!内の全てのテストの前処理');
    });
    afterEach(() => {
        console.log('テスト!!内の全てのテストの後処理');
    });
    describe('正常系', () => {
        beforeEach(() => {
            console.log('正常系の全てのテストの前処理');
        });
        afterEach(() => {
            console.log('正常系の全てのテストの後処理');
        });
            test('テストケース1', () => {
            console.log('正常系テストケース1');
        });
        test('テストケース2', () => {
            console.log('正常系テストケース2');
        });
    });

    describe('異常系', () => {
        test('テストケース1', () => {
            console.log('異常系テストケース1');
        });
    });
});
こんな結果になります。
      テスト!!の全体で一回の前処理
      テスト!!内の全てのテストの前処理
      正常系の全てのテストの前処理
      正常系テストケース1
      正常系の全てのテストの後処理
      テスト!!内の全てのテストの後処理
      テスト!!内の全てのテストの前処理
      正常系の全てのテストの前処理
      正常系テストケース2
      正常系の全てのテストの後処理
      テスト!!内の全てのテストの後処理
      テスト!!内の全てのテストの前処理
      異常系テストケース1
      テスト!!内の全てのテストの後処理
      テスト!!の全体で一回の後処理
describe.each
これを使うと同じようなテストでデータだけ違うものを簡単に書けるので、必要になったときのために頭に入れておくと良さそう。
使い方は上記ドキュメントからの引用ですが以下のようなコードになります。便利そう。
describe.each([
  [1, 1, 2],
  [1, 2, 3],
  [2, 1, 3],
])('.add(%i, %i)', (a, b, expected) => {
  test(`returns ${expected}`, () => {
    expect(a + b).toBe(expected);
  });

  test(`returned value not be greater than ${expected}`, () => {
    expect(a + b).not.toBeGreaterThan(expected);
  });

  test(`returned value not be less than ${expected}`, () => {
    expect(a + b).not.toBeLessThan(expected);
  });
});
まとめ
ということで、Jest で個人的なまとめでした。