今回の登場人物
- Cosmos DB
- 最近無料枠が追加されていい感じの NoSQL DB
- 公式ドキュメント:https://docs.microsoft.com/ja-jp/azure/cosmos-db/
- Azure Functions
- Azure のサーバーレスなサービスの代名詞(だと思ってる
- 公式ドキュメント:https://docs.microsoft.com/ja-jp/azure/azure-functions/
- SignalR Service
- WebSocket 等(状況に応じていくつかの中から最適な方法を選んでくれる)を使ってリアルタイムにサーバーから接続しているクライアントに通信できるサービス
- 公式ドキュメント:https://docs.microsoft.com/ja-jp/azure/azure-signalr/
3 つとも、それぞれ無料枠があります。今回は、このサービスを使って以下のようなものを作ってみようと思います。
一番左端と右端は、適当なコンソールアプリでも作って、適当に誤魔化していこうと思います。本番は、IoT デバイスやらスマホやらパソコンやら別サービスやらでやる感じを想定。
開発言語
ここ最近は TypeScript で 2 記事ほど書きましたが、今回は C# で行こうと思います。開発環境は Visual Studio 2019 で。VS Code でもいけます。
リソースの作成
では、Azure ポータルを開いて Function App, Cosmso DB, SignalR Service の 3 つのリソースを作ります。Function App は従量課金プラン(コンサンプションプラン)で 100 万回の呼び出しが無料、Cosmos DB も Free tier を適用することで 5GB のストレージと一定の性能まで無料で使えます、SignalR Service は Free プランがあります。
Cosmos DB のキーから接続文字列をコピーしておきましょう。SignalR Service も作り終わったら Keys から接続文字列をコピーしておきましょう。
プロジェクトの作成
では Azure Functions のプロジェクトを作ります。今回は ServerlessPushApp で作りました。Cosmos DB と SignalR Service を使うので対応するパッケージを NuGet から追加します。追加するパッケージは以下の 2 つになります。
そして、local.settings.json というファイルに Cosmos DB と SignalR Service の接続文字列を追加します。
{
  "IsEncrypted": false,
  "Values": {
    "AzureWebJobsStorage": "UseDevelopmentStorage=true",
    "FUNCTIONS_WORKER_RUNTIME": "dotnet",
    "DefaultCosmosDB": "ポータルで取得した Cosmos DB の接続文字列",
    "AzureSignalRConnectionString": "ポータルで取得した SignalR Service の接続文字列"
  }
}
このファイルはプロジェクトテンプレートに含まれる .gitignore でリポジトリーには追加されないようになっていて、ローカル開発時に一番手軽に設定を書ける場所になります。
local.settings.json 以外にもリポジトリーに入れたくないような情報を管理する方法はいくつか提供されているので、自分に合いそうなものを選んで使うといいと思います。
-
ASP.NET Core での開発におけるアプリシークレットの安全な保存
- ASP.NET Core 向け記事ですが Azure Functions でも同じような感じで出来ます。
-
Azure Functions でも appsettings.json と User Secrets を使った設定とシークレットの管理を行う
- Azure の PaaS 系の情報の元として安定のしばやん雑記
SignalR の接続文字列の設定名は AzureSignalRConnectionString にしておくと、デフォルトでこの名前が使われるので、後々 Azure Functions の関数に指定するバインドの設定が楽になります。
Cosmos DB へデータを追加する関数の作成
では、Cosmos DB へデータを追加する関数を作っていきます。とりあえずデータは以下のような JSON を想定します。
[
    { "amount": 100, "sensorId": "xxx" },
    { "amount": 1, "sensorId": "yyy" },
    { "amount": 44, "sensorId": "zzz" },
    { "amount": 32, "sensorId": "xxx" },
    { "amount": 65, "sensorId": "yyy" },
    { "amount": 29, "sensorId": "zzz" },
    { "amount": 47, "sensorId": "xxx" },
    { "amount": 23, "sensorId": "yyy" },
    { "amount": 99, "sensorId": "xxx" },
    { "amount": 120, "sensorId": "zzz" }
]
これが HTTP リクエストの Body に入ってきていて、配列の要素を 1 つずつ Cosmos DB に追加していきます。では、この JSON のデータを格納するためのクラスを定義します。
using Newtonsoft.Json;

namespace ServerlessPushApp
{
    public class Data
    {
        [JsonProperty("id")]
        public string Id { get; set; }
        [JsonProperty("amount")]
        public int Amount { get; set; }
        [JsonProperty("sensorId")]
        public string SensorId { get; set; }
    }
}
そして、データを追加するための関数を定義します。Azure Functions では HttpTrigger を使うと HTTP のリクエストが来たら動く関数が定義できるので、それと Cosmos DB への出力バインドを組み合わせて、以下のようなコードで実現できます。
using Microsoft.AspNetCore.Http;
using Microsoft.AspNetCore.Mvc;
using Microsoft.Azure.WebJobs;
using Microsoft.Azure.WebJobs.Extensions.Http;
using Microsoft.Extensions.Logging;
using Newtonsoft.Json;
using System.Threading.Tasks;

namespace ServerlessPushApp
{
    public class ImportDataFunction
    {
        [FunctionName("ImportData")]
        public static async Task<IActionResult> ImportData(
            [HttpTrigger(AuthorizationLevel.Function, "post", Route = "data")] HttpRequest req,
            [CosmosDB("serverlesspushdb", "data", CollectionThroughput = 400,
                ConnectionStringSetting = "DefaultCosmosDB",
                CreateIfNotExists = true)] IAsyncCollector<Data> output,
            ILogger log)
        {
            var dataArray = JsonConvert.DeserializeObject<Data[]>(await req.ReadAsStringAsync());
            log.LogInformation($"{dataArray.Length} items received.");
            foreach (var data in dataArray)
            {
                await output.AddAsync(data);
            }

            return new AcceptedResult();
        }
    }
}
HttpTrigger と Cosmos DB の出力バインドについては以下の公式ドキュメントが参考になります。
では、実行してみましょう。
デバッグ実行すると、コマンドプロンプトが起動してきて、そこでローカルで動いてくれます。デバッグとかも普通に出来るのでローカル開発は正義だなぁといつも思います。
以下のように関数を起動するための URL が表示されます。
適当なツールで叩いてみましょう。私は最近ずっと VS Code の REST Client 拡張機能を使ってます。
以下のようなリクエストを送ると…
POST http://localhost:7071/api/data
Content-Type: applicatoin/json

[
    { "amount": 100, "sensorId": "xxx" },
    { "amount": 1, "sensorId": "yyy" },
    { "amount": 44, "sensorId": "zzz" },
    { "amount": 32, "sensorId": "xxx" },
    { "amount": 65, "sensorId": "yyy" },
    { "amount": 29, "sensorId": "zzz" },
    { "amount": 47, "sensorId": "xxx" },
    { "amount": 23, "sensorId": "yyy" },
    { "amount": 99, "sensorId": "xxx" },
    { "amount": 120, "sensorId": "zzz" }
]
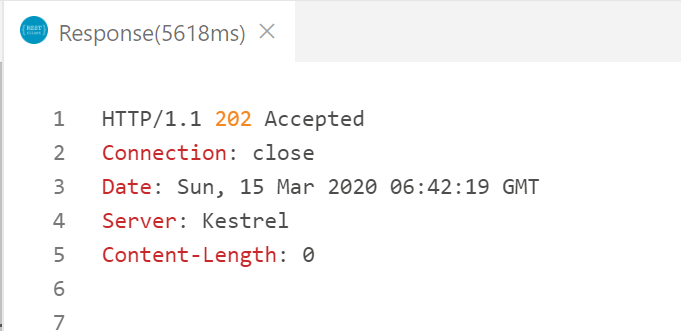
無事 Accepted が返ってきました。
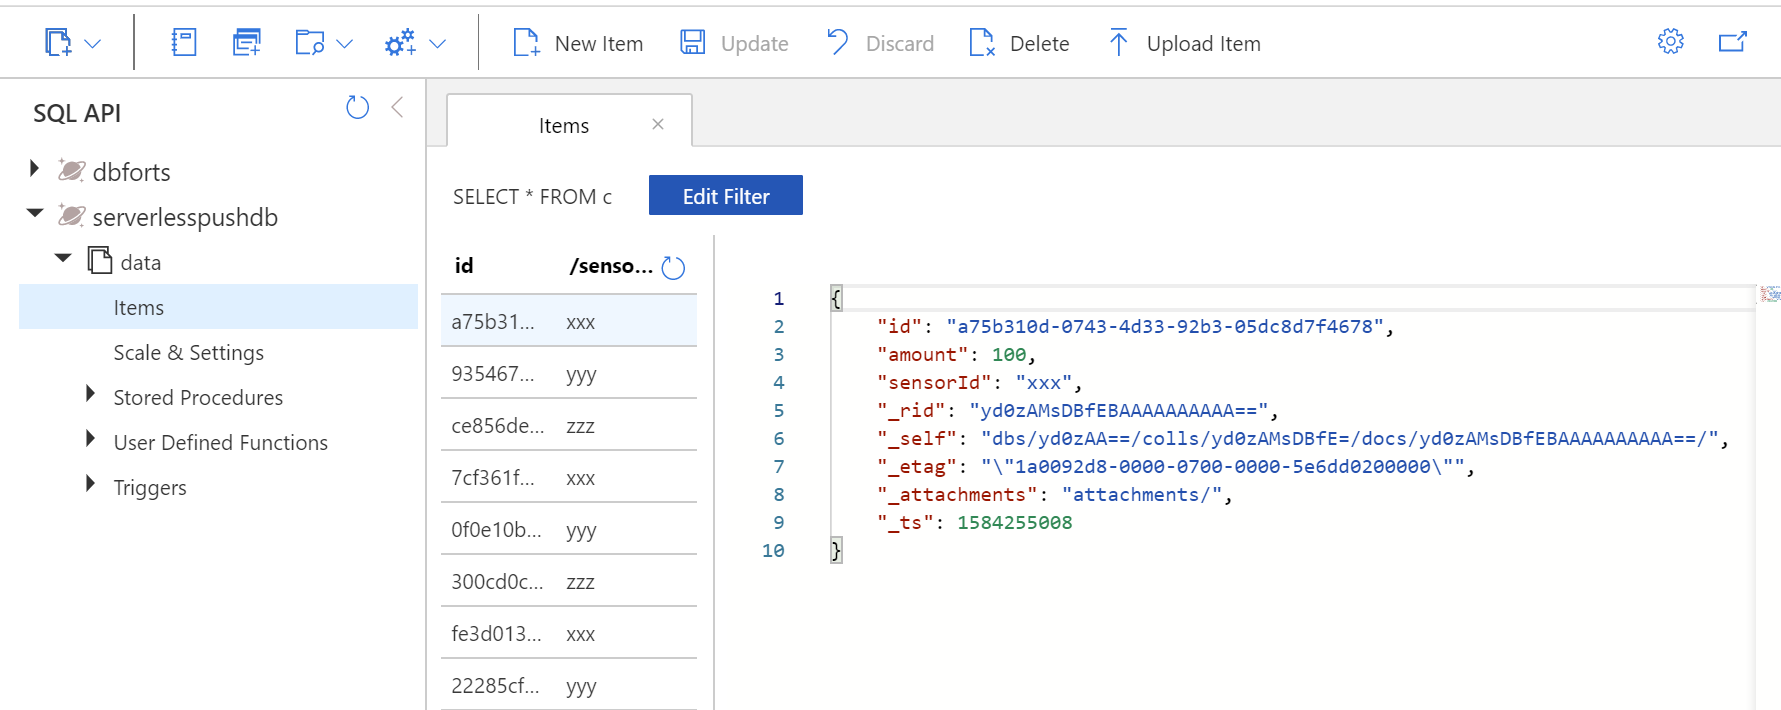
Cosmos DB のデータエクスプローラーでデータを覗いてみると、ちゃんと出きてますね。
続けて SignalR 対応していきます。まず、Cosmos DB の data コレクションに追加・更新があったら動く関数を作ります。
新しクラスを作って以下のようにします。 CosmosDbTrigger が Cosmos DB のデータの変更によって起動する関数のトリガーです。ここに、先ほどデータを追加するときに指定した data コレクションを対象にするように設定を追加しています。
using Microsoft.Azure.Documents;
using Microsoft.Azure.WebJobs;
using Microsoft.Extensions.Logging;
using System.Collections.Generic;
using System.Linq;
using System.Threading.Tasks;

namespace ServerlessPushApp
{
    public class AlertFunction
    {
        [FunctionName("Alert")]
        public static async Task Alert(
            [CosmosDBTrigger("serverlesspushdb",
                "data",
                ConnectionStringSetting = "DefaultCosmosDB",
                CreateLeaseCollectionIfNotExists = true)] IReadOnlyList<Document> documents,
            ILogger log)
        {
            log.LogInformation($"{documents.Count} items updated. The first data's id is {documents.First().Id}.");
        }
    }
}
まだ SignalR とは繋いでいませんが、データの追加で発火するか試してみましょう。実行して適当にデータを Cosmos DB に突っ込み続けてるとそのうち Alert 関数が動いたログが以下のように表示されます。
あとは、SignalR 対応です。SignalR に出力するバインドを先ほどの Alert 関数に追加します。そして、100以上の値を異常値として SignalR に出力します。以下のようになりました。
using Microsoft.Azure.Documents;
using Microsoft.Azure.WebJobs;
using Microsoft.Azure.WebJobs.Extensions.SignalRService;
using Microsoft.Extensions.Logging;
using System.Collections.Generic;
using System.Linq;
using System.Threading.Tasks;

namespace ServerlessPushApp
{
    public class AlertFunction
    {
        [FunctionName("Alert")]
        public static async Task Alert(
            [CosmosDBTrigger("serverlesspushdb",
                "data",
                ConnectionStringSetting = "DefaultCosmosDB",
                CreateLeaseCollectionIfNotExists = true)] IReadOnlyList<Document> documents,
            [SignalR(HubName = "alert")] IAsyncCollector<SignalRMessage> messages,
            ILogger log)
        {
            log.LogInformation($"{documents.Count} items updated. The first data's id is {documents.First().Id}.");
            var alertTargets = documents.Select(x => (Data)(dynamic)x)
                .Where(x => x.Amount >= 100)
                .ToArray();
            if (alertTargets.Any())
            {
                log.LogInformation($"{alertTargets.Length} items are outlier.");
                await messages.AddAsync(new SignalRMessage
                {
                    Target = "alert",
                    Arguments = new object[] { alertTargets },
                });
            }
        }
    }
}
実行して適当にデータを追加してみると、ちゃんとそれっぽい数の異常値が検出されてますね。
最後に SignalR Service にクライアントから繋ぐための情報を返す関数を作ります。ここに対して SignalR のクライアントアプリが最初にアクセスしに来ます。
関数の URL は固定で negotiate になります。
個の関数は SignalRConnectionInfo を返すだけの関数になります。
using Microsoft.AspNetCore.Http;
using Microsoft.Azure.WebJobs;
using Microsoft.Azure.WebJobs.Extensions.Http;
using Microsoft.Azure.WebJobs.Extensions.SignalRService;

namespace ServerlessPushApp
{
    public class SignalRFunction
    {
        [FunctionName("Negotiate")]
        public static SignalRConnectionInfo Negotiate(
            [HttpTrigger(AuthorizationLevel.Function, Route = "negotiate")] HttpRequest req,
            [SignalRConnectionInfo(HubName = "alert")]SignalRConnectionInfo signalRConnectionInfo) =>
            signalRConnectionInfo;
    }
}
これで、この negotiate 関数で alert という名前の Hub に繋ぐための情報が返ります。alert という名前の Hub は AlertFunction でも同じ名前を使ってるので、ここに繋ぎに来たクライアントが AlertFunction で SignalR に出力したメッセージを受けることが出来るっていう寸法です。
クライアントアプリは、適当に .NET Core のコンソールアプリを作って以下の 2 つの NuGet パッケージを追加します。
- Microsoft.AspNetCore.SignalR.Client
- Nwetonsoft.Json
そして、以下のようなコードを書いて完成。とりあえず受け取ったものを標準出力にメッセージ出すだけにしました。
using Microsoft.AspNetCore.SignalR.Client;
using Newtonsoft.Json;
using System;
using System.Threading.Tasks;

namespace ServerlessPushApp.Client
{
    class Program
    {
        static async Task Main(string[] args)
        {
            Console.WriteLine("何かキーを押すとサーバーに接続します。");
            Console.ReadKey();
            var hubConnection = new HubConnectionBuilder()
                .WithUrl("http://localhost:7071/api") // この URL に追加して /negotiate に自動で行く
                .WithAutomaticReconnect()
                .Build();
            hubConnection.On<Data[]>("alert", x =>
            {
                Console.WriteLine("異常値がありました");
                foreach (var d in x)
                {
                    Console.WriteLine($"  {d.SensorId}: {d.Amount}");
                }
            });
            await hubConnection.StartAsync();
            Console.WriteLine("接続しました。何かキーを押すとプログラムが終了します。");
            Console.ReadKey();
        }
    }

    public class Data
    {
        [JsonProperty("id")]
        public string Id { get; set; }
        [JsonProperty("amount")]
        public int Amount { get; set; }
        [JsonProperty("sensorId")]
        public string SensorId { get; set; }
    }
}
では、Azure Functions とコンソールアプリを同時に実行して動かしてみましょう。適当に Visual Studio Code からデータを追加していきます。
前と同じ下記のデータを追加すると…
POST http://localhost:7071/api/data
Content-Type: applicatoin/json

[
    { "amount": 100, "sensorId": "xxx" },
    { "amount": 1, "sensorId": "yyy" },
    { "amount": 44, "sensorId": "zzz" },
    { "amount": 32, "sensorId": "xxx" },
    { "amount": 65, "sensorId": "yyy" },
    { "amount": 29, "sensorId": "zzz" },
    { "amount": 47, "sensorId": "xxx" },
    { "amount": 23, "sensorId": "yyy" },
    { "amount": 99, "sensorId": "xxx" },
    { "amount": 120, "sensorId": "zzz" }
]
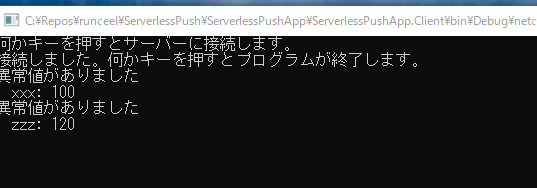
クライアントのコンソールにちゃんと異常値がすぐに表示されます。
SignalR のクライアントは C# 以外にも Java や JavaScript 等があるので、対応言語の中で好きなやつでクライアント側は作れます。対応言語などについては以下のドキュメントに記載があります。
Azure にデプロイしてみよう
Azure Functions は色々な方法でデプロイできます。Visual Studio を使ってる場合は、一番簡単なのは Visual Studio からやることです。本番環境では各種 CI/CD 系のサービスやツールでデプロイしましょう。
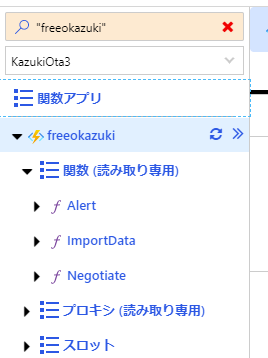
プロジェクト右クリックメニューからの「発行」で始まるウィザードに従ってればデプロイされます。デプロイされたらポータルを開くと関数の一覧に関数が表示されます。
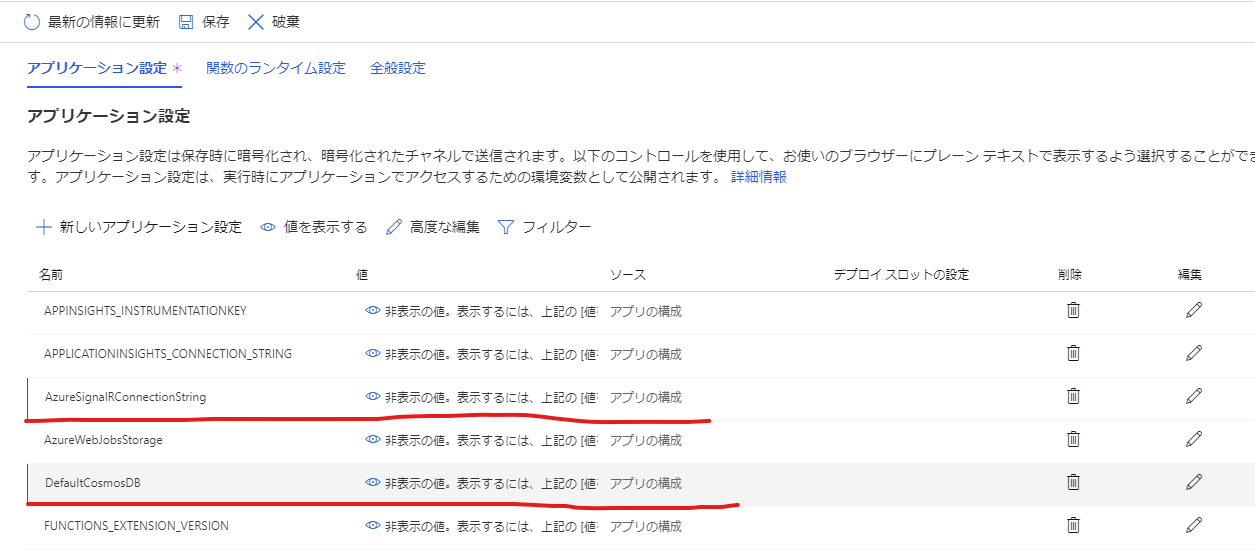
構成を選択してアプリケーション設定に local.settings.json で設定したのと同じ DefaultCosmosDB と AzureSignalRConnectionString を追加します。
ポータルから Negotiate 関数の URL をゲットして /negotiate を削除してクライアントのコードの URL を置き換えましょう。
using Microsoft.AspNetCore.SignalR.Client;
using Newtonsoft.Json;
using System;
using System.Threading.Tasks;

namespace ServerlessPushApp.Client
{
    class Program
    {
        static async Task Main(string[] args)
        {
            Console.WriteLine("何かキーを押すとサーバーに接続します。");
            Console.ReadKey();
            var hubConnection = new HubConnectionBuilder()
                // /negotiate は自動で追加されるので消してね
                .WithUrl(new Uri("https://freeokazuki.azurewebsites.net/api?code=ZmOaAaEWOcy0eoQ13J1hLBLGPyVPFNnFSUbxMYZCsxzN8xmeYeZsmw=="))
                .WithAutomaticReconnect()
                .Build();
            hubConnection.On<Data[]>("alert", x =>
            {
                Console.WriteLine("異常値がありました");
                foreach (var d in x)
                {
                    Console.WriteLine($"  {d.SensorId}: {d.Amount}");
                }
            });
            await hubConnection.StartAsync();
            Console.WriteLine("接続しました。何かキーを押すとプログラムが終了します。");
            Console.ReadKey();
        }
    }

    public class Data
    {
        [JsonProperty("id")]
        public string Id { get; set; }
        [JsonProperty("amount")]
        public int Amount { get; set; }
        [JsonProperty("sensorId")]
        public string SensorId { get; set; }
    }
}
クライアントを実行すると接続が成功して待機を始めます。そして、ポータルから ImportData 関数の URL を取得して Visual Studio Code から以下のようなリクエストを送ります。
POST https://freeokazuki.azurewebsites.net/api/data?code=aqgH/RXjsZoPrRB7pknD2A7Zg3JfnZnazmnHmuc6MP5c9EaRlz1Mzw==
Content-Type: applicatoin/json

[
    { "amount": 100, "sensorId": "xxx" },
    { "amount": 1, "sensorId": "yyy" },
    { "amount": 44, "sensorId": "zzz" },
    { "amount": 32, "sensorId": "xxx" },
    { "amount": 65, "sensorId": "yyy" },
    { "amount": 29, "sensorId": "zzz" },
    { "amount": 47, "sensorId": "xxx" },
    { "amount": 23, "sensorId": "yyy" },
    { "amount": 99, "sensorId": "xxx" },
    { "amount": 120, "sensorId": "zzz" }
]
そうすると、クライアントに以下のように表示されます。ばっちりですね。
まとめ
ということで、無料枠のあるサーバーレス系サービスだけを使ってクライアントにプッシュで配信するような感じのものを作ってみました。結構いい感じに作れるのじゃないかなぁと思います。
今回のソースコードは以下に置いています。Azure Functions の関数に繋ぐためのキーとか入っていますが、Azure 上のリソースは全部消してあるので気にしないでください。


