ということで、前回に引き続き Cosmos DB 触っていきます。前回は Azure Functions 使ってみたけど、今回は素のコンソールアプリケーションから突いてみたいと思います。
Windows だと Cosmos DB にはローカル開発用のエミュレーターがあるけど Linux とか macOS 向けにはまだないのかな。Windows だと docker コンテナ上で実行したり
ローカルでの開発とテストに Azure Cosmos Emulator を使用する
上記ドキュメントから引用
## システム要件
Azure Cosmos Emulator のハードウェア要件とソフトウェア要件は、次のとおりです。
- ソフトウェア要件
  - Windows Server 2012 R2、Windows Server 2016、または Windows 10
  - 64 ビット オペレーティング システム
- 最小ハードウェア要件
  - 2 GB の RAM
  - 10 GB のハードディスク空き容量
無料枠が出来たので試すのにはあんまり困らないけど、ローカルで閉じて開発できるというのはやっぱり強いので Windows 以外への対応も個人的には早くほしいな~と思うところ。今回は本物使って試してみます。
やってみよう
ということでやってみようと思います。Azure に作成した Cosmos DB は SQL を選択して作りました。これで作ると、JSON のコレクションに対して SQL 書けるのが強い。慣れ親しんだ SELECT xxxx FROM xxxx WHERE xxxxx という形でクエリを投げられるのは強い。
ということでまずは node のプログラムの下準備。Visual Studio Code で TypeScript で作っていこうと思います。
適当な空のフォルダーで以下のコマンドを叩きます。
> git init
> npm init -y
> code -r .
続けて TypeScript 関連のパッケージを追加して初期化
> npm install -D typescript @types/node
> tsc -init
tsconfig.json はちょっとだけいじりました。
{
  "compilerOptions": {
    "moduleResolution": "node",
    "resolveJsonModule": true,
    "target": "ES2020",                          /* Specify ECMAScript target version: 'ES3' (default), 'ES5', 'ES2015', 'ES2016', 'ES2017', 'ES2018', 'ES2019', 'ES2020', or 'ESNEXT'. */
    "module": "commonjs",                     /* Specify module code generation: 'none', 'commonjs', 'amd', 'system', 'umd', 'es2015', 'es2020', or 'ESNext'. */
    "sourceMap": true,                     /* Generates corresponding '.map' file. */
    "outDir": "./dist",                        /* Redirect output structure to the directory. */
    "strict": true,                           /* Enable all strict type-checking options. */
    "esModuleInterop": true,                  /* Enables emit interoperability between CommonJS and ES Modules via creation of namespace objects for all imports. Implies 'allowSyntheticDefaultImports'. */
    "forceConsistentCasingInFileNames": true  /* Disallow inconsistently-cased references to the same file. */
  }
}
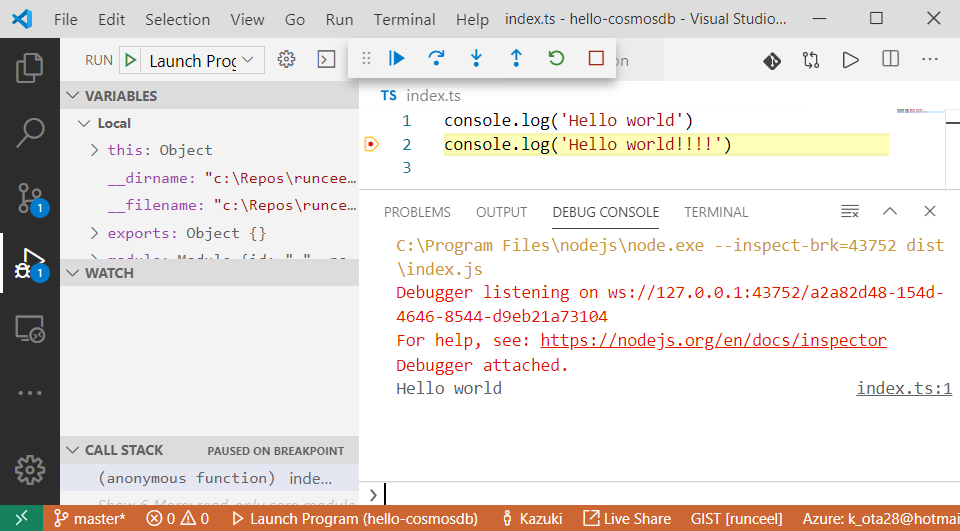
VS Code で Ctrl + Shift + B をしてビルドタスクで tsc するようにして、F5 を押してデバッグするようにしたら準備完了!!試しに index.ts を作ってハローワールドしてみます。
ばっちりですね。では続けて Cosmos DB の SDK を入れていきましょう。公式にチュートリアルがあります。
チュートリアル:JavaScript SDK を使用して、Azure Cosmos DB SQL API データを管理するための Node.js コンソール アプリを構築する
SDK を npm でさくっといれちゃいましょう
> npm install @azure/cosmos --save
node_modules/@azure/cosmos/dist の下を見てみると index.d.ts とかもあるので安心して使えそうです。
接続のための情報をゲットします。Azure ポータルから作成した Cosmos DB を選択してキーから URI とプライマリ キーをコピーしましょう。.env ファイルを追加して以下のように記載しておきます。
COSMOS_DB_URI=ポータルからゲットした URI
COSMOS_DB_KEY=ポータルからゲットしたプリマり キー
dotenv を npm で入れます。
> npm install dotenv --save
では早速繋いで DB を作ってみましょう。DB を作るには CosmosClient クラスを作って databases の createIfNotExists で作れるようなのでさくっと呼んでみます。
import { CosmosClient } from '@azure/cosmos';
// 環境変数を .env から読み込む
import dotenv from 'dotenv';
dotenv.config();

async function main() {
    const endpoint = process.env.COSMOS_DB_URI;
    const key = process.env.COSMOS_DB_KEY;
    if (!endpoint || !key) {
        return;
    }

    // Cosmos DB に繋ぐクライアントを作る
    const client = new CosmosClient({
        endpoint: endpoint,
        key: key,
    });

    // DB が無かったら作る
    const { database } = await client.databases.createIfNotExists({ id: 'dbforts' });
    console.log(`${database.id} was created.`);
}

main();
これを実行すると以下のような結果になりました。
いい感じですね。そのままコレクションも作ってみます。コレクションを作るには id (名前ですね) と partitionKey (ここで指定したプロパティの値でパーティション分割される)と、offerThroughput のようです。offerThroughput が高いほど性能がいいのですが無料枠に収めたいので最低値の 400 あたりを設定しておこうと思います。先ほどのコードの続きにコレクションを作るコードを追加しました。
// コレクションが無かったら作る
const { container } = await database.containers.createIfNotExists({
    id: 'items',
    partitionKey: { paths: [ '/partitionKey' ]}
},
{ offerThroughput: 400 });

console.log(`${container.id} was created.`);
実行してみると期待した通りに動きました。
Azure ポータルで、作成した Cosmos DB のデータ エクスプローラーを選択してみると、ちゃんと TypeScript で指定した DB とコレクションが出来ています。
じゃぁ適当にデータを突っ込んでいきましょう。 pk1 と pk2 という 2 種類の partitionKey を持つ感じで、それぞれに 100 件ずつ適当にデータを突っ込みます。
import { CosmosClient } from '@azure/cosmos';
// 環境変数を .env から読み込む
import dotenv from 'dotenv';
import { Hash } from 'crypto';
dotenv.config();

// Cosmos DB に突っ込む型
type Item = {
    id: string | undefined,
    value: string,
    partitionKey: string,
};

async function main() {
    const endpoint = process.env.COSMOS_DB_URI;
    const key = process.env.COSMOS_DB_KEY;
    if (!endpoint || !key) {
        return;
    }

    // Cosmos DB に繋ぐクライアントを作る
    const client = new CosmosClient({
        endpoint: endpoint,
        key: key,
    });

    // DB が無かったら作る
    const { database } = await client.databases.createIfNotExists({ id: 'dbforts' });
    console.log(`${database.id} was created.`);

    // コレクションが無かったら作る
    const { container } = await database.containers.createIfNotExists({
        id: 'items',
        partitionKey: { paths: [ '/partitionKey' ]}
    },
    { offerThroughput: 400 });

    console.log(`${container.id} was created.`);

    // 適当なデータを突っ込む
    for (let i = 0; i < 100; i++) {
        const { item: item1 } = await container.items.upsert({
            partitionKey: 'pk1',
            value: `${new Date().toISOString()} ${Math.random() * 1000}`,
        });
        const { item: item2 } = await container.items.upsert({
            partitionKey: 'pk2',
            value: `${new Date().toISOString()} ${Math.random() * 1000}`,
        });
        console.log(`${item1.id} and ${item2.id} were created.`);
    }
}

main();
実行すると、こんな感じでログが出ます。
データエクスプローラーで覗いてみるとちゃんとデータが出来ています。
ついに SQL を実行します。Cosmos DB で使える SQL は以下のページにまとまってます。
部分一致で value に 000 が入っているものだけ抜いてみようと思います。ちょっとしくじったなと思ったのは value が SQL のキーワードで SQL 内で value プロパティの値を扱おうとするとキーワードなのでエラーになってしまうので c["value"] のような表記にしないといけなかったところです。キーワードをプロパティ名にしてない場合は c["value"] は c.value のように記載できます。
ではさくっと SQL を発行してみましょう。パラメーターもサポートしているので SQL インジェクションも安心ですね。
import { CosmosClient } from '@azure/cosmos';
// 環境変数を .env から読み込む
import dotenv from 'dotenv';
import { Hash } from 'crypto';
dotenv.config();

// Cosmos DB に突っ込む型
type Item = {
    id: string | undefined,
    value: string,
    partitionKey: string,
};

async function main() {
    const endpoint = process.env.COSMOS_DB_URI;
    const key = process.env.COSMOS_DB_KEY;
    if (!endpoint || !key) {
        return;
    }

    // Cosmos DB に繋ぐクライアントを作る
    const client = new CosmosClient({
        endpoint: endpoint,
        key: key,
    });

    // DB が無かったら作る
    const { database } = await client.databases.createIfNotExists({ id: 'dbforts' });
    console.log(`${database.id} was created.`);

    // コレクションが無かったら作る
    const { container } = await database.containers.createIfNotExists({
        id: 'items',
        partitionKey: { paths: [ '/partitionKey' ]}
    },
    { offerThroughput: 400 });

    console.log(`${container.id} was created.`);

    // 適当なデータを突っ込む
    // for (let i = 0; i < 100; i++) {
    //     const { item: item1 } = await container.items.upsert({
    //         partitionKey: 'pk1',
    //         value: `${new Date().toISOString()} ${Math.random() * 1000}`,
    //     });
    //     const { item: item2 } = await container.items.upsert({
    //         partitionKey: 'pk2',
    //         value: `${new Date().toISOString()} ${Math.random() * 1000}`,
    //     });
    //     console.log(`${item1.id} and ${item2.id} were created.`);
    // }

    const { resources } = await container.items.query<Item>({
        query: 'SELECT * FROM items c WHERE CONTAINS(c["value"], @xxx)',
        parameters: [
            { name: '@xxx', value: '000' }
        ]
    }).fetchAll();
    for (let x of resources) {
        console.log(`id:${x.id}, value:${x.value}, partitionKey:${x.partitionKey}`);
    }
}

main();
実行すると私の場合ははかったかのように pk1, pk2 それぞれに 1 件ずつありました。
fetchAll の戻り値の requestCharge で消費 RU もわかります。
const { resources, requestCharge } = await container.items.query<Item>({
    query: 'SELECT * FROM items c WHERE CONTAINS(c["value"], @xxx)',
    parameters: [
        { name: '@xxx', value: '000' }
    ]
}).fetchAll();
// RU を表示
console.log(`requestCharge: ${requestCharge}`);
for (let x of resources) {
    console.log(`id:${x.id}, value:${x.value}, partitionKey:${x.partitionKey}`);
}
その他に query の第二引数に FeedOptions も指定可能で SQL 件数が多いときに続きから読み込むとかできます。
びっくりしたのが、partitionKey でフィルタリングしていないとクロスパーティションクエリ―になるのですが、C# 用 SDK だと明示的に FeedOptions で EnableCrossPartitionQuery に true を指定しないとエラーになった気がするのですが、JavaScript SDK だと勝手にクロスパーティションクエリーになるのかな?
実際に使うときには WHERE には可能な限りパーティションキーつけて、データの設計をするときになるべくクエリ―の範囲はパーティションキーの範囲内に入るようにしつつ、いい感じにデータは分散されるようにしておくのがいいとされています(超ムズイ
詳細は以下のドキュメントを参照してください。
Azure Cosmos DB でのパーティション分割
まとめ
ということで、前回は Azure Functions のバインドの機能を使ってやってましたが、ちゃんと JavaScript 用の SDK もあって繋いでデータ突っ込んだりクエリ投げたりできます。
なので express 製の Web アプリからもサクッと使えるので Azure App Service の Web App の無料プランで express のアプリをホストして裏で Cosmos DB の無料プランという構成も出来そうですね。
今回書いたソースコードは以下の GitHub のリポジトリーにアップしています。
それでは、良い Cosmos DB ライフを。


