はじめに
動作環境
- Windows 11 Home(23H2)
- .NET 8.0(SDK 8.0.204)
- Visual Studio 2022
- MySQL 8.4.2
前提
- Visual Studioインストール済み
手順
MySQL環境構築
インストール
以下サイトが分かりやすかったです。
こちらにある手順「MySQL Community Serverのインストール」では、管理者以外のユーザーの作成を後回しにしていますが、ここでやってしまっていいと思います。楽なので。
(飛ばしてしまった方は、同サイトの「ユーザーの作成」を参考にしてください)
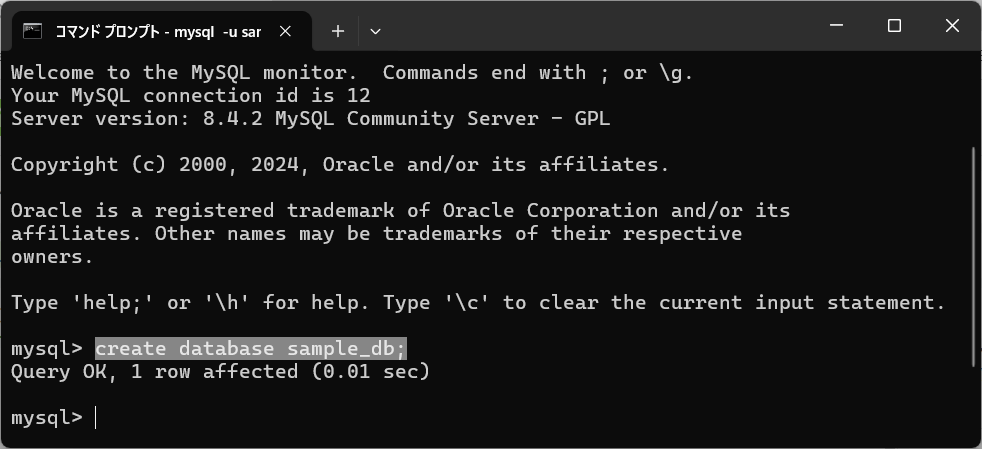
データベースの作成
作成したユーザーでログインし、以下コマンドを実行します。
CREATE DATABASE データベース名
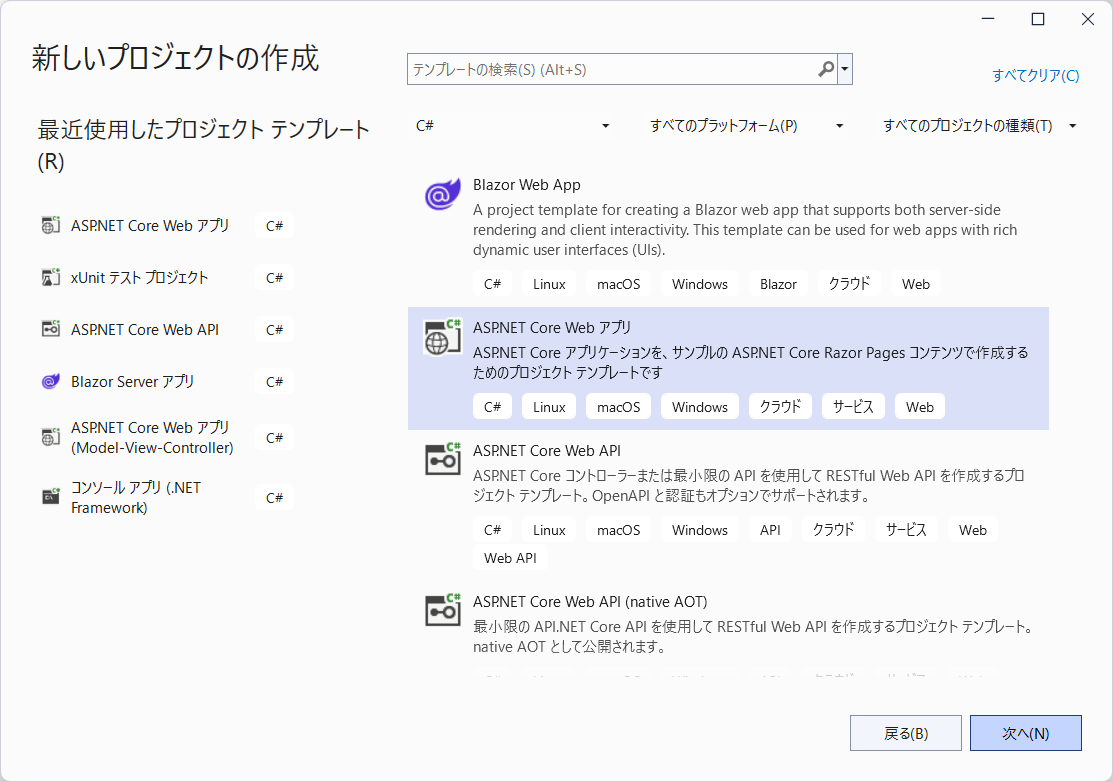
.NETアプリケーションの作成
今回は、「MySQLSample」という名前で、Razor Pagesアプリケーションを作成します。

パッケージのインストール
プロジェクト > NuGetパッケージの管理から、以下パッケージをインストールします。
- Pomelo.EntityFrameworkCore.MySql(必須)
- Microsoft.EntityFrameworkCore.Tools

それぞれのパッケージの役割について簡単にご説明します。
Pomelo.EntityFrameworkCore.MySql
⇒MySQL用のDBプロバイダ。MySQLへの接続、および諸々操作するのに必要
今回はMySQLを使用するのでこちらのパッケージをインストールします。
このように、使用するDBエンジンに応じたプロバイダをインストールすることで、Entity Framework Core(EF Core)を利用できるようになります。
EF CoreではDbContext, DbSetクラス(後述)を使ってプログラムからDBを操作します。
これらのクラスは、各DBプロバイダが依存するパッケージに含まれているため、DBプロバイダをインストールしてしまえば、ひとまず必要なものは揃うわけです。
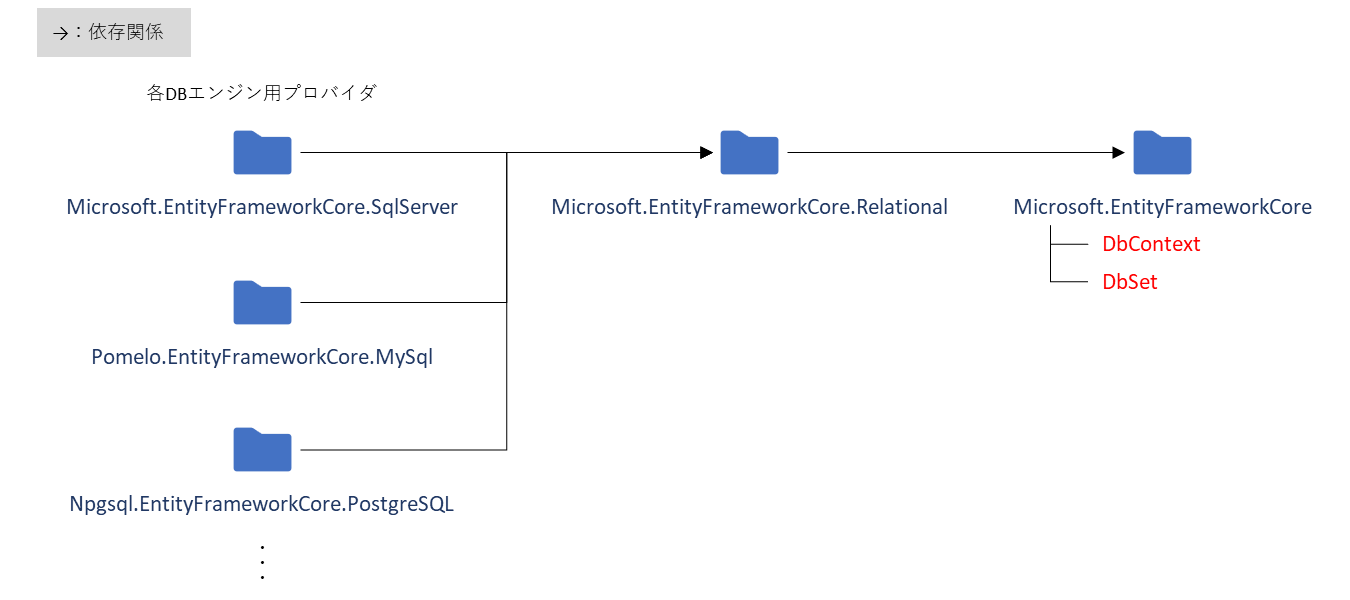
Microsoft.EntityFrameworkCore.Tools
⇒EF Coreの便利機能が詰め込まれたツール。
こちらは必須ではないのですが、今回はテーブルの作成をDBマイグレーションで自動的に行うので、以下二つの機能を使用するためにインストールします。
- マイグレーションファイルの作成(Add-Migrationコマンド)
- マイグレーションの実行(Update-Databaseコマンド)
他にも便利な機能があるので、詳しくはこちらをご参照ください。
モデル作成
テーブルと1対1で紐づくモデルクラスを作成します。

namespace MySQLSample.Models
{
    public class Item
    {
        public int Id { get; set; }
        public string Name { get; set; } = default!;
        public int Price { get; set; }
    }
}
DbContext作成
データベースと1対1で紐づく、DbContextの派生クラスを作成します。

using Microsoft.EntityFrameworkCore;

namespace MySQLSample.Data
{
    public class MySQLSampleContext : DbContext
    {
        public MySQLSampleContext(DbContextOptions<MySQLSampleContext> options) : base(options) { }

        public DbSet<Models.Item> Item { get; set; } = default!;
    }
}
DBとの接続設定
接続文字列の用意
今回は設定ファイルに定義しますが、「接続処理の実装」のタイミングで文字列をベタ書きでも問題ないです。
MySQLの接続文字列は以下の通りになります。
- server:DBサーバのホスト名(今回はlocalhost)
- port:MySQLが使用しているポート番号(デフォルトのままなら3306)
- database:作成したデータベース名
- userid:作成したユーザ名
- password:パスワード
{
  "Logging": {
    "LogLevel": {
      "Default": "Information",
      "Microsoft.AspNetCore": "Warning"
    }
  },
  "AllowedHosts": "*",
+ "ConnectionStrings": {
+   "MySQLSampleContext": "server=127.0.0.1;port=3306;database=sample_db;userid=sample_user;password=sample_pass"
+ }
}
接続処理の実装
エントリポイントにて、上記の接続文字列を使ってMySQLに接続します。
+ using Microsoft.EntityFrameworkCore;
+ using MySQLSample.Data;

  var builder = WebApplication.CreateBuilder(args);

  // Add services to the container.
  builder.Services.AddRazorPages();
+ builder.Services.AddDbContext<MySQLSampleContext>(options => options.UseMySql(
+     builder.Configuration.GetConnectionString("MySQLSampleContext"), new MySqlServerVersion(new Version(8, 4, 2))));

  var app = builder.Build();

// 省略
DBマイグレーション
表示 > その他のウインドウ > パッケージマネジャーコンソールを開き、以下コマンドを実行します。
Add-Migration 任意のマイグレーション名
Update-Database

Itemクラスの情報に応じて、itemテーブルが作られました。

使用例
MySQLSampleContextを通じてDBからデータを取得し、フィールドのオブジェクトに格納しています。
  public class IndexModel : PageModel
  {
+     private readonly MySQLSampleContext _context;

+     public IList<Item> Items { get; set; } = default!;

      public IndexModel(MySQLSampleContext context)
      {
+         _context = context;
      }

      public async Task OnGetAsync()
      {
+         Items = await _context.Item.ToListAsync();
      }
  }
あとは各アプリケーションのやり方に応じて、データを参照します。
  @page
  @model IndexModel
  @{
      ViewData["Title"] = "Home page";
  }

+ <table class="table">
+     <thead>
+         <tr>
+             <th>
+                 @Html.DisplayNameFor(model => model.Items[0].Name)
+             </th>
+             <th>
+                 @Html.DisplayNameFor(model => model.Items[0].Price)
+             </th>
+         </tr>
+     </thead>
+     <tbody>
+         @foreach (var item in Model.Items)
+         {
+             <tr>
+                 <td>
+                     @Html.DisplayFor(modelItem => item.Name)
+                 </td>
+                 <td>
+                     @Html.DisplayFor(modelItem => item.Price)
+                 </td>
+             </tr>
+         }
+     </tbody>
+ </table>
動作確認
テスト用のデータを追加します。

動かしてみると、
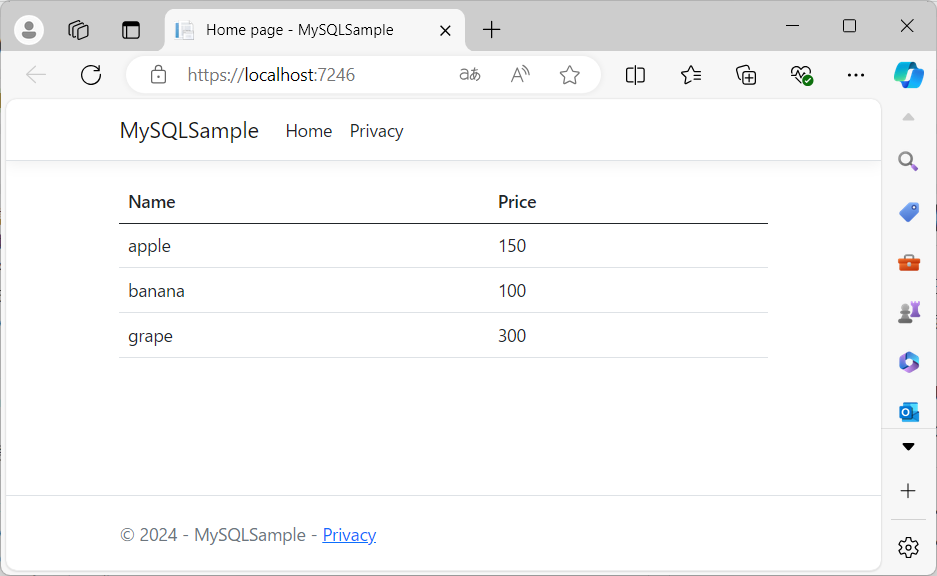
無事MySQLからデータを取得することができました。
余談(コマンドによるDbContextの作成)
今回は手でDbContextの派生クラスを作成しましたが、Scaffold-DbContextコマンドを使用すれば簡単に作成できそうなことに気づきました。
(こちらもAdd-Migration, Update-Databaseと並び、Microsoft.EntityFrameworkCore.Toolsに含まれる機能です)
おわりに
ここでは省略しましたが、スキャフォールディングを使えば簡単にCRUD処理が実装できたり、データアノテーションを使用してカラム定義を行ったり、Seedでサンプルデータを突っ込めたりと便利な機能は多々あります。
詳しくは参考リンクを参考にしてみてください!
参考
- EF Core の概要
- Pomelo.EntityFrameworkCore.MySql(MySQLプロバイダ)
- 移行の概要(DBマイグレーション)